Table of Contents >> Show >> Hide
- A Respectful Note Before You Start
- Why a Crochet Doily and Wire Make Such a Great Pair
- Supplies You’ll Need
- How to Choose the Right Doily and Wire
- Step-by-Step: How to Make a DIY Dream Catcher Using Crochet Doily and Wire
- Step 1: Shape the wire into a hoop
- Step 2: Wrap the hoop if desired
- Step 3: Position the crochet doily in the center
- Step 4: Attach at four anchor points first
- Step 5: Fill in the rest of the attachment points
- Step 6: Add a hanging loop
- Step 7: Create the hanging tails
- Step 8: Add beads, feathers, or decorative accents
- Easy Design Ideas to Customize Your DIY Dream Catcher
- Common Mistakes and How to Avoid Them
- Where to Hang a Crochet Doily Dream Catcher
- How to Care for Your Finished Piece
- Real-Life Craft Experiences: What This Project Actually Feels Like
- Final Thoughts
If your craft corner has been whispering, “Please make something pretty and slightly boho,” this project is your sign. A DIY dream catcher made with a crochet doily and wire is one of those rare crafts that looks fancy, feels personal, and does not require the patience level of a saint. You get texture, shape, movement, and a handmade finish that looks right at home in a bedroom, nursery, reading nook, or anywhere that could use a little softness and charm.
The beauty of this project is that it combines two things that already know how to behave: a crochet doily brings delicate pattern and vintage character, while wire gives you structure and freedom. Together, they create a wall hanging that feels airy, artsy, and custom-made without demanding a degree in advanced crafting. Even better, you can keep it simple or go full creative tornado with ribbon, lace, beads, feathers, faux flowers, or layered textures.
In this guide, you’ll learn how to make a dream catcher using a crochet doily and wire, how to choose the right supplies, how to keep the center looking neat instead of saggy and confused, and how to customize the finished piece so it looks intentional rather than “hot glue happened here.”
A Respectful Note Before You Start
Dream catchers have cultural roots in Ojibwe tradition, and traditional versions carry meaning beyond décor. That matters. If you are making this project as a decorative craft inspired by circular fiber art, it is a good idea to do so respectfully, avoid claiming Native authenticity, and avoid marketing a non-Native handmade item as “Native-made” or “Indian-made.” Think of this project as a handmade wall hanging inspired by the familiar dream catcher silhouette, while also recognizing that the traditional object has a deeper history than what shows up in craft aisles and Pinterest boards.
That respectful awareness does not make the project less creative. It makes it better. Crafting with context is always a good look.
Why a Crochet Doily and Wire Make Such a Great Pair
A crochet doily already has the intricate openwork that gives a dream catcher-style wall hanging its visual magic. Instead of weaving a center web from scratch, you begin with a ready-made lace pattern that brings symmetry, detail, and texture immediately. It is a shortcut, yes, but the elegant kind. Not the “I microwaved a holiday dinner” kind.
Wire, meanwhile, is flexible enough to shape into a hoop and sturdy enough to hold that shape once secured. It also gives you more freedom than a fixed embroidery hoop because you can create the exact diameter you want. Want a larger statement piece? Make a wider ring. Want a mini version for gifts or party décor? Cut shorter wire and scale it down.
This combination makes the project beginner-friendly, budget-friendly, and wonderfully customizable. It is also a smart way to repurpose vintage or thrifted doilies that deserve a life beyond a drawer.
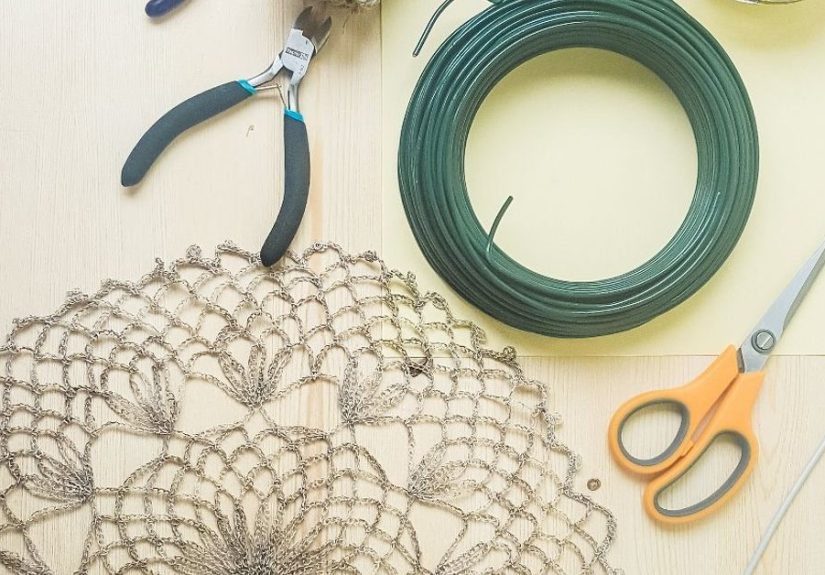
Supplies You’ll Need
- 1 crochet doily, ideally 6 to 10 inches across
- Craft wire or floral wire for the hoop
- Thin wire, strong thread, or embroidery floss for attaching the doily
- Wire cutters
- Pliers
- Ribbon, lace, yarn, suede cord, or twine for wrapping and hanging
- Feathers, beads, charms, tassels, or faux flowers for embellishment
- Scissors
- Hot glue gun or fabric glue, optional
For the outer ring, medium-sturdy wire usually works best because it bends without flopping all over the place like a noodle with stage fright. If you want a stronger frame, you can double the wire or twist two strands together. For attaching the doily, thinner wire or strong thread is easier to hide and easier to control.
How to Choose the Right Doily and Wire
Pick a doily with open detail
A crochet doily with clear holes or loops around the outer edge is the easiest to attach. The more obvious the stitch openings, the easier it will be to lace or tie it to the frame. Very dense doilies can still work, but they are fussier and tend to make you mutter at the table.
Match the hoop size to the doily
The finished hoop should be slightly larger than the doily so the center can stretch gently without distortion. If your doily is 8 inches wide, a 9- to 11-inch hoop usually looks balanced. Too small, and the doily bunches. Too large, and it sags in the center like it gave up halfway through the project.
Use wire that can hold shape
If the wire is too thin, your hoop can warp once you add hanging tails and decorations. If it is too thick, it becomes harder to shape neatly by hand. A medium craft wire or floral wire is usually the sweet spot for most decorative wall hangings.
Step-by-Step: How to Make a DIY Dream Catcher Using Crochet Doily and Wire
Step 1: Shape the wire into a hoop
Cut a length of wire long enough to form your desired circle, plus a little extra for overlap. Wrap it around a bowl, vase, or round container to help create an even shape. Overlap the ends by about 1 to 2 inches, then twist them together tightly with pliers. Tuck any sharp ends inward so your dream catcher does not double as a surprise hand attack.
If you want extra strength, wrap a second piece of wire around the first ring and twist the ends together. This gives the hoop a cleaner, sturdier structure and helps it hold up better if you plan to add beads or layered tails.
Step 2: Wrap the hoop if desired
You can leave the wire visible for a minimalist look, but most people prefer wrapping it. Use ribbon, yarn, twine, lace, or faux suede cord and wind it tightly around the entire hoop. This covers the wire, softens the look, and creates a more finished base. Secure the beginning and end with a small knot, glue dot, or discreet dab of hot glue.
Wrapping also helps your attachment stitches blend in better, especially if your doily is ivory, cream, white, blush, sage, or another soft neutral.
Step 3: Position the crochet doily in the center
Lay the hoop flat on your work surface and center the doily inside it. Check that the design looks even from every angle. If the doily has a clear focal motif in the middle, make sure it sits squarely in the center before you attach anything. This tiny pause saves a lot of later regret.
Step 4: Attach at four anchor points first
Before working your way around the entire hoop, secure the doily at four points: top, bottom, left, and right. Use thin wire, thread, or embroidery floss to tie through a stitch opening on the doily and around the wrapped hoop. Pull each point gently so the doily stretches evenly, but do not yank hard enough to distort the pattern.
These anchor points act like guideposts. Once they are in place, it becomes much easier to keep the tension balanced around the ring.
Step 5: Fill in the rest of the attachment points
Continue attaching the doily around the hoop, working from one anchor point to the next. Add small ties every 1 to 2 inches, or wherever the doily naturally meets the frame. The goal is even tension, not overengineering. You want the doily to sit flat and slightly taut, like a neat lace drumhead, not like it has been stretched for a medieval experiment.
If you are using thread instead of wire, double-knot each attachment point. If you are using thin wire, twist gently and snip any excess cleanly.
Step 6: Add a hanging loop
Cut a piece of ribbon, twine, or cord and tie it to the top of the hoop to create a hanging loop. Keep it centered. If the loop is off even a little, the whole piece may hang crooked, and you will spend the next three months pretending you “meant to do that.”
Step 7: Create the hanging tails
Now for the fun part. Cut several lengths of ribbon, lace, yarn, cord, or fabric strips and tie them to the bottom of the hoop. Vary the lengths for a layered look. Some crafters prefer three main strands; others go for a full curtain of texture. Both work. The difference is mostly whether you lean minimalist or delightfully dramatic.
Try combining textures such as satin ribbon, cotton yarn, torn fabric strips, and narrow lace. This gives the project movement and dimension, especially when it hangs near a window or vent where it can sway a little.
Step 8: Add beads, feathers, or decorative accents
Thread beads onto the hanging strands, knot them in place, or add feathers at the ends using wire or string. You can also attach small charms, wooden beads, tassels, shells, faux greenery, or tiny flowers. There is no single correct design here. The best version is the one that looks like you made it on purpose.
If you love a softer, modern look, stick with neutral ribbon and wooden beads. If you want something playful, use dyed feathers, colorful embroidery floss, and glass or acrylic beads. If your style can best be described as “romantic thrift store with opinions,” try lace, antique-looking charms, and tea-stained ribbon.
Easy Design Ideas to Customize Your DIY Dream Catcher
Boho neutral
Use an ivory doily, jute wrapping, cream ribbon, and natural wood beads. This version works beautifully in modern farmhouse, bohemian, or Scandinavian-inspired rooms.
Vintage cottage
Choose a tea-stained or antique crochet doily, dusty rose ribbon, lace trims, and pearl-like beads. Add one or two small faux flowers for a softer, romantic finish.
Colorful craft-room style
Wrap the hoop in bright yarn, use rainbow ribbon tails, and add multicolored beads. This is especially fun for a cheerful bedroom or maker space.
Minimal modern
Keep the wire black or gold, use a white doily, and add only a few long cotton cords. Sometimes less really is more. Occasionally it is also less cleaning.
Common Mistakes and How to Avoid Them
The doily looks loose
This usually means the hoop is too large or the attachment points are too far apart. Add a few more tie points and gently tighten them evenly around the ring.
The hoop is not round
Shape the wire around a round object before securing it. If it still looks uneven, adjust it with your hands before adding the doily and decorations.
The bottom feels too heavy
If you add lots of beads, charms, or heavy feathers, the hoop can tilt. Balance the piece by keeping embellishments symmetrical or reinforcing the frame with extra wire.
The project looks cluttered
Limit yourself to two or three main materials and one accent. For example: lace, ribbon, wood beads. Or yarn, suede cord, brass beads. A little editing can make the entire piece look more intentional.
Where to Hang a Crochet Doily Dream Catcher
This type of wall hanging works well above a bed, crib, reading chair, dresser, desk, or gallery wall. It also makes a sweet handmade gift for birthdays, baby showers, dorm rooms, or housewarmings. Smaller versions can even be used as party décor, seasonal accents, or photo-backdrop details.
If you are making one for a nursery or child’s room, be smart about placement. Hang it well out of reach and secure it properly to the wall. Pretty décor should stay pretty, not become a grab-and-tangle situation.
How to Care for Your Finished Piece
Because this project often includes crochet, ribbon, feathers, and beads, it is best treated as delicate décor. Dust it lightly with a soft brush, microfiber cloth, or cool hair dryer on low airflow. Avoid placing it in very humid areas, where fabric or wrapped materials may loosen over time.
If the doily center shifts, you can retighten one or two anchor points without taking apart the whole project. That is the nice thing about a handmade piece: it can be adjusted, refreshed, and customized again later.
Real-Life Craft Experiences: What This Project Actually Feels Like
One reason this DIY dream catcher project is so appealing is that the making experience is almost as satisfying as the finished result. It starts out deceptively simple. You gather your crochet doily, wire, ribbon, and beads and think, “This will be a quick little craft.” Then you begin shaping the wire and instantly discover that circles are very easy in theory and surprisingly opinionated in practice. The hoop may come out a little oval at first. That is normal. Nearly everyone has a moment where they hold it up, squint at it, rotate it twice, and say, “You know what, close enough,” before fixing it anyway.
The most enjoyable part for many crafters is attaching the doily. Once the center starts stretching into place, the project suddenly looks like something real instead of a pile of hopeful supplies. That moment is genuinely satisfying. It is also the point where people usually get more confident and start improvising. Maybe you planned a simple neutral wall hanging, but then a velvet ribbon appears. Then beads. Then maybe one charming tassel. Craft restraint is noble, but not always realistic.
There is also a very common first-timer experience with tension. Pull too little, and the doily droops. Pull too much, and the lace pattern distorts. Most people adjust the same attachment point at least three times before getting it right. That is not failure. That is the project teaching your hands what “even” feels like. By the second or third tie, you begin to understand the rhythm of it, and the whole process gets easier.
Another thing people notice is how relaxing the embellishing stage can be. Choosing ribbons, lining up strands, sliding beads into place, and deciding where the feathers should hang feels less like a strict tutorial and more like styling. It is creative without being chaotic. You are making dozens of tiny design decisions, but none of them are permanent disasters. If a ribbon looks awkward, move it. If the colors fight each other, swap one out. If the bottom feels too heavy, trim it back. The project is forgiving, which is one reason it is such a good weekend craft.
There is often a sentimental side to the experience too, especially if you use a thrifted or inherited crochet doily. Turning an older handmade textile into wall décor can feel like giving it a second life. The finished piece carries both texture and memory. Even when the materials are brand new, the final result tends to feel personal because the combination of doily pattern, hoop size, color palette, and hanging details is uniquely yours.
And then comes the final reveal: you hang it up, step back, and realize the project looks far more expensive than it was. That is a deeply satisfying craft outcome. It is the DIY version of finding a perfect jacket on clearance. Better yet, every little imperfection disappears once the dream catcher is on the wall. The slightly uneven ribbon suddenly looks artistic. The handmade wire hoop feels organic. The whole piece reads as warm, textured, and intentional. In other words, it looks like art, which is an excellent reward for an afternoon spent wrestling politely with wire and lace.
Final Thoughts
Learning how to make a DIY dream catcher using crochet doily and wire is less about mastering a complicated craft and more about combining simple materials thoughtfully. A well-shaped hoop, a centered doily, balanced tension, and a few carefully chosen embellishments can turn a humble pile of supplies into a beautiful handmade wall hanging.
Whether you prefer soft neutrals, colorful boho layers, or vintage lace charm, this is the kind of project that lets your style lead the way. It is affordable, beginner-friendly, easy to personalize, and satisfying to finish. Best of all, it leaves you with something handmade that feels special every time you see it on the wall.
So grab that crochet doily, bend some wire, and make something lovely. Your wall has been waiting.