Table of Contents >> Show >> Hide
- Why Build a Raspberry Pi Chicken Door Instead of Buying a Basic One?
- The Core Parts of a Raspberry Pi Controlled Chicken Door
- Best Door Design for a DIY Automatic Chicken Coop Door
- How the System Works
- Wiring and Power: Where Many Builds Go Wrong
- Smart Features Worth Adding
- Do Not Forget Actual Coop Safety
- Common Mistakes to Avoid
- Is a Raspberry Pi Controlled Chicken Door Worth It?
- Field Notes: Real-World Experiences With a Raspberry Pi Chicken Door
- Conclusion
- SEO Tags
If you keep chickens, you already know the job description is part farmer, part security guard, part weather analyst, and part very underpaid doorman. Every morning, somebody has to open the coop. Every evening, somebody has to close it before raccoons clock in for their night shift. That is exactly why a Raspberry Pi controlled chicken door is such a satisfying project. It solves a real problem, gives you more control than a basic timer, and turns your coop into a smarter, safer system.
The beauty of this build is that it sits right at the sweet spot between practical homesteading and fun DIY automation. A Raspberry Pi can open and close a chicken door on a schedule, react to daylight, read a magnetic contact sensor to confirm the door is actually shut, and even send alerts if something jams. In other words, it does more than yank a string and hope for the best. It helps you build an automatic chicken coop door that is thoughtful, reliable, and far less likely to leave your flock exposed because one little part got moody in the rain.
This guide walks through how to plan, build, and improve a smart coop door with a Raspberry Pi. We will cover the hardware, the best door styles, the wiring logic, the software workflow, the coop-safety details people forget, and the real-life lessons that tend to appear only after you have spent an hour in the yard saying, “Why is the door opening sideways?”
Why Build a Raspberry Pi Chicken Door Instead of Buying a Basic One?
Off-the-shelf automatic coop doors are handy, and some are genuinely well designed. But a Raspberry Pi setup gives you something many basic door kits do not: flexibility. A Pi can combine scheduling, light sensing, door-position confirmation, remote monitoring, and custom rules in one system. That matters because chickens do not live in a perfect lab environment. They live in weather, dust, feathers, mud, and chaos with beaks.
With a smart chicken door, you can create logic like this: open at sunrise unless the temperature is extreme, close 20 minutes after sunset, stop if the sensor shows an obstruction, and send an alert if the door fails to reach the closed position. That is a big step up from a bargain timer that simply assumes the mechanism always works.
There is also the fun factor. If you enjoy Raspberry Pi projects, this is one of the most useful ones you can build. Unlike a blinking LED demo, your coop door has a job. It protects animals, reduces routine chores, and gives you a reason to use sensors, GPIO control, Python, and basic automation in a way that feels immediately worthwhile.
The Core Parts of a Raspberry Pi Controlled Chicken Door
1. The Brain: Raspberry Pi
The Raspberry Pi is the controller. It handles logic, timing, sensor input, and output signals. You can use it with Python, GPIO libraries, or a dashboard tool like Node-RED if you want a simple interface for remote control. Think of the Pi as the project manager. It decides when the door should move, whether it actually moved, and what to do if something goes wrong.
2. The Muscle: Motor, Servo, or Linear Actuator
The Pi does not directly power the door motor. That is a major design rule. The GPIO pins are for control signals, not for feeding a hungry motor like it is a tiny power plant. You will need an external power supply and a driver device such as a relay board, transistor-based switching circuit, motor driver, or actuator controller.
For the actual movement, most builders choose one of three options:
- Linear actuator: Great for strong, direct movement. Excellent for a sturdy sliding door.
- DC gear motor with pulley or spool: Common in DIY builds. Budget-friendly, but it needs careful limit control.
- Servo motor: Best for lighter doors or latch systems, not heavy barn-door drama.
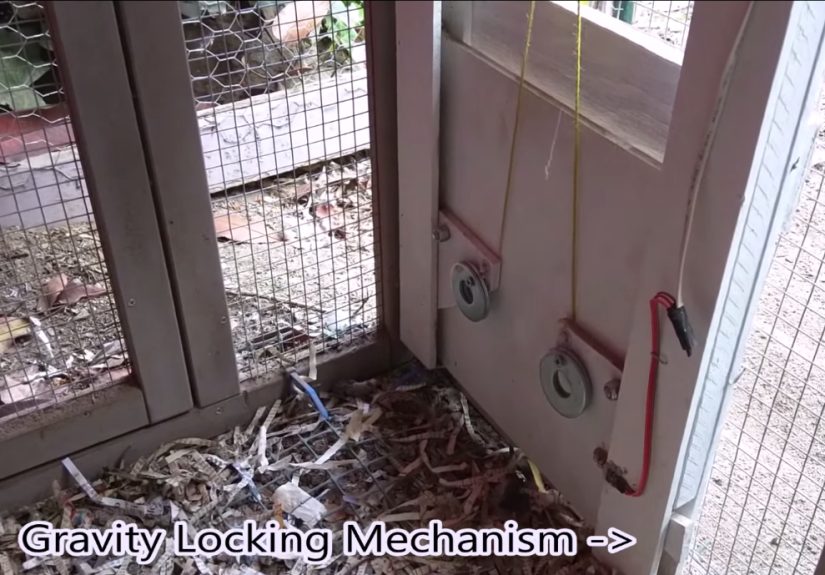
If you are building a serious predator-resistant setup, a vertical sliding door driven by a linear actuator or geared lift mechanism is usually the smartest move. It is simple, compact, and harder for clever paws to manipulate.
3. The Eyes and Ears: Sensors
A good coop door should never be “blind.” At minimum, add a sensor to confirm whether the door is open or closed. A magnetic reed switch is a classic choice because it is simple, durable, and easy to wire to the Pi. When the magnet lines up with the switch, the system knows the door reached its correct position.
You can also add:
- A light sensor or sunrise/sunset software trigger
- Limit switches to stop travel at the top and bottom
- A current sensor to detect a stall or jam
- An IR or obstruction sensor to reduce the risk of closing on a bird
That last feature matters more than people expect. Commercial doors increasingly advertise anti-pinch or auto-stop behavior for a reason. Chickens have an incredible talent for standing exactly where not to stand.
Best Door Design for a DIY Automatic Chicken Coop Door
If you want this project to age gracefully, start with the right door style. The best choice for most coops is a vertical sliding chicken door. It is compact, easy to guide with side rails, and naturally works well with timers, motors, and actuators.
Why not a hinged door? Because hinged doors can sag, catch wind, bind in mud, or create openings that clever predators can pry at. A flush sliding panel is usually easier to secure and easier to automate.
Use weather-resistant materials. Aluminum, sealed wood, or composite panels all work better than flimsy scrap wood that swells after two rainy weekends and suddenly behaves like a medieval drawbridge. Add smooth runners or guides so the door moves straight. A door that rubs even slightly will become a jam sooner or later.
And remember this: the automation is only as good as the physical door. If the frame is crooked, the motor will not “figure it out.” It will simply try harder, make sad noises, and teach you new vocabulary.
How the System Works
A Raspberry Pi chicken coop door usually follows a simple control loop:
- The Pi checks the schedule, light level, or both.
- When the open condition is met, it triggers the motor or actuator.
- It watches for an open-position sensor or limit switch.
- At closing time, it reverses the motion.
- It confirms the closed position through a reed switch or limit sensor.
- If the door does not reach the expected position, it stops and logs or alerts you.
That sensor-confirmation step is what separates a smart DIY chicken coop door opener from a glorified egg timer. If your system cannot verify the door state, then it is not truly automated. It is just optimistic.
Wiring and Power: Where Many Builds Go Wrong
Here is the non-glamorous truth: most failures in a Raspberry Pi controlled chicken door are not software problems. They are power problems, wiring problems, or “I thought this little pin could handle it” problems.
Motors and actuators should use their own properly rated power supply. The Pi provides the signal, while a driver handles the actual load. If you are using a servo, power it externally and tie the grounds together. If you are switching a motor or relay, use the correct protection components. Inductive loads can kick voltage back into the circuit when they turn off, so proper motor drivers, relay boards, flyback protection, or built-in protection hardware matter.
This is also where weatherproofing matters. Outdoor electronics should live in a sealed enclosure, with cable glands or strain relief where wires enter. Keep the controller above splash level, away from bedding dust, and out of direct pecking range. Chickens are not certified electricians, but they are deeply committed to unauthorized inspections.
Smart Features Worth Adding
Sunrise and Sunset Automation
You can use an actual light sensor, a sunrise/sunset API, or both. Light-based opening feels natural, but timer-based closing can be more predictable in stormy weather. Many builders end up using hybrid rules, such as “open after sunrise but never before 6:00 a.m.” and “close at sunset plus 15 minutes.”
Manual Override
Always include a manual open-and-close option. Maybe it is a button on the controller box. Maybe it is a dashboard on your phone. Maybe it is a simple pull-release for emergencies. Whatever the method, do not trap yourself in a design that requires debugging Python in the dark while a thunderstorm is approaching and your hens are filing complaints.
Notifications
One of the Pi’s biggest advantages is communication. You can set up email, SMS, or dashboard alerts that say things like “door failed to close,” “obstruction detected,” or “battery voltage low.” This is the kind of feature that makes the project feel less like a gadget and more like a serious flock-management tool.
Camera or Logging
Some keepers add a Pi camera or simple event log. You do not need it, but it is useful when diagnosing odd behavior. Was the door late because the actuator slowed in cold weather? Did debris collect in the track? Did a hen decide to sleep in the doorway like she was proving a point? Logs can answer that.
Do Not Forget Actual Coop Safety
A smart door is not a substitute for a safe coop. It is one part of a larger system. The coop still needs proper ventilation, predator protection, and sensible layout.
Ventilation should be high enough to remove moisture, heat, and ammonia without creating a direct draft at roost level. That is important year-round, not just in summer. A tightly sealed coop might sound cozy, but stale, damp air causes more trouble than cold, dry air in many backyard setups.
Openings should be covered with hardware cloth, not ordinary chicken wire. Chicken wire is excellent at containing chickens and much less impressive at stopping determined predators. Use secure latches, reinforce vulnerable openings, and consider a buried apron or welded wire barrier to stop digging animals at the perimeter. The best automatic door in the world will not help much if the rest of the coop is basically a predator suggestion box.
Common Mistakes to Avoid
- Using a weak door mechanism: A tiny hobby motor may work for two days and then surrender emotionally.
- Skipping position sensors: If the system cannot confirm open and closed states, it cannot fail safely.
- Ignoring weather: Moisture, cold, dust, and swelling materials change how mechanisms behave.
- No manual override: A “fully automatic” system that cannot be manually controlled is a future inconvenience.
- Thinking the door alone makes the coop predator-proof: It does not. The whole enclosure matters.
- Mounting electronics inside pecking range: Chickens are chaos interns with no supervision.
Is a Raspberry Pi Controlled Chicken Door Worth It?
Yes, if you want more than a simple opener. This project is worth it when you care about control, safety, and customization. It is especially attractive if your coop is far from the house, your schedule is inconsistent, or you enjoy building systems that can grow over time.
A Raspberry Pi powered door is not always the cheapest route, but it is often the most adaptable. You can start with a basic timed opener, then add sensors, alerts, a dashboard, and better failsafes as your setup matures. That makes it a great long-term smart chicken coop project, not just a weekend gadget.
Field Notes: Real-World Experiences With a Raspberry Pi Chicken Door
The most useful lessons around a Raspberry Pi controlled chicken door do not usually come from the first day the system works. They come from the second week, the first storm, the first freeze, and the first time a hen decides the doorway is her preferred location for deep philosophical reflection.
One common experience is discovering that the software was actually the easy part. Plenty of builders get the script running quickly, only to spend the next several evenings adjusting tracks, reducing friction, or rethinking how the cable winds. In theory, the logic is clean: send a signal, move the door, read the sensor. In practice, the door might drift slightly, rub on one side, or close perfectly unless there is a bit of bedding in the track. That is why experienced builders start treating the mechanics like the main event and the code like support staff.
Another frequent lesson is that chickens do not respect engineering assumptions. You might assume they will all enter the coop before dusk. Usually they do. Then one bird decides twilight is the ideal time to stand in the opening, stare into the middle distance, and question every life choice she has ever made. This is where obstruction handling stops being a “nice feature” and becomes a sanity-saving one. A well-designed door should pause, reverse, or retry rather than force the issue.
Weather is another humbling teacher. A setup that behaves beautifully in dry weather may slow down in cold temperatures, gum up in wet conditions, or collect dust in ways the builder never expected. People who have the best long-term results tend to overbuild the enclosure, shield the moving parts, and use materials that can tolerate expansion, grit, and temperature swings. In other words, they build for January even if the prototype was made in May.
There is also the reliability lesson. Most keepers who love their automated doors are not the ones who made the fanciest version. They are the ones who made the most predictable one. They added a manual override. They made the door easy to inspect. They used sensors to verify position. They chose a power supply with headroom. They planned for what would happen if the Pi rebooted, the power flickered, or the door failed to close on schedule. That is the difference between a clever coop gadget and a dependable farm tool.
And then there is the quiet reward that sneaks up on you. After the tweaking, the testing, the muddy shoes, and the inevitable “why is this wire here?” moment, the system begins to feel wonderfully normal. The door opens in the morning. The flock heads out. The door closes in the evening. Your phone stays silent because nothing failed. That silence is glorious. It means the design is doing what it should: protecting your birds without demanding your constant attention.
That is the real experience of building a Raspberry Pi chicken door. It is part electronics project, part coop upgrade, and part long game in practical problem solving. It teaches patience, rewards thoughtful design, and has a very satisfying outcome: safer chickens, fewer rushed trips outside, and one less daily task standing between you and your coffee.
Conclusion
A Raspberry Pi controlled chicken door is one of those rare DIY builds that is both geeky and genuinely useful. It blends automation with animal care in a way that can make daily flock management easier, safer, and much more reliable. The trick is not just making the door move. It is making the whole system smart enough to handle real-life conditions: weather, predators, friction, timing, and the occasional chicken that treats the threshold like a red carpet.
If you build with solid mechanics, proper motor control, door-position sensing, weather protection, and real coop-security principles, you can create a system that feels less like a novelty and more like a dependable upgrade to your homestead. And honestly, that is the dream: a coop door that opens and closes on time, protects the flock, and lets you enjoy chicken keeping without being personally assigned to the dawn shift forever.