Table of Contents >> Show >> Hide
- Why a Hand Held Shower Head Leaks in the First Place
- First, Figure Out Exactly Where the Leak Is
- Tools and Supplies You May Need
- Solution 1: Clean Mineral Buildup from the Shower Head and Inlet
- Solution 2: Reseal the Threaded Connection with Fresh Plumber’s Tape
- Solution 3: Replace the Hose Washer, Gasket, or O-Ring
- What If the Shower Head Still Drips When the Water Is Off?
- When You Should Replace the Entire Handheld Shower Head
- How to Prevent Future Hand Held Shower Head Leaks
- Final Thoughts
- Real-World Experiences with a Leaky Hand Held Shower Head
- SEO Tags
A leaky hand held shower head is one of those tiny home problems that somehow makes a huge amount of emotional noise. Drip. Drip. Drip. It is like your bathroom hired a percussionist and forgot to ask your permission. The good news is that this is often a beginner-friendly fix. In many cases, you do not need to replace the entire fixture, tear open a wall, or call in a plumber riding heroically through the mist.
Most handheld shower head leaks come from three familiar troublemakers: mineral buildup, a bad seal at the threaded connection, or a worn washer, hose gasket, or internal part. Sometimes the shower head only looks guilty and the real issue is a worn shower valve cartridge behind the handle. The trick is figuring out where the leak starts and then using the right fix instead of randomly attacking your bathroom with a wrench and optimism.
In this guide, you will learn three simple solutions for fixing a leaky hand held shower head, plus how to tell when the leak is normal residual dripping, when it is a hose or gasket problem, and when it is time to stop DIY-ing and investigate the valve itself.
Why a Hand Held Shower Head Leaks in the First Place
Before you fix anything, it helps to know what you are actually fixing. A handheld shower head has more possible leak points than a fixed head because it usually includes a hose, extra threaded connections, gaskets, an inlet screen, and sometimes a diverter or dock.
Here are the most common causes:
- Mineral buildup: Hard water can clog spray nozzles or internal passages, causing water to come out in odd places or continue dripping.
- Old plumber’s tape or poor thread sealing: The connection where the shower head or hose meets the shower arm may not be sealed tightly anymore.
- Worn washer, gasket, or O-ring: Rubber parts age, flatten, crack, or shift out of place.
- Dirty inlet screen: Debris can affect flow and sealing inside the handle connection.
- High water pressure or diverter issues: These can make water leak from the wrong outlet.
- Valve cartridge trouble: If the shower drips continuously even when turned off, the real problem may be inside the faucet valve, not the hand shower.
First, Figure Out Exactly Where the Leak Is
This step saves time, parts, and unnecessary muttering.
Leak from the spray face or nozzles after shutoff
A brief drip right after turning the water off can be normal. Some hand showers hold leftover water that drains out for a short time. If the dripping stops after a minute or so, you may not have an actual repair problem. If it keeps dripping long after that, move on to cleaning or valve diagnosis.
Leak where the hose connects to the shower head
This usually points to a flattened hose washer, a damaged gasket, debris on the threads, or a loose connection.
Leak where the hose or bracket connects to the shower arm
This often means the thread seal is failing, the fitting is cross-threaded, or the washer is not seated correctly.
Leak only when the water is off
If the head keeps dripping when the handle is fully off, the shower valve cartridge or stem may be the real culprit.
Leak only when switching between tub spout and shower
That can signal a diverter or pressure-related issue rather than a bad handheld head.
Tools and Supplies You May Need
- Soft cloth or towel
- Adjustable wrench or slip-joint pliers
- Plumber’s tape
- Replacement hose washer or shower head gasket
- Small O-ring assortment
- White vinegar
- Plastic bag or bowl
- Old toothbrush
- Toothpick or soft pick for nozzles
Tip: Protect the finish with a cloth before using pliers or a wrench. Chrome may be shiny, but it is not emotionally prepared for bare metal teeth.
Solution 1: Clean Mineral Buildup from the Shower Head and Inlet
If your hand held shower head sprays unevenly, dribbles after shutoff, or leaks around the face, mineral buildup is a strong suspect. Hard water deposits can block the small outlets and force water to behave like a confused tourist with no map.
How to do it
- Unscrew the hand shower from the hose, or remove the whole unit if needed.
- Check the inlet end of the shower head for a screen, washer, or flow control piece.
- Gently remove visible debris and rinse the inlet.
- Soak the shower head in white vinegar for a few hours, or overnight if buildup is heavy.
- Use a soft toothbrush to scrub the nozzles and outer face.
- Use a toothpick carefully if individual spray holes are clogged.
- Rinse thoroughly and reassemble.
Why this works
Mineral deposits can restrict flow and create back-pressure inside the head. That pressure can make water seep from the faceplate, around seals, or continue dripping longer than it should. Cleaning the screen and nozzles often restores normal flow and stops the fake drama.
Best use case
This is the right first move when the shower head still mostly works but sprays weirdly, leaks around the front, or has visible limescale. It is also the cheapest fix, which makes it the bathroom equivalent of finding money in your winter coat.
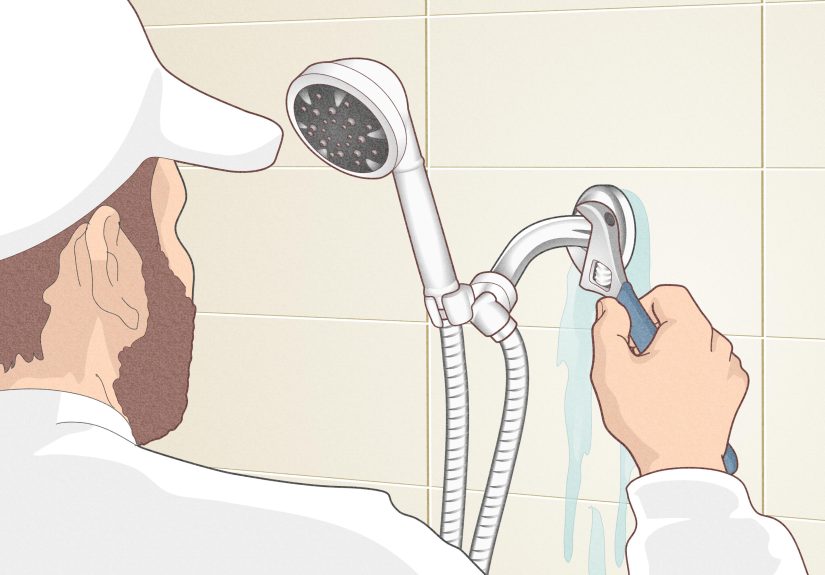
Solution 2: Reseal the Threaded Connection with Fresh Plumber’s Tape
If the leak appears where the hand shower mount, bracket, or hose connection meets the shower arm, the seal at the threads may be worn out. Plumber’s tape does a simple but important job: it helps create a tighter, leak-resistant threaded connection.
How to do it
- Turn off the shower and let any remaining water drain.
- Unscrew the leaking connection by hand. If it is stuck, use a towel and wrench carefully.
- Clean the threads to remove old tape, grit, and mineral crust.
- Wrap new plumber’s tape clockwise around the male threads two to three times.
- Reconnect the hose mount or shower head carefully, making sure the threads catch evenly.
- Hand-tighten first, then snug it gently if needed. Do not crank it down like you are trying to win an arm-wrestling contest.
- Turn the water on and test for leaks.
Common mistakes to avoid
- Wrapping the tape backward: It can unravel as you screw the fitting on.
- Overtightening: This can damage threads, crack fittings, or distort gaskets.
- Skipping thread cleaning: Old tape and debris can prevent a proper seal.
- Cross-threading: If the fitting resists immediately, back off and start again.
This fix is especially effective when the leak is at the arm connection, not the spray face. If your leak disappears after fresh tape and proper tightening, congratulations: you just defeated a plumbing issue with a strip of white film that looks suspiciously underqualified.
Solution 3: Replace the Hose Washer, Gasket, or O-Ring
Handheld shower heads usually rely on a rubber washer or gasket inside the hose nut to seal the connection. If that washer is cracked, flattened, missing, or coated with buildup, water can leak where the hose meets the hand shower or where the hose meets the wall bracket.
How to do it
- Unscrew the leaking hose connection.
- Look inside the hose nut for the rubber washer or gasket.
- Remove the old washer if it is brittle, misshapen, or damaged.
- Clean the seat and threads.
- Insert a matching new washer or shower hose gasket.
- Reconnect and hand-tighten firmly.
- Test the shower.
When to suspect an O-ring
If the leak seems to come from a swivel joint, holder connection, or a seam on the shower head body, there may be a worn O-ring inside. Some models are easy to open; others are not meant to be rebuilt. If your model allows disassembly, replace the O-ring with the same size. If not, replacing the handheld head is often faster and cheaper than performing a tiny bathroom surgery with uncertain odds.
When this fix is most likely to work
Choose this repair when the leak is clearly coming from a hose nut or connection point and not from the nozzles themselves. It is also the right move when the fixture was recently installed and has leaked since day one, because a missing or poorly seated washer is a classic culprit.
What If the Shower Head Still Drips When the Water Is Off?
This is the important fork in the road. If you cleaned the head, replaced the washer, and resealed the threaded connection, but the shower still drips continuously with the handle off, the handheld unit may be innocent.
At that point, the likely suspects include:
- A worn valve cartridge
- A failing valve stem or internal seal
- A transfer valve issue in systems with multiple outlets
- Pressure-related stacking or diverter problems
That repair is less about the hand held shower head and more about the faucet valve behind the wall trim. Some homeowners can replace a cartridge themselves, but you need the correct part for the faucet brand and valve type. If you do not know the brand or your shutoff situation is messy, this is a reasonable moment to call a plumber before a small leak becomes a bigger wall problem.
When You Should Replace the Entire Handheld Shower Head
Sometimes replacement is smarter than repair. Consider replacing the full handheld unit if:
- The plastic body is cracked
- The swivel joint leaks and is not serviceable
- The finish is corroded and internal parts are failing
- The hose is kinked or permanently damaged
- The cost of parts is close to the price of a new unit
If you replace it, look for a model with solid connection hardware, replaceable washers, and a WaterSense label if efficiency matters to you. Many new units install in minutes and can be a nice upgrade instead of just a repair.
How to Prevent Future Hand Held Shower Head Leaks
- Clean the nozzles and head regularly if you have hard water.
- Do not overtighten the hose or mount connections.
- Replace washers and gaskets at the first sign of seepage.
- Check the hose for twisting, stretching, or sharp bends.
- Inspect the shower arm connection if you notice intermittent drips.
- Address valve drips early before water stains, mold, or higher bills show up.
Final Thoughts
Fixing a leaky hand held shower head is usually less complicated than it sounds. Start by identifying the exact leak location. Then work through the three simple solutions in order: clean mineral buildup, reseal the threaded connection with fresh plumber’s tape, and replace the washer, gasket, or O-ring. In many bathrooms, one of those three steps solves the problem without drama, drywall damage, or an emergency plumbing bill.
The key is not guessing wildly. A leak from the spray face is different from a leak at the hose nut, and a constant drip with the water off often points to the valve cartridge instead of the handheld unit. Once you know the pattern, the fix becomes much more obvious.
And when the dripping finally stops, enjoy that rarest of home-maintenance luxuries: silence.
Real-World Experiences with a Leaky Hand Held Shower Head
In real homes, this repair usually unfolds in a surprisingly familiar way. The homeowner first notices a drip after a shower and assumes the hand held shower head is simply getting old. Then comes the first tiny mystery: the leak is inconsistent. Some days it drips for thirty seconds. Other days it keeps going long enough to make everyone in the house slightly irritated. That inconsistency matters because it often points to buildup, washer seating, or pressure changes rather than a catastrophic failure.
In older homes with hard water, the most common experience is that the shower head slowly gets worse before anyone realizes why. The spray pattern becomes uneven. One nozzle starts shooting sideways like it has a personal vendetta. Then the face begins to dribble after shutoff. When people finally remove the hand shower and soak it in vinegar, the amount of white crust that comes loose can be genuinely shocking. This is the kind of repair that makes people say, “Well, that explains a lot.”
In apartments and rental homes, the threaded connection is often the star of the problem. A previous install may have been rushed, the tape may be old, or the hose may have been tightened with excessive enthusiasm. In those cases, replacing the tape and washer feels almost too easy. The leak stops, the bathroom gets quiet, and the repair takes less time than scrolling through reviews for a new shower head you no longer need to buy.
Another common experience happens with newer handheld units. Everything looks clean, modern, and expensive, yet the leak shows up right where the hose meets the head. The reason is often a washer that shifted during installation or a gasket that was missing altogether. This is why a brand-new fixture is not automatically a correctly installed fixture. Plenty of “bad product” complaints are really “tiny rubber part not seated properly” stories in disguise.
Families with kids often notice hose wear faster than anyone else. The hand shower gets pulled down, twisted, dropped, and docked at angles that the designer probably did not imagine on a peaceful weekday in the testing lab. Over time, the hose connection loosens, the washer compresses, and a small leak begins. In these homes, the fix is not just replacing the washer. It is also teaching everyone that the hand shower is a plumbing fixture, not a medieval flail.
Then there is the most frustrating experience of all: fixing the head, the hose, and the tape, only to realize the shower still drips with the handle off. That is the moment many homeowners discover that the hand held shower head was innocent the whole time and the cartridge behind the wall was the actual troublemaker. Annoying, yes. But also useful. Once the source is identified correctly, the repair path becomes much clearer.
The biggest lesson from real-world repairs is simple: start small, observe carefully, and do the easy fixes first. A leaky hand held shower head often looks like a bigger problem than it is. Most of the time, it turns out to be a manageable mix of buildup, sealing, and worn rubber parts. In other words, not a plumbing apocalypse. Just a bathroom asking for a little attention.