Table of Contents >> Show >> Hide
- Why a Meat Thermometer Beats Guesswork Every Time
- The Main Types of Meat Thermometers
- Where to Put the Meat Thermometer
- Safe Internal Temperatures That Matter
- How to Use a Meat Thermometer Step by Step
- The Secret to Tender Meat: Pull Temperature and Carryover Cooking
- Common Meat Thermometer Mistakes
- How This Works in Real Cooking
- Real Kitchen Experiences: What a Meat Thermometer Changed for Me
- Conclusion
- SEO Tags
If you have ever sliced into a roast and wondered whether dinner would be juicy perfection or a tragic chew-fest, welcome to the club. Many home cooks still rely on cook times, color, or the old “poke it and pray” method. Unfortunately, meat does not care about optimism. It cares about temperature. That is exactly why learning how to use a meat thermometer is one of the smartest kitchen upgrades you can make.
A meat thermometer does more than help you avoid undercooked chicken or dry pork. It gives you control. It helps you pull meat at the right moment, rest it properly, and serve it when the texture is still tender, flavorful, and worth bragging about. Whether you are roasting a turkey, grilling steaks, baking chicken breasts, or smoking a pork shoulder low and slow, the thermometer is the difference between guessing and knowing.
In this guide, you will learn how to use a meat thermometer correctly, where to place it in different cuts, which temperatures matter most, and how to use carryover cooking to your advantage. In other words, this is how to stop overcooking beautiful meat and start serving dinner that makes people suspiciously quiet because they are too busy eating.
Why a Meat Thermometer Beats Guesswork Every Time
Cooking meat by time alone is like navigating with a treasure map drawn by a raccoon. It might get you close, but it is not dependable. Ovens run hot or cool, grills have flare-ups, meat thickness varies, and a “medium” chicken breast in one recipe may be a “tiny edible brick” in another.
That is why a meat thermometer matters so much. It tells you what is happening inside the food, where doneness actually lives. Surface color can mislead you. Clear juices can mislead you. Even a recipe’s minute-by-minute instructions can mislead you if your roast is larger, smaller, colder, or shaped differently than the one the author cooked. Internal temperature is the truth teller.
It also helps you cook meat more tenderly. When you know the exact temperature, you stop blasting food with extra “just in case” minutes. Those extra minutes are often the reason chicken turns chalky, pork turns tight, and steak goes from rosy and buttery to something that could double as a shoe insert.
The Main Types of Meat Thermometers
Before you use one well, it helps to know what is in your drawer.
Instant-read thermometer
This is the kitchen workhorse. You insert it toward the end of cooking to quickly check internal temperature. It is ideal for steaks, chops, chicken breasts, burgers, fish, and roasts. If you buy only one thermometer, make it a good digital instant-read model.
Leave-in probe thermometer
This style stays in the meat while it cooks, with a cord or external display sitting outside the oven or grill. It is excellent for large roasts, brisket, turkey, pork shoulder, or anything that cooks long enough to justify hands-off monitoring.
Wireless probe thermometer
This one is the modern overachiever. It stays in the meat and sends data to a hub or app. It is great for smoking, grilling, and situations where opening the lid would cause heat loss. Also, it makes you feel delightfully technical, which is never a bad seasoning.
The key is using the right tool for the right cut. Thin foods usually benefit from fast instant-read thermometers. Large roasts and long cooks are easier with leave-in or wireless probes.
Where to Put the Meat Thermometer
This is where many cooks go wrong. A thermometer is only as useful as its placement. The goal is to measure the coolest part of the meat, which is usually in or near the thickest section. If the probe touches bone, fat, gristle, or the pan, the reading can be inaccurate.
Steaks and pork chops
Insert the thermometer through the side toward the thickest part when possible, especially for thinner cuts. This gives you a better shot at finding the center without poking straight through too quickly.
Roasts
Place the probe into the thickest part of the roast, away from bone and large fat pockets. For larger cuts, check in more than one spot before declaring victory.
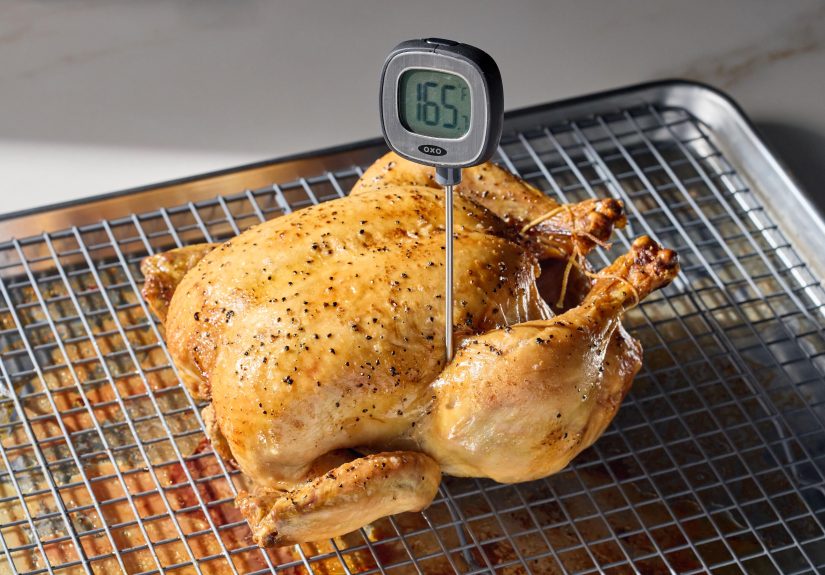
Whole chicken or turkey
Check the thickest part of the breast and the inner thigh without touching bone. Poultry is uneven by nature, so testing more than one location is a smart move.
Ground meat and burgers
Insert the thermometer into the center of the thickest area. Ground meat deserves special attention because bacteria can be distributed throughout the mixture, not just on the surface.
Thin foods
For thinner foods, insert the thermometer sideways. It looks a little dramatic, but it works. This is especially helpful for fish fillets, thin pork chops, or chicken cutlets.
A useful trick for instant-read thermometers is to insert the probe, then slowly move it through the meat to find the lowest reading. That lowest reading is the one you should trust most. Think of it as the coldest, most honest little patch inside your dinner.
Safe Internal Temperatures That Matter
Tenderness matters, but so does safety. Here are the temperatures most home cooks should remember:
| Food | Safe Internal Temperature | Notes |
|---|---|---|
| Beef, pork, veal, lamb steaks, chops, roasts | 145°F | Let rest for 3 minutes |
| Ground beef, pork, veal, lamb | 160°F | Check in the center |
| Poultry: whole, parts, ground, stuffing | 165°F | Check thickest areas |
| Fish | 145°F | Flesh should be opaque and flake easily |
| Fully cooked ham, reheated | 140°F | Reheat safely without drying out |
If you are cooking for tenderness and flavor, you should also understand the difference between a safe final temperature and a pull temperature. In many cases, especially with roasts and larger cuts, meat continues cooking after it leaves the heat. That is where the magic of carryover cooking comes in.
How to Use a Meat Thermometer Step by Step
1. Start with the right thermometer
Use an instant-read thermometer for quick checks or a leave-in probe for long cooks. If your dial thermometer takes forever to settle, do not panic, but also do not expect it to perform miracles on a thin steak.
2. Insert the probe in the correct spot
Target the thickest part. Avoid bone, gristle, and heavy fat. For thin cuts, go in from the side.
3. Check at the right time
Do not wait until the recipe says the food is definitely done. Start checking a bit earlier. This gives you room to avoid overshooting your target temperature.
4. Read the lowest temperature
Move the thermometer slightly if needed. The coolest reading in the thickest section is the number that matters most.
5. Remove the meat before it is ruined by your own caution
If carryover cooking is likely, pull the meat a few degrees early. Large roasts and whole birds can continue rising during rest.
6. Rest before slicing
Resting helps the temperature even out and gives juices time to settle. Cutting immediately is the culinary equivalent of popping a balloon before the party starts.
The Secret to Tender Meat: Pull Temperature and Carryover Cooking
One of the biggest reasons people overcook meat is that they cook to the final target while the meat is still on the heat. Then the temperature keeps climbing. Then they wonder why the roast is dry. Then they start blaming the oven, the recipe, the moon, and perhaps society itself.
Carryover cooking is the continued rise in internal temperature after meat is removed from the oven, grill, skillet, or smoker. The hotter the exterior and the larger the cut, the more carryover you can expect. That means a thick roast or whole chicken may rise several degrees while resting.
So if your target is juicy pork loin at 145°F, you may want to pull it slightly below that and let resting finish the job. If you want a beautiful medium-rare style steak texture, you will also generally remove it before the final peak temperature appears. The exact number varies by cut, thickness, cooking method, and heat level, which is why a thermometer beats blind faith every time.
Resting is not optional fluff. It is part of the cooking process. For steaks, a shorter rest may be enough. For larger roasts or turkey, a longer rest pays off. Your cutting board will collect fewer runaway juices, and the slices will hold moisture better.
Common Meat Thermometer Mistakes
Using the wrong insertion depth
Some thermometers are better for thick roasts than thin chops. A bulky analog thermometer may not read accurately in a skinny cutlet. Match the tool to the job.
Touching bone or the pan
Bone heats differently and can fool the thermometer into reading hotter than the surrounding meat. The same goes for a hot roasting pan.
Checking only one spot
Especially with poultry and large roasts, different areas can finish at different speeds. Check more than one location.
Waiting too long to test
If you begin checking only when the recipe time is up, you may already be too late. Start early and check again as needed.
Skipping calibration
If your thermometer is inaccurate, your confidence is also inaccurate. Test it occasionally in ice water or boiling water according to the manufacturer’s guidance. A properly made ice bath should read about 32°F.
Leaving the thermometer in when it was not designed for that
Instant-read thermometers are for quick checks, not for lounging in a 400-degree oven like they own the place.
How This Works in Real Cooking
Steak
A steak can look gorgeous on the outside and still be cooler in the center than you expect. Insert the thermometer sideways into the thickest part. Check early, then pull it before it overshoots. Rest it briefly so the juices stay where they belong.
Chicken breast
Chicken breast is notorious for going from juicy to stringy at warp speed. Check the thickest part and do not rely on color alone. With a thermometer, you can stop cooking at the right moment instead of apologizing over dinner.
Pork tenderloin
Pork is one of the best examples of why thermometer cooking matters. It does not need to be cooked into sadness. When you monitor it carefully and rest it properly, it can be tender, slightly blush, and incredibly flavorful.
Turkey
Holiday meals become much less dramatic when you stop depending on pop-up timers or wishful thinking. Check both the breast and the inner thigh. A well-used thermometer is worth more than ten people shouting, “It looks done to me.”
Burgers
Ground meat should be checked in the center, and temperature matters here more than appearance. A burger can still look juicy and appetizing while also needing a few more degrees to land in the safe zone.
Real Kitchen Experiences: What a Meat Thermometer Changed for Me
The first time I understood what a meat thermometer could really do, it was not during a fancy dinner. It was during an ordinary weeknight with a tray of chicken breasts that had already suffered through a long workday, a distracted cook, and an oven that runs hotter than it admits. I had always treated chicken with intense suspicion. If a recipe said twenty minutes, I gave it twenty-five. If it said done, I gave it “extra done.” The result was technically safe but emotionally disappointing. It was the kind of chicken that made you reach for extra sauce and lower your expectations.
Then I started using an instant-read thermometer properly. Not randomly. Properly. I checked the thickest part, avoided the pan, and started testing a few minutes before I normally would. The difference was immediate. The chicken was still fully cooked, but the texture changed from dry and fibrous to tender and actually enjoyable. It was such a small adjustment that it felt slightly ridiculous. Same meat. Same oven. Same cook. Different information.
Steak taught me the second lesson. Before the thermometer era, I relied on touch tests, timing charts, and the universal home-cook strategy of squinting meaningfully. Sometimes it worked. Sometimes I cut into the steak to check, which of course released juices and left the final presentation looking like a crime scene. Once I began checking temperature from the side and pulling the steak before the final number, everything got easier. Suddenly, I could repeat good results. Medium-rare stopped being a lucky accident and became something I could actually plan.
Roasts drove the lesson home even more clearly. A big roast can fool you because the outside looks finished long before the center catches up. Or worse, the center is basically there, but you leave it in just a bit longer “to be safe,” then slice into a roast that tastes like it attended a dehydration seminar. Using a leave-in probe changed that entire experience. I could watch the temperature climb, notice when it slowed, and pull the roast before carryover cooking pushed it too far. That one habit saved not only the meat but also my mood, which is an underrated side dish.
I also learned that thermometers reduce stress during holidays. Turkey used to feel like an annual trust fall with very high stakes. Everyone had an opinion, nobody had data, and the bird somehow became a family referendum on competence. Once I started checking both the breast and the thigh with confidence, the whole meal became calmer. The turkey rested, the juices stayed put, and I stopped pretending I enjoyed dramatic kitchen uncertainty.
Most of all, using a meat thermometer made cooking feel less like gambling and more like skill. It turned tenderness into something repeatable. It taught me when to stop cooking instead of when to keep panicking. And honestly, that may be the real secret behind superbly tender results: not more seasoning, not more butter, not a mystical chef whisper, but better timing backed by actual temperature.
Conclusion
If you want tender meat consistently, a meat thermometer is not a bonus gadget. It is a core cooking tool. It helps you hit safe temperatures without overshooting, understand carryover cooking, rest meat more intelligently, and adapt confidently whether you are working with steak, chicken, turkey, pork, or burgers. Once you start cooking by temperature instead of guesswork, the results get better, the stress drops, and your dinner becomes much more difficult to criticize.
In short, learn where to place the probe, know your target temperature, and pull the meat before caution turns into overcooking. The thermometer is not there to make cooking complicated. It is there to make your food superbly tender, reliably safe, and dramatically more delicious.