Table of Contents >> Show >> Hide
- What You’ll Learn
- What Tyvek Does (and What It Doesn’t)
- Tools and Materials
- Prep Work That Makes Installation 10x Easier
- Step-by-Step: How to Install Tyvek
- 1) Start at the Bottom (Because Gravity Is Boss)
- 2) Fasten It Correctly (Caps Are Your Friend)
- 3) Overlap Like You Mean It (Shingle-Style Laps)
- 4) Tape and Seal Seams (Especially If You Want Air-Sealing)
- 5) Handle Corners Without Creating Wind Sails
- 6) Flash and Seal Penetrations (Pipes, Vents, Boxes)
- 7) Detail Transitions (Foundation, Roof-Wall, Deck Ledgers)
- Windows & Doors: The Make-or-Break Details
- Common Tyvek Installation Mistakes (and How to Avoid Them)
- Installation Inspection Checklist
- FAQs
- Real-World Installation Experiences: Lessons Installers Learn the Hard Way (500+ Words)
- Conclusion
Installing Tyvek (a.k.a. “housewrap,” “WRB,” or “that crinkly cape your house wears before siding”) is one of those jobs
where the details matter more than your confidence. Do it right and it helps shed water, block wind, and keep your wall
assembly happier for longer. Do it wrong and you’ve basically built a waterslide behind your sidingminus the fun.
This guide walks you through a practical, builder-friendly Tyvek installation that follows common manufacturer best practices:
shingle-style overlaps, smart fastening, clean seam sealing, and proper integration with windows, doors, and flashing.
Always follow the specific instructions for the exact Tyvek product you’re using and your local building code.
What Tyvek Does (and What It Doesn’t)
Tyvek housewrap is a weather-resistive barrier (WRB). In normal wall assemblies, it helps:
- Shed bulk water that sneaks behind your siding.
- Reduce air infiltration when seams and edges are properly sealed.
- Let water vapor escape so walls can dry (in the right direction, with the right assembly).
It does not replace proper flashing, kickout flashing, roof-wall detailing, or good judgment. Think of Tyvek like a raincoat:
useful, but it won’t save you if you leave the zipper open in a hurricane.
Tools and Materials
Keep it simple. You’ll be faster, cleaner, and less likely to invent new swear words.
Materials
- Tyvek WRB roll (HomeWrap, DrainWrap, StuccoWrap, etc.use the one specified for your wall system)
- Compatible seam tape (Tyvek tape or another manufacturer-approved WRB tape)
- Cap nails or cap staples (plastic caps help prevent tearing and reduce leakage at penetrations)
- Flashing tapes/membranes for windows/doors and transitions (self-adhered flashing products)
- Sealant/primer as required by tape/flashing manufacturer (especially in cold or dusty conditions)
- Optional: patch material (WRB patches) for tears and punctures
Tools
- Utility knife with fresh blades (dull blades make Tyvek look like it lost a fight with a lawnmower)
- Tape measure, chalk line, marker
- Hammer or cap stapler / cap nailer
- J-roller for self-adhered flashing tapes (improves bond)
- Ladder/scaffold and basic PPE
Prep Work That Makes Installation 10x Easier
- Confirm your sheathing is ready.
Replace rotten or delaminated sheathing, drive or remove protruding nails, and knock down splinters that could puncture the wrap. - Plan your “shingle-style” path.
Water should always have an easy route down and out. That means you’ll install Tyvek (and flashing) from bottom to top
so upper layers lap over lower layers. - Decide how you’ll handle windows and doors.
Are they installed before the WRB or after? Your flashing sequence depends on this. If you don’t know, pause and find out now. - Pick your fasteners and tape before you climb.
Mixing random tapes and hoping for “the power of positivity” is not a tested building science strategy.
Step-by-Step: How to Install Tyvek
The fundamentals: start low, stay plumb, overlap generously, fasten without turning the wrap into Swiss cheese,
and seal seams like you actually want it to work.
1) Start at the Bottom (Because Gravity Is Boss)
- Begin at a corner. Unroll the first course so it’s straight and plumb. Leave a vertical overlap at corners
(commonly 6–12 inches depending on the guide). - Extend over the sill plate interface. Common guidance is to extend the bottom edge at least a couple inches over the sill plate area
(and detail it to drain appropriately for your foundation type). - Keep the wrap snug, not drum-tight. You want it flat and supported, but overly tight wrap can tear when wind loads hit before cladding goes on.
2) Fasten It Correctly (Caps Are Your Friend)
Mechanically attached housewraps are typically fastened with cap nails or cap staples. The cap spreads load, reduces tearing,
and helps seal the penetration. Staples without caps can tear more easily and may not meet best-practice fastening guidance for many wraps.
- Fastener spacing: Follow the manufacturer schedule for your Tyvek product and wind zone. Many guides call for fastening along stud lines at regular intervals (often in the 12–18 inch range).
- Avoid sensitive areas: Some instructions recommend not fastening too close to window/door rough openingsespecially near the headso flashing integration stays clean.
- Don’t “overfasten.” More holes don’t equal more protection. They equal more holes.
3) Overlap Like You Mean It (Shingle-Style Laps)
When installing the next course, overlap the upper course over the lower course so water sheds to the exterior.
A common minimum is about 6 inches of horizontal overlap for many Tyvek housewrap installations, plus sufficient overlap at vertical seams.
- Horizontal laps: Upper over lower, consistent overlap, no reverse laps.
- Vertical seams: Overlap at least several inches; many manufacturer guides specify around 6 inches and recommend taping these seams.
- Keep it smooth: Big wrinkles can create pathways for water to travel sideways or pool at seams.
4) Tape and Seal Seams (Especially If You Want Air-Sealing)
If your goal is just basic WRB performance, some codes may not require every seam to be taped. But if you want Tyvek to help as an air barrier,
you’ll need to treat seams and transitions as part of an air-control layer: tape/seal them with compatible products and good surface prep.
- Clean surfaces before taping. Dust, frost, or wet wrap reduces adhesion.
- Press tape firmly. A little pressure goes a long way. For some products, a roller improves bond.
- Seal bottom edge if required. Many air-sealing approaches include sealing the bottom course to reduce air leakage at the sill area.
5) Handle Corners Without Creating Wind Sails
- Inside corners: Keep the wrap tight into the corner. Avoid “bridging” that creates a loose flap.
- Outside corners: Overlap cleanly and tape/seal if needed. Corners are high-stress points for wind.
6) Flash and Seal Penetrations (Pipes, Vents, Boxes)
Penetrations are where “pretty good” installs go to die. The best practice is to shingle flashing from bottom to top, and seal around penetrations using
manufacturer-recommended self-adhered flashing products or compatible detailing methods.
- Make a tight cut. Cut the WRB neatly around the penetrationdon’t create a giant “air funnel.”
- Apply flashing in layers. Bottom pieces first, then sides, then topalways lapping so water sheds outward.
- Patch tears immediately. Small rips become big problems once wind gets involved.
7) Detail Transitions (Foundation, Roof-Wall, Deck Ledgers)
Water management is a system, not a sticker. At transitions, you want continuous drainage: WRB laps over flashing, flashing laps over the layer below,
and any critical roof-wall intersections get proper step flashing and kickout flashing as needed.
- Bottom of wall: Use flashing/drip details so water exits the assembly instead of soaking your sill area.
- Roof-wall intersections: Step flashing should integrate with the wall’s drainage plane (your WRB) so water is directed out, not behind.
- Deck ledger areas: Use proper ledger flashing and integrate WRB so water drains outward.
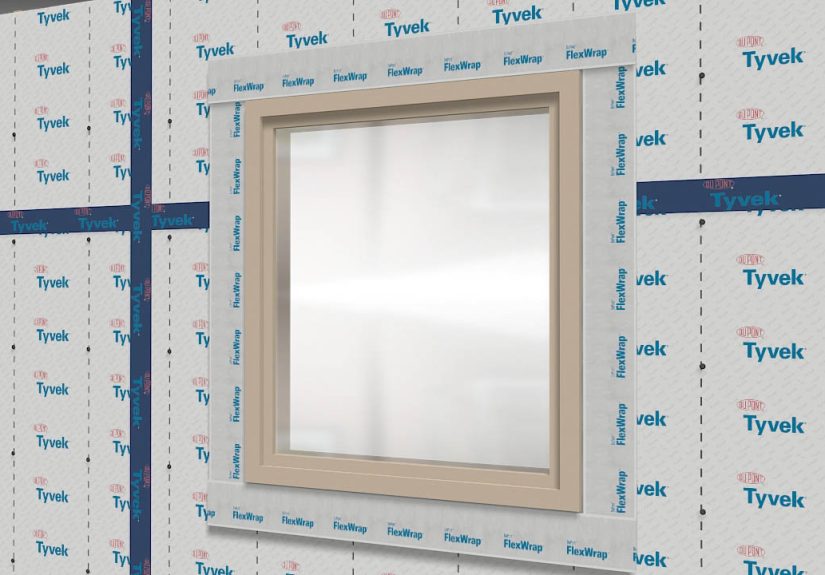
Windows & Doors: The Make-or-Break Details
If housewrap is the raincoat, windows and doors are the zipper. Most leaks happen here because it’s the busiest intersection
of cuts, flanges, tapes, and “I thought the trim would cover it.”
Scenario A: WRB First, Then Window (Common on New Builds)
- Wrap right over the rough opening. Install the Tyvek continuously, then mark the opening location.
- Cut the opening carefully. A common approach is an “I-cut”:
cut across the head, down the sides, and along the sill, then fold the WRB into the opening temporarily.
(Exact cut patterns varyfollow the flashing system instructions you’re using.) - Flash the sill first. This is your “pan” area. Detail it so any water that gets in can drain out.
- Install the window. Fasten per manufacturer instructions.
- Flash jambs next, then head last. Bottom-to-top layering keeps water shedding outward.
- Integrate the head WRB flap. Fold the WRB at the head back down over the head flashing so water can’t run behind it, then tape/seal the diagonal cuts as required.
Scenario B: Window Installed First, Then WRB
This can be done, but you must integrate the WRB with the window flashings in proper shingle fashion. The goal is the same:
WRB and flashing layers should always lap so water drains out.
Pro Tip: Don’t Skimp on Compatibility
Use flashing tapes and sealants that are compatible with both the WRB and the window flange/material. If the tape manufacturer recommends primer in cold weather or dusty conditions,
take the hint. “It’ll probably stick” is not a warranty-approved plan.
Common Tyvek Installation Mistakes (and How to Avoid Them)
Reverse laps (“Fish scales pointing up”)
Any time the lower layer laps over the upper layer, you’ve created a shelf for water. Fix it immediatelydon’t rely on tape as a miracle cure.
Underlapping seams
Small overlaps can open up under wind pressure. Stick to the manufacturer’s overlap requirements and keep seams flat and supported.
Staples without caps
Bare staples can tear the WRB more easily and may leak at the fastener line. Caps are a cheap upgrade with a big payoff.
Dirty, wet, or icy surfaces before taping
Tape adhesion drops fast on dirty or damp surfaces. If you’re taping in cold weather, follow the tape/flashing guidance and use primer if recommended.
Leaving Tyvek exposed too long
Most residential Tyvek housewrap products have a maximum UV exposure window (commonly up to about 120 days for HomeWrap). Get your cladding on within the specified timeframe.
Forgetting drainage needs behind certain claddings
Some assemblies (like stucco) often require special drainage detailing (e.g., proper integration with weep screed). Choose the correct wrap and detail it accordingly.
Installation Inspection Checklist
- All courses installed bottom-to-top with proper shingle-style laps
- Horizontal overlaps consistent and meet manufacturer minimums
- Vertical seams overlapped and taped/sealed as required
- Corners tight, supported, and sealed where specified
- Cap fasteners used, properly spaced, and not overdriven
- Windows/doors flashed in correct sequence (sill, jambs, head)
- Head flap integrated over head flashing (no “water behind zipper”)
- Penetrations sealed with compatible flashing methods
- Bottom-of-wall termination detailed to drain outward
- No big rips, holes, or loose flaps; patches installed where needed
FAQs
Which side of Tyvek faces out?
For many Tyvek housewrap products, the printed side is typically installed facing outward mainly for easier identification and layout.
Follow the specific product’s instructionssome specialty wraps (like drainage-grooved products) have directional requirements.
Do I have to tape every seam?
If you want the WRB to double as part of your air barrier strategy, seam sealing becomes much more important. Some manufacturer guides and field guides
emphasize that a mechanically attached wrap can act as an air barrier when seams are taped/sealed with compatible products.
Code requirements varycheck local rules and your project specs.
Can I use staples?
Many best-practice guides recommend cap staples (staples with plastic caps) or cap nails for mechanically attached housewrap.
Caps help prevent tearing and reduce leakage at the fastener point.
How long can Tyvek stay exposed before siding?
It depends on the exact product. A commonly cited limit for Tyvek HomeWrap is up to four months (120 days) of UV exposure before it should be covered.
Confirm the current spec sheet for your exact wrap.
Do I install Tyvek over or under step flashing at roof-wall intersections?
The wall drainage plane should connect in a way that directs water out. Typically, step flashing is integrated so the WRB/drainage plane sheds water over the flashing
where appropriate, and details like kickout flashing are used to prevent water from dumping behind cladding.
Real-World Installation Experiences: Lessons Installers Learn the Hard Way (500+ Words)
If you spend enough time around job sites, you’ll notice a pattern: almost nobody regrets using better tape, more thoughtful flashing,
or taking five extra minutes to flatten a seam. Plenty of people regret the oppositeusually right after the first wind-driven rain,
or when the inspector points at a reverse lap like it’s a crime scene. Here are common “field lessons” that come up again and again.
1) The Wind Test Is Not a Vibe Check
Installers often underestimate how much wind can punish a loosely fastened wrap before cladding goes on. A wall that looks “fine”
at 4 p.m. can look like a sailboat at 4 a.m. If the wrap is flapping, the fasteners are overdriven, or corners are bridged and unsupported,
the material can tear at the fastener line. Crews who’ve lived through this once tend to become very loyal to cap fasteners and proper spacing.
The funny part is that the fix is boring: keep the wrap snug, fasten on schedule, and don’t leave big loose pockets for wind to grab.
The un-funny part is rewrapping a whole elevation because the first one shredded itself overnight.
2) “I’ll Tape It Later” Turns Into “Why Is This Sticky Dust Not Sticking?”
On paper, it’s efficient to wrap the whole house and tape later. In reality, the longer the wrap sits exposed on a busy site,
the more likely it collects dust, sawdust, drywall powder, or that mysterious grime that appears when nobody is looking.
Then the tape goes on, and two days later it starts peeling at the edges like a cheap sticker on a water bottle.
Installers who get consistently good results treat taping as part of the wrapping rhythm: wrap a course, smooth it, tape key seams while it’s clean,
and keep moving. If conditions are cold or surfaces are questionable, they follow product guidance on primers and pressure (yes, pressurepressing tape is free).
3) Window Flashing Is a Sequence, Not a Suggestion
The most common “almost-right” detail is a window where every piece of tape exists, but the layering is backwards.
Water doesn’t care that you used premium flashing tapeit cares about gravity and overlaps. Crews that do this well adopt a mantra:
sill first, then jambs, then head, and always integrate the WRB so the head flap laps over the head flashing.
People also learn to stop cutting gigantic openings in the WRB. A neat, deliberate cut pattern is easier to tape, easier to integrate,
and less likely to become an air leak. It’s also faster in the long run, because you’re not spending an hour trying to patch your way out of a masterpiece of overcutting.
4) The Bottom of the Wall Is Where Water Wants to Hang Out
Installers who focus only on the field of the wall and ignore terminations often get surprised later.
The bottom edge of the WRB, foundation transitions, and weep details are where drainage either works beautifully or fails quietly for years.
People who’ve repaired rot near sills tend to become “bottom-of-wall” evangelists: detail the lower edge to drain outward, avoid trapping water,
and make sure your flashing and WRB are layered so water exits the wall instead of soaking the framing.
5) Small Tears Become Big Stories
A one-inch tear looks harmlessuntil wind gets behind it, or until it’s right where water concentrates (near a corner, near a roof line, near a penetration).
Installers who stay ahead of problems patch as they go. The patch doesn’t have to be dramatic; it just has to restore continuity and shingle properly.
The biggest “experience-based” takeaway is simple: you’re not installing a sheet, you’re installing a system. The wrap, seams, flashings,
penetrations, and transitions all need to work together. If you treat Tyvek like a decoration, it will perform like one.
Bottom line: the best Tyvek installs look almost boringflat, layered, sealed, and predictable. And boring, in water management, is a compliment.