Table of Contents >> Show >> Hide
- Why Build a Barn Door Yourself?
- Before You Start: Know What a Barn Door Can and Cannot Do
- Planning Your DIY Barn Door
- Tools and Safety
- How to Build a Barn Door Yourself: Step-by-Step
- Best Wood and Design Tips
- Common DIY Barn Door Mistakes
- How Much Does It Cost to Build a Barn Door Yourself?
- Final Thoughts
- Experience-Based Tips and Lessons From Real DIY Barn Door Builds
Building a barn door yourself is one of those home projects that looks wildly impressive, saves space, and makes guests say, “Wait, you made that?” in a tone that can be interpreted as either admiration or genuine shock. Either way, a DIY barn door can add character, privacy, and a custom look to a pantry, office, laundry room, bedroom, or closet without the swing clearance of a traditional hinged door.
The best part? You do not need a fancy workshop worthy of a TV renovation show. You need a solid plan, accurate measurements, the right materials, and enough patience to stop measuring “close enough” and start measuring “correct enough.” This guide walks you through how to build a barn door yourself in a practical, beginner-friendly way, with design ideas, material choices, common mistakes, and real-world tips that make the difference between “custom feature” and “wobbly saloon moment.”
Why Build a Barn Door Yourself?
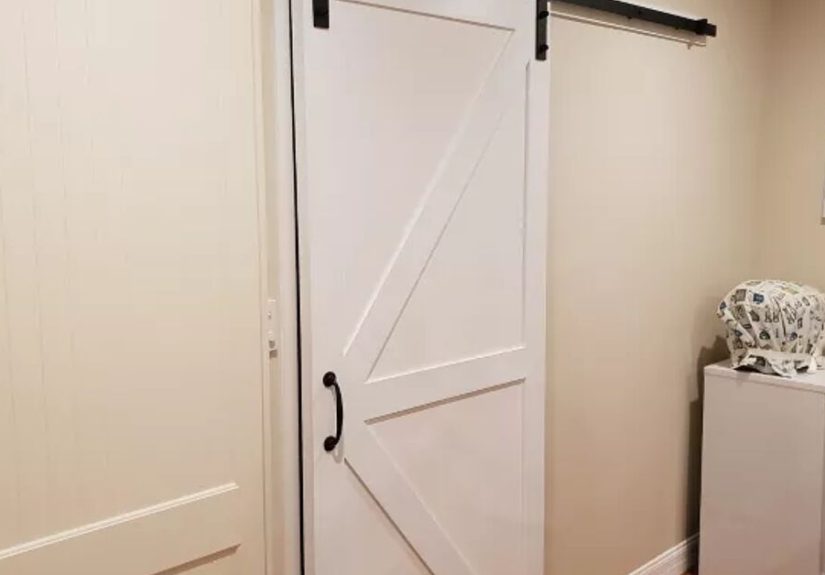
A sliding barn door is functional, stylish, and surprisingly flexible. It can work in rustic, modern farmhouse, Scandinavian, industrial, or even minimalist interiors depending on the finish and hardware you choose. A black metal track with a painted slab-style door feels modern. A stained plank door with diagonal bracing leans classic farmhouse. Same concept, totally different vibe.
Building your own also gives you more control over:
- Door size and proportions
- Wood species and finish
- Panel layout and trim design
- Hardware style and budget
- Total project cost
A store-bought barn door can look great, but a DIY version lets you tailor the dimensions to your opening and avoid paying premium prices for something that still might need modification.
Before You Start: Know What a Barn Door Can and Cannot Do
Let’s set expectations like responsible adults who definitely have not bought hardware before measuring the wall. A barn door is great for visual separation and moderate privacy, but it does not seal as tightly as a standard hinged door. That means it may not be the best choice for every bathroom or noise-sensitive room unless privacy is more “soft suggestion” than “vault-level requirement.”
You also need enough wall space beside the opening so the door can slide fully open. If switches, vents, artwork, or furniture sit in the door’s travel path, that needs to be addressed before installation day turns into muttering day.
Planning Your DIY Barn Door
1. Measure the Opening Carefully
Start by measuring the width and height of the finished opening, including trim if the door will overlap the casing. In most cases, a barn door should be wider and taller than the opening so it covers the gap properly. A common rule is to allow at least a little overlap on each side and at the top. Many DIYers prefer more overlap for better privacy and a more balanced look.
You should also check:
- The available wall space to one side of the opening
- The height between the top of the opening and the ceiling
- Baseboard thickness and trim depth
- Floor level from one side of the opening to the other
If the floor is uneven, your finished door can look crooked even if the track is level. That is the sort of detail you only ignore once.
2. Pick a Door Style
There are several popular approaches when learning how to build a barn door yourself:
- Plank door: Made from vertical boards joined side by side, often with horizontal and diagonal trim.
- Plywood-backed frame door: A stable option that uses plywood as the main panel with decorative trim on top.
- Modern slab-style door: Cleaner lines, less rustic texture, easier to fit into contemporary rooms.
- Chevron or X-brace door: More decorative and eye-catching, but a little more work.
For beginners, a plywood-based door with face trim is often the easiest route because it stays flatter and is easier to size consistently than a wide solid-wood glue-up.
3. Choose the Right Materials
Common materials for a DIY barn door include:
- Plywood for the main panel
- 1×4, 1×6, or similar boards for trim and framing
- Wood glue
- Screws or brad nails
- Sandpaper
- Primer and paint, or stain and topcoat
- Barn door hardware kit with track, rollers, stops, anti-jump pieces, and floor guide
- Handle or pull
Try to choose straight, dry lumber. Boards with dramatic bows, cups, or twists are not charming; they are future problems wearing a pine costume.
Tools and Safety
You will need basic measuring, fastening, sanding, and leveling tools. If you are new to woodworking, have a qualified adult or experienced builder handle the cutting and wall mounting steps, especially when working with heavy doors or power tools. Many home centers can also cut sheet goods and boards to rough size for you, which makes the build much more manageable.
Wear eye protection, work slowly, and never rush the hanging stage. A barn door is not especially forgiving once it is heavy, finished, and hovering near your floor like a stylish wooden moon.
How to Build a Barn Door Yourself: Step-by-Step
Step 1: Finalize Your Dimensions
Sketch the door before you touch any material. Decide the exact finished width and height, then map out the center panel, top and bottom rails, side stiles, and any decorative braces. This helps you estimate material and avoid building a door that is gorgeous but mysteriously too short.
If you are using a plywood panel, your base panel becomes the core of the door. If you are using planks, lay them out dry first to check the look and total width.
Step 2: Build the Main Door Panel
For a plywood-based door, cut the sheet to your finished size. Then add trim boards around the perimeter to create a framed look. You can also add a center brace, chevron pattern, or faux panel detail depending on your design.
For a plank-style door, align your boards edge to edge and secure them from the back or reinforce them with front-facing trim. Many builders use horizontal rails and a diagonal brace or X-pattern to stiffen the assembly and achieve the classic barn look.
The goal is a square, flat panel. Check for squareness as you assemble, because a door that starts slightly off can become annoyingly obvious once it is hanging on a straight track.
Step 3: Sand Everything Well
Sand the face, edges, and trim before finishing. Barn doors are touched constantly, so sharp corners and rough grain are not your friends. Ease the edges slightly for a more finished feel. Spend extra time where hands will land, including the handle area and door edges.
Good sanding is the difference between “custom-built” and “weekend project that still owes you an apology.”
Step 4: Prime, Paint, or Stain
Choose a finish that matches your room:
- Painted white or black: Clean, modern, versatile
- Warm wood stain: Rustic and classic
- Gray wash or matte finish: Softer, contemporary farmhouse style
Finish both sides and all edges for a more stable, polished result. Let everything cure fully before installing hardware. Rushing finish work is how fingerprints become a permanent design choice.
Step 5: Mark Hardware Placement on the Door
Most barn door kits include specific measurements for roller placement, edge clearances, and door thickness compatibility. Follow the manufacturer’s layout for your kit, not your inner optimist. Pre-mark and double-check the holes before drilling or fastening the hangers.
Install the handle at a comfortable height and make sure any inside pull will not interfere with the wall or jamb when the door slides closed.
Step 6: Install the Header or Backer Board
This is one of the most important parts of the project. The track must be anchored securely into framing or a properly mounted header board. If you mount a heavy door into weak material, you are not installing décor. You are scheduling a future event.
The header board should be level, sized appropriately for the track, and fastened securely into studs. Take your time here. If the header is off, the whole installation feels off.
Step 7: Mount the Track
Use a level to position the track. Install the standoffs or brackets according to the kit instructions, then attach the rail securely. Add end stops and any anti-jump components included with the hardware.
Before hanging the door, confirm:
- The track is level
- The fasteners are tight
- The wall clearance matches your hardware requirements
- The door has room to slide fully open
Step 8: Hang the Door
This is a two-person step. Lift the door carefully, set the rollers onto the track, and check operation. Slide it slowly from side to side to make sure it moves smoothly and stays aligned.
Install the floor guide next. This keeps the door from swinging outward and helps it travel in a straight line. Some systems require a groove in the bottom of the door, while others use a surface-mounted guide. Match your door construction to your guide style before final assembly.
Step 9: Fine-Tune the Fit
Once the door is hanging, check the bottom gap, side overlap, and overall movement. Adjust the rollers if your hardware allows it. Add soft-close accessories if desired. This is also the moment to decide whether you are thrilled with your work or simply relieved it slides without sounding like a shopping cart.
Best Wood and Design Tips
If you want a more stable, beginner-friendly build, plywood with trim is often the safest bet. If you love the look of real planks, use straight material and allow time for the wood to acclimate indoors before building. Wood moves with humidity, and a door that looks flat in the garage may develop opinions once it enters your climate-controlled house.
For a high-end look:
- Keep trim spacing symmetrical
- Use fewer decorative lines in modern rooms
- Paint the header board to match the wall or trim
- Coordinate hardware finish with nearby fixtures
- Use a recessed pull on the inside when clearance is tight
Common DIY Barn Door Mistakes
- Making the door too small for the opening
- Ignoring the door’s travel path on the wall
- Using warped or wet lumber
- Installing the track without solid support
- Forgetting the floor guide
- Skipping finish on edges and back
- Assuming every hardware kit works with every door thickness
Most barn door problems are not dramatic craftsmanship failures. They are planning failures. Measure well, read the hardware instructions, and treat “I’ll figure it out later” like the red flag it is.
How Much Does It Cost to Build a Barn Door Yourself?
The total cost depends on the size, wood species, and hardware you choose. A simple painted plywood-and-trim door with basic hardware can be quite budget-friendly compared with custom prebuilt options. A premium solid-wood door with designer hardware, soft-close features, and custom pulls can cost significantly more.
In many cases, the hardware is the biggest single expense. It is worth spending for a well-reviewed kit that matches your door weight and thickness. A beautiful door on bad rollers is still a bad experience.
Final Thoughts
If you have been wondering how to build a barn door yourself, the project is absolutely doable with careful planning and a realistic design. The smartest approach is not the fanciest one. It is the one that fits your opening, your wall, your skill level, and your patience. Start with accurate measurements, use stable materials, choose hardware that fits your door, and do not treat the header installation like a casual suggestion.
A good DIY barn door should slide smoothly, cover the opening properly, and look intentional in the room. When done right, it becomes one of those rare projects that is equal parts useful and show-off worthy. In other words, it is the home-improvement version of baking bread that actually rises.
Experience-Based Tips and Lessons From Real DIY Barn Door Builds
One of the most common experiences people have after building a barn door is realizing that the building part is only half the story. The other half is all about planning around the room. First-time builders often focus on the door face, stain color, and hardware style, then suddenly remember they also need a clear wall for the door to slide across. That is why experienced DIYers almost always say the same thing: walk the full path of the door before you buy anything. Check for light switches, outlet covers, return vents, thermostat locations, framed art, and chunky baseboards. A barn door does not care that your wall styling looked perfect before it arrived.
Another common lesson is that “straight enough” lumber usually is not. A board that looks acceptable at the store can reveal a twist once it is laid flat at home. Builders who have done this project more than once often recommend buying extra material so you can reject the most stubborn pieces. They also learn quickly that letting wood sit inside the house for a while before assembly is not fussy behavior. It is prevention. A door built from lumber that has not adjusted to indoor conditions can shift later, which shows up as seams, cupping, or trim lines that no longer look crisp.
There is also a very relatable moment during installation when the door finally goes on the track and everyone expects magic. Instead, it may rub slightly, hang a little low, or reveal that the floor is less level than anyone hoped. This is normal. Seasoned DIYers expect a small adjustment phase. They keep a level nearby, move slowly, and fine-tune the hardware instead of assuming the first hang is the final hang.
Finish choice also becomes more emotional than expected. Many people start out wanting a deeply rustic, weathered look, then get the first coat of stain on and realize their room actually wants something cleaner and lighter. Others paint the door a safe neutral and later wish they had gone bolder. The lesson here is simple: test finishes on scrap first. Tiny test boards save enormous regret.
Then there is the handle placement issue, which seems minor until the door is closed and the pull lands exactly where your knuckles hate it. Builders who have learned the hard way will tell you to mock up handle placement with tape before fastening anything permanently.
Finally, nearly everyone who successfully builds a barn door says the same thing afterward: the project looked intimidating from a distance but became manageable once broken into stages. Measure. Design. Build flat. Finish well. Mount securely. Adjust patiently. That is really the rhythm. Not glamorous, but effective. And once the door glides smoothly for the first time, the satisfaction is immediate. It feels custom, clever, and a little addictive. Which is why so many people finish one barn door and immediately begin looking around the house for a suspiciously ordinary closet that could use a dramatic upgrade.