Table of Contents >> Show >> Hide
- How to Choose the Right “Cheap” Upgrade
- Curb Appeal That Pays Off (Even If You Never Sell)
- 1) Paint the Front Door a Bold, Classic Color
- 2) Swap in Modern House Numbers
- 3) Upgrade the Porch Light (and the Bulb)
- 4) Give the Mailbox a Makeover
- 5) Add Fresh Mulch and Crisp Bed Edging
- 6) Power Wash the “Gray Film of Time” Off Everything
- 7) Refresh the Welcome Zone
- 8) Clean Windows and Touch Up Trim
- Lighting and Hardware: The Fastest “New House” Feeling
- 9) Replace Yellowed Switch Plates and Outlet Covers
- 10) Add Dimmer Switches in Key Rooms
- 11) Install Under-Cabinet Lighting
- 12) Switch to LED Bulbs (Strategically, Not Obsessively)
- 13) Add Smart Plugs or Timers for “Invisible” Convenience
- 14) Replace Cabinet Knobs and Drawer Pulls
- 15) Update Door Handles in High-Traffic Spots
- Kitchen Refreshes That Don’t Require a Full Remodel
- Bathroom Upgrades That Feel Like a Spa (Not a Construction Site)
- Energy Efficiency and Comfort (The Upgrades That Pay You Back)
- Conclusion: Your House Doesn’t Need “More,” It Needs “Better”
- of Hard-Earned Experience (So You Don’t Repeat My Mistakes)
You don’t need a reality TV crew (or a second mortgage) to make your house feel newer, brighter, and more “wow.”
The secret is picking high-impact upgrades: the ones people notice immediately, feel every day, andbonusmight
help your home value when it’s time to sell. The best part? Most of these are weekend-friendly DIY home improvement
projects, and many cost less than a fancy dinner for two.
Below are 30 budget-friendly home upgrades that punch way above their price tagorganized so you can choose your
own adventure: curb appeal, lighting, kitchen and bathroom refreshes, energy efficiency, and storage. Let’s make
your place look like you “have it together” (even if you’re still storing batteries in a random mug).
How to Choose the Right “Cheap” Upgrade
Low-cost home improvements work best when they solve one (or more) of these:
- First impressions: what you see in the first 10 seconds (curb appeal, entryway, lighting).
- Daily friction: annoying little things (drafts, dim rooms, clutter, sticky drawers).
- Perceived cleanliness: grout, caulk lines, scuffs, dingy switchestiny details that scream “maintenance backlog.”
- Comfort + savings: air leaks, hot water waste, inefficient lightingquiet money leaks.
A good rule: if you can finish it in a day and it changes how the space feels, it’s probably high impact.
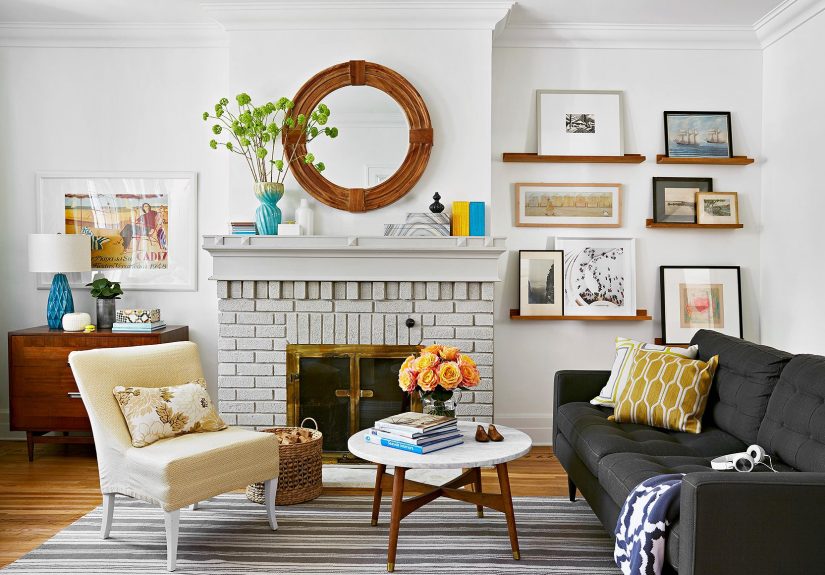
Curb Appeal That Pays Off (Even If You Never Sell)
1) Paint the Front Door a Bold, Classic Color
A front door repaint is the definition of “small job, big payoff.” Choose a color that fits your exteriorclassic black,
deep navy, forest green, or a rich wood tone. Upgrade the vibe with a clean satin or semi-gloss finish.
2) Swap in Modern House Numbers
If your current numbers look like they were installed during the dial-up era, replace them. Go larger, higher-contrast,
and easier to read from the street. It’s a tiny change that makes your home look instantly more intentional.
3) Upgrade the Porch Light (and the Bulb)
A dated porch fixture can drag down your whole facade. Replace it with a clean, simple style, then use an LED bulb
with a warm tone (think cozy, not interrogation room). Your entry becomes “inviting,” not “mysterious.”
4) Give the Mailbox a Makeover
New mailbox, new post, or even just fresh paintthis is one of the cheapest ways to make the front of your home look cared for.
Add reflective numbers if delivery drivers regularly play “guess that house.”
5) Add Fresh Mulch and Crisp Bed Edging
Mulch is like mascara for your landscaping. It hides imperfections and makes everything pop. Edge the beds with a spade
(clean curve lines), then lay mulch for a tidy, magazine-ready border.
6) Power Wash the “Gray Film of Time” Off Everything
Sidewalks, patios, steps, sidingpressure washing reveals the color your house used to be. If you don’t own a washer,
many hardware stores rent them. Warning: it’s wildly satisfying and may become your new personality.
7) Refresh the Welcome Zone
Add a simple doormat, a pair of matching planters, and one “anchor” item like a bench or a wreath. The goal is to make
the entry feel styled, not like a loading dock for Amazon boxes.
8) Clean Windows and Touch Up Trim
Clean glass + crisp trim = instant “well maintained” energy. Touch up peeling paint on window trim, fascia, or railings.
This is especially powerful before photos, guests, or a seasonal family gathering you didn’t ask for.
Lighting and Hardware: The Fastest “New House” Feeling
9) Replace Yellowed Switch Plates and Outlet Covers
This is one of the most overlooked inexpensive home upgrades. New plates take minutes, cost little, and make rooms
look cleaner. Bonus: you stop noticing the weird paint smears from 2014.
10) Add Dimmer Switches in Key Rooms
Dimmers are mood control. Put them in dining areas, bedrooms, and living rooms to make lighting flexiblebright for cleaning,
softer for relaxing. It’s a small DIY upgrade that makes your home feel more high-end.
11) Install Under-Cabinet Lighting
Under-cabinet lights make kitchens look expensive, even when your cutting board collection is… ambitious. Battery or plug-in
LED puck lights are easy for beginners and instantly brighten countertops for cooking and photos.
12) Switch to LED Bulbs (Strategically, Not Obsessively)
LEDs use less energy and last longer, so you’ll save money without thinking about it. Start with the most-used fixtures:
kitchen ceiling, living room, hallway, exterior lights, and bathroom vanity.
13) Add Smart Plugs or Timers for “Invisible” Convenience
Put lamps on timers, schedule holiday lights, or automate a coffee station. Smart plugs are an easy smart home upgrade
that feels futuristic while costing less than a single “premium” throw pillow.
14) Replace Cabinet Knobs and Drawer Pulls
Hardware is jewelry for your kitchen and bathroom. Matte black, brushed nickel, or warm brass can change the whole style.
Measure the hole spacing before you buy, unless you enjoy drilling extra holes as a hobby.
15) Update Door Handles in High-Traffic Spots
Swap handles on the front door (if appropriate), interior doors, and closets for a consistent finish. Matching hardware
throughout a home reads “renovated,” even if you only renovated your willpower.
Kitchen Refreshes That Don’t Require a Full Remodel
16) Paint the Walls in a Modern, Neutral Shade
Paint is the MVP of affordable home renovation. Choose a soft white, warm greige, or light neutral that brightens the space.
Prep matters: patch holes, sand rough spots, and cut clean linesyour future self will thank you.
17) Peel-and-Stick Backsplash for a “Did You Remodel?” Moment
Peel-and-stick tiles can create a dramatic focal point with less cost and commitment than traditional tile. Clean the wall well,
measure twice, and use a level. It’s a budget kitchen update that photographs beautifully.
18) Re-Caulk the Sink and Counter Seam
Old caulk gets moldy, cracked, and sadlike a banana you forgot in a gym bag. Removing and re-caulking around the sink
and backsplash line is cheap, fast, and makes the kitchen look cleaner instantly.
19) Upgrade the Faucet (or At Least the Aerator)
A new faucet is a small splurge that makes daily life feel nicer. If replacing the faucet feels like “too much plumbing energy,”
start with a new aerator for a better flow and less splash.
20) Add Shelf Risers and Pull-Out Bins in Cabinets
Storage upgrades are sneaky high impact. Shelf risers double usable space for plates and pantry items. Pull-out bins or
sliding trays make deep cabinets less like a black hole of lost Tupperware lids.
21) Create a Countertop “Drop Zone”
Choose one tray or bowl for keys, mail, and chargers. When clutter has a home, counters look cleaner. This is the simplest
upgrade for better home organizationand it costs almost nothing.
Bathroom Upgrades That Feel Like a Spa (Not a Construction Site)
22) Replace the Showerhead with a Water-Saving Model
A WaterSense-labeled showerhead can reduce water use while keeping a satisfying spray. It’s a small swap that can lower
both water and energy costs over timeand it takes about as long as scrolling through a streaming menu.
23) Re-Caulk the Tub or Shower
Fresh caulk is a glow-up for bathrooms. Remove the old bead completely, clean and dry the surface, then apply a smooth line.
Your bathroom will look cleaner even if you still own three nearly-empty shampoo bottles.
24) Brighten with a New Vanity Light
If your vanity light makes you look like you’re auditioning for a zombie movie, replace it. Choose a fixture with good coverage,
then use flattering bulbs. This is high-impact, low-cost, and improves daily routines immediately.
25) Upgrade the Mirror (or Add a Frame)
Builder-grade mirrors are fine… in the way plain toast is “fine.” Swap for a framed mirror or add a DIY frame kit to your existing one.
It’s an easy way to make the bathroom feel designed rather than default.
26) Add Storage Where You Actually Need It
Over-the-toilet shelves, slim rolling carts, adhesive shower caddies, and drawer organizers make bathrooms feel calmer.
Less countertop clutter reads “hotel,” not “teenager’s first apartment.”
Energy Efficiency and Comfort (The Upgrades That Pay You Back)
27) Weatherstrip Exterior Doors
Drafty doors waste heating and cooling and make rooms uncomfortable. Add adhesive weatherstripping, replace worn door seals,
and install a door sweep. It’s one of the best low-cost energy-saving home improvements.
28) Caulk Around Windows and Exterior Gaps
Seal cracks around window frames, trim, and small exterior penetrations. Less air leakage means a more comfortable home
and less HVAC strain. It’s a classic “small tube of caulk, big difference” project.
29) Seal Attic Air Leaks (Where the Big Savings Hide)
If you want a high-impact upgrade that isn’t glamorous but is wildly effective, look to the attic. Seal obvious gaps around plumbing,
wiring, and the attic hatch area. Your house will hold temperature betterlike putting a lid on a pot.
30) Insulate Hot Water Pipes (and Consider a Water Heater Jacket)
Insulating hot water pipes helps water stay hotter on the way to your faucetso you waste less while waiting for heat.
In some homes, adding a water heater jacket also improves efficiency. Small materials, long-term comfort.
Bonus Move: Do a “One-Room Energy Sweep”
Pick one room and eliminate the little leaks: seal the door, swap the bulb, add a smart plug, and close gaps you can feel.
The compounding effect is what makes budget upgrades feel dramatic.
Conclusion: Your House Doesn’t Need “More,” It Needs “Better”
High-impact home improvement isn’t about doing everything. It’s about doing the right thingsprojects that improve
comfort, curb appeal, and daily function without turning your home into a never-ending renovation show.
If you’re not sure where to start, pick one category:
curb appeal (fastest visual win), lighting (biggest mood shift), or air sealing
(quiet savings you feel every month). Do two or three of these and your home will look and live betterwithout the stress.
of Hard-Earned Experience (So You Don’t Repeat My Mistakes)
I used to think “DIY home improvement” meant confidently walking into a store, buying exactly what I needed, and finishing
before lunch. That was adorable. Here’s what actually happens: you start strong, realize you don’t own the right screwdriver,
discover your wall is not remotely level, and suddenly it’s 9:47 p.m. and you’re watching a tutorial called “How to Remove Caulk
Without Losing Your Mind.”
The biggest lesson: prep is the project. Painting a door isn’t painting a doorit’s cleaning it, sanding the glossy spots,
taping edges, and choosing a day without surprise rain. The paint is the easy part. The prep is what makes it look like a professional
did it. Skip prep and your “quick refresh” becomes “why is it peeling like sunburn?”
Second lesson: buy the boring tools. A decent caulk gun, painter’s tape that actually sticks, a good brush for cutting-in,
and a little level will save you from 80% of beginner problems. A cheap tool can turn a 20-minute job into a two-day argument with
your own house. Also, keep a few microfiber cloths around. They clean everything and make you feel like a responsible adult.
Third: measure first, then measure again like you’re being graded. Cabinet pulls are the classic trap. You fall in love with
a style, order them, and then realize your old hardware has a different hole spacing. Now you’re either returning everything or drilling
new holes while questioning your life choices. Same goes for peel-and-stick backsplash: plan the layout so your cuts end in corners,
not right where your eye lands.
Fourth: don’t underestimate “tiny gross.” Old caulk, dingy switch plates, dusty vents, and grimy grout lines make a space feel
older than it is. Cleaning or replacing those small items is weirdly transformative. The first time you re-caulking a sink line cleanly,
you will stare at it with pride. You’ll also wonder why you waited five years. This is normal.
Finally, remember: momentum matters. A lot of people stop because they think upgrades have to be huge. They don’t. Do one small project
that’s visible every daylike under-cabinet lighting or a front door refreshand you’ll feel the difference constantly. That daily “nice”
feeling is what gets you to do the next one. Home improvement doesn’t have to be dramatic; it just has to be consistent. And if all else fails,
add fresh mulch. Mulch is the universal apology for neglected landscaping.