Table of Contents >> Show >> Hide
- Before You Dig: Make Sure It Is Really a Wild Grape
- Should You Transplant the Whole Vine or Start a New One?
- The Best Time to Transplant Wild Grapes
- Choose the Right New Site
- How to Transplant Wild Grapes Step by Step
- Aftercare: What the Vine Needs in Year One
- When Layering or Cuttings Are the Better Move
- Common Mistakes to Avoid
- Final Thoughts
- Practical Experiences and Lessons Gardeners Learn the Hard Way
Wild grapes are the acrobats of the plant world. Give them one fence, one tree, or one forgotten corner of the yard, and they will treat it like an all-access climbing gym. That vigor is exactly why some gardeners want to move them: maybe you found a healthy vine in the woods, maybe an old family grape is growing where a shed is about to go, or maybe you want that rustic, rambling look without letting the vine swallow a maple whole.
The good news is that transplanting wild grapes can work. The less-cheerful news is that mature vines do not always cooperate. Grapes are woody, long-lived, deep-rooted plants, so the bigger and older the vine, the more likely it is to act like you have personally offended its ancestors. Still, with the right timing, smart pruning, careful digging, and realistic expectations, you can give a wild grapevine a strong second life.
This guide covers when to move a wild grapevine, how to prepare the new site, what to do step by step, and when you should skip the shovel drama and propagate the plant by layering or cuttings instead. In other words: fewer gardening regrets, more grapes.
Before You Dig: Make Sure It Is Really a Wild Grape
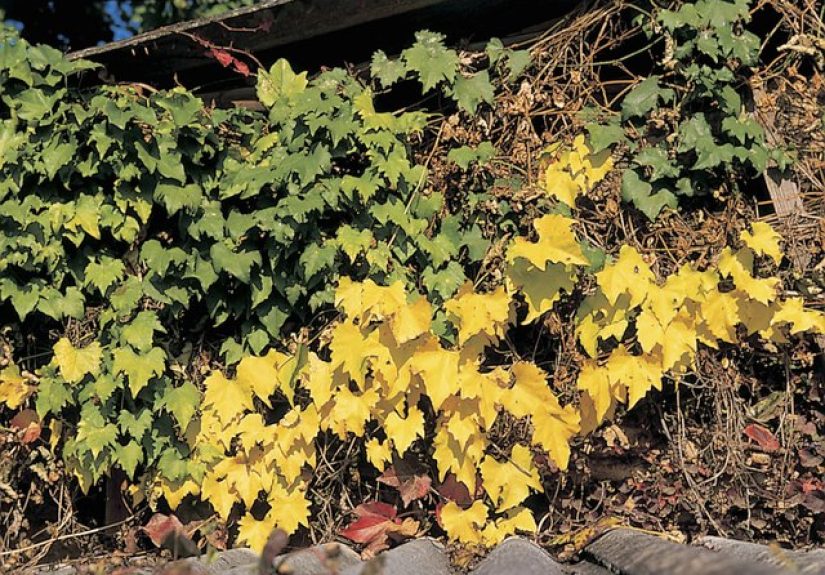
Before transplanting wild grapes, identify the vine correctly. True wild grapes belong to the Vitis group and typically climb with tendrils. Their berries contain several seeds. One important look-alike, Canada moonseed, is toxic and can be mistaken for wild grape at first glance. Moonseed fruit contains a single crescent-shaped seed rather than several round or oval seeds. If the vine is fruiting and you are not one hundred percent sure what it is, do not guess. Gardening is supposed to be adventurous, not medically memorable.
You should also make sure you have permission to collect the plant. If the vine is on your property, great. If it is on private land, ask the landowner first. If it is on public land, collection rules may apply and permits may be required. “Wild” does not mean “free for the taking.” It just means the plant has never heard of your landscape plan.
Should You Transplant the Whole Vine or Start a New One?
This is the question that saves gardeners the most heartache. Young wild grapevines are usually the best transplant candidates. If the vine is only a year or two old, has a stem around pencil thickness, and has not yet built a monster root system, your chances are much better. Older, established vines can be moved, but they are harder to dig, harder to balance, and slower to recover.
If the vine is thick, tangled, and wrapped around a tree like it pays rent there, transplanting the whole thing may not be the smartest route. In that case, propagation is often easier than relocation. Layering a healthy cane or taking dormant hardwood cuttings usually gives you a younger plant with less transplant shock and far less sweating on your part.
So here is the simple rule: move young vines, think twice about middle-aged vines, and assume very old vines will test your patience, your back, and your vocabulary.
The Best Time to Transplant Wild Grapes
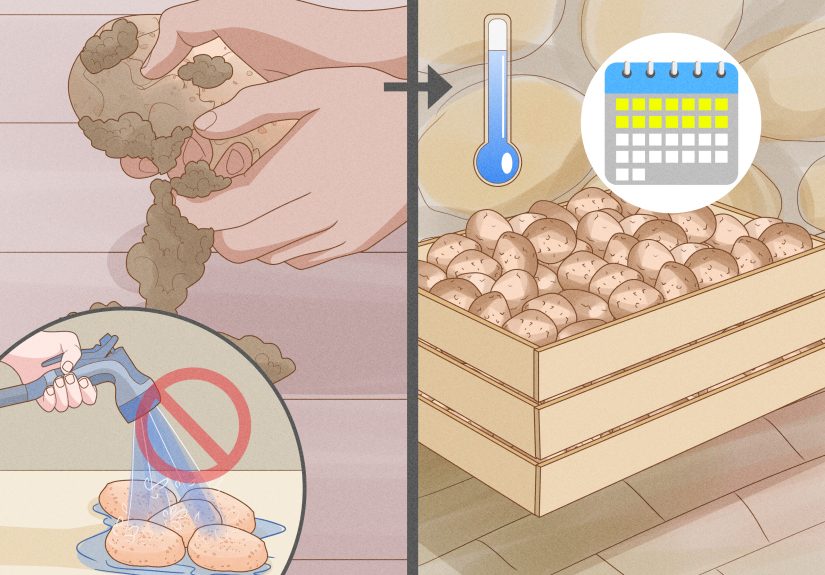
The best time to transplant wild grapes is while the vine is dormant, ideally in late winter or early spring before active growth begins. That means before bud break, before tender shoots appear, and definitely before the vine decides it is showtime. Dormant transplanting reduces stress because the plant is not trying to support a full canopy of leaves while rebuilding lost roots.
In regions with mild winters, late fall after leaf drop can also work. But for many home gardeners, early spring is simpler because you can see the plant more clearly, the soil is workable, and the vine has an entire growing season to settle in.
Avoid moving wild grapes during hot weather, during active summer growth, or when the soil is waterlogged. That combination tends to produce the gardening equivalent of a sad shrug.
Choose the Right New Site
Wild grapes may survive in rough places, but survival is not the same as thriving. If you want a healthy vine that grows well after transplanting, give it a better home than the one it is leaving.
Look for these site conditions:
- Full sun: At least six hours daily, and more is better for growth and fruiting.
- Well-drained soil: Grapes dislike soggy feet and persistently wet ground.
- Slightly acidic soil: A pH around 6.0 to 6.5 is ideal, though grapes tolerate a broader range.
- Good air movement: Helpful for reducing disease pressure.
- Room to climb: Install or plan for a trellis, fence, arbor, or sturdy support.
- Low weed competition: New vines hate fighting established turf and perennial weeds for water.
If your site is rocky or tends to flood, a raised bed can improve drainage and root development. Also avoid frost pockets if you can. Grapes wake up early in spring, and tender new shoots are not fans of surprise cold snaps.
How to Transplant Wild Grapes Step by Step
1. Prune First, Then Dig
Start by pruning the vine before or at the time of transplanting. This is especially important if you are moving a wild vine with a lot of top growth and inevitably losing a chunk of the root system. Reduce the vine to one strong cane or a short framework, leaving just a few healthy buds. For a small wild vine, two to three buds on the retained cane is a practical target.
This feels harsh, but it helps balance root loss with top growth. If you try to move a leafy octopus and keep every whip attached, the reduced root system may not be able to support it. Think of pruning as taking stress off the vine, not punishing it for being enthusiastic.
2. Dig as Wide as You Reasonably Can
Use a sharp spade and dig around the vine in a wide circle rather than trying to yank it straight up. Your goal is to preserve as many fibrous roots as possible. With young vines, that may mean a manageable root ball. With older vines, you will likely need to cut some roots. That is normal.
Try to follow the main roots outward and lift the vine carefully. If the soil is dry, water the area lightly the day before digging so the ground is easier to work and the roots are less likely to desiccate. Do not turn the site into pudding, though. Mud wrestling belongs in a different hobby.
3. Keep the Roots Moist the Entire Time
This part matters a lot. Exposed roots dry out fast, and drying is one of the biggest reasons bare-root plants fail after transplanting. As soon as the vine is dug, wrap the roots in damp burlap, moist paper, or a plastic covering that keeps moisture in without baking the roots in direct sun.
If the roots are badly exposed, you can soak them briefly before planting. Remove broken roots and trim excessively long or ragged ends so the root system fits the planting hole without being twisted into a knot.
4. Prepare a Generous Planting Hole
Dig the new hole before the roots sit around getting grumpy. The hole should be large enough to spread the roots out naturally. For a bare-root or mostly bare-root vine, that usually means wider than the root spread and deep enough so the roots can point downward and outward without bending sharply.
If the sides of the hole are slick from augering or heavy clay, rough them up with your shovel. You want roots to move into the surrounding soil, not sit inside a polished dirt bucket.
5. Replant at About the Same Depth
Set the vine at roughly the same depth it was growing before, with the crown just above or near the soil line. Spread the roots over a small mound of soil if needed so they sit naturally. Backfill with the native soil, working it gently around the roots to remove large air pockets.
Do not get fancy with huge amounts of peat moss, random “miracle” amendments, or a fertilizer dump in the hole. Grapes do best when their roots transition into the surrounding soil rather than lounging in a soft little spa that ends abruptly at hard native ground.
6. Water Thoroughly Right Away
Once planted, water deeply to settle the soil around the roots. This is not the time for a decorative sprinkle. You want enough water to remove air pockets and create good soil-to-root contact. Add a little more soil if the backfill settles too much after watering.
7. Provide Support Immediately
Even a young transplanted vine benefits from a stake, string, or nearby trellis. Choose one shoot to become the main trunk as new growth begins, and remove weak competing shoots once the vine starts growing. Training early makes the vine easier to manage later and reduces the chance that it turns into a botanical hairball.
Aftercare: What the Vine Needs in Year One
The first year after transplanting is not about fruit. It is about recovery, root growth, and building a solid framework. If your newly moved wild grape gives you clusters the first year, remove them. Yes, all of them. I know. It hurts. But fruiting steals energy the plant needs for establishment.
Focus on these basics:
- Consistent moisture: Keep the soil evenly moist, especially in the first growing season.
- Weed control: Keep grass and weeds away from the base so the vine does not compete for water and nutrients.
- Light mulch: Use a modest layer if needed to conserve moisture, but keep it away from the stem.
- Shoot selection: Keep the strongest shoot for the trunk and remove extras.
- Patience: Do not expect instant beauty, instant grapes, or instant gratitude.
Fertilizer should be used cautiously. A soil test is the best guide. If the site has reasonable soil and the vine is newly moved, overfeeding is more likely to create weak, excessive growth than to help recovery. Lime should also be added only if a soil test says it is needed.
When Layering or Cuttings Are the Better Move
If your wild grapevine is older, valuable, or impossible to dig cleanly, propagation may be the smarter option.
Layering
Layering is one of the easiest ways to create a new plant from an existing vine. Bend a healthy one-year cane to the ground, bury part of it, and leave the tip exposed. The buried section forms roots while still attached to the parent vine. Once it is well rooted, you can sever it and move it. This method is especially handy when you want better survival and less transplant shock.
Hardwood Cuttings
During dormancy, you can also take cuttings from one-year-old canes. A cutting with several buds can be rooted in a nursery row, propagation bed, or container setup. This route is often more practical than trying to relocate a deeply established woodland vine in one heroic afternoon.
If your goal is simply “I want this grape in a better place,” layering and cuttings deserve serious respect.
Common Mistakes to Avoid
- Moving the vine after bud break: The plant loses water fast and transplant shock gets worse.
- Letting roots dry out: Even short exposure can reduce survival.
- Choosing a shady site: Grapes may live, but they will not perform well.
- Planting in soggy soil: Wet feet invite weak growth and root trouble.
- Keeping too much top growth: A reduced root system cannot support a jungle of canes.
- Expecting a mature harvest immediately: Recovery comes before production.
- Skipping support: A grape without training quickly becomes a design problem.
- Guessing on identification: Wild grape look-alikes are not a place for confidence-based gardening.
Final Thoughts
Transplanting wild grapes is absolutely possible, but success depends on understanding one very important truth: younger vines move better, older vines fight back, and dormant-season timing is your best friend. Give the vine sun, drainage, moisture, support, and a ruthless first pruning, and you dramatically improve your odds.
If the vine is huge or sentimental, do not assume the only solution is digging it up whole. Layering and dormant cuttings can preserve the plant with less stress and better long-term success. In grape terms, that is not cheating. That is gardening with a functioning spine.
Practical Experiences and Lessons Gardeners Learn the Hard Way
One of the most common experiences people have with transplanting wild grapes is underestimating just how attached the vine is to its original spot. A young vine growing along a fence may come out with a decent root system and only moderate complaining. A bigger vine growing out of a hedgerow, on the other hand, often seems to be rooted in another ZIP code. Gardeners start with cheerful confidence, then discover roots snaking under rocks, through old mulch, and around tree roots like buried extension cords. That moment usually changes the plan from “I’ll move the whole thing this morning” to “Maybe I should have brought water, patience, and a second shovel.”
Another frequent lesson is that a transplanted wild grape rarely looks impressive right away. In fact, it may look like a bundle of sticks that has reconsidered its life choices. This is normal. Many successful growers say the hardest part is trusting the process when the vine sits still for weeks, then suddenly pushes a few tentative shoots. The first season is often quieter than people expect. The vine may not explode with growth, and that does not automatically mean failure. Grapes are often rebuilding below ground before they put on much of a show above ground.
Gardeners also learn quickly that pruning feels scary until they see the results. Leaving too much top growth after transplanting is a classic mistake because the vine looks healthier when it is bigger. Unfortunately, the root system usually disagrees. People who cut the vine back hard often report better recovery because the plant is not trying to support a huge top with a reduced underground engine. It can feel dramatic to prune a wild grape down to a few buds, but sometimes dramatic is exactly what saves it.
Site choice is another place where experience teaches fast. A vine moved from partial woodland edge into a hot, sunny trellis spot often grows better than expected, but only if the soil drains well and the plant gets enough water during establishment. A vine moved into heavy, wet soil may sulk, stall, or decline. Many gardeners discover that sunlight alone is not the magic ingredient. Sun plus drainage plus support is the real trio.
Then there is the emotional side of the job. Wild grapes are often moved for sentimental reasons: a family homestead vine, a patch found near a childhood home, or a volunteer seedling with especially good fruit. In those cases, the smartest gardeners often hedge their bets. They transplant the best young sucker they can find, but they also take a few dormant cuttings or set a cane for layering. That way, if the main transplant fails, the genetics are not lost. It is a practical move, but it also gives peace of mind.
Finally, experienced growers tend to agree on one simple truth: wild grapes reward patience more than fussing. They do not need daily interference, mystery tonics, or inspirational speeches. They need moisture, space, sunlight, and time. The gardeners who do best are usually the ones who prepare well, move the vine while dormant, train it early, and then resist the urge to micromanage every leaf. In short, the best experience with transplanting wild grapes usually comes from doing the important things carefully and the unimportant things not at all.