Table of Contents >> Show >> Hide
- Why a French Cleat Wall Beats Pegboard (Most Days of the Week)
- French Cleat Basics (So the Wall Doesn’t “French Yeet” Your Tools)
- Plan Your Tool Wall Like a Workshop Designer (Without Wearing a Black Turtleneck)
- Materials and Tools Checklist
- Step-by-Step: Build and Install the French Cleats
- How to Build Tool Holders That Don’t End Up in a Drawer “Temporarily”
- Common Mistakes (and How to Avoid Them Without Learning the Hard Way)
- Maintenance and Upgrades
- Experiences and Lessons Learned From Real French Cleat Builds (500+ Words)
- Final Thoughts
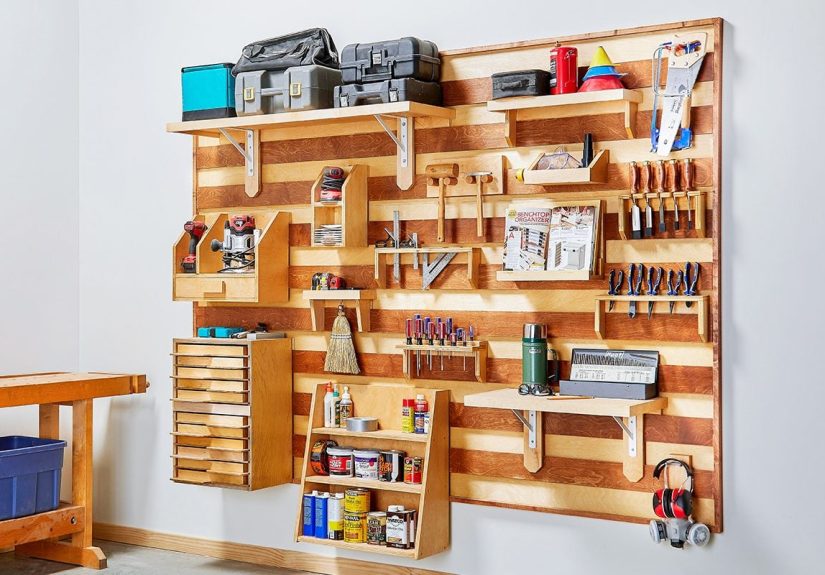
If your “tool organization system” currently involves (1) stacking stuff on the workbench and (2) hoping future-you
has better manners, it’s time for a French cleat wall. This DIY setup turns a blank wall into a modular, endlessly
reconfigurable storage systemso your drill, clamps, and hand tools can finally stop playing hide-and-seek.
A French cleat tool storage wall is one of those rare shop upgrades that feels fancy, looks pro, and still works even
when your tool collection evolves (which it will… because tools breed when the lights go out). Build the wall once,
then keep adding holders, shelves, racks, and little “task kits” forever.
Why a French Cleat Wall Beats Pegboard (Most Days of the Week)
Pegboard is fineuntil you hang anything heavier than a tape measure. French cleats, on the other hand, are designed
to hold serious weight because the load is supported by interlocking beveled boards. The result: a strong “gravity lock”
that lets you move tool holders around without committing to a permanent layout.
- Modular: Reconfigure holders in seconds as your workflow changes.
- Strong: Great for heavier racks (clamps, power tools, small cabinets) when properly mounted to studs.
- Space-smart: Uses vertical wall space instead of your benchtop.
- Expandable: Add new holders anytimeno need to redo the wall.
French Cleat Basics (So the Wall Doesn’t “French Yeet” Your Tools)
What is a French cleat, exactly?
A French cleat is a two-piece hanging system. One beveled strip is mounted to the wall with the bevel facing up.
The matching strip is mounted to the back of a tool holder with the bevel facing down. When you drop the holder onto
the wall cleat, the bevels mate and gravity keeps them locked together.
Do the cleats have to be 45 degrees?
The classic approach is a 45° bevel because it’s easy to cut and widely used. That said, plenty of woodworkers use
other angles (like 30°) and still get excellent holding power. The key is consistency: whatever angle you cut on the
wall cleats, the holders must match perfectly.
Backer panel vs. cleats directly on drywall
You have two popular options:
- Backer panel method: Fasten a plywood panel to the wall (into studs), then mount cleats onto the panel.
This gives you a flatter surface and more flexibility for screw placement. - Direct-to-studs method: Mount cleats straight through drywall into studs. It’s cheaper and thinner,
but your cleat rows must align with stud locations (or use appropriate heavy-duty anchors where allowed).
Plan Your Tool Wall Like a Workshop Designer (Without Wearing a Black Turtleneck)
Step 1: Pick a wall that matches how you work
The best location is near your primary workbench or assembly areaclose enough that you’ll actually put tools back
(because if it’s across the garage, your “organization system” will quietly relapse).
Step 2: Do a quick tool inventory and group by tasks
Before you cut anything, lay out your most-used tools and group them into zones:
measuring/marking, cutting, drilling, sanding, fastening, and “mysterious adhesives and tapes that appeared somehow.”
This helps you decide how much wall you need and what holders to build first.
Step 3: Decide cleat spacing
Most French cleat walls use rows spaced roughly 6–8 inches apart vertically, which balances flexibility with material use.
Tighter spacing gives more placement options; wider spacing reduces the number of cleats you need. If you expect lots of
small holders, go tighter. If you’re mostly hanging shelves and bigger racks, you can go wider.
Materials and Tools Checklist
Materials
- 3/4-inch plywood (cabinet-grade or sturdy shop plywood) for cleats and many holders
- Wood screws long enough to hit studs (commonly 2-1/2 inches for wall cleats, depending on your wall build)
- 1×2 or scrap strips for spacer rails (optional but helpful)
- Wood glue (for building holders; typically not needed between cleat and wall)
- Finish: paint, clear coat, or just sanded plywood if you like the “I’m here to work” look
- Labels (optional, but they help keep the system from becoming “creative chaos”)
Tools
- Table saw (best for consistent cleats) or track saw/circular saw with guide
- Stud finder
- Level or laser level
- Drill/driver (impact driver is nice)
- Clamps, tape measure, pencil
- Sander and sandpaper
- Safety gear: eye protection, hearing protection, and dust protection
Step-by-Step: Build and Install the French Cleats
1) Choose your “system material” and cut it into strips
Start with a 4×8 sheet of 3/4-inch plywood. Rip it into strips for cleatsmany builders like strips around
3 to 4 inches wide because they’re easy to handle and provide a generous bearing surface for holders.
If you’re building a big wall, label your strips as you go so you don’t lose track of which edges are “cleanest.”
2) Cut the bevel (the money cut)
Set your saw to the angle you’ve chosen (commonly 45°) and bevel-rip each strip lengthwise to create two matching pieces.
Each original strip becomes a “wall cleat” and a “mate” for tool holders.
Safety note: Bevel ripping long strips can be awkward. Use push sticks, keep your hands away from the blade,
and use a featherboard if you have one. If you’re new to table saw bevel cuts, consider practicing on a short offcut first.
3) Decide: install a plywood backer panel or go direct-to-studs
If you’re using a backer panel, cut the panel to cover your intended area and screw it into wall studs. A backer panel can
make the wall flatter, protect drywall from repeated holder movement, and give you more freedom for cleat placement.
If you’re going direct-to-studs, mark stud centers clearly (painter’s tape works great) and plan cleat rows so each row hits
multiple studs.
4) Mount your first cleat perfectly level
Your first row sets the tone for everything that followslike the first pancake, except you actually want this one to be good.
Use a level or laser, mark a reference line, then pre-drill the cleat to reduce splitting and help the screws pull it tight.
- Mount the cleat with the bevel facing up and away from the wall (so it “catches” the holder cleat).
- Drive screws into studs at consistent intervals (often every stud, sometimes two screws per stud for longer cleats).
- If your wall is wavy (welcome to real life), use shims so the cleat sits straight and doesn’t twist.
5) Add more rows with consistent spacing
The fastest way to keep spacing consistent is to cut a spacer block (or blocks) to your chosen gap (for example, 6 inches).
Rest the next cleat on the spacer, level it, then screw it in. Repeat until your wall looks like a sleek wooden ladder.
6) Clean up and finish
Sand any sharp edges (your knuckles will thank you). Then choose a finish:
- Paint: Brightens a dark garage and makes tools pop visually.
- Clear coat: Keeps the plywood look while reducing grime absorption.
- No finish: Totally finethis is a shop wall, not a dining table.
How to Build Tool Holders That Don’t End Up in a Drawer “Temporarily”
The three rules of holders that actually get used
- Make it obvious: If it takes two hands and a physics degree to dock a tool, you won’t do it.
- Keep the center of gravity close: The farther a heavy tool sits from the wall, the more leverage it creates.
- Add a bottom spacer (often): A small strip at the bottom of the holder can keep it sitting plumb against the wall.
Five starter holders you can build in one weekend
1) Drill/impact driver holster
Build a small shelf with a slot or a thick block with a bored hole sized for your drill handle.
Add a lip so the battery doesn’t bump the drill forward. For heavier drills, use a wider holder and a longer cleat on the back.
2) Screwdriver rack
Drill a row of holes into a strip of wood and mount it on a shallow tray. Angle the holes slightly upward so drivers don’t slide out.
Bonus points for labeling Phillips vs. flathead vs. “mystery driver that came with furniture in 2012.”
3) Small parts bin shelf
A simple box shelf sized to your favorite bins (or jars) is a game-changer. Keep it near your bench so screws and fasteners
live where you use themnot where they go to disappear.
4) Clamp rack
Clamps are heavy and awkward, which makes them perfect candidates for a sturdy cleat-mounted rack.
Use thick stock, plenty of fasteners, and keep the rack’s weight close to the wall. If you have a lot of clamps, consider
splitting them across two racks rather than building one mega-rack that dares gravity to do something rude.
5) Charging station shelf
Build a small shelf with cable pass-through holes and a power strip mount. Keeping chargers together reduces cord chaos,
which is the leading cause of people shouting “WHY IS THIS TANGLED?!” (unofficially, but still.)
Common Mistakes (and How to Avoid Them Without Learning the Hard Way)
- Missing studs: If the cleats aren’t anchored properly, the wall becomes a surprise tool piñata.
Use a stud finder and confirm with pilot holes. - Inconsistent bevels: If your saw angle drifts, holders won’t seat correctly. Lock your bevel setting and
batch-cut all cleats in one session. - Cleats too thin: Thin material can split or flex. 3/4-inch plywood is a common sweet spot for durability.
- No plan for growth: Leave blank space for future holders. Your tool collection will not respect your optimism.
- Overloading a single holder: For heavy items, use longer cleats, wider holders, and distribute weight across
multiple cleat rows when possible.
Maintenance and Upgrades
Once installed, maintenance is mostly “enjoy your life.” Still, a few habits keep the wall working beautifully:
- Do a quick seasonal “shop reset” and re-home tools that migrated to the bench.
- Tighten any screws that loosen from vibration (especially near frequently used power tools).
- Add labels or silhouettes if multiple people use the shopor if you sometimes forget where you put your own hammer.
- Keep a small bin of scrap plywood specifically for new holders, so you can expand the system without delay.
Experiences and Lessons Learned From Real French Cleat Builds (500+ Words)
Builders who install French cleat walls tend to have the same “before and after” moment: before, the bench is buried;
after, the bench becomes an actual work surface again. But the best lessons don’t come from the perfect photosthey come
from the small decisions that make the wall easier to live with day after day.
One common experience: people often start by copying the classic 45° cleat and then discover the real magic is not the angle,
but the ecosystem. The wall is only half the project; the holders are where you win (or lose) the organization game.
The most successful setups begin with a handful of “high-frequency” holdersdrill, driver bits, tape measure, pencils,
a square, and the fasteners you use constantly. Once those are off the bench and on the wall, motivation skyrockets,
because you can actually see progress instead of just moving clutter in circles.
Another shared lesson: flat matters more than you think. Drywall can have bows, studs can be crowned, and garages can be…
character-building. Many DIYers end up adding shims behind cleats to keep every row straight, because a twisted cleat row
causes subtle problems. Holders rock. Tools tilt. You’ll tell yourself it’s “fine,” and then you’ll rebuild the row later
because it annoys you every time you look at it. Taking extra time on the first row and using spacers for consistent gaps
pays off for years.
People also learn quickly that “one giant wall of cleats” isn’t the only way. Some prefer mounting cleats on removable panels.
That approach can be especially handy if you’re reorganizing a workshop, renting, or planning future changes. Panels let you
build and tweak sections at the bench, then mount them to the wall as finished modules. It’s like meal prep, but for shop
organizationand no one has to eat cold chicken and rice afterward.
A surprisingly popular upgrade is the “task kit” concept. Instead of hanging single tools everywhere, builders create small
boxes dedicated to a task: a sanding kit (assorted discs, interface pad, dust hose adapter), a layout kit (square, pencil,
marking knife, rule), or a glue-up kit (glue, spreader, tape, small brush, and a couple of clamps). The benefit isn’t just
organizationit’s speed. You grab one box and you’re ready to work without making six trips across the shop.
Another real-world discovery: heavy tools are more about leverage than weight. A moderate-weight tool sitting far from the wall
can stress a holder more than a heavier tool that sits close. DIYers often redesign holders so power tools nest closer to the wall,
or they add a second support pointlike a small “foot” or bottom spacer stripso the holder doesn’t pivot. In practice, that
tiny piece of wood can make the entire system feel rock-solid.
Finally, there’s the “first-month shuffle,” and it’s normal. Most people rearrange holders repeatedly in the first few weeks
as they learn what belongs where. The win is that rearranging is easyno patching pegboard holes, no committing to a layout
that doesn’t match how you actually work. If you embrace that early shuffle, you end up with a tool wall that fits your workflow
like a glove. And if you don’t embrace it? You still have a French cleat wall, so you can fix it in about 30 seconds. That’s
the whole point.
Final Thoughts
A French cleat tool storage wall is one of the most satisfying DIY shop projects because it keeps paying you back:
faster workflow, cleaner bench space, safer tool storage, and a setup that grows with your needs. Build the wall carefully,
mount it securely, then have fun creating holders that match your tools and your style. Your future self will be thrilled
and your workbench might finally become a workbench again.