Table of Contents >> Show >> Hide
- Before You Cut a Single Page: Quick Prep Tips
- 15 Brilliant Crafts With Old Books
- 1) Make a Book-Page Wreath for Your Door
- 2) Roll Book Pages Into Paper Roses
- 3) Create Folded Paper Rosettes for Wall Decor or Parties
- 4) Turn Book Spines Into Bookmarks
- 5) Make a Book-Page Table Runner
- 6) Decoupage a Tray, Box, or Wooden Letter
- 7) Build a Secret Compartment Book Box
- 8) Make a Hollow Book Planter (With a Liner)
- 9) Stack Hardcovers Into a Lamp Base
- 10) Paint Book Covers for Decorative Stacked Books
- 11) Upgrade Beat-Up Paperbacks Into Custom Hardcovers
- 12) Frame Book Pages as Art
- 13) Make Gift Tags, Envelopes, and Wrapping Accents
- 14) Craft a Garland or Hanging Banner
- 15) Build a Book-Based Knife Block (Yes, Really)
- Common Mistakes to Avoid When Making Crafts With Old Books
- What to Do With Books You Don’t Want to Craft
- Experience Notes: What People Usually Learn After Making Old Book Crafts
- Final Thoughts
If your shelves are groaning, your closet has become a paperback retirement home, and you’re one stack away from an avalanche, it might be time for a creative intervention. The good news? Those old books can become gorgeous DIY decor, clever gifts, and practical household items. The even better news? You don’t need to be a master crafter with a glue gun holster and a crafting cape.
This guide shares 15 brilliant crafts with old books that are actually worth making. We’re talking wreaths, bookmarks, wall art, secret storage, and a few projects that make guests say, “Wait… that used to be a novel?” You’ll also get smart tips for choosing the right books, avoiding common mistakes, and keeping the mess to a minimum.
One important note before we start snipping pages like confetti: don’t repurpose rare, valuable, or sentimental books. First editions, signed copies, family heirlooms, and older collectibles deserve preservation. For everything elseespecially damaged, mold-free, outdated, duplicate, or falling-apart bookslet the craft party begin.
Before You Cut a Single Page: Quick Prep Tips
Choose the right books
Best candidates include damaged hardcovers, outdated textbooks, duplicate novels, or old dictionaries/encyclopedias that no one is actually reading. Books with thick pages and sturdy covers work well for structural projects (like lamp bases or hidden boxes), while paperbacks and lightweight pages are perfect for flowers, garlands, and wreaths.
Gather a basic toolkit
- Sharp scissors
- Craft knife and metal ruler
- Cutting mat or scrap cardboard
- Hot glue gun and glue sticks
- Craft glue or decoupage medium
- Paintbrush or foam brush
- Pencil, clips, and twine/ribbon
- Optional: Mod Podge, squeegee/brayer, acrylic sealer
Work clean and smart
Book crafts can get dusty and papery fast. Use a wipeable surface, keep a small trash bowl nearby for scraps, and do all blade work slowly. If a project uses a utility knife or drill, treat it like an adult-level DIY. “Easy peasy” is great. “Oops, I need a bandage” is not.
15 Brilliant Crafts With Old Books
1) Make a Book-Page Wreath for Your Door
This is the crowd-pleaser of old book crafts. Roll, fold, or cone book pages and attach them to a wreath form, embroidery hoop, or cardboard ring. The final look can be rustic, romantic, farmhouse, or modern depending on how tightly you shape the paper and whether you add paint, glitter, or ribbon.
Why it works: It uses lots of pages quickly, so it’s perfect for a truly giant pile of books. It also looks more expensive than it isalways a win.
Pro tip: Mix full-text pages with a few tea-stained or lightly painted pages for depth. Add a small label tag or monogram in the center to make it look boutique-worthy.
2) Roll Book Pages Into Paper Roses
Rolled paper roses made from old book pages are one of the prettiest ways to repurpose books. Use them in bouquets, shadow boxes, wreaths, gift toppers, or table centerpieces. If you’ve never made one, start with larger circles and looser rolls. Tight spirals look lovely, but they can make beginners mutter dramatic things under their breath.
Why it works: Book text adds texture and vintage charm that plain paper doesn’t have.
Pro tip: Ink the edges lightly with brown or gold craft ink for a soft antique effect.
3) Create Folded Paper Rosettes for Wall Decor or Parties
Accordion-folded rosettes are fast, cheerful, and surprisingly versatile. You can hang them on a wall, layer different sizes for a party backdrop, or use them as gift toppers. Old book pages give them a neutral, literary look that blends well with almost any decor style.
Why it works: Rosettes are beginner-friendly and forgiving. Tiny uneven folds disappear once the rosette opens up.
Pro tip: Combine book-page rosettes with kraft paper or sheet music for a fuller display.
4) Turn Book Spines Into Bookmarks
This one is wonderfully meta: a book becomes a bookmark for another book. Carefully remove the spine from an old hardcover, reinforce the back with contact paper or cardstock, then punch a hole and add twine or ribbon.
Why it works: It’s quick, giftable, and a great use for covers from books that are too damaged inside.
Pro tip: Keep the title visible if it’s charming, or cover it with patterned paper and stamp a quote for a more polished look.
5) Make a Book-Page Table Runner
Hosting a book club? Bridal shower? Cozy fall dinner? A DIY table runner made from old book pages is theatrical in the best way. Arrange pages with slight overlap, glue them together, and trim the edges. The result looks artsy, layered, and intentionally imperfect.
Why it works: It covers a lot of space on a small budget and looks fantastic in photos.
Pro tip: For durability, glue the pages onto kraft paper or a thin fabric base instead of page-to-page only. That way, your runner survives more than one party.
6) Decoupage a Tray, Box, or Wooden Letter
If you love a neat finish, decoupage with book pages is your best friend. Cover a wood tray, keepsake box, clipboard, or decorative letter with trimmed book pages and seal it with a decoupage medium. This is where old books go from “recycled” to “I bought this at a cute shop downtown.”
Why it works: Decoupage gives structure and durability, especially when sealed properly.
Pro tip: Paint the surface first in a coordinating color before applying paper. If your page edges don’t line up perfectly, the painted background still looks intentional.
7) Build a Secret Compartment Book Box
Ah yes, the classic hidden book box. Hollow out the center of a thick hardcover, glue the page edges, and line the inside if you want a cleaner look. You can use it for notes, keepsakes, jewelry, or tiny office clutter.
Why it works: It’s practical and fun. Also, it instantly makes any shelf look more mysterious.
Pro tip: Use a book that’s thick enough to create a useful cavity but not a collector’s item. Clamp or weight the book while the page edges dry so the shape stays tidy.
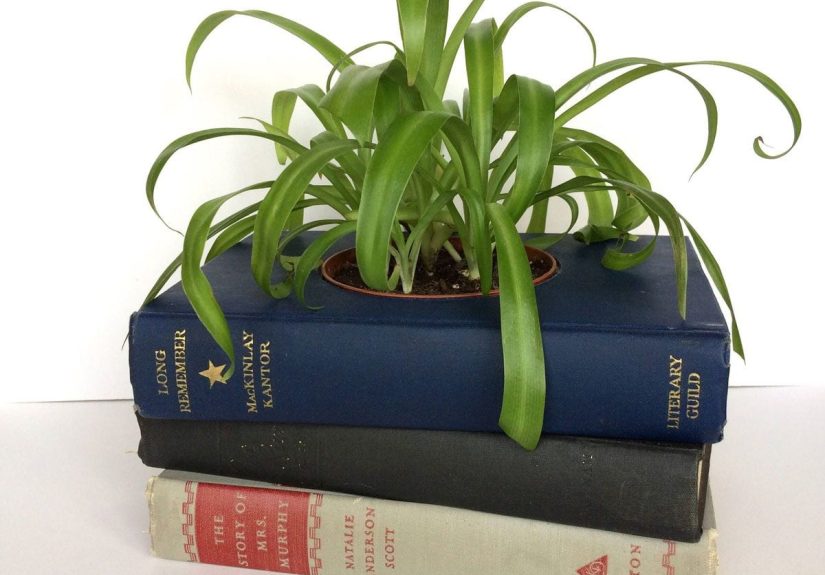
8) Make a Hollow Book Planter (With a Liner)
This is one of the coolest-looking projects and one of the easiest to mess up if you skip the waterproofing. The basic idea: hollow out a hardcover, line the cavity with plastic, and add a small plant. Succulents work best because they need less water.
Why it works: It’s an eye-catching decor piece for desks, shelves, and reading nooks.
Pro tip: Keep the plant in a tiny removable pot inside the lined cavity instead of planting directly into the book. It’s cleaner, safer for the paper, and easier to maintain.
9) Stack Hardcovers Into a Lamp Base
If you want a project that screams “library-core,” this is it. Stack several hardcovers, drill a centered hole through each, and run a lamp kit rod through the middle. The bottom book can be notched to hide the cord.
Why it works: It transforms old books into a functional statement piece.
Pro tip: Use books with similar dimensions so the stack looks clean. Mix colors for a playful look or stick to one palette for a designer finish.
10) Paint Book Covers for Decorative Stacked Books
Not every project needs cutting. Sometimes all an old hardcover needs is a paint makeover. Paint several covers in coordinating colors, sand lightly for a distressed finish, and stack them on a coffee table, shelf, or entry console.
Why it works: It’s one of the fastest old book decor ideas and requires minimal tools.
Pro tip: Add hand-lettered words on the spines (like “Read,” “Cozy,” or a family name) for a personalized touch without looking too “craft fair 2009.”
11) Upgrade Beat-Up Paperbacks Into Custom Hardcovers
Some beloved paperbacks have great stories but terrible covers (or no covers left at all). Wrap them in custom hard covers using cardboard, fabric, decorative paper, or printable designs. This is a fantastic way to rescue ugly-but-loved books.
Why it works: You keep the book readable while making it shelf-worthy.
Pro tip: Use neutral linen, canvas, or kraft paper for a classic look. Add a simple printed spine label so you can still find the title later.
12) Frame Book Pages as Art
Book-page wall art is easy and surprisingly chic. Start with a page that has nice typography, then layer a pressed flower, silhouette, line drawing, or short quote on top. Frame it and hang it alone or as a gallery set.
Why it works: It’s low-cost art with texture and literary charm.
Pro tip: Use pages with even margins and readable text. Torn or crooked edges can be beautiful toojust make sure the “messy” look is clearly intentional.
13) Make Gift Tags, Envelopes, and Wrapping Accents
Old book pages are excellent for gift wrapping details. Cut shapes (stars, trees, hearts, initials), glue them onto plain gift wrap, or turn smaller pieces into tags and mini envelopes. This is especially cute for book lovers, teachers, and holiday gifts.
Why it works: It uses scraps, not just full pages, so almost nothing goes to waste.
Pro tip: Pair book pages with brown kraft paper and twine for a classic, cozy look that never fails.
14) Craft a Garland or Hanging Banner
Cut pages into circles, pennants, stars, leaves, or tiny hearts, then stitch or glue them onto twine. Garlands work year-roundbook-themed baby showers, reading corners, classroom decor, holiday mantels, or even wedding tables.
Why it works: It’s easy to customize by season and uses thin paper beautifully.
Pro tip: Sew paper shapes with a sewing machine for a cleaner, flatter garland. If you glue instead, use small dots of adhesive so the pieces don’t warp.
15) Build a Book-Based Knife Block (Yes, Really)
This one is a conversation starter. A stack of old books can become a DIY knife block for the kitchen when arranged tightly and secured together. It’s a clever upcycling project that leans more “functional DIY” than “paper craft,” but it absolutely belongs on this list.
Why it works: It’s useful, bold, and surprisingly simple in concept.
Pro tip: Choose sturdy hardcovers and keep the stack tightly bound. If it feels unstable, don’t use itsafety always wins over aesthetics.
Common Mistakes to Avoid When Making Crafts With Old Books
1) Using books that should be preserved
If a book is antique, signed, rare, or meaningful to your family, pause. Preservation is the better choice. Upcycle the damaged paperback from 1993, not Grandma’s first-edition poetry collection.
2) Over-gluing everything
More glue is not more secure. It’s usually just wetter. Thin, even coats work better and reduce warping, bubbling, and sticky fingerprints.
3) Skipping the sealant on decor pieces
If your project will be handled, dusted, or displayed in a humid area, seal it. A proper top coat makes a huge difference in durability.
4) Ignoring moisture risks
Planters and paper are not natural best friends. Always use a liner, and never let wet soil or standing water touch the book itself.
5) Rushing blade work
Craft knives make crisp cutsbut only when you take your time. Use a sharp blade, cut in light passes, and keep fingers out of the “oops zone.”
What to Do With Books You Don’t Want to Craft
Not every old book needs to become decor. Some are better donated, sold, traded, or passed along. Libraries, used bookstores, local schools, Little Free Libraries, and community groups may accept books depending on condition and relevance. You can also gift books directly to friends or post a free curbside box and let your neighborhood do the rest.
A simple rule: if the book is readable and useful, consider rehoming it first. If it’s damaged, duplicate, or outdated, it’s a perfect candidate for DIY upcycling.
Experience Notes: What People Usually Learn After Making Old Book Crafts
Here’s the part nobody mentions in the pretty tutorial photos: crafting with old books is wildly satisfying, but it teaches you patience very quickly. The first experience many people have is surprisepages feel different depending on the book. Some are soft and cottony, some are slick, and some behave like they have a personal grudge against glue. Once you realize this, your projects get much better because you stop expecting every book to fold, roll, and cut the same way.
Another common experience is that the “easy” projects are easy only after the first one. For example, a book-page wreath looks simple, but your first few cones or folds may be uneven. That’s normal. Most crafters find a rhythm after 10 to 15 pieces. Suddenly the shapes match, the spacing improves, and the whole project starts looking polished. It’s one of those crafts where the middle looks messy and the ending looks magical.
People also learn that prep matters more than talent. When pages are trimmed ahead of time, tools are within reach, and the glue gun is hot before you start, everything flows. When you “just wing it,” you spend half the project searching for scissors while holding a sticky paper flower in one hand like a confused octopus. The craft itself is not hard; the setup is what makes it smooth.
A really fun experience with crafts using old books is seeing how personal the results become. Two people can follow the same ideasay, a decoupage boxand end up with completely different styles. One will look vintage and neutral, another bold and modern, another cottagecore, another dark academia. The printed words on the pages add a built-in layer of texture, so even simple projects look thoughtful.
There’s also a practical lesson: durability comes from finishing, not just assembling. A lot of first-time crafters make a beautiful piece, then skip the sealing step and wonder why it warps, peels, or gets dusty fast. The second time around, they seal it properly and instantly understand why the extra few minutes are worth it. That’s the moment book crafts go from “cute experiment” to “this is actually decor I’d keep.”
And maybe the best experience of all is the emotional one: turning clutter into something useful changes how you feel about the pile. Instead of guilt (“Why do I still have these old books?”), you get momentum (“I can make three gifts and a wreath from this stack”). It feels creative, practical, and just a little bit genius. Also, your shelves breathe again, which is deeply underrated.
Final Thoughts
Repurposing old books is one of the most charming ways to blend creativity, sustainability, and home decor. Whether you start with a quick bookmark or go full DIY with a lamp base, these projects prove that worn-out books can still tell great storiesjust in a different format.
Start small, pick one project, and don’t worry if the first attempt is a little crooked. Crooked is often just another word for handmade. And handmade is where the fun lives.