Table of Contents >> Show >> Hide
- Why the Metric Side Is Easier Than You Think
- What the Marks Mean on a Metric Measuring Tape
- How to Read a Measuring Tape in Meters Step by Step
- Quick Examples So Your Brain Stops Arguing
- When to Use Meters, Centimeters, or Millimeters
- Common Mistakes When Reading a Metric Tape
- Helpful Tricks That Make Reading a Tape Easier
- How to Convert Readings Without Crying
- Practice Reading a Metric Tape Like a Normal, Calm Person
- Real-Life Experiences with Reading a Measuring Tape in Meters
- Final Thoughts
If reading a measuring tape makes you feel like you accidentally enrolled in a surprise math class, take a breath. The metric side of a tape measure is actually one of the friendliest tools in your toolbox. No weird fractions. No muttering “Is that 7/16 or 9/16?” while squinting like a pirate. Just clean, logical units: millimeters, centimeters, and meters.
That’s the beauty of the metric system. Everything moves in tens, which means your measuring tape is less of a puzzle and more of a polite little roadmap. Once you know what the marks mean, you can measure a table, wall, shelf, window, or DIY project without breaking into a cold sweat.
In this guide, you’ll learn how to read a measuring tape in meters, how to spot centimeters and millimeters fast, how to avoid the most common mistakes, and how to feel a whole lot smarter the next time someone hands you a tape measure and says, “Can you get me that dimension?” Yes. Yes, you can.
Why the Metric Side Is Easier Than You Think
If you hate math, here’s the good news: metric measuring is basically math with training wheels. The system is built on 10s, so the pattern repeats over and over.
- 10 millimeters (mm) = 1 centimeter (cm)
- 100 centimeters = 1 meter (m)
- 1,000 millimeters = 1 meter
That means you don’t need to decode fractions or reduce anything. If you see 4 centimeters and 6 extra millimeter marks, that’s 4.6 cm. If you see 1 meter, 23 centimeters, and 5 millimeters, that’s 1.235 m. Nice, neat, civilized.
So no, you do not need to “be good at math.” You just need to count tiny lines and keep your coffee away from the blueprint.
What the Marks Mean on a Metric Measuring Tape
On the metric side of a measuring tape, the smallest lines are usually millimeters. Every 10 millimeters, you get a centimeter. Every 100 centimeters, you get a meter.
Millimeters
These are the smallest marks on the tape. Each tiny line equals 1 millimeter. They’re great for precise measurements, especially when you’re measuring smaller objects or trying to avoid the classic DIY disaster known as “close enough.”
Centimeters
These are the larger numbered marks. Each centimeter contains 10 millimeters. On many metric tape measures, there’s also a slightly longer line halfway between centimeters, which marks 5 millimeters, or 0.5 centimeters.
Meters
Each full meter equals 100 centimeters. On some tapes, the meter point is labeled clearly as 1m, 2m, and so on. Some also highlight every 10 centimeters, and you may see decimeter-style numbering at those intervals. You do not need to fall in love with decimeters to read the tape correctly, but knowing they exist can make the markings feel less mysterious.
How to Read a Measuring Tape in Meters Step by Step
Step 1: Start at Zero
Hook the metal end onto the edge of the object you’re measuring, or place the zero point exactly where the measurement begins. Make sure the tape is straight. A sagging tape is like a bad rumor: it causes problems fast.
Step 2: Find the Last Full Meter
If the object is longer than 1 meter, first look for the last whole meter mark before the endpoint. For example, if the tape passes the 1m mark but not 2m, you already know your measurement is 1-point-something meters.
Step 3: Count the Full Centimeters After the Meter
Next, count the centimeters after the last full meter. If the endpoint lands 37 centimeters past the 1-meter mark, you now have 1.37 meters if it lands exactly on a centimeter line.
Step 4: Add Any Extra Millimeters
If the endpoint falls between centimeter marks, count the tiny millimeter lines. For example, if it goes 6 millimeters past 37 centimeters, the total measurement is 1.376 meters.
Step 5: Write the Unit Clearly
This matters more than people think. Write down m, cm, or mm every time. If you write “137.6” without a unit, congratulations, you’ve created confusion in three different measurement systems.
Quick Examples So Your Brain Stops Arguing
Example 1: A bookshelf width
The endpoint lands at 86 centimeters and 4 millimeters. You can write that as:
- 86.4 cm
- 0.864 m
Example 2: A doorway height
The endpoint lands at 2 meters, 3 centimeters, and 8 millimeters. Write it as:
- 2.038 m
- 203.8 cm
Example 3: A table leg
The tape shows 71 centimeters exactly. That can be written as:
- 71 cm
- 0.71 m
The trick is simple: read the biggest unit first, then add the smaller ones. Meter, then centimeter, then millimeter. Big to small. Like packing luggage, but less emotional.
When to Use Meters, Centimeters, or Millimeters
One reason people get tripped up is that they’re not sure which metric unit makes the most sense. Here’s the cheat sheet:
- Use meters for larger dimensions like walls, rooms, doors, fences, and furniture length.
- Use centimeters for medium-size objects like shelves, picture frames, cabinets, and cushions.
- Use millimeters for small, precise measurements like gaps, material thickness, trim adjustments, or hardware spacing.
For example, saying a desk is 1.2 m long sounds normal. Saying it’s 120 cm is also fine. Saying it’s 1,200 mm is technically correct, but now you sound like a very intense robot.
Common Mistakes When Reading a Metric Tape
1. Starting from the wrong point
Always check that the hook is sitting properly and the zero point is where you think it is. If the hook is bent or loose in a bad way, your reading can be off.
2. Confusing centimeters with millimeters
This happens constantly. If you count every little line like it’s a centimeter, your project is going to come out hilariously wrong. Remember: the tiny lines are millimeters. The numbered marks are centimeters.
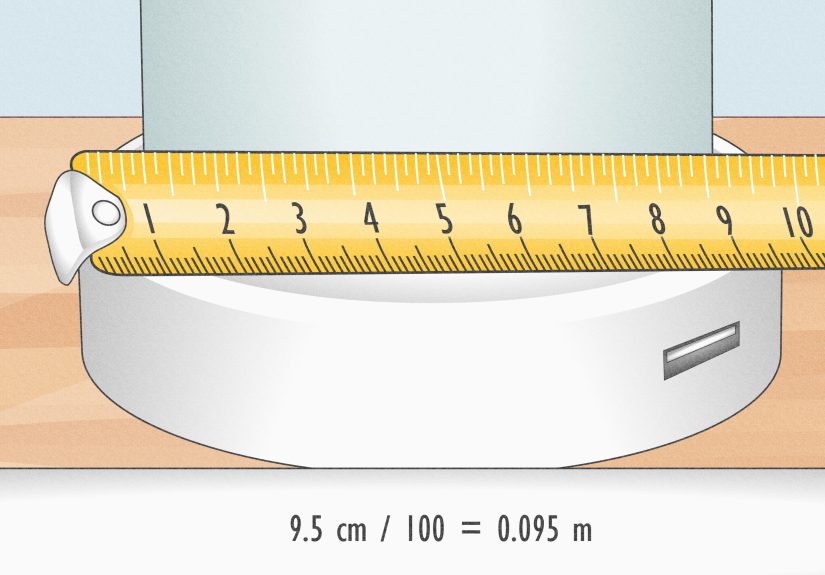
3. Forgetting to convert properly
If you’re converting centimeters to meters, move the decimal two places left. So 245 cm becomes 2.45 m. No drama required.
4. Measuring at an angle
If the tape isn’t straight, the reading won’t be accurate. Pull it tight and keep it aligned with the edge or surface you’re measuring.
5. Trusting the number but ignoring the unit
Writing down “2.5” could mean meters, centimeters, or a level of confidence in your life choices. Add the unit every time.
Helpful Tricks That Make Reading a Tape Easier
Use the lock
If your tape measure has a thumb lock, use it. It freezes the blade in place so you can stop wrestling the tool and actually read it like a civilized person.
Read at eye level
Looking at the tape from the wrong angle can make the mark appear slightly off. Get your eyes level with the measurement whenever precision matters.
Measure twice
Yes, it’s a cliché. It’s also the reason some people have nice cabinets and others have “creative gaps.” Measure twice. Cut once. Complain less.
Know your inside-measure trick
If you’re measuring inside a tight space, like the width of a cabinet opening, many tape measure cases have their case length printed on the back. You can butt the case into the corner, read the exposed tape, then add the case length. That’s one of those tiny tool secrets that makes you feel suspiciously competent.
Check the hook
The metal hook at the end is supposed to move slightly. That tiny bit of movement helps the tape stay accurate for inside and outside measurements. But if the hook gets bent or damaged, your results can drift. So if your cuts keep turning out wrong, the hook might be the villain of the story.
How to Convert Readings Without Crying
Sometimes you’ll read a tape in centimeters but need the answer in meters. Here are the easiest conversions:
- 10 mm = 1 cm
- 100 cm = 1 m
- 1,000 mm = 1 m
Quick examples:
- 56 cm = 0.56 m
- 148 cm = 1.48 m
- 1 m 24 cm = 1.24 m
- 1 m 24 cm 5 mm = 1.245 m
Here’s the simplest way to think about it: metric conversions are mostly decimal placement. You are not solving a riddle from a fantasy novel. You are moving a dot.
Practice Reading a Metric Tape Like a Normal, Calm Person
If you want to get comfortable fast, grab your measuring tape and measure five things around your home:
- Your phone
- A notebook
- A chair seat
- A tabletop
- A door
First, write each measurement in centimeters. Then rewrite it in meters. This helps your brain connect the two formats without turning the exercise into a spreadsheet nightmare.
For example:
- Phone: 15.2 cm = 0.152 m
- Door: 203.0 cm = 2.03 m
After a few rounds, the tape stops looking like a line-covered snake and starts looking like what it is: a very practical tool.
Real-Life Experiences with Reading a Measuring Tape in Meters
The funny thing about learning to read a measuring tape in meters is that most people don’t realize they’ve been avoiding it. They act like the metric side is the “advanced level,” when really it’s usually easier than the inch side. I’ve seen people stare confidently at imperial fractions, then panic at a clean row of millimeter marks as if the tape suddenly switched to ancient wizard language.
One of the first times this really clicked was during a simple furniture project. The goal was to measure a wall and make sure a shelving unit would fit. Nothing fancy. No architecture degree required. But the moment the tape came out, someone asked, “Wait, are we doing this in centimeters or meters?” That question alone somehow made the room feel like a quiz had just begun.
Once we broke it down, though, the stress disappeared. The wall was a little over 2 meters wide. The shelf was 1.8 meters. Suddenly the whole task became easy. No converting odd fractions, no guessing between marks, no dramatic sighing. Just read the meters, count the centimeters, and move on with life.
Another common experience happens when people measure smaller things and assume they must use meters every time because the tape is “metric.” Not true. If you’re measuring a cutting board, a drawer front, or a laptop sleeve, centimeters often make more sense. That realization helps a lot. People stop trying to force every reading into meters and start using the unit that matches the job.
There’s also a confidence boost that comes from understanding what the little marks mean. At first, the millimeter lines look annoyingly tiny. But after a few practice readings, you begin to trust your eyes. You start noticing that every fifth millimeter is easier to spot, and every tenth millimeter becomes a full centimeter. The pattern repeats so consistently that it becomes almost relaxing. Not spa-day relaxing, obviously. More like “I can handle this without asking for help” relaxing.
A lot of DIY frustration comes from not knowing whether the mistake came from measuring, marking, or cutting. When you use the metric side correctly, one big source of that frustration goes away. The numbers are cleaner. The decimals are simpler. Your notes make more sense later. If you come back to a project tomorrow and see “1.26 m,” you know exactly what you meant. That’s a lot better than finding a mystery note that says “49 and a bit.”
People also tend to remember the embarrassing mistakes. Measuring from the wrong edge. Forgetting to include the unit. Reading 14 millimeters as 14 centimeters and briefly wondering why the object seems to belong in a dollhouse. Those moments are annoying, but they’re useful teachers. After one or two blunders, most people slow down, check the numbered centimeter marks first, and then count the millimeters. That tiny habit changes everything.
The most satisfying experience, though, is when reading a metric tape stops feeling like “doing measurements” and starts feeling automatic. You pull the blade out, spot the last whole meter, count the centimeters, add a few millimeters, and write it down. Done. No panic. No math meltdown. No bargaining with the universe.
That’s usually the point where people realize they never actually hated measuring in meters. They just hated not understanding the markings. Once the system makes sense, the tape measure becomes one of the least intimidating tools in the house. Which is great, because unlike that mystery Allen wrench from your last flat-pack furniture build, this one is actually useful.
Final Thoughts
Learning how to read a measuring tape in meters is not about becoming a math person. It’s about recognizing a simple pattern and using it with confidence. The metric system is logical, consistent, and much easier to read than many people expect.
Remember the basic rhythm: find the meters, count the centimeters, add the millimeters, and write the unit. That’s it. Once you practice a few times, the markings stop looking confusing and start looking helpful.
So the next time someone hands you a tape measure and asks for a metric reading, you can smile, read it correctly, and enjoy the rare thrill of knowing exactly what you’re doing.