Table of Contents >> Show >> Hide
- Why Seasonal Baits Matter
- What You Need to Make a Homemade Wasp Trap
- How to Make a Wasp Trap at Home
- The Best Seasonal Baits for a Homemade Wasp Trap
- Where to Place a DIY Wasp Trap
- How Often to Refresh the Bait
- Mistakes People Make with Homemade Wasp Traps
- When a Homemade Wasp Trap Is Not Enough
- Real-World Experiences with Homemade Wasp Traps and Seasonal Baits
- Conclusion
Wasps have a talent for showing up exactly when your burger hits the grill, your soda cracks open, or your peaches finally look perfect enough to brag about. The good news is that a homemade wasp trap can help reduce nuisance wasps in a small area when you use the right design, the right bait, and the right timing. The even better news? You do not need a laboratory, a hazmat suit, or a dramatic movie soundtrack to make one.
The trick is understanding one very important fact: wasps do not want the same foods all season long. Early in the growing season, many nuisance wasps are more interested in protein because they are feeding developing larvae. Later in summer and into fall, adult wasps lean much harder into sweets and fermenting foods. That is why a trap that works beautifully in May can feel completely ignored in September, like a party guest who suddenly decided your playlist is beneath them.
This guide explains how to make a simple DIY wasp trap at home, how to choose seasonal baits, where to place the trap, and what mistakes to avoid. It also covers the limits of homemade traps, because honesty is part of good pest control. A bottle trap can help lower local wasp traffic, but it is not a magic wand for every nest in the neighborhood.
Why Seasonal Baits Matter
If you only remember one thing from this article, remember this: match the bait to the season. Yellowjackets and some other nuisance wasps shift their food preferences as the colony changes through the year.
In spring and early summer, colonies are in growth mode. Workers are hunting protein-rich food sources to feed larvae, so meat-based bait can be more attractive. By late summer and fall, colonies are larger, ripe fruit is abundant, and adult wasps are more interested in carbohydrates. That is when fermenting fruit juice, beer, and other sweet baits usually perform better.
Not all wasps behave exactly the same way, either. Paper wasps often feed on nectar and ripe fruit and can become a bigger annoyance around orchards, gardens, and outdoor seating later in the season. Yellowjackets are the classic picnic crashers and garbage-can investigators, especially in late summer and early fall.
So yes, your wasp trap bait should evolve with the season. Even insects appreciate a menu refresh.
What You Need to Make a Homemade Wasp Trap
A basic bottle wasp trap is simple, cheap, and easy to hang in the yard. You only need a few items:
- One clean 1- or 2-liter plastic soda bottle
- Scissors or a utility knife
- Hole punch, nail, or awl for hanging holes
- String or wire for hanging
- Dish soap
- Water
- Your seasonal bait of choice
- Optional: a little cooking oil or petroleum jelly along the funnel edge
The bottle funnel design works because wasps can follow the smell inside more easily than they can figure out how to fly back out. In other words, you are not outsmarting nature so much as gently encouraging bad navigation decisions.
How to Make a Wasp Trap at Home
Step 1: Cut the bottle
Cut off the top third of the plastic bottle, just below the shoulder. You want the top section to become an inverted funnel.
Step 2: Create the funnel
Flip the top piece upside down and place it into the bottom half of the bottle. This creates a funnel entrance that guides wasps downward into the trap.
Step 3: Secure it
Use tape, staples, or a snug fit to keep the funnel in place. Then punch two holes near the upper edge so you can thread string or wire through for hanging.
Step 4: Add drowning liquid
Pour in a small amount of water and add a few drops of dish soap. The soap helps break surface tension so trapped insects are less likely to float and escape.
Step 5: Add the bait
Use the appropriate seasonal bait from the sections below. For liquid bait, pour it into the trap. For protein bait, suspend it just above the soapy water if possible. That setup works especially well for yellowjackets because they may grab a piece and then fall into the liquid.
Step 6: Hang it in the right place
Place the trap away from patios, doors, decks, play areas, and outdoor dining spots. A common mistake is hanging the trap exactly where people sit. That only turns the trap into a wasp billboard for your favorite chair.
The Best Seasonal Baits for a Homemade Wasp Trap
Spring to Early Summer: Protein Baits
During the early season, protein bait is often the smarter move for yellowjacket trap success. Good options include:
- A small piece of raw fish
- A little chicken or turkey
- A spoonful of pet food
- A small bit of hamburger
Keep the amount modest. More bait does not mean more genius. It usually just means more odor. Fresh bait works better than rotten bait, so replace it frequently. Once meat starts turning funky in a truly offensive way, its effectiveness tends to drop and your yard starts auditioning for a questionable reality show.
This season is also a good time to start trapping before local nuisance levels peak. Catching foraging wasps earlier may help reduce wasp activity in a small target area later, although it still will not wipe out every nest nearby.
Mid to Late Summer: Fermenting Fruit Baits
As summer matures, many wasps become more interested in sugary or fermenting foods. This is when a homemade wasp bait based on fruit really shines. Effective options include:
- Fruit juice diluted with water
- Overripe fruit pieces
- A little beer
- Fermenting fruit juice with a pinch of yeast
One classic backyard formula is a diluted fruit-juice mix with a little yeast and a few drops of dish soap. Another simple approach is ripe fruit plus a sweet liquid in the bottom of the trap. These blends are especially useful around fruit trees, gardens, and outdoor entertaining spaces where sweet-loving scavengers become more noticeable.
For paper wasps around ripening fruit, fruit-based bait often makes more sense than meat. These wasps are frequently drawn to soft, sweet, ripe fruit late in the season, which is excellent news for your trap and terrible news for your peaches.
Fall: Sweet Baits
Early fall is peak nuisance season in many yards. This is when adult wasps often go all-in on sweets. Try:
- Apple juice
- Sweet soda
- Sugar water
- Beer with a little fruit juice
- Overripe fruit with a sweet liquid base
Fermenting bait tends to outperform plain sugar water in many home settings because the smell travels well. The goal is to attract the wasps you do not want near your grill, not to host a deluxe dessert buffet for the entire zip code.
One Important Bee-Safe Rule
Do not use honey. Honey and some very bee-friendly sweet baits can draw in honey bees, which you do not want to trap. If pollinators are active in the area, use care with bait choice and placement. Keeping traps away from flowers, vegetable blooms, and bee-heavy spots is just plain smart backyard management.
Where to Place a DIY Wasp Trap
Placement matters almost as much as bait. Put the trap in the wrong spot and you can accidentally pull wasps closer to people. Put it in the right spot and you can intercept foragers before they reach the patio.
Here are the best placement rules:
- Hang traps away from human activity, especially patios, doors, picnic tables, grills, and play spaces
- For general bottle traps, hanging around 4 to 5 feet above ground works well
- If yellowjackets are foraging low to the ground, a somewhat lower position can be useful
- Set traps along the perimeter of the yard rather than at the center of activity
- Place fruit-based traps near fruit trees or problem zones, but not right beside where people gather
- Keep traps accessible so you can empty and refill them easily
In orchards or fruit-heavy yards, multiple traps can be more effective than one lonely bottle trying to defend the entire property like an underpaid security guard.
How Often to Refresh the Bait
A neglected trap becomes decorative failure. Refreshing the bait keeps it useful.
- Check traps every few days during hot weather
- Replace meat bait often, especially when it dries out or smells aggressively rotten
- Refresh sweet or fruit bait every 1 to 2 weeks, or sooner if diluted by rain or packed with insects
- Empty dead insects regularly so the trap stays functional
If your trap suddenly goes quiet, do not assume wasps read your eviction notice and moved out. More often, the bait is stale, the season has changed, or the trap needs a better location.
Mistakes People Make with Homemade Wasp Traps
Using the Wrong Bait for the Season
This is the big one. Meat in peak fall may underperform. Sweet bait in early spring can be less attractive than protein. Seasonal timing matters.
Hanging the Trap Next to the Patio
A trap should pull wasps away from people, not invite them to dinner. Move it away from high-traffic spots.
Ignoring Sanitation
A trap helps, but it should not compete with an open trash can, fallen fruit, sticky soda cans, pet food, and a compost lid that has given up emotionally. Clean up ripe fruit, secure garbage, and reduce easy food sources.
Expecting Total Elimination
A homemade wasp trap can reduce local foraging pressure. It usually does not eliminate established colonies. If a nest is in a wall void, underground near a walkway, or close to a doorway, trapping alone is often not enough.
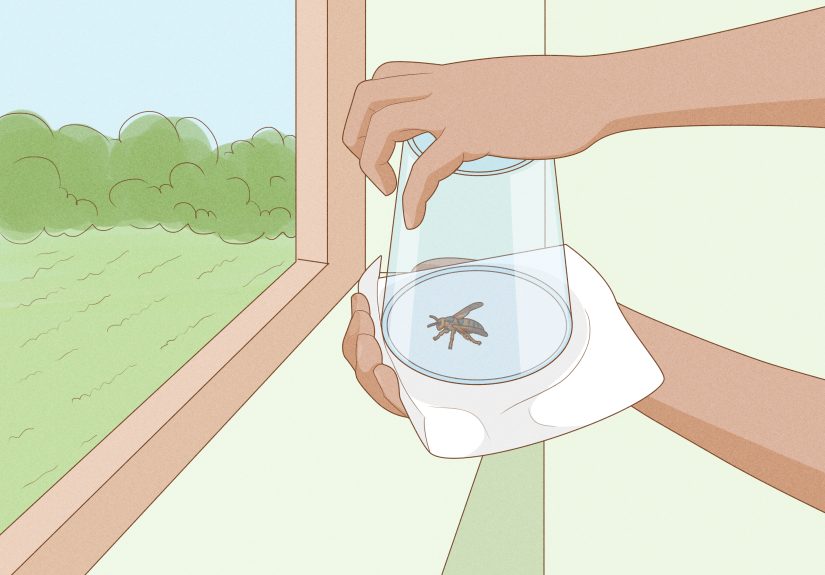
When a Homemade Wasp Trap Is Not Enough
If you can see wasps flying directly in and out of one hole in the ground, under siding, or into a wall void, you are likely dealing with an active nest. That is no longer a “cute little backyard project” situation.
Do not disturb active nests near people, pets, or entryways. In those cases, the safest option is usually professional help. A trap is best for managing nuisance foragers, not for turning a risky nest problem into a DIY action sequence.
Also, keep perspective. Many wasps are beneficial predators that help control caterpillars, flies, and other pests. If they are nesting far from people, leaving them alone can be the best move. Not every striped insect in your yard is declaring war.
Real-World Experiences with Homemade Wasp Traps and Seasonal Baits
One of the most common experiences people report is that a trap seems useless at first, then suddenly becomes wildly effective after a small change in bait. That usually is not luck. It is seasonality. Someone hangs a bottle trap in June with a sweet soda and catches almost nothing. They switch to a small protein bait and suddenly start catching yellowjackets. A month later, the same meat bait stops working well, so they move to fruit juice or beer and the trap gets busy again. The trap did not magically become smarter. The user simply started paying attention to what the wasps wanted at that time of year.
Another frequent lesson is placement. Many homeowners instinctively hang a trap right beside a deck or patio because that is where they see the wasps. Unfortunately, that can increase activity near the exact place they are trying to protect. People often get better results after moving traps to the yard perimeter, near a fence line, beside a fruit tree, or along the edge of a garden. The change feels small, but it matters because it turns the trap into an interception point instead of a wasp magnet above the lemonade.
Gardeners also notice that sanitation changes the whole game. A trap can help, but if fallen pears are fermenting under a tree, dog food is sitting on the porch, and the garbage can lid is more of a suggestion than a reality, the trap has serious competition. Many of the best outcomes come from combining a homemade trap with basic cleanup: picking ripe fruit on time, removing rotting fruit from the ground, wiping sticky outdoor surfaces, and keeping trash sealed. In other words, the trap works better when it is not competing against an all-you-can-eat buffet.
Fruit growers and backyard orchard fans often describe a slightly different pattern. They may notice that paper wasps become more of a problem as peaches, grapes, figs, or berries ripen. In that setting, fruit-based traps placed before harvest can be more helpful than meat bait. People who wait until fruit is already damaged sometimes feel like the trap “failed,” when really they just started late. Timing matters almost as much as bait choice.
Then there is the universal experience of underestimating maintenance. A fresh trap smells appealing to wasps. A trap full of old insects and diluted bait after a rainstorm smells like neglect. Homeowners who check traps regularly usually report better results than those who hang one in May and remember it again around Labor Day.
Finally, experienced backyard tinkerers learn a truth that deserves framing: a homemade wasp trap is a management tool, not total domination. It can absolutely make a patio, garden edge, or fruit tree area more tolerable. It can reduce nuisance traffic. It can save a cookout from turning into an airborne negotiation. But when there is a nest in the wall or an underground colony beside the front steps, most people quickly realize that the bottle trap is not the hero of that story. At that point, smart judgment beats stubborn DIY pride every time.
Conclusion
A homemade wasp trap with seasonal baits is one of the simplest and most effective low-cost ways to reduce nuisance wasps in a yard, especially when you tailor the bait to the time of year. Use protein bait in spring and early summer, switch to sweet or fermenting bait in late summer and fall, and place traps away from patios and other busy areas. Refresh bait regularly, clean up competing food sources, and remember that traps work best for local foragers, not major nest removal.
Done right, a DIY bottle trap can make your backyard more comfortable without turning your weekend into an overcomplicated pest-control experiment. And that is the dream, really: fewer wasps, more peace, and a much lower chance of sharing your soda with an uninvited striped bodyguard.