Table of Contents >> Show >> Hide
- Why a Bathroom Roof Vent Matters
- Before You Start: Decide Whether Roof Venting Is the Best Option
- Tools and Materials You’ll Likely Need
- Choose the Right Fan Size First
- How To Install a Bathroom Roof Vent Step by Step
- Common Mistakes to Avoid
- How Long Should You Run the Fan?
- Signs Your Bathroom Roof Vent Is Working Properly
- Real-World Experience: What This Job Feels Like in Practice
- Final Thoughts
- SEO Tags
Installing a bathroom roof vent is one of those projects that sounds small until you realize it involves moisture, airflow, shingles, flashing, attic space, and at least one moment where you question every life decision that brought you onto a roof with a pry bar. The good news is that, done correctly, a bathroom roof vent helps move humid air outside, protects paint and drywall, reduces the chance of mold, and gives your exhaust fan a fighting chance to do more than make noise.
If your bathroom fan currently dumps air into the attic, you do not have a ventilation system. You have a fog machine with ambitions. A proper bathroom roof vent sends that damp air outdoors through a sealed duct and roof cap, which is exactly what you want in a room that regularly turns into a miniature rainforest.
This guide walks through how to install a bathroom roof vent in a practical, step-by-step way. It also covers sizing, materials, common mistakes, and real-world experience so you can avoid the classic DIY ending: “It looked great until the ceiling stained in February.”
Why a Bathroom Roof Vent Matters
A bathroom exhaust fan is only as good as the path it uses to get moist air out of the house. When warm, humid bathroom air is allowed to linger, it can contribute to peeling paint, musty smells, swollen trim, and condensation in all the places you do not want condensation. Routing that air outside through a bathroom roof vent helps protect both indoor air quality and the structure around the bathroom.
For many top-floor bathrooms, venting through the roof is the most direct option. A short, straight duct run generally performs better than a long, winding path with extra elbows. That means better airflow, less noise, and less chance of condensation forming inside the duct. In plain English: the fan actually works, and your attic is less likely to feel like a tropical greenhouse.
Before You Start: Decide Whether Roof Venting Is the Best Option
A roof termination often makes sense when the bathroom sits just below the attic and the duct can travel upward with minimal bends. If the bathroom is located on a lower floor, a wall termination may be easier. The best route is usually the most direct route to the outdoors while following the fan manufacturer’s instructions and local code requirements.
Roof work is not the place for overconfidence. If your roof is steep, slippery, very high, or in rough condition, hire a qualified adult professional. The same goes for electrical work if you are adding a new fan, new switch, or humidity sensor. A bathroom roof vent is a great upgrade. A trip to urgent care is not.
Tools and Materials You’ll Likely Need
Basic Tools
- Tape measure
- Drill and small pilot bit
- Utility knife
- Reciprocating saw or hole saw
- Pry bar
- Caulk gun
- Hammer or driver
- Tin snips or side cutters
- Ladder and roof-safety gear
Materials
- Roof vent cap sized for your duct
- Insulated duct or insulated flex duct
- Metal duct connector if required
- HVAC foil tape or approved duct sealing product
- Roof cement or exterior roofing sealant
- Roofing nails or approved fasteners
- Exterior-grade caulk
- Bathroom exhaust fan, if you are installing or replacing the fan too
- Timer switch or humidity-sensing control, optional but smart
Choose the Right Fan Size First
Before you install a bathroom roof vent, make sure your bathroom exhaust fan is sized properly. In many standard bathrooms, a minimum of 50 CFM is the baseline, and a common rule of thumb is about 1 CFM per square foot for bathrooms up to 100 square feet. Larger bathrooms may need extra capacity based on fixtures such as a toilet, shower, tub, or jetted tub.
If your fan is undersized, the roof vent will not magically turn it into a powerhouse. That is like giving a lawn mower racing stripes and expecting it to win Daytona. Match the fan to the room, then build a duct path that helps the fan deliver its rated airflow.
How To Install a Bathroom Roof Vent Step by Step
1. Plan the Duct Route
Go into the attic and look for the shortest, straightest path from the bathroom exhaust fan to the roof. Avoid unnecessary bends. If possible, keep the first section of duct as straight as you can. Also make sure the roof cap location will sit between rafters and away from obstructions.
Pick a route that lets the duct slope gently and stay supported. In unconditioned attic space, insulated duct helps reduce condensation. That matters because warm, humid air from showers can meet a cold duct and leave you with dripping water inside the line. Nobody wants a vent system that doubles as an indoor rain simulator.
2. Mark the Roof Opening From Inside
Once you know where the vent cap should go, drill a small pilot hole up through the roof deck from the attic. This gives you a reliable marker when you move to the roof. Position the hole so the cap will fit between rafters and sit where shingles can properly overlap the vent flange.
Take your time here. A carefully placed pilot hole is the difference between “clean install” and “why is this vent cap six inches from a rafter?”
3. Cut the Roof Opening
On the roof, find the pilot hole. Use a utility knife to cut the shingles as needed, then carefully loosen surrounding shingles with a flat pry bar. Follow the roof cap manufacturer’s opening size. Many common bathroom roof vent kits for 3-inch or 4-inch duct call for about a 5-inch roof opening, but always verify the exact requirement for your cap.
Cut through shingles and roof sheathing cleanly. Keep debris out of the duct area, and do not make the opening larger than necessary. A tidy hole is easier to flash, easier to seal, and far less likely to invite leaks.
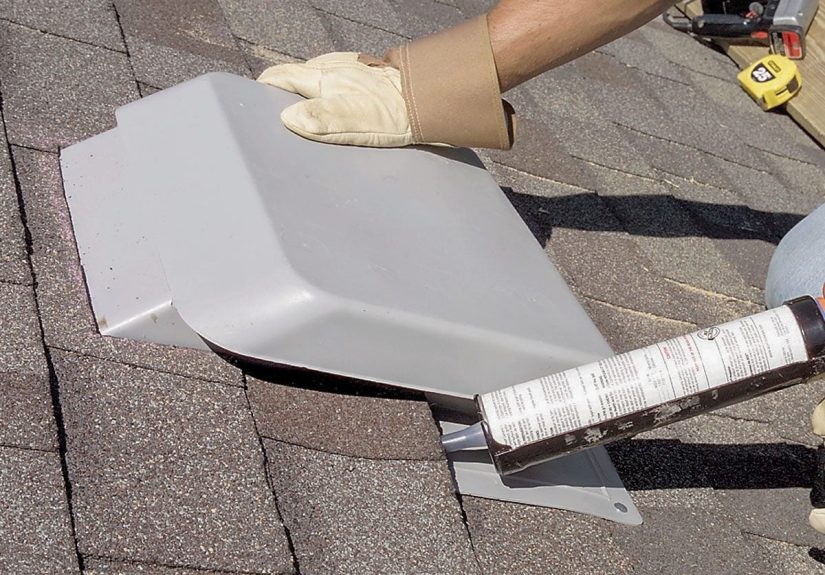
4. Install the Roof Vent Cap and Flashing
Attach any required duct connector to the underside of the roof cap. Dry-fit the cap first so you can trace the flange if needed and confirm that it slides properly under the upper shingles. The top and side portions of the flange should tuck under shingles, while the lower edge remains exposed to shed water correctly.
Apply roofing sealant where the manufacturer calls for it, insert the cap into the opening, and fasten it according to the instructions. Seal nail heads and any shingle overlaps as required. The goal is simple: water should behave as if the vent cap has always lived there.
One important note: some standard roof caps are not intended for flat roofs. If your roof is flat or very low-slope, use a termination approved for that application instead of improvising with wishful thinking.
5. Connect the Duct From the Fan to the Roof Cap
Back in the attic, run the duct from the bathroom exhaust fan to the roof cap connector. Use the duct diameter recommended by the fan manufacturer. Do not reduce the duct size just because a smaller piece is already lying around in the garage beside a mystery screw collection and three half-empty paint cans.
Seal the joints with approved foil tape or another manufacturer-approved sealing method. Keep the duct run as direct as possible and avoid tight turns. If you use insulated flex duct, pull it fairly taut without crushing it, because sagging and sharp bends restrict airflow.
6. Air-Seal the Penetrations
Seal around the fan housing at the ceiling and around the roof penetration as needed. Air sealing matters because gaps allow conditioned indoor air to leak into the attic, which can create energy loss and moisture problems. Use appropriate caulk, spray foam, or sealing products in the right locations, and make sure the exterior flashing details are weather-tight.
This is the part many people rush, then later wonder why the bathroom still feels damp or why the attic smells suspiciously like shampoo. Air sealing is not glamorous, but it is one of the reasons a vent system performs well over time.
7. Test the System
Turn on the bathroom exhaust fan and make sure air is discharging outside through the roof vent. Check for rattling, backdraft issues, or duct sections that look pinched. A simple tissue test at the fan grille can help confirm suction, though the real test is whether the bathroom clears moisture effectively after use.
If you are upgrading controls, install a timer or humidity-sensing switch. A timer is a smart addition because people tend to leave the bathroom and turn the fan off too soon. The fan should keep running after a shower long enough to remove lingering humidity.
Common Mistakes to Avoid
Venting Into the Attic
This is the biggest mistake, and it is a costly one. Dumping warm, damp air into the attic can lead to mold, damp insulation, wood damage, and a lovely musty aroma no one requested.
Using a Duct That Is Too Small
A smaller duct can reduce airflow and increase noise. Match the duct to the fan’s specifications rather than forcing the fan to perform through a skinny straw.
Too Many Bends
Every bend adds resistance. A duct that snakes around the attic like it is sightseeing will not move air efficiently.
Skipping Insulation on the Duct
In cold attic spaces, uninsulated ductwork can collect condensation. That moisture can drip back toward the fan or ceiling.
Poor Flashing Details
If the roof cap is not integrated correctly with the shingles, water can find its way in. Roof leaks are patient, creative, and very good at ruining ceilings.
How Long Should You Run the Fan?
A good rule is to run the fan during the shower and keep it running afterward. Many ventilation recommendations suggest at least 20 minutes after use, and in especially humid bathrooms, longer runtime may be helpful. A timer switch or humidity sensor makes this much easier because it removes the human tendency to say, “Eh, probably fine,” and walk away.
Signs Your Bathroom Roof Vent Is Working Properly
- The mirror clears faster after showers.
- The bathroom smells fresher and less musty.
- Paint and trim are less likely to peel or swell.
- You do not see moisture staining around the fan grille.
- The attic stays dry, with no visible dampness near the duct or roof cap.
Real-World Experience: What This Job Feels Like in Practice
In real homes, installing a bathroom roof vent is rarely difficult because of one giant step. It is difficult because of seven small details that all matter at once. Homeowners often begin this project thinking the hard part will be cutting the hole in the roof. Surprisingly, that is not always the part that slows things down. More often, the time disappears in planning the duct path, shifting insulation around in the attic, double-checking measurements, and finding the exact spot where the cap fits between rafters and still lands well under the shingles.
Another very common experience is discovering that the old setup was much worse than expected. People open the attic and find a loose duct pointed toward insulation, a crushed flex line, or a fan that technically exists but does almost nothing except hum with confidence. Once the new bathroom roof vent is installed correctly, the difference is usually obvious within days. Mirrors clear faster, the room smells cleaner, and the damp feeling after a shower fades much sooner.
Many homeowners also report that the project teaches them how much airflow depends on details they never used to notice. A short, smooth duct run performs very differently from a long duct with multiple bends. An insulated duct behaves differently from a bare metal or sagging flex line in a cold attic. Even a solid fan can seem weak if the duct is undersized or poorly connected. That “aha” moment tends to happen during the first test run, when a properly vented fan suddenly sounds less strained and actually pushes air where it is supposed to go.
There is also the roof factor. People who are perfectly comfortable with drills, saws, and attic work often discover that roof work feels different. The surface angle, the weather, the shingles, and the need to protect flashing details all raise the stakes. That is why many successful DIYers split the job in a smart way: they install the fan and duct inside, then hire a roofer for the exterior penetration if the roof is steep or the weather is questionable. That is not quitting. That is excellent judgment wearing work boots.
Perhaps the most satisfying part of the experience is that this is not a flashy upgrade, but it makes the house work better every single day. You do not install a bathroom roof vent for bragging rights at a barbecue. You install it because bathrooms create moisture, houses hate trapped moisture, and prevention is much cheaper than repair. In real life, that kind of project ages well. It is quiet, useful, and deeply unglamorous, which is often the secret recipe for a smart home improvement decision.
Final Thoughts
Learning how to install a bathroom roof vent is really about learning how to manage moisture the right way. The best setup is not complicated: a properly sized bathroom exhaust fan, a short and direct duct route, an insulated and sealed duct, and a roof cap flashed correctly so water stays out and humid air goes where it belongs.
If you treat the roof cap like roofing work and the duct like airflow work, you will get much better results than if you rush the whole job as “just a fan vent.” Take the time to plan it well, follow the manufacturer’s instructions, and use a timer or humidity control so the fan actually finishes the job after the shower ends.
Note: Roof cutting and electrical hookup can be hazardous. If the roof is steep, the weather is poor, or wiring changes are needed, use a qualified adult professional for those portions of the project.