Table of Contents >> Show >> Hide
- What Is a DIY Concrete Glaze, Exactly?
- When This Method Works Best
- Materials You Will Need
- Surface Prep: The Part Everyone Wants to Skip and Nobody Should
- How to Mix Fabric Dye and Sealer for a Concrete Glaze
- Best Color Strategies for a Natural Look
- How to Apply the Glaze
- How to Create Different Decorative Effects
- Should You Add a Final Clear Coat?
- Common Mistakes to Avoid
- How Long Will It Last?
- Is This Better Than Standard Concrete Stain?
- Real-World Experience With DIY Concrete Glaze
- Final Thoughts
Concrete has a reputation for being practical, tough, and about as emotionally expressive as a cinder block at a tax seminar. But with the right approach, it can look layered, rich, and surprisingly custom. That is where a DIY concrete glaze with fabric dye and sealer comes in. Instead of creating a thick painted coat that hides the surface, this technique aims for a translucent, stain-like wash that lets some of the texture and character of the concrete show through.
If that sounds fancy, relax. This is still a weekend DIY project, not a laboratory experiment conducted by a person wearing twelve pairs of goggles. The method is simple in spirit: use a small amount of water-based fabric dye to tint a compatible sealer, then apply it in thin coats to create a soft color wash. The result can feel a little like a concrete stain, a little like a glaze, and a lot more interesting than plain gray.
The key word is decorative. This is not the same thing as a factory-formulated concrete dye or an acid stain. It is an experimental finish for DIYers who want to play with color on planters, stepping stones, craft-scale slabs, accent pieces, and certain low-risk surfaces. When done carefully, it can produce a beautiful aged look, a smoky tinted finish, or a modern wash of color that feels custom rather than cookie-cutter.
What Is a DIY Concrete Glaze, Exactly?
In this context, a concrete glaze is a thin, tinted topcoat that changes the appearance of the surface without burying all of its natural variation. Think of it as a color wash rather than a heavy paint film. A good glaze-style finish should let the pores, speckles, and subtle tonal changes of the concrete remain visible. That is what gives concrete its charm. Well, that and its ability to survive weather, dropped tools, and the occasional questionable design decision.
Using fabric dye in the mix can create a surprisingly lively color effect because the dye is transparent rather than chalky. When it is blended into the right water-based sealer, it can help tint the clear coat just enough to shift the surface color while keeping the look semi-transparent. That said, this is not a universal recipe for every sealer, every slab, or every dream you had at 2 a.m. after scrolling through patio makeover photos. Test first. Always.
When This Method Works Best
This DIY concrete glaze with fabric dye and sealer works best when you treat it like an artistic finish, not a miracle cure for damaged concrete. It is ideal for:
- Concrete planters and cement pots
- Small tables, coasters, and decorative slabs
- Garden accents and stepping stones
- Sheltered patios or low-traffic accent zones
- Concrete pieces where a mottled, layered look is a plus
It is less ideal for heavily used driveways, commercial floors, or surfaces with active moisture problems, flaking concrete, heavy oil contamination, or an old mystery coating that has been hanging on since the early age of reality television. If the substrate is failing, the prettiest glaze in the world will not save it.
Materials You Will Need
- Clean, cured concrete surface
- Water-based acrylic concrete sealer or compatible clear masonry sealer
- Liquid fabric dye
- Small mixing container
- Stir stick
- Foam brush, synthetic brush, sponge, microfiber applicator, or short-nap roller
- Spray bottle with water for blending edges if needed
- Mild concrete cleaner or degreaser
- Stiff brush and clean rags
- Protective gloves and eye protection
- Painter’s tape and drop cloths
Surface Prep: The Part Everyone Wants to Skip and Nobody Should
If you remember one thing from this article, make it this: concrete prep decides whether your finish looks intentionally artistic or accidentally haunted. Concrete needs to be clean, dry, sound, and able to absorb the finish. Dirt, grease, old sealer, or trapped moisture can cause uneven color, weak adhesion, cloudy patches, or peeling.
1. Make Sure the Concrete Is Fully Cured
Fresh concrete should not be rushed into a finish. If your project is newly poured, give it proper curing time before glazing. Small craft pieces may feel dry on the surface long before they are actually ready. Patience is not flashy, but it is cheaper than redoing the project.
2. Clean It Thoroughly
Sweep loose debris first. Then wash away dirt, grease, and stains using a cleaner that is appropriate for concrete. Rinse well and allow the surface to dry completely. If the concrete has oily spots, keep cleaning until water no longer beads around them. Oil is the enemy of even color.
3. Check for Existing Sealer
Here is an easy test: sprinkle a few drops of water on the surface. If the water darkens the concrete and absorbs in, that is a good sign. If it beads up like the concrete is wearing an invisible raincoat, you probably have an old sealer or coating that needs to be removed before applying a glaze-style finish.
4. Fix Flaws Before You Color
Hairline cracks, chips, rough filler spots, or glue residue will often show through a translucent finish. Sometimes that adds character. Sometimes it adds regret. Patch what needs patching and smooth down problem areas before moving on.
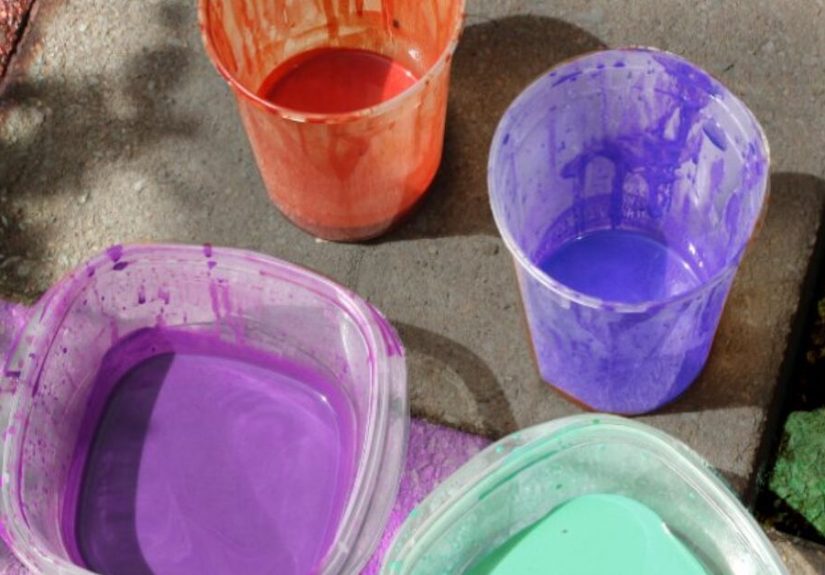
How to Mix Fabric Dye and Sealer for a Concrete Glaze
This is where the fun starts, along with the possibility of making something gorgeous or something that looks like a blueberry sneezed on your planter. Start small.
A safe beginner approach is to mix a small batch using:
- 1 cup water-based clear sealer
- 1 to 2 teaspoons liquid fabric dye
- Optional: 1 to 2 teaspoons water if you want a thinner wash
Stir thoroughly and test the mixture on the underside or a hidden section of your concrete piece. Let it dry fully before judging the color. Wet glaze almost always looks darker than the final dried result. If the effect is too faint, add a little more dye. If it looks overly strong or starts feeling paint-like, back off and add more sealer.
The goal is not to create opaque coverage. You want a translucent tone that can be built in layers. In most cases, several light coats look far better than one heavy coat. Heavy coats tend to puddle, streak, or leave shiny patches that scream, “I made a bold choice and now I must live with it.”
Best Color Strategies for a Natural Look
Not every color plays nicely with concrete. Some bright fabric dyes can look stunning on a shirt and a little dramatic on a cement pot. For a finish that feels sophisticated, try muted, earthy, or smoky colors first.
- Charcoal or black: great for a weathered, industrial effect
- Brown or tan: useful for warm stone-like tones
- Blue-gray: modern, moody, and subtle when diluted
- Terracotta or rust tones: good for aged garden pieces
- Green-gray washes: can create a soft patina effect
You can also layer two related tones. For example, a diluted gray-blue base followed by a whisper of charcoal can add depth without making the concrete look painted. The secret is restraint. Concrete loves nuance. It does not always love neon.
How to Apply the Glaze
Step 1: Tape and Protect the Area
Cover nearby surfaces and tape off anything you do not want tinted. Fabric dye has an impressive talent for finding sleeves, fingers, and innocent bystanders.
Step 2: Start With a Test Patch
Apply a little glaze in an inconspicuous area. Let it dry completely. Check the color, sheen, and absorption. This tiny step can save the whole project.
Step 3: Work in Small Sections
Use a foam brush, sponge, microfiber pad, or roller to apply the glaze in thin, even passes. For a mottled decorative look, dab and feather the material rather than brushing it like wall paint. For a more uniform finish, apply in smooth overlapping strokes.
Step 4: Wipe or Feather Excess
If you notice puddling, dark drips, or hard edges, soften them right away with a clean rag or slightly damp sponge. Concrete can grab color quickly in some areas and slowly in others, so keep an eye on the surface as you work.
Step 5: Let It Dry and Build Slowly
Allow the first coat to dry before deciding whether it needs another. One coat may give a whisper of color. Two or three light coats can produce more depth. The finish should look layered, not smothered.
How to Create Different Decorative Effects
Soft Wash Finish
Use a very diluted mix and apply with a sponge or microfiber cloth. This gives concrete a subtle tinted haze and works especially well on modern planters or minimalist decor pieces.
Antiqued Look
Apply a slightly darker glaze unevenly, then wipe back the high spots. The color will settle more in pores and texture, which makes the surface look older and more dimensional.
Layered Stone Effect
Build two or three related colors in thin coats, allowing dry time between layers. This can mimic the tonal variety found in natural stone or aged masonry.
Edge Shading
Darken corners, rims, or recessed details slightly more than flat center areas. This gives a handmade piece more visual depth and a custom finish that looks intentional.
Should You Add a Final Clear Coat?
In many cases, yes. If your tinted glaze layer is light and decorative, a final compatible clear sealer can help protect it and even out the finish. This is especially useful on outdoor decor, tabletops, and pieces that may get damp or handled often. Make sure the tinted layer is dry first, and use thin coats rather than flooding the surface.
If your original glaze was already sealer-heavy and gave you the exact sheen you wanted, you may not need much more. But for most projects, a protective topcoat is a smart finishing step. Think of it as insurance for your hard work, with less paperwork and more drying time.
Common Mistakes to Avoid
- Using too much dye: this can create a blotchy or overly artificial look
- Applying to sealed concrete: the finish may sit on top and fail unevenly
- Skipping the test patch: famous last words in DIY
- Using a thick coat: heavy application increases streaks and tacky spots
- Working on dirty concrete: grime becomes part of the “design” whether invited or not
- Ignoring moisture: trapped dampness can cause haze or adhesion trouble
How Long Will It Last?
That depends on where the piece lives, how much sun and weather it gets, and how well it was sealed. On small decorative items in sheltered conditions, the finish can last quite well with occasional maintenance. On high-traffic or full-weather surfaces, expect more wear and be prepared for touch-ups. This is one reason many DIYers love testing the technique first on planters or cement decor before trying it on larger surfaces.
Is This Better Than Standard Concrete Stain?
Not better. Just different. Standard concrete stain products are formulated specifically for masonry and usually offer more predictable adhesion, colorfastness, and performance. A DIY concrete glaze with fabric dye and sealer is best for people who want creative control, semi-transparent color, and a handmade finish on smaller or less demanding projects.
In other words, if you want the most reliable technical solution for a large patio, buy a real concrete stain system. If you want to experiment, customize the color, and enjoy a crafty decorative process, this DIY method is a fun option. Both paths are valid. One is just more likely to involve a sponge and a burst of artistic confidence.
Real-World Experience With DIY Concrete Glaze
The most useful thing about this method is how forgiving it feels once you stop expecting factory perfection. The first time many DIYers try a concrete glaze with fabric dye and sealer, the biggest surprise is how subtle the first coat looks. It can be almost disappointingly faint at first. Then, as the surface dries and the second coat goes on, the character starts showing up. A plain planter begins to look aged. A small tabletop starts reading like stone. A cement tray suddenly looks like something you paid too much for at a boutique home store and then defended passionately to your friends.
A common real-life experience is discovering that concrete absorbs color unevenly, even when it seems smooth. Areas around edges, pinholes, patch spots, and cast texture usually take color differently. Instead of fighting that, the best results often come from leaning into it. Dabbing with a sponge, wiping back darker spots, and layering in light passes creates a finish that looks more natural than one single perfect coat ever could.
Another thing people notice quickly is that color choice matters more than they expected. Deep black can look elegant on one piece and harsh on another. Brown can turn wonderfully earthy or strangely muddy depending on the base concrete. Blue, when diluted heavily, often gives a sophisticated cool cast that reads more gray than blue. That is why test boards, sample coasters, or the underside of a planter become your best friends. A five-minute sample can prevent a five-hour meltdown.
There is also the hands-on side of the experience. This project feels less like painting a wall and more like finishing furniture or doing an art wash. You watch the surface closely. You adjust pressure. You change tools halfway through because the sponge creates softer variation while the brush reaches texture around the rim. It is tactile and a little improvisational. For creative DIYers, that is half the fun.
One especially satisfying part is the reveal after the final clear coat. Before sealing, the project can look dry, dusty, and uncertain, like it is still making up its mind. Once the compatible clear coat goes on, the depth becomes more obvious. The color deepens slightly, the mottling looks intentional, and the concrete texture comes alive. That final step often turns a “maybe this worked?” project into a confident “oh, that actually looks great” moment.
Of course, the experience is not all cinematic success and triumphant background music. Sometimes a piece dries darker on one side. Sometimes an old patch shows through more than expected. Sometimes the glaze mix is too strong and you have to dilute it, wipe it back, or start again with a lighter second pass. But even those moments tend to be fixable if you work in thin layers and stay patient.
Overall, the lived experience of this project is what makes it worth trying. It is inexpensive, flexible, and surprisingly creative. You are not just protecting concrete; you are giving it personality. And frankly, gray cement deserves a little drama now and then.
Final Thoughts
DIY concrete glaze with fabric dye and sealer is a smart creative option for decorative concrete projects when you want a semi-transparent, custom finish without jumping straight into industrial coatings or expensive specialty systems. The process is simple: prep thoroughly, mix lightly, test first, apply in thin coats, and protect the result with a compatible clear sealer if needed.
The beauty of this technique is that it does not try to make concrete into something it is not. It still looks like concrete. It just looks better dressed. Whether you want a smoky charcoal planter, a softly weathered garden accent, or a subtle color wash on a handmade cement tray, this method gives you room to experiment and create a finish that feels personal, layered, and distinctly not boring.