Table of Contents >> Show >> Hide
- Why Grow Clematis From Seed?
- Choose the Right Clematis Seed
- Understand Clematis Seed Dormancy
- How to Stratify Clematis Seeds
- How to Sow Clematis Seeds After Stratification
- How Long Clematis Seeds Take to Germinate
- Seedling Care: The Make-or-Break Stage
- When to Move Clematis Seedlings Outdoors
- Best Soil and Light Conditions for Seed-Grown Clematis
- Common Problems When Growing Clematis From Seeds
- Can You Grow Clematis From Seed Successfully?
- Grower Experiences: What It Really Feels Like to Grow Clematis From Seeds
- Final Thoughts
- SEO Tags
Growing clematis from seeds is a little like adopting a cat from a shelter that refuses to make eye contact. It may ignore you at first, act mysterious for a while, and then one day become the undeniable star of the garden. If you are patient, organized, and willing to accept that clematis seeds run on their own gloriously inconvenient schedule, you can raise healthy vines and herbaceous types from seed at home.
This method is especially useful for species clematis and native types. It is also a satisfying way to grow a lot of plants without spending a small fortune on nursery pots that somehow cost as much as lunch. The catch is that clematis seed germination is often slow, uneven, and occasionally dramatic in the way only gardening can be. One tray sprouts in a month. Another tray sits there like a decorative box of disappointment until you have nearly given up. Then, boom, green.
Here is the good news: once you understand how clematis seeds behave, the process becomes much less mysterious. You do not need a greenhouse, a laboratory, or a wizard with a misting wand. You need good seed, a clean seed-starting setup, moisture control, cold stratification, and the emotional resilience to not dump the tray too soon.
Why Grow Clematis From Seed?
Most gardeners buy clematis as nursery plants because they want flowers sooner. That is reasonable. We all enjoy instant gratification. However, starting clematis from seed has real advantages. It is budget-friendly, useful for growing species types, and ideal for gardeners who enjoy propagation as much as the final display. It can also be the best route for native clematis species that are harder to find at local garden centers.
Seed-grown clematis can also surprise you. Some seedlings may vary in vigor, bloom timing, or flower character, especially if the seed came from open-pollinated plants. That unpredictability is either a charming adventure or a personality test, depending on your mood.
Choose the Right Clematis Seed
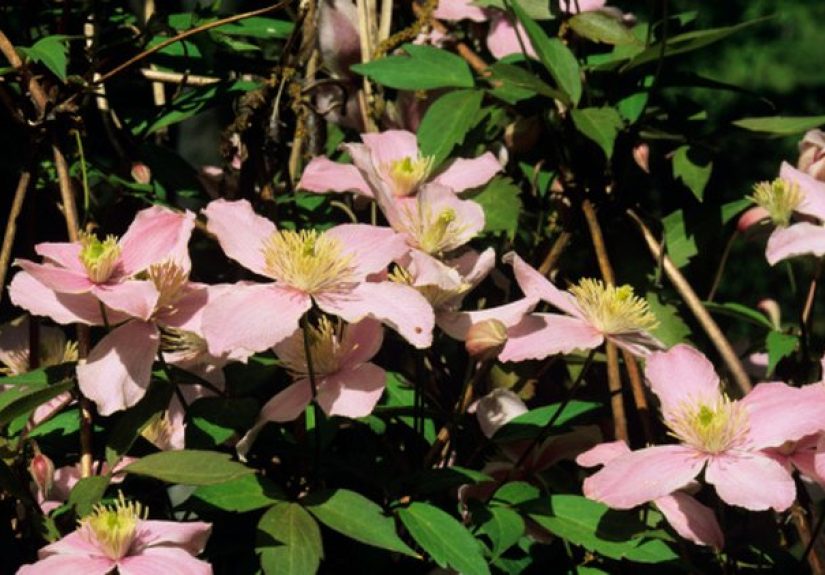
Start with fresh, viable seed from a trusted supplier or collect it from a healthy plant in fall when the seed heads have matured. Clematis seeds are usually attached to feathery tails or silky plumes, and ripe seed heads often turn brown or coppery. At that point, they are usually ready for collection.
If you are collecting your own seed, choose a dry day. Snip mature seed heads into a paper bag, let them air-dry indoors for a few days, and gently separate the seeds from the fluffy tails if needed. Label everything clearly. “Mystery Vine Seed 1” sounds cute until spring arrives and you cannot remember what on earth you sowed.
Fresh seed is often your best bet, but stored seed can still work well when treated properly. The main thing is to keep it dry and cool until you are ready to stratify or sow.
Understand Clematis Seed Dormancy
This is the part many beginners miss: clematis seeds are not usually difficult because they are fussy in a dramatic reality-show way. They are difficult because many of them are naturally dormant. In nature, that dormancy helps the seed avoid sprouting at the wrong time. In your home setup, it means the seed may need a period of cold, moist conditions before it wakes up and decides life is worth living.
That process is called cold-moist stratification. Think of it as winter in a bag. For many clematis seeds, this step improves germination and helps break dormancy. Depending on the species, the required chill period may be around 60 to 90 days, and some native types benefit from even longer treatment.
This is why many gardeners fail on their first try. They sow the seed in warm soil, wait three weeks, see nothing, and assume the seed is dead. The seed, meanwhile, is basically saying, “Dead? No. Just unconvinced.”
How to Stratify Clematis Seeds
Method 1: Refrigerator Stratification
This is the easiest method for most home gardeners. Lightly moisten a sterile medium such as seed-starting mix, vermiculite, or a mix of peat-free seed compost and perlite. It should feel damp, not soggy. Put the medium in a labeled zip-top bag or sealed container, mix in the seeds, and refrigerate it for 2 to 3 months.
Do not freeze the seeds. Do not let them swim. You are trying to simulate winter soil, not create a tiny swamp or a botanical popsicle.
Check the bag every couple of weeks. If the medium dries, mist it lightly. If it develops mold, open it, improve air exchange, and replace overly wet medium. Cleanliness matters here because seeds that take a long time to germinate are more vulnerable to fungal trouble.
Method 2: Outdoor Winter Sowing
If your climate has a real winter, you can sow clematis seed outdoors in containers and let natural cold do the work. Use a pot or lidded winter-sowing container with drainage holes, fill it with seed-starting mix, sow the seeds lightly, and leave it in a protected outdoor spot through winter.
This method is wonderfully low-tech and often effective, but it requires patience and decent labeling. Otherwise, by April you may have a container of unknown seedlings and a strong suspicion that you have raised either clematis or a very ambitious weed.
How to Sow Clematis Seeds After Stratification
Once the stratification period is done, sow the seeds in clean pots or seed trays filled with a sterile, well-drained seed-starting mix. Clematis seeds should generally be covered lightly rather than buried deeply. A dusting of mix to about 1/8 inch, and no more than 1/4 inch for larger seed, is usually a sensible range for home sowing.
Space the seeds so seedlings have airflow. Crowding raises the risk of damping off, which is one of those gardening phrases that sounds harmless until your seedlings collapse overnight like tiny stage actors in a Victorian tragedy.
After sowing, water gently so you do not wash the seeds into one corner of the tray. Place the containers in bright light. Warm room temperatures are usually fine after stratification, but avoid extremes. Keep the mix evenly moist, never waterlogged.
How Long Clematis Seeds Take to Germinate
Here is the honest answer: it depends. Some clematis seeds germinate in a few weeks after stratification. Others take several months. A few seem to enjoy making you question your life choices before appearing.
Do not throw out the tray too early. As long as the medium stays clean and the seeds have not rotted, patience pays. Clematis does not care about your calendar, your optimism, or the encouraging speech you gave it three Saturdays ago.
If germination is sparse, that does not always mean failure. Clematis often germinates unevenly. One seedling may appear now, another later, and another when you have already repurposed the tray for basil and regret your impulsiveness.
Seedling Care: The Make-or-Break Stage
Once seedlings emerge, remove any covering that traps too much humidity and move them into strong light. Bright indoor light or supplemental grow lights help prevent lanky, weak growth. Seedlings grown in poor light stretch, lean, and generally behave like teenagers avoiding chores.
Water carefully. The goal is steady moisture, not constant saturation. Soggy conditions invite damping off and root problems, while bone-dry conditions can stop young seedlings cold.
When the first true leaves appear, or when seedlings are large enough to handle safely, transplant them into individual pots. Hold them by the leaves, not the stem. Stems are delicate, and one careless squeeze can end the gardening career of an otherwise promising plant.
Use a small dibble, pencil, or plant label to lift seedlings gently. Replant them at the same depth they were growing before, firm the medium lightly, and water them in. Then place them back into bright light and let them continue building roots.
When to Move Clematis Seedlings Outdoors
Do not rush. Young clematis seedlings are not yet the rugged lattice-climbing heroes pictured in catalogs. They are babies with ambition. Let them establish a small but healthy root system in pots before transplanting outside.
Harden them off gradually by moving them outdoors for longer periods over 7 to 10 days. Start in shade, protect them from strong wind, and avoid planting into hot, exposed conditions right away.
When you are ready to plant them in the garden, choose a site with well-drained soil, good organic matter, and sturdy support. Clematis generally grows best with sun on the upper growth and cooler, shaded roots. Mulch helps, and low-growing companion plants can shade the root zone without smothering the vine.
Best Soil and Light Conditions for Seed-Grown Clematis
Sunlight
Most clematis performs best with several hours of sun, often around six hours for strongest flowering. In hot climates, some afternoon shade can help prevent stress and fading.
Soil
Well-drained, fertile soil is essential. Clematis dislikes standing in wet soil, especially when young. Work in compost or other organic matter before planting, but avoid turning the site into a soggy sponge.
Root Zone
The old advice still works: heads in the sun, feet in the shade. Mulch the base, plant a shallow-rooted companion nearby, and keep the root area evenly moist. Cool roots are happy roots. Happy roots make better vines.
Support
Give climbing types something slender enough to grab, such as netting, wire, thin trellis pieces, or small branches. Clematis climbs by twisting its leaf stalks around supports, so giant chunky posts are not especially helpful unless there is smaller material attached for the stems to grasp.
Common Problems When Growing Clematis From Seeds
No Germination
This usually comes down to dormancy, impatience, or inconsistent moisture. Recheck whether the seed received enough cold stratification and whether the medium dried out during the waiting period.
Mold or Rot
That usually points to too much moisture, poor airflow, or contaminated medium. Use clean containers, sterile mix, and lighter watering.
Seedlings Collapse
Damping off is the classic culprit. Avoid overcrowding, overwatering, and stale air. Start clean and water like a cautious grown-up, not like someone hosing down a driveway.
Weak, Stretchy Seedlings
They need more light. A bright window may not be enough, especially in winter or early spring. Supplemental lighting usually makes a big difference.
Can You Grow Clematis From Seed Successfully?
Yes, absolutely. But success comes faster when you stop expecting clematis to behave like marigolds. This is not a sow-on-Friday, bloom-by-Tuesday kind of plant. Clematis from seed rewards the gardener who plans ahead, labels everything, controls moisture, and accepts that germination may unfold in waves.
If you want exact duplicates of a named hybrid, buy a plant or propagate vegetatively. If you want the satisfaction of raising clematis from the very beginning, seed starting is deeply rewarding. It is slower, more experimental, and honestly more fun for gardeners who enjoy the process as much as the flowers.
Grower Experiences: What It Really Feels Like to Grow Clematis From Seeds
Gardeners who grow clematis from seed often describe the experience the same way: exciting at first, confusing in the middle, and weirdly addictive by the end. The first phase is pure optimism. You collect the fluffy seed heads, tuck the seeds into moist medium, label the bag like a model citizen, and slide it into the refrigerator with the confidence of someone who has definitely mastered propagation. Then the waiting begins.
The second phase is the quiet drama of checking. You open the fridge. You inspect the bag. You wonder whether the seeds are doing anything at all. They usually are, but not in a theatrical way. Nothing looks exciting. No fanfare. No triumphant soundtrack. Just seeds sitting in slightly damp mix, plotting their own schedule. This is the part where many new growers get impatient, and seasoned gardeners keep repeating the same advice: do not rush the process, and definitely do not toss the container just because it refuses to perform on command.
Once the seeds are sown after stratification, the emotional roller coaster continues. One gardener may get the first sprout in three weeks and feel like a propagation genius. Another may wait three months and become convinced the tray is a decorative tray of dirt. Then, right when hope is wobbling, a tiny green seedling appears. That single sprout is enough to restore full faith in gardening and probably inspire a slightly smug text message to a friend.
Another common experience is uneven germination. Gardeners often expect a tray of seedlings to appear all at once, as though nature follows a production schedule. Clematis rarely agrees. One seedling pops up early, another appears later, and a third emerges just when the grower has almost reused the pot. This staggered timing teaches patience better than any motivational poster ever could.
Many growers also notice that seedling care is more about restraint than action. The temptation is to overwater, overhandle, overfertilize, and generally love the seedlings to death. Clematis seedlings respond better to calm, steady care: bright light, modest watering, clean conditions, and space to breathe. In other words, they prefer thoughtful supervision over helicopter parenting.
And then comes transplanting. Gardeners often remember this part vividly because clematis seedlings look delicate, and they are. The first time you lift one successfully, pot it up, and see it continue growing, it feels disproportionately satisfying. By the time the plant finally reaches the garden and starts climbing its support, the relationship changes. It is no longer “a plant I bought.” It is “the clematis I raised from seed,” which sounds more dramatic and far more impressive at casual garden conversations.
That is probably the best reason to try it. Growing clematis from seed is not the quickest path to flowers, but it is one of the most satisfying. It teaches patience, observation, and timing. It also gives you a front-row seat to one of gardening’s best plot twists: a stubborn little seed becoming a vine with real presence, real flowers, and a story worth telling.
Final Thoughts
If you want to grow clematis from seeds, the secret is not magic, luck, or whispering encouraging words at the seed tray. It is understanding dormancy, using cold-moist stratification, keeping the sowing mix evenly moist but never soggy, and giving seedlings excellent light and gentle care. Do that, and you dramatically improve your odds.
Will every seed germinate? No. Will every tray behave the same way? Also no. But if you enjoy real gardening, the kind with patience, learning, and a little suspense, clematis from seed is absolutely worth the effort. The first time a seed-grown plant settles into the garden and starts climbing, you will feel like a genius. A humble genius with potting mix on your sleeves, but a genius all the same.