Table of Contents >> Show >> Hide
- What Is a Face Pull?
- Why Face Pulls Deserve a Spot in Your Workout
- How to Face Pull: 12 Steps
- Step 1: Choose the Right Equipment
- Step 2: Set the Anchor at the Right Height
- Step 3: Use a Light to Moderate Weight
- Step 4: Grip the Rope Correctly
- Step 5: Step Back and Create Tension
- Step 6: Set Your Stance and Posture
- Step 7: Begin by Moving the Shoulder Blades
- Step 8: Pull the Rope Toward Your Face
- Step 9: Separate the Rope at the End
- Step 10: Pause and Feel the Right Muscles
- Step 11: Return Slowly
- Step 12: Repeat for Quality Reps
- Common Face Pull Mistakes
- Best Face Pull Variations
- How Often Should You Do Face Pulls?
- Who Should Be Careful with Face Pulls?
- Sample Face Pull Workouts
- Experience Notes: What Face Pulls Feel Like in Real Training
- Conclusion
If your upper-body workout is mostly bench presses, push-ups, overhead presses, and the occasional heroic attempt at carrying all the groceries in one trip, your shoulders may be quietly filing a complaint. The face pull is one of the best exercises for balancing that pushing work, strengthening the rear delts, training the upper back, and improving shoulder positioning. It looks simple: grab a rope, pull it toward your face, repeat. But like many “simple” gym moves, it has a sneaky way of turning into a sloppy row, a biceps curl, or a dramatic battle with a cable machine.
This guide explains exactly how to face pull in 12 clear steps, including setup, form cues, common mistakes, beginner-friendly variations, programming tips, and practical experience from real training situations. Whether you use a cable machine, resistance band, or home-gym setup, the goal is the same: controlled movement, strong posture, happy shoulders, and zero need to glare at your reflection wondering why your traps are doing all the work.
What Is a Face Pull?
A face pull is an upper-body pulling exercise that targets the rear deltoids, rhomboids, middle and lower trapezius, and rotator cuff muscles. It is most often performed with a rope attachment on a cable machine, but it can also be done with a resistance band anchored at about upper-chest to face height.
The movement combines shoulder blade retraction, elbow drive, and external rotation. In normal-person language, that means you pull the rope toward your face while squeezing your shoulder blades back and rotating your hands so they finish near the sides of your head. Done correctly, it trains the muscles that help keep your shoulders from rounding forward like you have spent twelve hours arguing with a laptop.
Why Face Pulls Deserve a Spot in Your Workout
Face pulls are popular because they solve a common training problem: many people overtrain the front side of the body and undertrain the back side. Chest presses, dips, push-ups, and front raises all emphasize the front delts and chest. Without enough pulling and rear-shoulder work, posture can suffer, shoulder mechanics can feel cranky, and your upper back may become the forgotten intern of your workout program.
Main Benefits of Face Pulls
Face pulls can help strengthen the rear delts, improve scapular control, build upper-back endurance, support shoulder stability, and improve posture awareness. They are also useful as a warm-up, accessory exercise, or high-rep finisher after heavier back or shoulder training.
They are not magic. They will not instantly fix years of poor posture, make your shoulders bulletproof, or transform you into a superhero who owns three different foam rollers. But performed consistently with good form, they are one of the most practical exercises for building balanced shoulders and a stronger upper back.
How to Face Pull: 12 Steps
Step 1: Choose the Right Equipment
For the classic cable face pull, use a cable machine with a rope attachment. The rope allows your hands to separate naturally as you pull, which helps create external rotation at the shoulder. If you do not have a cable machine, use a resistance band anchored securely to a post, rack, or door anchor.
Avoid using a straight bar when learning the movement. A bar can restrict the natural path of your hands and make it easier to turn the exercise into a weird upright row. The rope is your friend here. Treat it nicely.
Step 2: Set the Anchor at the Right Height
Set the cable pulley around upper-chest, neck, or face height. A slightly higher setup usually helps you pull toward the eyes or forehead while keeping the elbows lifted. If the cable is too low, you may end up pulling upward awkwardly. If it is too high, you may shrug and let your upper traps hijack the exercise.
The best height is the one that lets you keep a neutral spine, relaxed neck, high elbows, and controlled shoulder blades throughout the movement.
Step 3: Use a Light to Moderate Weight
Face pulls are not the place to chase gym glory. Start lighter than you think you need. If the weight makes you lean back, jerk your torso, or turn the movement into a full-body tug-of-war, it is too heavy.
A good working weight should allow you to pause briefly at the end of the pull without losing posture. You should feel the rear shoulders and upper back working, not your lower back, ego, or survival instincts.
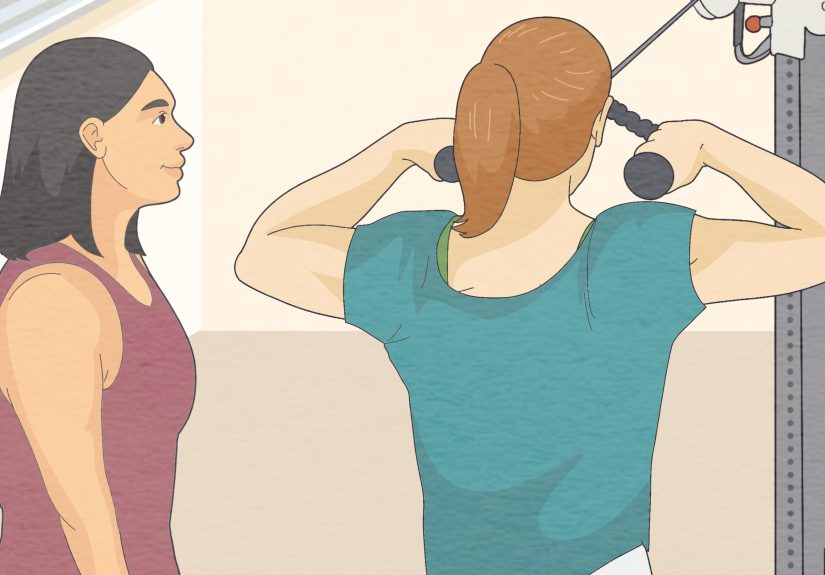
Step 4: Grip the Rope Correctly
Grab one end of the rope in each hand. Many lifters prefer a neutral grip with thumbs facing each other at the start. As you pull, allow the hands to separate and rotate so your knuckles move backward and your thumbs travel toward the sides or back of your head.
The exact grip can vary, but the key is this: your hands should not stay glued together. Let the rope split apart so your shoulders can rotate naturally.
Step 5: Step Back and Create Tension
Take one or two steps back from the cable stack until your arms are fully extended and the cable has tension. Do not let the weight plates slam down between reps. Constant tension helps keep the target muscles engaged and prevents the exercise from becoming a lazy reset every time your arms straighten.
Your body should feel stable before you start. If the cable is pulling you forward, reduce the load or adjust your stance.
Step 6: Set Your Stance and Posture
Stand with your feet about shoulder-width apart. You can use a square stance or stagger one foot slightly in front of the other for balance. Keep your knees soft, ribs down, and core lightly braced.
Avoid arching your lower back or sticking your chin forward. Imagine someone gently pulling the crown of your head upward while your shoulder blades slide into your back pockets. Yes, that sounds oddly poetic for a cable exercise, but it works.
Step 7: Begin by Moving the Shoulder Blades
Start the pull by drawing your shoulder blades slightly back and down. This small movement helps activate the upper back before the arms take over. Do not over-squeeze or force your shoulders into an exaggerated position. Think “controlled pinch,” not “trying to crack a walnut between your shoulder blades.”
This step matters because face pulls are not just an arm exercise. The shoulder blades should move smoothly along the rib cage as part of the motion.
Step 8: Pull the Rope Toward Your Face
Drive your elbows back and slightly outward as you pull the rope toward your nose, eyes, or forehead. Your upper arms should stay roughly parallel to the floor or slightly below shoulder height, depending on comfort and mobility.
Do not pull the rope to your chest like a seated row. That changes the exercise and reduces the emphasis on the rear delts and external rotators. The name is face pull, not “sternum yank.”
Step 9: Separate the Rope at the End
As the rope approaches your face, separate your hands so they finish near your ears or temples. Your elbows should be bent, your shoulder blades controlled, and your chest open without flaring your ribs.
At the end position, you should look a bit like you are flexing into a double-biceps pose, except more functional and less likely to scare the person waiting for the cable machine.
Step 10: Pause and Feel the Right Muscles
Hold the end position for a brief one-count pause. You should feel tension across the rear shoulders, upper back, and the muscles around the shoulder blades. A small amount of trap involvement is normal, but if your neck feels like it is doing taxes, lower the weight and relax your shoulders.
This pause is where the exercise becomes powerful. It teaches control instead of momentum and helps you build a better mind-muscle connection.
Step 11: Return Slowly
Extend your arms forward under control until they are straight again. Do not let the cable pull your shoulders into a sloppy rounded position. Allow the shoulder blades to move naturally forward, but keep your torso tall and your neck neutral.
The return phase should take about two seconds. If the weight stack crashes, the cable machine is not applauding you. It is complaining.
Step 12: Repeat for Quality Reps
Perform each rep with the same controlled rhythm. For most people, 2 to 4 sets of 10 to 20 reps works well. Beginners can start with 2 sets of 12 to 15 reps using light resistance. More experienced lifters may use face pulls as a warm-up, accessory movement, or finisher.
Stop the set when your form starts to fade. Face pulls reward precision, not punishment.
Common Face Pull Mistakes
Using Too Much Weight
The most common mistake is loading the cable too heavily. When the weight is too much, you lean back, swing, shrug, or shorten the range of motion. Face pulls work best with control and clean positioning.
Pulling Too Low
If you pull toward your chest, you are doing more of a row. Pull toward the face to keep the rear delts and external rotators involved.
Letting the Elbows Drop
Low elbows shift the work away from the rear shoulders. Keep the elbows lifted and moving backward, not tucked tightly against your ribs.
Shrugging the Shoulders
If your shoulders climb toward your ears, your upper traps may dominate. Lower the weight, relax the neck, and focus on pulling the shoulder blades back without shrugging.
Rushing the Reps
Fast, jerky reps make the exercise less effective and harder to control. Use a smooth pull, short pause, and slow return.
Best Face Pull Variations
Cable Face Pull
This is the standard version and usually the easiest to load progressively. Use a rope attachment and keep the cable at about upper-chest to face height.
Resistance Band Face Pull
This version is excellent for home workouts, warm-ups, and travel. Anchor the band securely and step back until it has enough tension. Bands become harder as they stretch, so control the end range carefully.
Seated Face Pull
Sitting can reduce body sway and help you focus on the upper back. This is useful if you tend to lean back during standing face pulls.
Half-Kneeling Face Pull
The half-kneeling position challenges core stability and makes it harder to cheat with your lower body. Keep your ribs down and glutes lightly engaged.
Face Pull with External Rotation
This variation emphasizes the rotation at the end of the movement. Pull toward the face, then rotate the hands slightly backward so they finish near the ears. Use very light weight and move slowly.
How Often Should You Do Face Pulls?
Most lifters can include face pulls 2 to 4 times per week, depending on training volume and shoulder tolerance. They work well at the end of upper-body workouts, after back training, during warm-ups, or on posture-focused accessory days.
A simple plan is 3 sets of 15 reps twice per week. If you sit a lot, press often, or feel your shoulders rounding forward, you may benefit from adding light band face pulls to your warm-up routine. However, more is not always better. If your shoulders feel irritated, reduce the volume and check your technique.
Who Should Be Careful with Face Pulls?
Face pulls are generally joint-friendly when performed correctly, but they are not automatically safe for everyone. If you have current shoulder pain, a recent injury, nerve symptoms, or a diagnosed rotator cuff issue, speak with a qualified healthcare professional or physical therapist before adding them aggressively.
Pain is not a badge of honor. If the movement causes pinching, sharp discomfort, numbness, or lingering soreness, stop and adjust. A good exercise should challenge muscles, not start a dramatic courtroom case inside your shoulder joint.
Sample Face Pull Workouts
Beginner Shoulder Balance Routine
Try this after your main workout:
- Band face pull: 2 sets of 15 reps
- Wall slides: 2 sets of 10 reps
- Light dumbbell rear delt raise: 2 sets of 12 reps
Upper-Body Strength Accessory Routine
Use this after pressing or pulling exercises:
- Cable face pull: 3 sets of 12 to 15 reps
- Chest-supported row: 3 sets of 8 to 12 reps
- Band external rotation: 2 sets of 12 reps per side
Posture-Friendly Desk Worker Routine
Try this two or three times per week:
- Resistance band face pull: 3 sets of 15 to 20 reps
- Scapular squeeze: 2 sets of 10 slow reps
- Thoracic extension over a foam roller: 1 to 2 minutes
Experience Notes: What Face Pulls Feel Like in Real Training
The first time many people try face pulls, they do not feel them where they expect. Instead of the rear delts and upper back lighting up, the exercise may feel like a strange arm pull, a neck shrug, or a battle against gravity with a rope attachment. That is normal. Face pulls are a skill-based accessory movement, and the muscles involved are often undertrained compared with the chest, front delts, and lats.
One useful experience-based cue is to stop thinking about pulling the rope with your hands. Instead, think about driving your elbows backward while your hands simply follow. This small mental switch often changes everything. The rear delts engage more clearly, the shoulder blades move better, and the exercise stops feeling like a biceps curl wearing a fake mustache.
Another real-world lesson is that lighter weight usually produces better results. Many lifters improve their face pull instantly by cutting the load in half. With less resistance, they can pause at the end, keep the elbows high, separate the rope fully, and avoid leaning backward. The burn arrives quickly because the correct muscles are finally doing the job. In this case, humility is not just a virtue; it is a shoulder-saving strategy.
Face pulls also tend to work well as a “reset” exercise after long periods of sitting. After several hours at a desk, the chest may feel tight, the upper back may feel sleepy, and the shoulders may drift forward. A few controlled sets of band face pulls can create an immediate sense of openness across the chest and activation through the upper back. That does not mean posture is fixed forever, but it can help remind the body where the shoulder blades are supposed to live.
In strength programs, face pulls are especially helpful after bench press days. Pressing exercises build power, but they can also leave the shoulders feeling crowded if pulling volume is too low. Adding face pulls at the end of a chest or shoulder workout gives the rear delts and scapular muscles some attention. Over time, this can make pressing feel more stable because the shoulders have better support from the back side.
For beginners, the band version is often the best teacher. A resistance band is less intimidating than a cable stack and easier to use at home. The band also encourages smooth control because the resistance increases as you pull. The downside is that it can pull you forward quickly if you rush the return. Slow reps solve that problem.
For intermediate lifters, cable face pulls are easier to progress. You can adjust the load in small increments, experiment with pulley height, and keep tension consistent. The best progress marker is not how heavy you go, but how clean your reps look. If your end position is strong and repeatable, you are progressing.
One final experience tip: film yourself from the side. Many people think they are pulling to face height, but the video reveals the rope landing at the collarbone. Others think their elbows are high, but the footage shows them tucked low like a row. A 10-second video can fix what weeks of guessing cannot. It is slightly humbling, but so is accidentally waving at someone who was waving at the person behind you. We survive.
Conclusion
The face pull is a small exercise with a big payoff. It strengthens the rear delts, upper back, and shoulder stabilizers while helping balance the pushing movements that dominate many workouts. The key is not brute strength; it is clean technique. Set the pulley correctly, use a rope, choose a manageable weight, pull toward your face, separate the hands, pause, and return with control.
Add face pulls consistently, keep the reps smooth, and treat the movement like shoulder maintenance with benefits. Your posture, upper back, and future self may all send thank-you notes.