Table of Contents >> Show >> Hide
- Why This Easy Chocolate Raspberry Cake Works
- Ingredients for Chocolate Raspberry Cake
- Equipment You Need
- Step-by-Step Instructions
- Helpful Tips for the Best Chocolate Raspberry Cake
- Easy Variations
- Storage and Make-Ahead Instructions
- Common Mistakes and How to Fix Them
- Serving Ideas
- Frequently Asked Questions
- Personal Experience: What Makes This Easy Chocolate Raspberry Cake So Memorable
- Conclusion
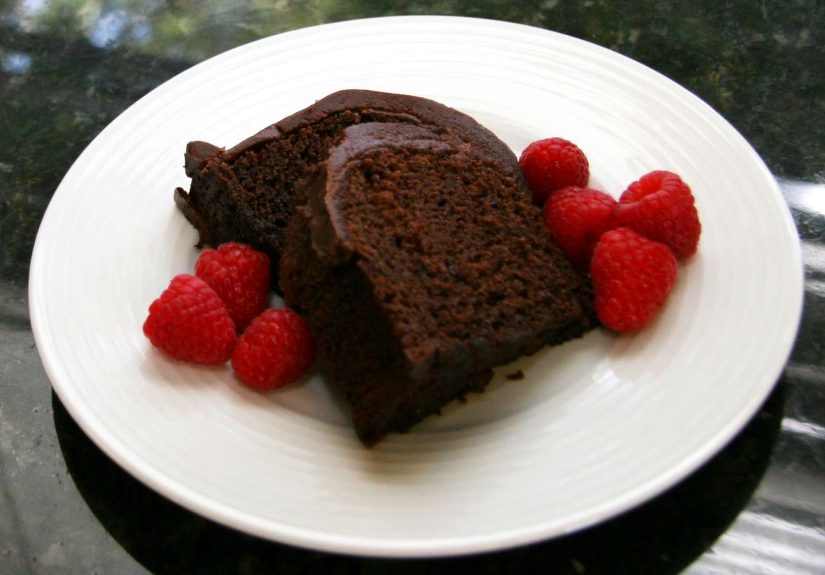
Some desserts whisper. This one walks into the room wearing velvet, carrying a bouquet of raspberries, and politely asks where the nearest fork is. This easy chocolate raspberry cake recipe is rich, moist, fruity, deeply chocolaty, and simple enough that you do not need a culinary degree, a marble countertop, or a dramatic baking montage to pull it off.
Chocolate and raspberries are one of those flavor pairings that make sense immediately. Chocolate brings the deep, cozy richness; raspberries bring bright, tangy sparkle. Together, they taste like a special occasioneven if the “occasion” is Tuesday night and you remembered you own a cake pan.
This recipe keeps things approachable: a moist chocolate cake, a quick raspberry filling, and a glossy chocolate topping that looks fancy but behaves nicely. No complicated pastry techniques. No twelve-layer tower that requires emotional support. Just a beautiful homemade chocolate raspberry cake that tastes bakery-worthy and still lets you keep your kitchen mostly under control.
Why This Easy Chocolate Raspberry Cake Works
The best chocolate raspberry cake should balance three things: moisture, flavor, and texture. Too much chocolate without acidity can taste heavy. Too much raspberry without enough structure can make the cake soggy. This recipe solves both problems by using cocoa-rich cake layers, a thickened raspberry filling, and a smooth chocolate ganache-style topping.
The cake batter uses common pantry ingredients: flour, cocoa powder, sugar, eggs, oil, buttermilk, and hot coffee or hot water. Oil keeps the crumb soft, buttermilk adds tenderness and a slight tang, and hot liquid helps bloom the cocoa powder so the chocolate flavor tastes deeper. Do not worrythe coffee does not make the cake taste like a latte. It simply turns up the chocolate volume, like a tiny flavor amplifier in a mug.
The raspberry filling is made with raspberries, sugar, lemon juice, and cornstarch. It cooks quickly into a jammy layer that holds its shape between the cakes. Fresh raspberries are wonderful, but frozen raspberries work beautifully too. That means this dessert is not limited to summer, which is good news for anyone who believes chocolate cake should be available in all weather conditions.
Ingredients for Chocolate Raspberry Cake
For the Chocolate Cake
- 1 3/4 cups all-purpose flour
- 3/4 cup unsweetened cocoa powder
- 1 3/4 cups granulated sugar
- 2 teaspoons baking soda
- 1 teaspoon baking powder
- 1 teaspoon fine salt
- 2 large eggs, room temperature
- 1 cup buttermilk, room temperature
- 1/2 cup vegetable oil or canola oil
- 2 teaspoons pure vanilla extract
- 1 cup hot coffee or hot water
For the Raspberry Filling
- 2 cups fresh or frozen raspberries
- 1/3 cup granulated sugar
- 1 tablespoon lemon juice
- 1 tablespoon cornstarch
- 1 tablespoon water
- Pinch of salt
For the Chocolate Ganache Topping
- 1 cup semi-sweet chocolate chips or chopped chocolate
- 1/2 cup heavy cream
- 1 tablespoon unsalted butter, optional for shine
- Fresh raspberries for decorating
- Chocolate curls or powdered sugar, optional
Equipment You Need
You do not need professional bakery equipment for this recipe. A couple of 8-inch or 9-inch round cake pans, mixing bowls, a whisk, a saucepan, parchment paper, and a cooling rack will do the job. A hand mixer is helpful if you decide to add frosting, but this cake can be made with a whisk and a reasonable amount of enthusiasm.
If you only have one cake pan, bake the layers one at a time. If you prefer a casual dessert, you can bake the batter in a 9-by-13-inch pan, spread the raspberry filling over the cooled cake, and drizzle the ganache on top. It will not have the dramatic layered look, but it will still disappear from the table at suspicious speed.
Step-by-Step Instructions
Step 1: Prepare the Cake Pans
Preheat your oven to 350°F. Grease two 8-inch or 9-inch round cake pans. Line the bottoms with parchment paper, then lightly grease the parchment. Dust the pans with cocoa powder instead of flour if you want to avoid pale streaks on the chocolate cake. This is a small detail, but chocolate cake appreciates this kind of respect.
Step 2: Mix the Dry Ingredients
In a large bowl, whisk together the flour, cocoa powder, sugar, baking soda, baking powder, and salt. Whisking helps evenly distribute the leavening agents, which means your cake layers rise evenly instead of forming mysterious cake mountains.
Step 3: Add the Wet Ingredients
Add the eggs, buttermilk, oil, and vanilla extract to the dry ingredients. Mix until the batter is mostly smooth. It will be thick at first, but do not panic. The hot coffee or hot water is coming in like a rescue team.
Step 4: Add Hot Coffee or Hot Water
Slowly pour in the hot coffee or hot water while whisking. The batter will become thin, glossy, and pourable. This is exactly what you want. Thin chocolate cake batter often produces a moist, tender crumb because it has enough liquid to hydrate the cocoa and flour properly.
Step 5: Bake the Cake Layers
Divide the batter evenly between the prepared pans. Bake for 28 to 34 minutes, depending on your pan size and oven. The cakes are done when a toothpick inserted in the center comes out with a few moist crumbs but no wet batter. Let the cakes cool in the pans for 10 to 15 minutes, then turn them out onto a wire rack to cool completely.
Step 6: Make the Raspberry Filling
While the cakes cool, combine raspberries, sugar, lemon juice, and a pinch of salt in a small saucepan over medium heat. Stir as the berries break down and release their juices. In a small bowl, mix cornstarch with water to make a slurry, then stir it into the raspberry mixture. Cook for 2 to 4 minutes, until thick and jammy.
Remove the filling from the heat and let it cool completely. If you prefer a seedless raspberry filling, press it through a fine-mesh sieve while it is still warm. If you do not mind seeds, leave it rustic. Rustic is just fancy language for “I chose texture and saved time.”
Step 7: Make the Chocolate Ganache
Place the chocolate chips or chopped chocolate in a heatproof bowl. Warm the heavy cream in a small saucepan until it is steaming but not boiling. Pour the cream over the chocolate and let it sit for 3 minutes. Stir until smooth, then add butter if using. The ganache should be glossy, thick, and pourable.
Step 8: Assemble the Cake
Place one cooled cake layer on a serving plate. Spread the raspberry filling over the top, leaving a small border around the edge so it does not spill out when the second layer goes on. Add the second cake layer. Pour the ganache over the top and gently encourage it toward the edges with a spatula. Let a little drip down the sides if you like that dramatic bakery-window look.
Step 9: Decorate and Chill
Top the cake with fresh raspberries, chocolate curls, or a light dusting of powdered sugar. Chill the cake for 20 to 30 minutes to help the ganache set before slicing. Use a sharp knife and wipe it clean between cuts for neat slices.
Helpful Tips for the Best Chocolate Raspberry Cake
Use Good Cocoa Powder
Cocoa powder is the backbone of this easy chocolate raspberry cake recipe. Natural unsweetened cocoa powder gives classic chocolate flavor, while Dutch-process cocoa can taste smoother and darker. Either can work here, but make sure it is fresh. If your cocoa smells dusty instead of chocolaty, it may be time to let it retire with dignity.
Cool Everything Before Assembling
Warm cake plus warm raspberry filling equals sliding layers. Unless you are aiming for dessert lasagna, let the cake layers and filling cool fully before assembly. Chilling the filling briefly can also help it spread cleanly.
Do Not Overbake
Chocolate cake can go from moist to dry faster than you can say, “Maybe just five more minutes.” Start checking early. A few moist crumbs on the toothpick are perfect. A bone-dry toothpick may mean the cake has baked a little too long.
Let the Ganache Rest
If the ganache is too thin, let it sit at room temperature for 5 to 10 minutes before pouring. If it is too thick, warm it gently in short bursts. Ganache is forgiving, but it does prefer not to be rushed like someone trying to find parking at a holiday party.
Easy Variations
Chocolate Raspberry Sheet Cake
Bake the batter in a greased 9-by-13-inch pan for about 32 to 38 minutes. Once cooled, spread the raspberry filling over the top and pour ganache over everything. This version is ideal for potlucks, birthdays, and people who believe layer cakes are beautiful but emotionally demanding.
Chocolate Raspberry Cupcakes
Turn the batter into cupcakes by filling lined muffin cups about two-thirds full. Bake at 350°F for 18 to 22 minutes. Once cool, core the centers, spoon in raspberry filling, and top with ganache or chocolate buttercream.
Dark Chocolate Raspberry Cake
Use dark cocoa powder and bittersweet chocolate for the ganache. This creates a more intense, less sweet dessert that pairs beautifully with coffee, red wine, or a quiet moment away from relatives asking who made the cake.
Chocolate Raspberry Cake with Cream Cheese Frosting
For a tangy twist, add cream cheese frosting between the layers or around the outside. The slight sharpness of cream cheese works well with both cocoa and raspberries, making the cake taste rich but balanced.
Storage and Make-Ahead Instructions
This homemade chocolate raspberry cake stores well, which is excellent news if you like planning ahead or secretly enjoy midnight cake. Cover the cake and refrigerate it for up to 4 days. Let slices sit at room temperature for 20 to 30 minutes before serving so the chocolate flavor can soften and bloom.
You can make the cake layers one day in advance. Wrap them tightly in plastic wrap and store them at room temperature if your kitchen is cool, or refrigerate them if your home runs warm. The raspberry filling can also be made up to 3 days ahead and stored in an airtight container in the refrigerator.
To freeze the cake layers, wrap each cooled layer in plastic wrap and then foil. Freeze for up to 2 months. Thaw overnight in the refrigerator before assembling. For the best texture, freeze the cake layers without filling or ganache.
Common Mistakes and How to Fix Them
The Cake Is Dry
The most common cause is overbaking or measuring too much flour. Spoon flour into the measuring cup and level it off instead of scooping directly from the bag. Scooping packs the flour down and can add more than the recipe needs.
The Raspberry Filling Is Runny
It probably needs more cooking time or a little more cornstarch. Simmer until the filling visibly thickens and coats the spoon. Remember that it will thicken further as it cools.
The Ganache Split
Ganache can split if the cream is too hot or the chocolate is overheated. Try whisking in a tablespoon of warm milk or cream to bring it back together. Stir gently rather than aggressively.
The Cake Layers Dome Too Much
Some doming is normal. You can trim the tops with a serrated knife for flatter layers. For a more even bake next time, use cake strips or bake the layers on the center rack.
Serving Ideas
This chocolate raspberry cake is rich enough to stand alone, but it also plays nicely with a few extras. Serve slices with whipped cream, vanilla ice cream, fresh berries, or a spoonful of raspberry sauce. For a dinner party, garnish each plate with cocoa powder and a few mint leaves. Suddenly, everyone thinks you have a pastry chef hiding in the pantry.
For drinks, coffee is a classic choice because it echoes the deep chocolate notes. Milk is perfect for kids and honest adults. Sparkling water with lemon keeps the dessert from feeling too heavy. If serving at a celebration, a berry-forward sparkling drink can make the raspberry flavor pop even more.
Frequently Asked Questions
Can I use frozen raspberries?
Yes. Frozen raspberries work very well for the filling. You do not need to thaw them first, but you may need to cook the filling a minute or two longer because frozen berries release more liquid.
Can I make this cake without coffee?
Absolutely. Use hot water instead. Coffee deepens the chocolate flavor, but hot water still helps bloom the cocoa powder and keeps the batter smooth.
Can I use raspberry jam instead of homemade filling?
Yes, especially if you want an even faster version. Use about 3/4 cup of good-quality raspberry jam or preserves. If the jam is very thick, stir it until spreadable. If it is very sweet, add a squeeze of lemon juice.
Can I frost the whole cake?
Definitely. Chocolate buttercream, raspberry buttercream, or cream cheese frosting all work well. If you frost the entire cake, use the raspberry filling only between the layers and keep a frosting border around the edge to prevent leaking.
Is this recipe good for birthdays?
Yes. This cake looks elegant, slices beautifully, and tastes like something from a bakery. Add candles, fresh raspberries, and chocolate shavings, and you have a birthday cake that feels special without requiring a three-day baking schedule.
Personal Experience: What Makes This Easy Chocolate Raspberry Cake So Memorable
The first thing you notice when making this cake is the smell. Chocolate cake batter already smells wonderful, but when hot coffee hits cocoa powder, the whole kitchen suddenly feels like a cozy bakery that somehow also gives excellent life advice. It is the kind of aroma that makes people wander into the kitchen pretending they “just needed water.” Nobody needs water. They are investigating dessert.
One of the best experiences with an easy chocolate raspberry cake recipe is how forgiving it feels. Some cakes demand perfection. This one is more relaxed. If the cake layers dome a little, trim them. If the ganache drips unevenly, call it artistic. If a raspberry rolls to the wrong side of the cake, congratulationsyou now have a naturally styled dessert. The finished cake still looks beautiful because chocolate and berries do most of the decorating work for you.
The raspberry filling is the part that makes the cake feel homemade in the best possible way. Store-bought jam is useful, but simmering raspberries with lemon juice creates a fresher flavor. It tastes bright, slightly tart, and real. That tartness cuts through the richness of the chocolate, which means each bite feels balanced instead of overwhelmingly sweet. It is the difference between “nice cake” and “wait, who made this?”
This cake is also a crowd-pleaser because it feels fancy without being fussy. Bring it to a birthday dinner and it looks celebratory. Serve it after a casual family meal and suddenly the whole evening feels upgraded. Make it for Valentine’s Day and it fits the theme perfectly. Make it for no reason at all and, honestly, that may be the best reason. Dessert does not always need a calendar invitation.
Another practical joy is that the cake improves after a little time in the refrigerator. The raspberry filling settles, the ganache firms up, and the chocolate flavor deepens. A slice the next day can taste even better than the first day, especially after sitting at room temperature for a short while. This makes it a smart make-ahead dessert for hosts who prefer not to be covered in cocoa powder when guests arrive.
If you are baking with kids, this recipe is fun because there are several simple jobs to share. Someone can whisk dry ingredients, someone can decorate with raspberries, and someone can perform the very important quality-control task of checking whether the chocolate chips are “still good.” Adults may also volunteer for that role. Quality control is a serious responsibility.
For beginner bakers, this recipe builds confidence. You learn how hot liquid improves cocoa, how cornstarch thickens fruit filling, how ganache forms, and how chilling helps a cake slice cleanly. None of these steps are difficult, but together they create a dessert that feels impressive. That is the magic of a good recipe: it teaches you something while rewarding you with cake.
For experienced bakers, the recipe is easy to customize. You can add espresso powder, brush the layers with raspberry syrup, fold mini chocolate chips into the batter, or finish the cake with whipped chocolate frosting. You can make it rustic or polished. You can serve it as a layer cake, sheet cake, or cupcakes. The core flavor combination remains reliable: deep chocolate, bright raspberry, smooth ganache, happy people.
Most importantly, this cake creates the kind of dessert moment people remember. The first forkful has soft cake, jammy raspberry, and silky chocolate all at once. It is rich but not heavy, sweet but not flat, elegant but not intimidating. That is why this easy chocolate raspberry cake recipe deserves a permanent spot in your baking collection. It is simple enough for a weekend, pretty enough for a party, and delicious enough to make everyone suspiciously quiet for a few bites.
Conclusion
This easy chocolate raspberry cake recipe delivers everything a great homemade dessert should: moist chocolate cake, tangy raspberry filling, glossy ganache, and a presentation that looks far more difficult than it really is. With simple ingredients and practical steps, you can create a bakery-style cake without stress. Whether you make it for a birthday, holiday, dinner party, or a well-earned personal treat, this cake brings together the richness of chocolate and the brightness of raspberries in every slice.
Note: This article is written as original, publication-ready content based on widely accepted American baking practices, common chocolate cake techniques, raspberry filling methods, and ganache preparation principles. It contains no copied recipe text, no unnecessary source-link elements, and no citation placeholders.