Table of Contents >> Show >> Hide
- Why Old Homes Inspire Better Renovation Ideas
- Start With What Makes the House Special
- The Best DIY Ideas a 100-Year-Old Renovation Can Spark
- Know What Should Never Be a Casual DIY
- How to Modernize an Old House Without Erasing It
- Budget Lessons Every Homeowner Should Borrow
- of Real-Life Experience: What a Century-Home Renovation Feels Like
- Conclusion
There is something wildly charming about a 100-year-old house. Maybe it is the creaky floors that sound like they are gossiping. Maybe it is the original trim that looks like someone cared an awful lot about tiny details. Or maybe it is the fact that these homes have survived world wars, questionable wallpaper decades, and at least one owner who thought beige shag carpet was a personality trait.
That is why a century-home renovation is never just a remodeling project. It is part rescue mission, part design challenge, and part relationship test with your toolbox. And when one old home renovation turns out beautifully, it tends to light a fire under every homeowner who has ever stared at a dated kitchen and thought, “You know what this place needs? A little vision. And probably a pry bar.”
A well-done 100-year-old home renovation can inspire smart DIY ideas for homeowners because it proves two important things. First, not every old-house problem should be bulldozed into oblivion. Second, not every beautiful update requires a luxury budget and a design team with matching black turtlenecks. Sometimes the best ideas come from saving what is already there, repurposing what others would toss, and choosing projects that add both function and character.
If you are planning your own old house remodel, here is how a century-home makeover can spark practical, budget-friendly, and delightfully clever DIY ideas you can actually use.
Why Old Homes Inspire Better Renovation Ideas
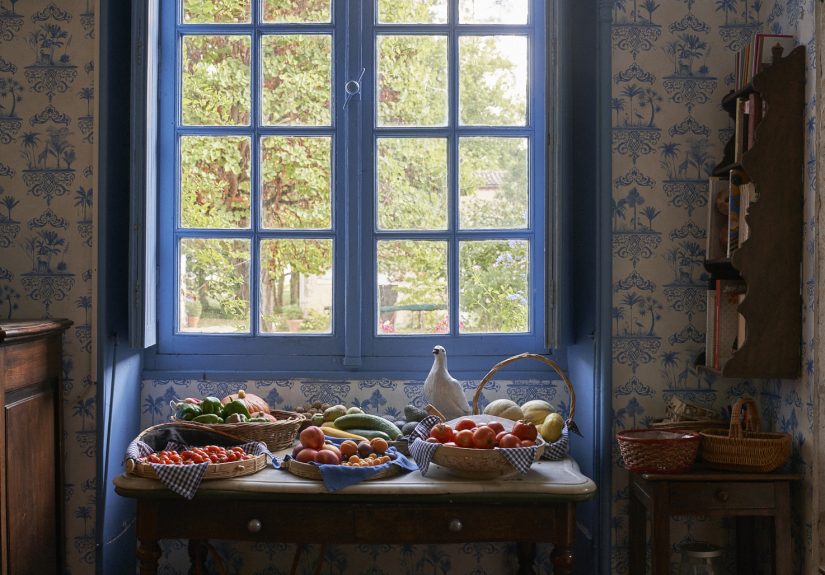
Modern homes can be efficient, bright, and comfortable. But older homes often come with something newer builds spend a lot of money trying to fake: soul. Original hardwood floors, detailed millwork, antique doors, brick fireplaces, transom windows, built-ins, and sturdy wood windows all create a sense of place that is hard to manufacture from scratch.
That is why the smartest homeowners do not start by asking, “What can I rip out?” They start by asking, “What deserves a second chance?” That shift changes everything. It turns renovation into a more thoughtful process and leads to DIY projects that feel personal instead of cookie-cutter.
When a 100-year-old home is renovated well, the best parts are usually not the splashiest. They are the small, strategic decisions: keeping the mantel even if the fireplace no longer works, refinishing the original floors instead of covering them, repainting old trim instead of replacing it, and turning salvaged wood or vintage doors into custom features. Those are the choices that inspire homeowners because they are creative, realistic, and full of charm.
Start With What Makes the House Special
Keep the details that tell the story
Before you plan a single DIY home improvement, walk through the house and identify its character-defining features. In older homes, that may include fireplaces, original moldings, stair rails, beadboard ceilings, brick chimneys, old-growth flooring, or even quirky built-ins. These features are not just decorative. They are what make the house feel like this house and not every other listing on the block.
For homeowners, this is where the best DIY inspiration begins. Instead of deleting the home’s identity, build around it. A worn mantel can be cleaned, repaired, and styled. Old brick can be carefully refreshed. Original doors can be rehung, refinished, or repurposed. Decorative trim can be painted for a lighter look without losing texture and depth.
Repair before you replace
Old-house renovation teaches a valuable lesson: replacement is not always the upgrade it claims to be. In many cases, repairing original windows, trim, doors, or flooring is more in keeping with the house and can save money compared with a full tear-out-and-replace plan. That is especially true when the original materials are higher quality than what you could afford to buy new today.
For DIY-minded homeowners, this opens up a long list of approachable projects: weatherstripping old windows, re-caulking trim, scraping and repainting woodwork, patching damaged plaster, restoring hardware, and refinishing old floors in stages. None of those jobs sound glamorous on social media, but in a real old house, they are the difference between “renovated” and “ruined.”
The Best DIY Ideas a 100-Year-Old Renovation Can Spark
1. Repurpose old materials into new features
One of the most inspiring things about old-home renovations is how often “junk” turns into design gold. An old swinging door can become a sliding pantry door. Wood from a shed or barn can become open shelving. Salvaged beams can become a dining table or floating mantel. Vintage registers, knobs, and brackets can turn an ordinary update into something with instant personality.
This is one of the most affordable DIY ideas for homeowners because it combines storage, style, and sustainability. Instead of shopping for something new and generic, you create something that looks like it belongs in the home because, well, it literally came from the home.
2. Save money with “looks expensive, isn’t expensive” upgrades
Old house projects have a way of eating money when you are not looking. That is why savvy renovations often balance structural necessities with budget-friendly cosmetic wins. Think laminate countertops that mimic marble, stock cabinetry dressed up with better hardware, thrifted lighting, closeout tile, peel-and-stick trial runs for visual planning, or tablecloths turned into long curtain panels for awkward vintage windows.
The point is not to be cheap. It is to be strategic. Spend where safety and longevity matter. Save where creativity can carry the look. That mindset inspires great DIY because it forces homeowners to think like designers and problem-solvers, not just shoppers.
3. Turn dead space into hardworking space
Older homes are famous for odd corners, narrow gaps, tiny nooks, and rooms that seem designed before anyone invented vacuum cleaners. Instead of fighting those quirks, use them. A slim wall gap can become spice shelves. An awkward landing can become a reading bench. A former dining room closet can become a coffee bar. A vintage desk, old tables, or built-ins can be reworked into a home office setup that feels intentional instead of improvised.
This is where DIY shines. You do not need to rebuild the entire floor plan to make an old house live better. Sometimes custom function comes from small carpentry projects, smart shelving, and better use of what is already there.
4. Make non-working features decorative again
Not every old-house feature has to return to its original function to earn its keep. A non-working fireplace can still become the focal point of a room. A vintage mantel can frame candles, stacked logs, or soft lighting. Old glass cabinets can store modern everyday items. Original wall niches can become display shelves.
This is a particularly helpful idea for homeowners who love history but still need a practical home. You can keep the visual poetry without pretending your family wants to heat soup over a coal grate.
Know What Should Never Be a Casual DIY
Here comes the less glamorous but absolutely necessary part: a 100-year-old home may hide issues that deserve caution, not confidence. This is where good renovation content separates fantasy from reality.
Lead paint, asbestos, and mystery materials
If your home is old enough to have a birth certificate with nice handwriting, assume there may be hazardous materials somewhere in the mix. Paint in pre-1978 homes may contain lead. Older insulation, siding, flooring, pipe wrap, and other materials may involve asbestos. Disturbing those materials carelessly can create serious health risks.
That does not mean you should panic and sell the house to a ghost historian. It means you should test before tearing out, follow safe work practices, and call qualified professionals when the job crosses into hazardous territory.
Wiring, plumbing, structure, and moisture
Century homes can also hide outdated electrical systems, patched-over plumbing, rot, termite damage, poor insulation, and moisture problems. DIY is excellent for painting, hardware swaps, cosmetic repairs, shelving, trim refreshes, and styling. DIY is not the place to freelance structural changes, major rewiring, or complicated plumbing reroutes unless you have the training to do it correctly and legally.
A good rule: if the mistake could flood the house, start a fire, or shift the floor under your feet, bring in a pro.
How to Modernize an Old House Without Erasing It
Improve comfort quietly
One reason old-home renovations inspire so many homeowners is that they show comfort upgrades do not have to look sterile. You can add weatherstripping, storm windows, insulation, improved lighting, better storage, and safer outlets without stripping the home of its personality.
In fact, some of the smartest updates are nearly invisible. Better air sealing. Smarter window treatments. Upgraded electrical protection. Hidden storage. Those improvements make daily life easier while letting the pretty stuff keep the spotlight.
Choose materials that respect the era
When you do add something new, it helps to choose materials and shapes that nod to the house’s age. That does not mean living in a museum. It means selecting finishes that feel compatible. Shaker cabinets, classic hardware, simple tile, warm wood tones, vintage-inspired lighting, and paint colors with a little depth tend to work beautifully in older homes.
The goal is not perfect historical reenactment. The goal is harmony. Your renovated kitchen should not look like it wandered in from an unrelated condo three zip codes away.
Budget Lessons Every Homeowner Should Borrow
Every inspiring old-house renovation comes with one universal truth: there will be surprises. Something behind the wall will be strange. Something under the floor will be worse than expected. Someone, sometime in the last 70 years, definitely “fixed” something in a way that raises more questions than answers.
So, if a 100-year-old home renovation inspires your DIY plans, let it also inspire your budget. Leave room for hidden costs. Phase the work if needed. Live in the house for a bit before making major layout decisions. Tackle projects in an order that protects the house first: roof, drainage, moisture, structure, electrical, plumbing, then finishes. That is not as thrilling as picking pendant lights, but it is how good renovations stay good.
A slow renovation can actually be a smart renovation. It gives you time to understand how the home functions, where the light falls, which rooms need help first, and which original details deserve saving. It also gives your wallet a chance to breathe into a paper bag.
of Real-Life Experience: What a Century-Home Renovation Feels Like
Ask homeowners what it is really like to renovate a 100-year-old house, and you will rarely get a neat answer. You will get a story. Usually one that begins with optimism, takes a sharp detour through dust and confusion, and ends with a kind of stubborn affection for the house that was not there on day one.
At first, the experience often feels romantic. You notice the tall ceilings, the solid doors, the old trim, the creak of the staircase, and the way afternoon light lands differently in rooms built before open-concept fever took over America. You imagine a few fresh coats of paint, some polished floors, maybe a kitchen facelift, and suddenly you are mentally hosting Thanksgiving in a home that still has knob-and-tube nerves behind the walls. Cute.
Then renovation begins, and the house starts revealing its secrets. A wall opens up and you find old damage, mystery repairs, missing insulation, or wood that has seen better centuries. A simple flooring project turns into a subfloor lesson. A quick paint refresh becomes a debate about whether the trim is worth saving. Spoiler: it usually is. Somewhere in the middle of it all, you start learning the difference between cosmetic ugly and structural ugly, and that is when you truly become an old-house person.
But here is the funny part: that learning curve is exactly what inspires better DIY ideas. You stop chasing perfection and start chasing solutions that fit the home. You realize an old door does not need to be tossed; it needs new hardware and a job description. You learn that open shelves made from reclaimed boards feel better than something mass-produced because they carry a little history. You discover that a thrifted light fixture, once rewired and cleaned up, can look like it was always meant to hang there. You become the kind of person who sees a pile of leftover trim and thinks, “That could become a picture ledge,” which is either growth or a mild renovation-related condition.
The emotional side of the experience matters too. Renovating an old home teaches patience in a way few hobbies can. It asks you to slow down, make fewer impulse decisions, and accept that not every fix has to happen this month. It teaches respect for craftsmanship, because once you handle old-growth wood, solid plaster, or hand-detailed millwork, you understand why these houses are still standing. And it teaches humility, because every old house eventually produces one problem that sends even the most confident DIYer marching toward the phone to call a professional.
By the end, most homeowners say the same thing in different words: the house changed them as much as they changed the house. They became more observant, more resourceful, and more thoughtful about design. They learned to preserve, not just replace. And when they finally sit in a finished room with original floors underfoot, restored trim around the windows, and one cleverly repurposed piece giving the whole space personality, it does not just feel renovated. It feels earned.
Conclusion
A 100-year-old home’s renovation inspires DIY ideas for homeowners because it proves that the best upgrades are not always the newest or most expensive ones. They are the ones that respect the house, solve real problems, and add beauty without sanding off the story.
If you own an older home, take your cue from the best century-house renovations: preserve the features that matter, upgrade the systems that protect comfort and safety, repurpose materials with imagination, and choose DIY projects that bring out the home’s character instead of covering it up. Do that well, and your house will not just look better. It will feel more like itself.