Table of Contents >> Show >> Hide
- Why an Insulated Doghouse Matters
- Before You Build: Smart Planning First
- Materials and Tools
- How to Build an Insulated or Heated Doghouse: Easy DIY Steps
- Best Features for a Heated Doghouse
- Common DIY Mistakes to Avoid
- How to Keep the Doghouse Safe All Winter
- Conclusion
- Real-Life DIY Experience: What Building One Actually Teaches You
- SEO Tags
If your dog’s current outdoor setup looks like a drafty box with commitment issues, it may be time for an upgrade. A well-built insulated doghouse is not just a cute backyard accessory. It can help create a dry, more comfortable shelter in cold weather, reduce drafts, and give your dog a place to get out of wind and damp conditions. Add a pet-safe heating option, and you can make that space even cozier without turning it into a backyard sauna.
That said, let’s get one important truth out of the way: even the best heated doghouse is not a free pass to leave dogs outside in dangerous winter weather for long stretches. Puppies, senior dogs, small breeds, short-haired dogs, and dogs with medical issues can get cold fast. Think of this project as a comfort upgrade and backup shelter, not a replacement for common sense, supervision, or bringing your dog indoors when temperatures get nasty.
In this guide, you’ll learn how to build an insulated or heated doghouse the easy DIY way, using practical materials, simple construction steps, and safer heating choices. No fancy carpenter cape required.
Why an Insulated Doghouse Matters
A basic doghouse may block a little wind, but insulation is what helps the structure hold warmth instead of behaving like a wooden refrigerator. A good winter dog shelter should do four things well: stay dry, stay off the ground, cut drafts, and fit the dog properly.
If the house is too large, your dog has to warm a giant pocket of cold air. If it is too small, your dog cannot stand, turn around, and lie down comfortably. The sweet spot is a doghouse that feels roomy enough for movement but snug enough to retain body heat. Add a raised floor, insulated walls and roof, and dry bedding, and you have a much better cold-weather setup.
Before You Build: Smart Planning First
1. Pick the Right Location
Place the doghouse on high, dry ground where rainwater will not pool around it. Turn the doorway away from prevailing wind if possible. Tuck the structure near a fence, garage wall, or other windbreak, but leave enough space for airflow and easy cleaning.
2. Size It for Your Dog
Measure your dog’s height, length, and shoulder width. The interior should allow your dog to stand up, turn around, and stretch out, but it should not feel like a studio apartment with vaulted ceilings. A snug interior is more efficient in winter. Giant empty space is great for dance practice, not heat retention.
3. Decide: Insulated Only or Insulated Plus Heat?
An insulated doghouse is often enough for moderate winter conditions, especially for cold-tolerant breeds. A heated doghouse may make sense for very cold climates, older dogs, short-coated dogs, or dogs that need extra support. If you add heat, use only pet-specific, outdoor-rated products designed for animal use. Skip human heating pads, bargain-bin space heaters, and improvised heat lamps. That is not DIY charm. That is a future headache.
Materials and Tools
Basic Materials
- Pressure-treated lumber for the base frame
- Exterior-grade plywood for floor, walls, and roof
- Rigid foam board insulation
- Wood screws
- Construction adhesive suitable for foam board
- Weatherproof roofing material such as shingles or roll roofing
- Exterior paint or sealant rated for outdoor use
- Vinyl flap or flexible door cover
- Straw or another dry, winter-appropriate bedding option
Optional Heating Materials
- Pet-safe outdoor heated pad or heated pet bed
- Outdoor-rated GFCI-protected power source
- Cord protector or conduit for added cable protection
Tools
- Circular saw or miter saw
- Drill and bits
- Measuring tape
- Square
- Utility knife for foam board
- Paintbrush or roller
- Staple gun if installing a flap or interior liner
How to Build an Insulated or Heated Doghouse: Easy DIY Steps
Step 1: Build a Raised Base
Start with a simple rectangular frame from lumber. This base should lift the floor a few inches off the ground. That little gap matters more than people think. It helps keep the doghouse drier, reduces ground chill, and makes the whole structure feel less like a sponge parked on wet soil.
Attach plywood on top of the frame to create the floor deck. For extra warmth, add rigid foam board between floor supports, then cover the insulation so your dog cannot chew or scratch at it.
Step 2: Frame the Walls
Build four wall panels using basic framing. The front wall gets the doorway. Keep the entry just large enough for your dog to pass through comfortably. Oversized doors may look dramatic, but they also invite wind inside like an uninvited relative.
Attach the wall frames to the base and make sure everything is square before fastening fully. A slightly crooked doghouse may still function, but it will haunt you every time you look at it.
Step 3: Add Insulation to Walls and Floor
Cut rigid foam board to fit snugly inside the wall cavities and floor space. This is one of the easiest and most effective ways to improve a DIY insulated doghouse. Once the insulation is in place, cover the interior side with thin plywood or another chew-resistant panel. You want the insulation inside the structure, not inside your dog.
If you live in a colder region, insulate the roof too. Heat rises, and an uninsulated roof is basically a polite way of letting warmth leave.
Step 4: Install the Roof
A sloped roof is the simplest option because it sheds rain and snow better than a flat top. If you can, design one side to open or hinge for cleaning. Future-you will be grateful when it is time to swap bedding, wipe out mud, or retrieve the tennis ball your dog absolutely insisted on taking indoors. Into the doghouse. Where it did not need to go.
Cover the roof with weatherproof material such as shingles or roofing felt. Make sure there is a slight overhang so water drips away from the walls and door instead of sneaking back inside.
Step 5: Seal the Exterior
Paint or seal the outside with a pet-safe exterior finish once the structure is fully assembled and dry. Sealants help the wood resist moisture and extend the life of the doghouse. Focus on weather exposure points like roof edges, wall seams, and floor corners.
Avoid strong-smelling finishes on interior surfaces where your dog will rest. Let everything cure fully before use. Dogs appreciate many smells. Fresh paint fumes are not usually on the favorites list.
Step 6: Add a Draft-Blocking Door Flap
A flexible flap helps keep wind and blowing snow out while allowing your dog to move in and out easily. Clear vinyl is a popular choice because it lets in light and is easy to clean. Make sure the flap is soft enough that your dog will actually use it. If the entrance feels weird or scary, your carefully engineered winter palace may be ignored in favor of the porch.
Step 7: Add Dry Bedding
For an outdoor winter setup, dry straw often works better than blankets because it insulates well and does not stay wet as easily. Blankets can get damp, flatten down, and turn cozy into clammy. Replace bedding regularly, especially after storms or muddy days.
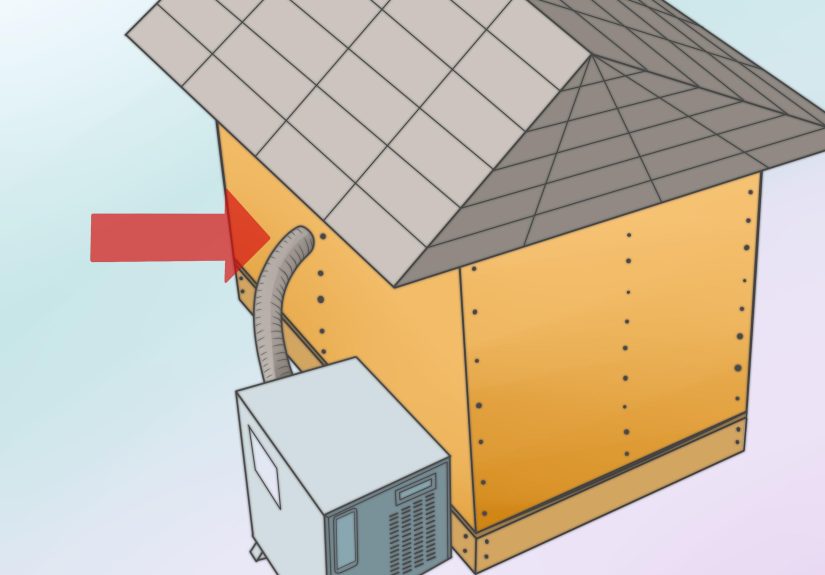
Step 8: Add Safe Heat Only If Needed
If you are building a heated doghouse, choose a pet-safe outdoor heated pad designed for sheltered spaces. Look for products with chew-resistant cords, thermostat control, and outdoor use ratings. Place the heated pad on one side of the doghouse instead of covering the entire floor. That gives your dog the ability to move closer or farther away from the heat.
Do not use human heating pads as a permanent doghouse solution. Do not install a household space heater inside a small wooden doghouse. Do not rely on open bulbs or heat lamps. The goal is gentle, controlled warmth, not a tiny fire hazard with shingles.
Best Features for a Heated Doghouse
- Raised floor: Helps reduce ground cold and moisture.
- Insulated walls and roof: Helps retain warmth more efficiently.
- Door flap: Cuts drafts and wind intrusion.
- Pet-safe heated pad: Adds controlled warmth in very cold conditions.
- Removable or hinged roof: Makes cleaning much easier.
- Weatherproof exterior: Extends the life of the structure.
Common DIY Mistakes to Avoid
Making the House Too Big
Bigger is not better in winter. A doghouse should be comfortable, not cavernous.
Skipping the Raised Base
Ground moisture and cold seep upward fast. Elevation is one of the cheapest improvements you can make.
Using Indoor Electrical Gear Outdoors
If it is not rated for outdoor or pet use, it does not belong in a doghouse. Full stop.
Relying on Heat Instead of Insulation
Heat works better when the structure is already insulated. Otherwise, you are paying to warm the neighborhood.
Ignoring Your Dog’s Actual Habits
Some dogs love enclosed shelters. Others prefer visibility, wide entries, or a little training before they trust a new setup. Introduce the doghouse gradually with treats and praise.
How to Keep the Doghouse Safe All Winter
Check bedding often. Inspect the roof after heavy weather. Make sure cords stay protected and dry. Clean mud and debris from the entry. If your dog seems reluctant to use the house, do not assume they are being dramatic. They may be cold, damp, uncomfortable, or bothered by a flap, smell, or heating surface.
Also watch your dog, not just the forecast. Shivering, lethargy, whining, lifting paws, curling up tightly, or refusing to settle can all mean the setup is not warm enough. In severe cold, storms, or icy conditions, the safest move is still bringing your dog indoors.
Conclusion
Building an insulated or heated doghouse is one of those DIY projects that feels practical, generous, and just plain satisfying. You are not only building a structure. You are building comfort, weather protection, and a better backyard routine for your dog. Keep the design simple: raised floor, dry interior, solid insulation, weatherproof roof, and safe heat only when truly needed.
If you remember nothing else, remember this: the best doghouse in winter is warm, dry, draft-resistant, easy to clean, and tailored to the dog who will use it. Not to your sketchbook. Not to your leftover lumber pile. And definitely not to that one dramatic Pinterest idea involving lanterns and rustic vibes.
Real-Life DIY Experience: What Building One Actually Teaches You
The funny thing about building a DIY heated doghouse is that the project looks simple on paper and then immediately turns into a master class in dog opinion. You may think you are making a beautiful insulated shelter. Your dog may think you have constructed a suspicious wooden riddle.
One of the biggest lessons people learn is that dogs care less about stylish trim and more about comfort details. The house that gets used most is usually the one that feels dry, quiet, and easy to enter. If the doorway is awkward, the floor feels cold, or the flap smacks your dog in the face like a tiny haunted curtain, you will see resistance fast. The fix is usually not dramatic. Make the entrance comfortable, keep bedding fresh, and let your dog explore the space with no pressure.
Another common experience is discovering how much moisture matters. Many first-time builders focus only on temperature, but dampness is often the real villain. A doghouse can technically be insulated and still feel miserable if water sneaks in through the roof edge, if bedding gets soggy, or if the structure sits directly on wet ground. Once people rebuild with a raised base and better roof overhang, the difference is huge. Suddenly the doghouse feels more like shelter and less like a glorified sponge.
Heating choices also teach a valuable lesson in restraint. Many DIYers start out wanting the warmest possible setup, then realize that gentle heat plus good insulation is smarter than blasting heat into a tiny box. Dogs need choice. A heated pad on one side works better than turning the whole floor into one giant warm zone. That way the dog can regulate comfort naturally. It is the canine version of sleeping with one leg outside the blanket.
There is also the maintenance reality nobody puts in the glamour photos. Outdoor doghouses need regular checks. Straw gets messy. Mud appears from nowhere. Leaves migrate like they pay rent. Hinged roofs, removable floor panels, and durable surfaces make a big difference over time. What seems like an optional convenience during the build becomes your favorite decision in January when you are cleaning things out in a jacket and wondering why you did not choose an easier hobby, like collecting stamps.
Perhaps the best part of the experience is watching a dog truly claim the space. When the sizing is right, the bedding is dry, and the shelter is placed in a calm spot, many dogs settle in quickly. They circle once, give the interior a serious quality inspection, then flop down with the unmistakable look of someone who has personally approved the architecture. That moment makes the measuring, cutting, fastening, insulating, and mild muttering in the driveway feel worth it.
So yes, build the doghouse. But build it with humility, flexibility, and the understanding that your dog is the final inspector. And unlike most inspectors, this one may pay you in muddy paw prints and total silence.