Table of Contents >> Show >> Hide
- Why a Vintage Door Makes Such a Great Porch Bench
- What to Look for in the Right Vintage Door
- How to Design a Front Porch Bench From a Door
- Materials and Tools You Will Likely Need
- Step-by-Step: Turning a Vintage Door Into a Porch Bench
- Best Finishes for an Outdoor Bench
- Common Mistakes to Avoid
- How This Bench Improves Front Porch Style
- Real-Life Experiences With a Re-purposed Vintage Door Bench
- Final Thoughts
Some DIY projects save money. Some save materials from the landfill. And some make your neighbors slow down just enough to whisper, “Wait… is that a bench made from an old door?” This project does all three. Turning a vintage door into a front porch bench is the kind of idea that feels equal parts practical, charming, and just a little bit smug in the best possible way. You get outdoor seating with character, a conversation piece with history, and a front porch upgrade that looks custom rather than cookie-cutter.
A re-purposed vintage door front porch bench works because old doors already bring structure, detail, and age-earned style to the table. Or, more accurately, to the bench. Raised panels, worn paint, original hardware holes, and sturdy wood construction all help create a piece that feels collected instead of mass-produced. The trick is not simply bolting a door to some boards and hoping for the best. The best results come from thoughtful planning, sturdy support, weather-friendly finishes, and a design that balances rustic appeal with sit-down comfort.
If you have been eyeing a salvaged door at a flea market, antique store, architectural salvage yard, or your granddad’s garage, this is your sign. Here is how to turn that forgotten slab of wood into a stylish front porch bench that looks intentional, functions beautifully, and doesn’t collapse the second Uncle Rick sits on it after Thanksgiving dinner.
Why a Vintage Door Makes Such a Great Porch Bench
Old doors have something most new furniture lacks: personality. A vintage door often comes with architectural details already built in, whether that means panels, carved trim, beadboard, glass sections, or gently weathered paint. That makes it a natural fit for an upcycled bench project, especially on a front porch where character matters as much as function.
From a design standpoint, a door is a ready-made backdrop. In many bench builds, the door becomes the backrest, which means you begin with the most visually striking part already done. That saves time and gives the finished piece height, presence, and old-house charm. It also helps the bench feel anchored instead of flimsy.
There is also a sustainability angle that people genuinely care about now. Repurposing architectural salvage keeps usable material in circulation and reduces waste. Instead of buying another flat-packed bench that arrives with seventeen mystery screws and a passive-aggressive instruction sheet, you are creating something durable and unique from an item that already has a story.
What to Look for in the Right Vintage Door
Solid Wood Beats Mystery Material
The best candidate for a re-purposed vintage door bench is a solid wood door. Older doors are often heavier and better built than many modern versions, which is exactly what you want for a furniture project. Solid wood is easier to repair, sand, reinforce, and paint. Hollow-core doors are lightweight, but they usually do not provide the strength or longevity needed for a bench that will live outdoors.
Check the Condition Before You Get Romantic
Yes, that peeling robin’s-egg-blue finish is adorable. No, rot is not “rustic.” Before you buy or start cutting, inspect the door carefully. Look for soft spots, cracked rails, insect damage, loose joints, and water exposure. Cosmetic imperfections are part of the charm. Structural weakness is part of the headache.
Be Smart About Old Paint
If the door came from an older home, especially one built before 1978, treat painted surfaces carefully. Lead paint is not a cute vintage detail. It is a safety issue. If you are unsure, test first or work with lead-safe practices before sanding, scraping, or cutting. This is the least glamorous part of the project, but it is also the part that keeps “DIY weekend” from turning into “why is everyone coughing and angry?”
How to Design a Front Porch Bench From a Door
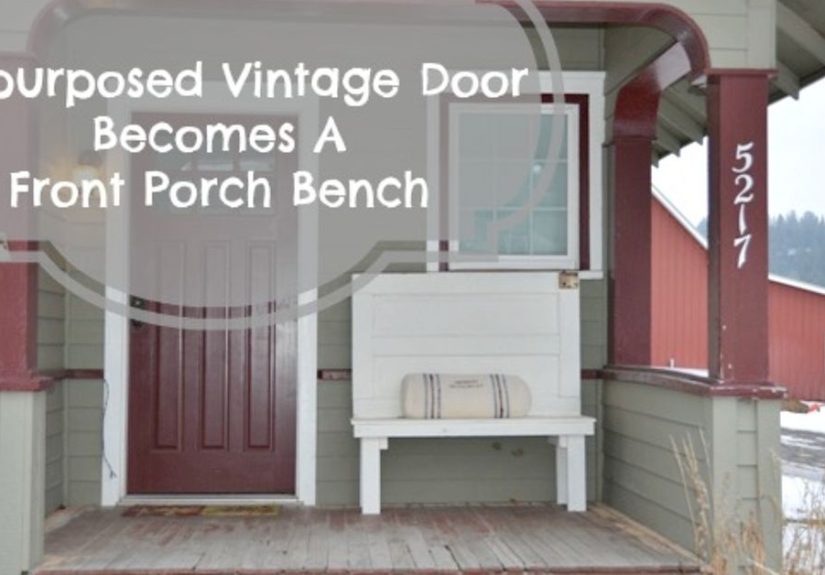
The most common layout uses the vintage door as the bench back. Then you build a seat, side supports, and legs or a base underneath it. This gives you the best mix of aesthetics and comfort. The door stays upright and visible, while the lower structure does the hard work of supporting weight.
Before cutting anything, think about scale. A porch bench should feel comfortable without swallowing the whole entrance. On a narrow front porch, a two-person bench usually works best. On a wider porch, a longer door can create a statement piece. The key is leaving enough walking space around it so your bench adds charm instead of creating an obstacle course.
For comfort, the bench seat should be deep enough to sit on easily but not so deep that people perch awkwardly like confused flamingos. A slightly angled back also helps. Many DIYers keep the seat simple and straight, then rely on cushions for extra comfort. Others add arms for a more traditional bench look. Both approaches work.
Materials and Tools You Will Likely Need
Your exact materials will depend on the design, but most builds include a vintage door, lumber for the seat and supports, exterior screws, wood glue rated for outdoor use, primer, exterior paint, and sandpaper. If you want the bench to have a more polished or cottage-style look, you can add trim boards, decorative feet, or a hinged seat with hidden storage.
Useful tools include a drill, circular saw or miter saw, orbital sander, clamps, square, measuring tape, paintbrushes or rollers, and safety gear. If the old door has hardware you want to preserve, keep a screwdriver and small containers nearby so nothing gets lost. Tiny vintage screws have a magical ability to vanish the moment you set them down.
Step-by-Step: Turning a Vintage Door Into a Porch Bench
1. Clean and Prep the Door
Start by removing loose dirt, cobwebs, old hardware you do not want, and anything unstable. Wash the door gently and let it dry fully. If the finish is flaking, decide whether you want to preserve the weathered look or refinish it completely. A distressed finish can be beautiful, but only if the surface is stable and safe.
2. Make Repairs Before You Build
Tighten loose joints, fill cracks if needed, and replace any sections that are too damaged to trust. This is also the time to square the bottom edge if the door needs trimming. Think of it as giving the old door a second chance and a stern talking-to.
3. Build a Strong Base
The seat and lower structure matter more than people expect. The vintage door may steal the spotlight, but the base does the heavy lifting. Use sturdy lumber for the seat frame and legs. Add cross supports beneath the seat so it does not sag over time. If your bench will sit on a covered porch, you still want materials and fasteners that can handle humidity, dust, and seasonal temperature changes.
4. Attach the Door as the Backrest
Secure the door firmly to the seat frame or rear supports. Do not rely on a couple of screws and positive thinking. Reinforce the connection with cleats, brackets, or side panels that tie the door into the bench structure. A vintage door is often heavy, and a secure attachment is what turns it from a decorative prop into actual furniture.
5. Add the Seat
You can make the seat from a single board, multiple slats, reclaimed wood, or even a cut-down panel depending on the look you want. If you want rain to drain more easily, slats with slight spacing are practical. If the porch is covered and you want a smoother painted finish, a solid seat can look more furniture-like.
6. Decide on Arms or No Arms
Bench arms are not required, but they do make the piece feel finished. They also give people somewhere to set a drink, a book, or their existential dread. Simple armrests can be made from flat boards attached to sturdy side frames. If you prefer a more open, airy look, skip them and lean into cushions and styling.
7. Sand, Prime, and Paint
If you are painting the bench, prep matters. Sand rough areas, feather edges where old paint meets bare wood, and apply a primer appropriate for the surface. If your bench combines wood and metal hardware, use the right prep for both. Once primed, paint with an exterior-grade product intended for outdoor use. That is not the time to use leftover interior wall paint from your guest bathroom makeover three summers ago.
8. Let It Dry and Cure Properly
One of the biggest mistakes in painted furniture projects is assuming “dry to the touch” means “ready for porch life.” It does not. Give the finish proper time between coats and enough curing time before heavy use. Rushing this step is how you end up with fingerprints, stuck cushions, and a finish that looks like it went through a mild crisis.
9. Style It for the Porch
Once the bench is finished, soften it with outdoor cushions, weather-friendly pillows, or a folded throw for covered spaces. Add a small side table, planters, or a lantern nearby. If your porch is tiny, keep the styling restrained so the bench remains the star. A great upcycled piece does not need fifteen accessories screaming for attention around it.
Best Finishes for an Outdoor Bench
If your porch bench will live outdoors, finish choices matter almost as much as construction. Exterior-grade paint is usually the easiest and most durable route for a painted vintage door bench. It protects the wood and helps unify old and new materials into one cohesive piece. A satin or semi-gloss finish often works well because it is easier to wipe down than a flat finish and adds a subtle furniture feel.
If you love a layered, timeworn look, milk paint or chalk-style finishes can be beautiful, but they are better suited to covered conditions and may need extra protection depending on the product. For a bench exposed to serious weather, durability should win over romance. You can still create vintage charm without choosing a finish that gives up after two thunderstorms.
Some DIYers want to top painted wood with a clear sealer. In many cases, a quality exterior paint already provides the protection you need. The bigger priority is proper prep, enough coats, and ongoing maintenance. Translation: the magic is not in one miracle topcoat. The magic is in doing the boring steps well.
Common Mistakes to Avoid
Using a Door That Is Too Damaged
A salvaged look is lovely. Structural weakness is not. If the door is rotted or badly split, it may be more work than it is worth.
Skipping Reinforcement
The backrest connection needs real support. Decorative alone does not cut it for seating.
Ignoring Outdoor Conditions
Even a covered front porch deals with moisture, pollen, humidity, and temperature swings. Use exterior-rated products and corrosion-resistant fasteners.
Overcrowding the Porch
A front porch bench should invite people in, not block the front door like an awkward furniture hostage situation. Always measure the space first.
How This Bench Improves Front Porch Style
A re-purposed vintage door front porch bench does more than provide seating. It creates a focal point. It adds height and architectural texture to an area that often gets decorated with only planters and a doormat. It also helps a porch feel like an outdoor room rather than just a pass-through.
This kind of bench works especially well with farmhouse, cottage, traditional, eclectic, and vintage-inspired homes, but it can also add warmth to newer houses that feel a little too polished. Pair it with black lantern sconces for contrast, striped cushions for a classic look, or simple neutral pillows if you want the door’s detail to speak for itself.
It is the sort of project that looks expensive because it is personal. No big-box bench can compete with a piece that clearly has history, craftsmanship, and a little imagination behind it.
Real-Life Experiences With a Re-purposed Vintage Door Bench
One of the most interesting things about this project is that it rarely feels like building ordinary furniture. People who make a front porch bench from a vintage door usually talk about the experience differently. It is less “I assembled a bench” and more “I rescued something with a past and gave it a new job.” That sounds dramatic, but honestly, it fits.
The experience often begins with the hunt. Maybe it is a salvage yard stacked with chipped doors that smell faintly of old wood and dust. Maybe it is a flea market where one door is leaning against a rusty iron bed frame like it absolutely knows it is the prettiest item there. Maybe it came from a family property, and suddenly the project is not just decorative, but personal. That emotional layer changes the way people approach the build. They are not simply measuring lumber. They are preserving character.
Then comes the surprise of the door itself. Vintage pieces have quirks. They are heavier than expected. The paint color changes under the dust. The hinge mortises and knob holes become features you either celebrate or cleverly disguise. Many DIYers discover that the imperfections they worried about at first become the very reason the bench looks special in the end. A tiny dent, an old latch mark, or slightly uneven paneling can make the finished porch bench feel authentic instead of staged.
There is also a practical satisfaction that shows up once construction starts. Building the bench forces you to think like both a decorator and a problem-solver. You want it to look charming, sure, but you also want it strong enough for actual adults wearing actual winter coats. That mix of beauty and engineering is what makes the project memorable. It is creative, but it also has stakes. If the measurements are off, your “quaint vintage bench” starts leaning like it heard gossip.
Once the bench is painted, cured, and finally carried onto the porch, the payoff is immediate. Suddenly the front entry feels warmer. Guests do not always comment on trim color or planters, but they notice a bench made from a repurposed old door. It becomes a natural place to set down bags, tie a shoe, wait for someone to answer the bell, or sit with coffee in the morning before the neighborhood fully wakes up.
That everyday usefulness is what tends to surprise people most. The bench is decorative, yes, but it quickly becomes part of real life. Kids sit on it to pull off muddy sneakers. Delivery boxes land there for a minute. A dog claims the shady end like it paid for the house. Seasonal pillows come and go, but the bench stays. It earns its place.
In the long run, the project often leaves people with something bigger than a nice piece of porch furniture. It builds confidence. After turning a vintage door into a functional front porch bench, many DIYers start eyeing headboards, shutters, windows, and old chairs differently. They begin to see potential where they once saw junk. And that may be the best part of all. The bench is lovely, but the shift in perspective is even better. You stop looking for perfect materials and start looking for good bones, great character, and the possibility hiding under a scratched-up finish.
Final Thoughts
A re-purposed vintage door to a front porch bench is more than a clever upcycling idea. It is a practical way to create outdoor seating with real personality. Done well, it combines salvage style, smart construction, and weather-aware finishing into one hardworking piece. It offers curb appeal, comfort, and a story, which is a rare trio in the world of porch furniture.
If you choose a sturdy old door, build a solid base, and use outdoor-friendly materials, you can create a bench that looks charming and performs like it belongs there. The result is welcoming, distinctive, and far more interesting than anything that arrives in a cardboard box with an Allen wrench the size of a toothpick.