Table of Contents >> Show >> Hide
- Why Homeowners Like Fiber Cement Siding
- What Makes Installation “Easy”
- Tools and Materials You’ll Want Nearby
- Step 1: Store and Handle the Boards Like They Matter
- Step 2: Prep the Wall Before You Touch the Siding
- Step 3: Flash the Details Like You Mean It
- Step 4: Plan the Layout Before the First Course
- Step 5: Respect Clearance Rules
- Step 6: Cut the Boards Safely and Cleanly
- Step 7: Install the First Course Carefully
- Step 8: Blind-Nail for a Cleaner Look
- Step 9: Handle Joints, Corners, and Openings the Right Way
- Step 10: Finish Smart, Not Just Fast
- Common Mistakes to Avoid
- DIY or Hire a Pro?
- of Real-World Experience and Practical Lessons
- Conclusion
Installing fiber cement siding is one of those projects that looks simple from the sidewalk and gets dramatically more interesting once you’re standing on a ladder holding a heavy board that suddenly feels like it was made from compressed regret. The good news is that fiber cement siding installation becomes much easier when you stop treating it like ordinary wood siding and start treating it like what it is: a durable, moisture-conscious cladding system that rewards careful prep, clean layout, and boringly good habits.
If you want a sharp-looking exterior that can handle weather, pests, and time better than many traditional siding materials, fiber cement is a smart choice. But the secret to a long-lasting job is not brute force. It is method. The easiest way to install fiber cement siding is to simplify each stage: prep the wall well, manage water correctly, cut with low-dust tools, keep reveals consistent, and follow the fastening and clearance rules your product requires.
This guide walks through the process in plain English, with practical tips that make the work smoother and help you avoid the mistakes that turn a weekend project into a very expensive lesson.
Why Homeowners Like Fiber Cement Siding
Before getting into the how-to, it helps to understand why this material is worth the trouble. Fiber cement siding is prized for its durability, resistance to rot and insects, strong fire performance, and ability to hold paint well over time. It also comes in several profiles, including lap siding, shingles, and panels, so you can get a traditional clapboard look or a more modern exterior without switching materials mid-project.
That said, it is heavier and more brittle than vinyl, and it is less forgiving than wood when you cut or fasten it carelessly. In other words, fiber cement is the straight-A student of exterior cladding: impressive, dependable, and just a little dramatic if mishandled.
What Makes Installation “Easy”
Let’s clear up one thing right away: easy does not mean sloppy, and it definitely does not mean “ignore the manual and trust vibes.” Easy means using strategies that reduce waste, save time, and keep the wall assembly dry.
The easiest installation methods usually include:
- Choosing a simple horizontal lap layout with a consistent reveal
- Using a story pole or siding gauges so every course lands where it should
- Installing a proper weather-resistant barrier and flashing before the first board goes up
- Using fiber-cement shears or a dust-controlled saw setup
- Marking stud locations in advance so nailing is faster and cleaner
- Using a starter strip so the first course sits at the right angle
- Sealing cut edges and caulking only where the manufacturer actually wants caulk
Tools and Materials You’ll Want Nearby
A smoother job starts with a realistic tool list. For most fiber cement siding installation projects, you will want fiber cement boards, housewrap or other approved weather-resistant barrier, flashing, starter strip material, corrosion-resistant nails or screws, caulk, paint or touch-up coating, layout tools, ladders or scaffolding, eye protection, gloves, and a respirator or dust mask appropriate for the cutting method you are using.
For cutting, the “easy way” is usually fiber-cement shears because they create far less airborne dust. If you use a circular saw, use a blade designed for fiber cement and connect it to dust collection. Outdoor cutting is the smart move. Indoor cutting is a great way to turn your work area into a powdery cautionary tale.
Step 1: Store and Handle the Boards Like They Matter
They do matter. Fiber cement should be stored flat, kept dry, and supported off the ground. If boards arrive wet or become saturated, let them dry fully before installation. Installing wet boards can create movement problems later, especially at joints.
When carrying lap siding, move it on edge rather than flat. This is one of the simplest “easy ways” to prevent breakage. New installers often focus on cutting technique and forget the material can crack before it ever reaches the wall. That is an annoying way to learn that gravity is still undefeated.
Step 2: Prep the Wall Before You Touch the Siding
A good siding job starts behind the siding. Check the wall framing and sheathing for flatness, damage, and moisture issues. Replace rotten sheathing, correct uneven framing, and make sure the substrate is solid enough to support the finished cladding.
Then install the weather-resistant barrier. This layer is not optional busywork. Water gets behind almost every cladding at some point, so the wall needs a drainage plane that directs moisture back out. Overlap the housewrap correctly, tape seams as required, and integrate flashing at windows, doors, penetrations, and wall transitions so water sheds down and away.
If you skip this step or do it halfway, the siding may still look pretty from the street, but your wall assembly will be quietly auditioning for a mold documentary.
Step 3: Flash the Details Like You Mean It
Most siding failures are really water-management failures wearing a siding costume. Flashing matters at window and door heads, horizontal trim transitions, roof-to-wall intersections, penetrations, and anywhere dissimilar materials meet.
At roof intersections, install proper step flashing and kickout flashing so runoff gets pushed away from the wall instead of behind the cladding. Above windows, doors, and band boards, use Z-flashing with a positive slope so water cannot sit on top. Where siding meets masonry or trim vertically, leave the proper gap and flash as needed rather than stuffing everything full of caulk and optimism.
Step 4: Plan the Layout Before the First Course
One of the biggest differences between a clean professional-looking job and a wavy DIY special is layout. Use a story pole to mark the bottom of each course, or use siding gauges to keep the reveal consistent. This saves time, reduces measuring errors, and helps you avoid ugly slivers above windows and doors.
Mark stud locations with vertical chalk lines after the wall is wrapped. That makes nailing quicker and more accurate once you start hanging boards.
If you are using lap siding, install a starter strip at the bottom. This tilts the first course to match the angle of the overlapping courses above it and prevents a visibly wrong first row. It is a tiny detail that makes a huge difference, which is basically the whole fiber cement experience.
Step 5: Respect Clearance Rules
Always verify the exact requirements for your brand, but many manufacturer instructions call for common minimum clearances such as about 6 inches above finished grade, 1 to 2 inches above roofs, decks, steps, and other hard surfaces, roughly 1/4 inch above horizontal flashing, and around 1/8 inch where siding meets trim or other vertical terminations. These gaps are not cosmetic. They help prevent wicking, trapped moisture, and premature failure.
One of the most common mistakes in fiber cement siding installation is making everything look “nice and tight.” Tight is wonderful for a hug. Tight is terrible for moisture management.
Step 6: Cut the Boards Safely and Cleanly
Cutting is where many projects go from manageable to messy. The easiest low-dust option is fiber-cement shears. They are slower than a saw, but they are cleaner, quieter, and usually kinder to both lungs and neighbors.
If you need a saw for faster work, cut outdoors and use a dust-collection setup. Support the board along its length and near the cut to prevent chipping or breakage. Many installers use the board face down with circular saws, depending on the product and blade setup, to improve cut quality. Always follow the siding manufacturer’s cutting guidance.
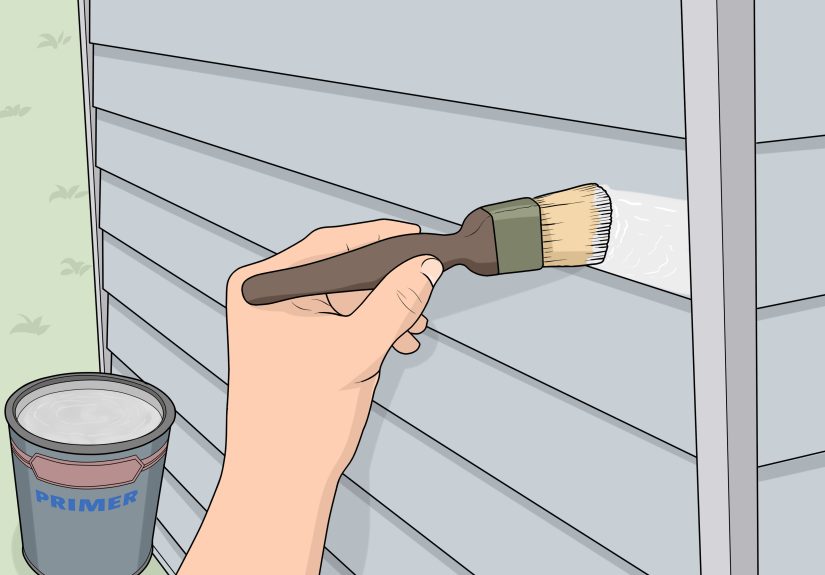
After cutting, wipe off dust and seal all cut edges with the recommended primer, paint, or touch-up coating. This is not the glamorous part of the job, but it is one of the most important. Raw cut edges are an open invitation for moisture trouble.
Step 7: Install the First Course Carefully
Start at the bottom and work up. Use the starter strip and a level line so the first course is perfectly straight. If the first row drifts, every row above it will follow like loyal but poorly trained ducklings.
Check exposure as you go. With lap siding, consistent reveal matters more than chasing every trim line on the house. The eye notices crooked courses quickly, even if the cause is hidden two dozen boards below.
Step 8: Blind-Nail for a Cleaner Look
Most lap siding is blind-nailed, meaning the fasteners are placed high enough on the board to be covered by the course above. This gives a cleaner appearance and better weather protection. Use corrosion-resistant hot-dipped galvanized or stainless steel fasteners, depending on your environment and manufacturer instructions.
Do not overdrive nails. The heads should sit flush, not buried. Overdriven fasteners reduce holding power and can create paths for moisture. Predrilling may help when hand-nailing. Pneumatic nailers can speed up the job, but they need careful pressure adjustment. If the gun is set too aggressively, it can ruin boards faster than you can say “that was an expensive sound.”
Step 9: Handle Joints, Corners, and Openings the Right Way
Butt Joints
At field butt joints, use factory edges when possible and back the joint with flashing. Some installers also use joint caulk depending on the product details, but the best practice is to follow the manufacturer’s system exactly rather than inventing your own hybrid approach.
Windows and Doors
At openings, leave the specified gap where the siding meets trim or flashing. Vertical gaps are commonly caulked; horizontal flashing gaps often are not. That distinction matters. Caulking the wrong place can trap water instead of blocking it.
Penetrations
For lights, outlets, faucets, and vent covers, use proper mounting blocks and flash above them. Notch carefully, support the material during cuts, and avoid creating sharp inside corners that can become crack points.
Step 10: Finish Smart, Not Just Fast
Once the siding is up, finish the details. Apply the recommended sealant at approved vertical joints and transitions. If the product is primed rather than factory-finished, apply high-quality exterior acrylic paint within the timeframe recommended by the manufacturer. Touch up cut edges and minor damage using the correct coating system.
Do not use random leftover paint from the garage just because it is technically “outside paint.” Fiber cement manufacturers specify compatible finishes for a reason.
Common Mistakes to Avoid
- Installing over uneven or damaged sheathing
- Skipping housewrap or poorly integrating flashing
- Ignoring clearance requirements at grade, roofs, and decks
- Using the wrong fasteners or overdriving them
- Cutting indoors without proper dust control
- Failing to seal cut edges
- Caulking horizontal flashing gaps that should stay open for drainage
- Carrying boards flat and breaking them before installation
- Starting without a layout plan, then discovering the top course looks awkward
DIY or Hire a Pro?
You can install fiber cement siding yourself, especially on a small one-story wall with straightforward details. But the project gets much less forgiving when the house is tall, the elevations are complicated, or the trim and flashing details are numerous. The material is heavy, the cuts can be dusty, and the water-management details matter a lot.
For many homeowners, the easiest route is a hybrid approach: do the tear-off, prep, and painting yourself if you have the skills, then hire an experienced crew for the siding installation. That can protect the most technical part of the project while still helping control cost.
of Real-World Experience and Practical Lessons
The first real-world lesson with fiber cement siding is that almost everyone underestimates the setup time. New installers tend to think the project begins when the first board goes on the wall. In reality, the project begins when the wall is flat, dry, wrapped, flashed, marked, and laid out. Once those parts are done well, the actual hanging of the siding becomes much easier. If those parts are rushed, the rest of the work feels like solving a puzzle while standing on a ladder with a nail gun.
Another common experience is surprise at the weight and brittleness of the boards. Fiber cement feels tough, and it is tough once installed, but during handling it has its own personality. Carrying long planks flat is one of the fastest ways to chip or snap them, especially on windy days or around scaffolding. Crews that work efficiently with this material usually move slowly at first, support each piece properly, and keep cutting stations organized so boards are not being shuffled around constantly.
Layout also changes everything. On paper, measuring each course one by one sounds fine. In practice, it is a time trap. A story pole, siding gauges, and clearly snapped chalk lines save huge amounts of effort and reduce mistakes. Experienced installers know that consistency looks expensive even when the material is not. Crooked reveals, awkward joints, and drifting lines make a job look amateur long before anyone notices what brand of siding was used.
Dust control is another topic where experience teaches humility quickly. People often imagine they will “just make a few cuts” with a saw. A few cuts becomes dozens, then more, and suddenly dust is on tools, clothes, trim, and every horizontal surface nearby. Low-dust shears or a proper vacuum setup feel like optional extras until the first long afternoon of cutting. After that, they feel like wisdom.
Moisture management is the lesson seasoned installers repeat most often. The siding itself is not the whole system. Flashing, drainage gaps, lapped weather barrier, and clearances around roofs and grade are what help the wall last. Many callbacks on siding jobs come from details that were hidden from view once the work was finished. A wall can look flawless on day one and still be vulnerable if water has nowhere to go. That is why experienced contractors obsess over kickout flashing, Z-flashing, and proper terminations. They have seen what happens when those pieces are missing.
Finally, there is the patience factor. Fiber cement rewards calm, repetitive work. It is not the material for rushing because the weather app says rain is coming in three hours and confidence feels strong. The best-looking jobs usually come from installers who check each course, keep their fastener depth consistent, seal every cut edge, and treat the last board of the day with the same care as the first. In short, the easiest way to install fiber cement siding is not some secret hack. It is preparation, consistency, and enough patience to let the system work the way it was designed to work.
Conclusion
If you want easy ways to install fiber cement siding, focus less on shortcuts and more on smart sequencing. Keep the wall flat, install the weather barrier correctly, flash every transition, use layout tools, control dust while cutting, maintain clearances, blind-nail properly, and finish every cut edge. That formula is not flashy, but it is what makes the job look better, last longer, and cause fewer headaches later.
Fiber cement siding is one of the best exterior upgrades for homeowners who want durability and curb appeal. Install it with care, and it can reward you for decades. Install it carelessly, and it will remind you that exterior water management is not a hobby. It is a lifestyle.