Table of Contents >> Show >> Hide
- Why Export Contacts from Outlook 2010?
- Before You Start
- How to Export Contacts from Outlook 2010 in 15 Steps
- Step 1: Open Outlook 2010
- Step 2: Click the File Tab
- Step 3: Choose Open
- Step 4: Click Import
- Step 5: Select “Export to a File”
- Step 6: Click Next
- Step 7: Choose the Right File Type
- Step 8: Click Next Again
- Step 9: Select the Contacts Folder
- Step 10: Double-Check Which Contacts Folder You Picked
- Step 11: Click Browse
- Step 12: Name the Export File Clearly
- Step 13: Review the Path and Click Next
- Step 14: Use “Map Custom Fields” If Needed
- Step 15: Click Finish and Verify the File
- CSV vs. PST: Which Export Format Should You Use?
- Common Problems When Exporting Outlook 2010 Contacts
- Best Practices for a Cleaner Export
- What Real-World Experience Teaches You About Exporting Contacts from Outlook 2010
- Final Thoughts
- SEO Tags
If you are still using Outlook 2010, first of all: respect. That software has the energy of an old filing cabinet that refuses to quit. But whether you are moving to a newer email app, backing up an aging computer, or trying to rescue years of contact data before a laptop gives up its last dramatic fan noise, exporting your contacts is one of the smartest little admin tasks you can do.
The good news is that exporting contacts from Outlook 2010 is not difficult. The slightly less good news is that Outlook 2010 likes to tuck important buttons into menus that feel like they were organized during a ribbon-themed scavenger hunt. Still, once you know where to click, the process is straightforward.
In this guide, you will learn exactly how to export contacts from Outlook 2010 in 15 steps, what file type to choose, how to avoid common mistakes, and what real-world users usually wish they had known before they clicked Finish. By the end, you will have a clean export file and one less reason to argue with old software.
Why Export Contacts from Outlook 2010?
People usually export Outlook contacts for one of four reasons: they want a backup, they are moving to another email service, they are switching computers, or they are cleaning up old business and personal address books. Whatever your reason, exporting creates a copy of your contact data that can be stored, reviewed, or imported somewhere else later.
For most people, the best export format is a CSV file. CSV stands for “comma-separated values,” which is a delightfully boring name for a very useful file. It works well with Excel, Gmail, Outlook on the web, and many other contact managers. If you are moving your contacts into another Outlook desktop setup and want a more Outlook-native format, a PST file may make more sense. We will get to that in a minute.
Important note: Office 2010 is no longer supported, so this is a great time to export anything important while your current setup still works exactly the way you expect it to.
Before You Start
Before you jump into the export wizard, take two minutes to make your life easier:
- Open Outlook 2010 on the computer where your contacts already live.
- Decide whether you want a CSV file or a PST file.
- Know which Contacts folder you want to export if you have more than one account.
- Choose a save location you can actually find later, such as your Desktop or Documents folder.
- Close the seventeen other windows you swore you still needed but absolutely do not.
How to Export Contacts from Outlook 2010 in 15 Steps
Step 1: Open Outlook 2010
Launch Outlook 2010 from your desktop, Start menu, or taskbar. Let it load fully before clicking around. If Outlook opens like it just woke up from a nap, give it a moment.
Step 2: Click the File Tab
Look at the top-left corner of the Outlook window and click File. This opens the backstage view, where Outlook hides many of its important administrative tools.
Step 3: Choose Open
In Outlook 2010, the path is usually File > Open. This can throw people off because newer versions often say Open & Export. Outlook 2010 prefers shorter labels and more mystery.
Step 4: Click Import
Inside the Open area, click Import. This launches the Import and Export Wizard, which handles both bringing data in and sending data out.
Step 5: Select “Export to a File”
When the wizard opens, choose Export to a file. This tells Outlook you want to create a separate file containing your data rather than import information from somewhere else.
Step 6: Click Next
After selecting Export to a file, click Next. Yes, this step sounds obvious, but it matters because many users accidentally stop at the selection screen and assume something else will happen automatically. Outlook is not that helpful.
Step 7: Choose the Right File Type
You will now see file type options. For most contact exports, choose a CSV option such as Comma Separated Values (Windows) or, in some Outlook 2010 environments, Comma Separated Values (DOS). If your goal is to move contacts into another Outlook installation and keep things more Outlook-specific, choose Outlook Data File (.pst) instead.
Step 8: Click Next Again
Once you choose the file type, click Next. You are now moving to the folder-selection stage, where Outlook asks what exactly you want to export.
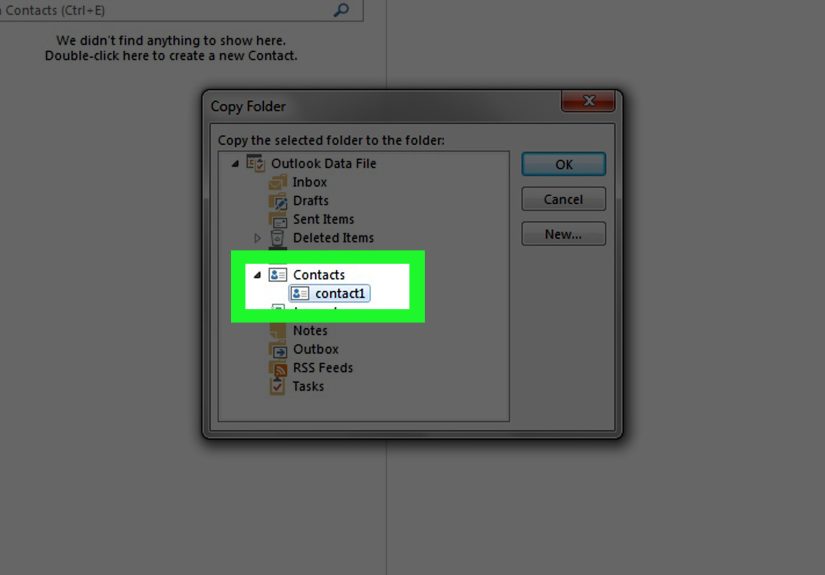
Step 9: Select the Contacts Folder
In the folder list, click the Contacts folder you want to export. This is the key step. If you choose the wrong folder, Outlook will export the wrong data, which is an efficient way to create future annoyance.
Step 10: Double-Check Which Contacts Folder You Picked
If Outlook contains multiple email accounts, you may see more than one Contacts folder. Choose the one under the correct mailbox. Work contacts, personal contacts, and old imported contacts can all live in different places, so take an extra five seconds here.
Step 11: Click Browse
Next to the save path field, click Browse. This lets you choose where the exported file will be saved. A local folder like Desktop or Documents is usually best because it is easy to find and simple to move later.
Step 12: Name the Export File Clearly
Give the file a useful name such as outlook-contacts-2010.csv or business-contacts-march-2026.csv. Avoid naming it something like contacts-final-final-2-really-final.csv. That path leads only to confusion and mild regret.
Step 13: Review the Path and Click Next
After choosing the location and file name, confirm the full save path looks correct. Then click Next. At this stage, Outlook is basically saying, “Are you sure this is where you want your file to live?” and you should answer confidently.
Step 14: Use “Map Custom Fields” If Needed
Before finishing, Outlook may give you the option to click Map Custom Fields. This is especially useful if you are preparing the file for another system and want to make sure names, phone numbers, email fields, and other columns line up properly. For a simple backup, many users skip this. For a cleaner migration, it is worth a quick look.
Step 15: Click Finish and Verify the File
Click Finish to complete the export. Then go to the folder where you saved the file and make sure it is actually there. If you exported to CSV, open it in Excel to confirm the contacts look normal. If the file exists and the data looks right, congratulations: your contact list has officially escaped Outlook 2010.
CSV vs. PST: Which Export Format Should You Use?
If you are wondering whether CSV or PST is better, the answer depends on what you plan to do next.
Choose CSV if:
- You want to import contacts into Gmail, Outlook on the web, or another email platform.
- You want to review or clean up contact data in Excel.
- You only need your contacts, not your full Outlook content.
Choose PST if:
- You are moving data from one Outlook desktop setup to another.
- You want a broader Outlook backup format.
- You may later restore contacts inside Outlook rather than another service.
For this article, CSV is the star of the show because it is the most flexible option for contact-only exports. PST is more like bringing the whole filing cabinet, while CSV is bringing the neatly labeled address book.
Common Problems When Exporting Outlook 2010 Contacts
You Cannot Find the Import Option
This is one of the most common points of confusion. In Outlook 2010, the path is usually File > Open > Import. In newer versions, it often appears under Open & Export. If you are following instructions for a newer Outlook version, the labels may not match exactly.
You Have More Than One Contacts Folder
This is common if Outlook is connected to multiple accounts or if old data was imported years ago and then quietly forgotten. Choose the folder under the mailbox you actually use. If you are unsure, open the folder first and look at a few contact names before exporting.
Your CSV File Looks Messy
If the exported file opens in Excel and some columns look odd, that does not always mean the export failed. It may simply mean the receiving app uses different field names. That is where Map Custom Fields becomes useful when importing later.
You Accidentally Exported the Wrong Thing
It happens. Outlook will not judge you, and neither will I. Just run the wizard again and choose the correct folder. This is exactly why clear file names matter.
You Are Trying to Import a Huge Contact List Somewhere Else
Some web-based systems may complain if the CSV is too large. In that case, open the CSV in Excel and split the file into smaller chunks before importing. It is not glamorous, but it works.
You Need More Than Contacts
If you also need email, calendar items, or tasks, a CSV file will not cover everything. In that situation, a PST export may be the better move because it is designed for larger Outlook data transfers.
Best Practices for a Cleaner Export
- Remove obviously outdated contacts before exporting if you want a cleaner file.
- Use a descriptive file name with a date.
- Save the file somewhere easy to access.
- Open the exported CSV once to verify it worked.
- Keep a backup copy before importing into another system.
A little cleanup before export can save a surprising amount of cleanup after import. This is especially true if your contact list has been collecting dust, duplicates, and old fax numbers since the Obama administration.
What Real-World Experience Teaches You About Exporting Contacts from Outlook 2010
Here is the part many short tutorials skip: exporting contacts from Outlook 2010 is easy in theory, but in real life it often happens at the exact moment someone is under pressure. Maybe a small business is replacing an old office computer. Maybe an employee is leaving and someone suddenly realizes all the client phone numbers live in one Outlook profile on one machine in one room, which is exactly as relaxing as it sounds. Maybe a family member is switching email services and wants to keep years of doctor, school, and community contacts intact.
In those moments, the export process feels less like a simple software task and more like a tiny digital rescue mission. That is why experienced users usually do three things differently from beginners.
First, they verify the actual Contacts folder before exporting. Newer users tend to assume Outlook has just one master list. Older Outlook setups love proving otherwise. You may have a default Contacts folder, another one tied to an old mailbox, and a third created during a past migration that nobody remembers. Seasoned users click into the folder first, look at a few names, and make sure they are exporting the right people.
Second, experienced users open the exported CSV right away. They do not wait until next week, next month, or the day the old computer stops turning on. They check the file immediately. This simple habit saves so much trouble. If the file is empty, incomplete, or named strangely, you can fix it while Outlook 2010 is still open and cooperative instead of trying to reconstruct everything later like a detective in a keyboard-themed crime show.
Third, people who have done this before tend to think one step ahead. They ask, “Where is this file going next?” If the answer is Gmail, Outlook on the web, or another cloud address book, CSV is usually perfect. If the answer is “another Outlook desktop installation and I want the data preserved in a more Outlook-friendly way,” PST may be smarter. The export choice matters because the easiest file to create is not always the easiest file to use later.
Another very real experience lesson is that contact data tends to be messier than people expect. You may discover entries with no first name, four email addresses in the wrong place, or a company name living in the street address field for reasons known only to 2014. This does not mean Outlook failed. It usually means your contacts were built slowly over time, imported from multiple sources, and edited by humans, which is to say: imperfectly. That is normal. A good export gives you a chance to clean things up.
There is also a practical emotional side to all of this. Contacts are one of those quiet forms of digital memory. They hold former coworkers, longtime clients, schools, doctors, old neighbors, club members, and people you only email once a year but really do not want to lose. Exporting them is not just a technical action. It is a way of preserving a useful map of your relationships and routines.
So yes, the steps themselves are simple. Click File. Click Open. Click Import. Choose Export. Pick CSV. Done. But the experience around those steps is what makes the task important. The smartest users treat the export as both a backup and a checkpoint. They save the file, label it clearly, verify it, and store a copy somewhere safe. That is the difference between “I think my contacts are backed up” and “I know exactly where they are.”
And honestly, that second sentence sleeps better at night.
Final Thoughts
Exporting contacts from Outlook 2010 is one of those small tasks that can save a huge amount of stress later. Whether you are migrating to a new platform, backing up an old PC, or just trying to get organized, the process is manageable once you know where Outlook 2010 hides the buttons. Follow the 15 steps above, choose the right file format, verify the export, and keep a backup copy somewhere safe.
Old software may have its quirks, but your contact list does not have to be trapped in the past with it.