Table of Contents >> Show >> Hide
- Why Make a Christmas Garland With Real Branches?
- Best Real Branches for Christmas Garland
- What You Need for a DIY Christmas Garland Using Real Branches
- How to Make a Christmas Garland With Real Branches
- How to Style Your Real Branch Garland So It Looks Custom
- How to Keep a Real Christmas Garland Fresh
- Common Mistakes to Avoid
- Safety Tips for Real Holiday Greenery
- Final Thoughts
- Real-Life Experiences and Lessons From Making DIY Christmas Garland Using Real Branches
- SEO Tags
Some holiday decorations are beautiful. Some are meaningful. And some smell like you kidnapped December and brought it straight into your living room. A DIY Christmas garland using real branches belongs in that last category. It is lush, textured, festive, and just a little dramatic in the best possible way. When you drape real greenery across a mantel, staircase, doorway, or porch rail, the whole house suddenly feels like it has better manners.
The best part is that making a real-branch garland is not a mysterious craft reserved for florists, stylists, or people with suspiciously perfect porches. It is a very doable project for regular humans with garden gloves, floral wire, and the willingness to sweep up a few needles afterward. With the right greenery, a simple technique, and a little patience, you can create a custom Christmas garland that looks expensive, smells amazing, and makes store-bought décor look like it needs a nap.
This guide covers everything you need to know, from choosing the best real branches for garland to building, styling, hanging, and keeping your greenery fresh. Whether you want a classic evergreen Christmas garland, a natural rustic look, or something a little more elegant with magnolia leaves and ribbon, you can make it happen without turning your house into a craft-store crime scene.
Why Make a Christmas Garland With Real Branches?
A real greenery garland has a charm that faux versions struggle to fake. The texture is softer, the shape is more organic, and the scent is pure holiday magic. Cedar drapes beautifully, pine adds that unmistakable Christmas-tree fragrance, magnolia leaves bring shine and structure, and eucalyptus adds movement and a fresh herbal note.
There is also a design advantage. When you build your own DIY garland using real branches, you control the fullness, length, color palette, and decorative details. You can keep it simple with just cedar and warm white lights, or dress it up with pinecones, velvet ribbon, dried orange slices, seed pods, bells, berries, or magnolia leaves. In other words, your garland does not have to look like everyone else’s. It can look like your holidays.
And yes, it can be budget-friendly. If you have evergreen shrubs or trees on your property, permission to forage from a friend’s yard, or access to affordable branch bundles from a garden center, a real branch garland can cost much less than a premium pre-made option. You are basically trading a little labor for a lot of beauty, which is a very festive deal.
Best Real Branches for Christmas Garland
Cedar for softness and drape
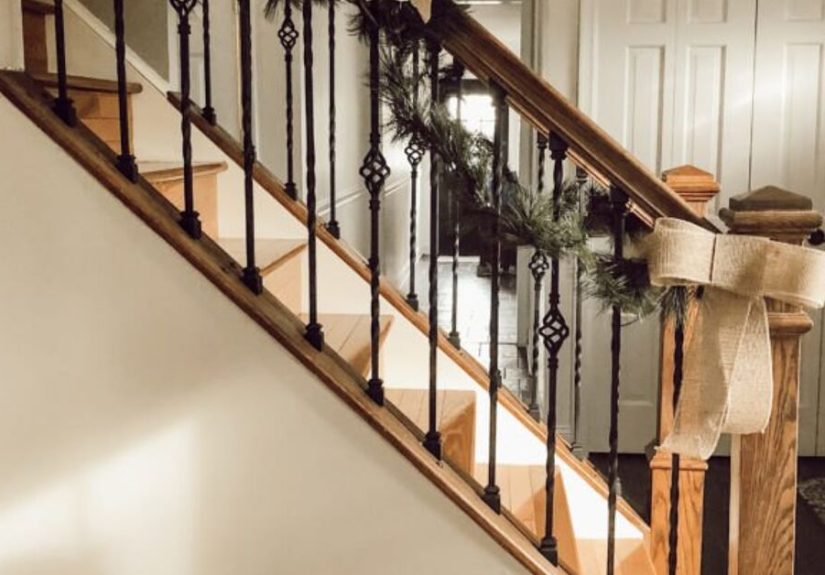
If you want that flowing, graceful, magazine-worthy look, cedar is a star. It hangs naturally, fills space quickly, and gives a garland a soft, feathery silhouette. It is especially good for mantels, stair rails, and doorway swags where you want movement instead of stiff, upright branches.
Pine, fir, and spruce for classic evergreen style
Pine, fir, and spruce are the classics for a reason. They bring that familiar Christmas tree look and scent, and they add volume and structure. Pine needles are often softer on the hands, while fir and spruce can create a fuller, richer body. If you want a traditional evergreen garland, these branches are your backbone.
Magnolia and eucalyptus for texture and contrast
Magnolia leaves are the secret weapon of elegant holiday décor. Their glossy green tops and warm brown undersides add instant contrast and a slightly upscale Southern feel. Eucalyptus, meanwhile, softens everything. It gives your garland a layered, airy finish and makes the whole project look more designed and less “I panic-wired branches at midnight.”
Holly, berries, and decorative accents
Holly can be beautiful in a garland, especially when you want pops of red, but use it thoughtfully. It is best as an accent rather than the main body. Faux berries are often a smarter choice if you have curious kids or pets. Pinecones, dried citrus slices, cinnamon bundles, bells, and velvet ribbon also make excellent additions and are much less likely to inspire an emergency phone call.
What You Need for a DIY Christmas Garland Using Real Branches
Before you begin, gather everything in one place. This project is easier when you are not sprinting around the house holding a half-wired branch and asking where the scissors went.
Basic materials
Use this simple setup:
- Fresh real branches, cut into manageable pieces
- Jute twine, rope, or a sturdy garland base
- Green floral wire or paddle wire
- Pruning shears or clippers
- Wire cutters
- Gloves
- Command-style hooks, twine loops, or zip ties for hanging
Optional decorative extras
- Magnolia leaves
- Eucalyptus
- Pinecones
- Velvet or wired ribbon
- Dried orange slices
- Battery-operated or plug-in LED string lights
- Ornaments, bells, or wooden beads
If you are building a long staircase garland or an outdoor doorway garland, buy more greenery than you think you need. Real branches compress visually once wired together, and a “lightly filled” garland often looks like it skipped lunch.
How to Make a Christmas Garland With Real Branches
1. Measure your space first
Measure the mantel, banister, doorway, mirror, or table where the garland will go. Then add extra length if you want drape at the ends. For a full, gathered look, add at least 12 to 24 inches beyond the exact span. Garland that is too short always looks a little apologetic.
2. Create a sturdy base
Lay out a length of rope, thick twine, or several strands of jute as your base. This gives your garland strength and makes hanging easier. For heavier garlands, especially those made with real magnolia, pinecones, and lights, a solid base is non-negotiable.
3. Cut branches into small bundles
Trim your greenery into pieces roughly 8 to 14 inches long. Group three to five stems into small bundles. Combine different textures in each bundle, such as cedar plus pine, or fir plus eucalyptus, so the finished garland looks layered from the beginning instead of patched together later.
4. Wire the first bundle to the base
Place the first bundle at one end of the rope with the cut stems facing backward. Wrap floral wire firmly around the stems and base several times. Keep the wire tight but not so tight that you crush the stems. The goal is secure, not strangled.
5. Overlap each new bundle
Add the next bundle so it overlaps the stems of the previous one. This creates the shingled effect that makes a garland look lush and polished. Continue wiring bundle after bundle in the same direction. By the time you finish, the stems should be mostly hidden and the greenery should flow naturally.
6. Build fullness in strategic areas
If your garland will sit on a mantel, focus fullness on the front-facing side. If it will hang on a staircase, build volume all around the visible edge. If one side of your garland is hidden against a wall or railing, do not waste premium branches there. This is not cheating. This is intelligent decorating.
7. Add specialty greens and decorative elements
Once the main structure is built, tuck in magnolia leaves, eucalyptus, or berry stems using shorter pieces of wire. Then add pinecones, ribbon, ornaments, or dried citrus. Wire decorative items in small clusters rather than spreading them evenly every six inches like you are setting up a parade route. A few intentional moments usually look more stylish than constant repetition.
8. Thread in lights last
If you want lights, use cool-running LED strands. Wind them through the garland after the greenery is complete, then hide the wire as you go. Warm white lights are timeless, but if your family loves colorful Christmas décor, go ahead and let the garland party a little.
9. Hang and shape the garland
Use removable hooks, discreet nails where appropriate, zip ties on railings, or twine loops to secure the garland. Shape the branches by hand and fluff the visible sections. If the garland looks flat, add another few clusters instead of yanking on the existing branches and pretending that helped.
How to Style Your Real Branch Garland So It Looks Custom
A beautiful DIY Christmas garland is not just about greenery. It is about contrast, rhythm, and restraint. Yes, restraint. We all love a festive impulse, but a garland can go from elegant to “holiday craft buffet” very quickly.
For a classic look
Stick with cedar, pine, white lights, velvet ribbon, and a few pinecones. This style works beautifully on mantels and staircases and pairs well with stockings, brass candleholders, and neutral décor.
For a rustic natural look
Use mixed evergreens, grapevine, dried orange slices, cinnamon sticks, seed pods, and burlap or natural linen ribbon. This style feels cozy, collected, and a little like you own a cabin even if you absolutely do not.
For a more refined, editorial look
Lean into magnolia leaves, eucalyptus, dark green cedar, slim satin ribbon, and a restrained color palette. A few oversized bows or clustered ornaments can create impact without making the garland feel crowded.
For outdoor curb appeal
Go fuller and bolder. Outdoor garlands need a little extra volume to read well from a distance. Add weather-friendly ribbon, large bells, big bows, pinecones, or lanterns nearby for a stronger visual statement.
How to Keep a Real Christmas Garland Fresh
Fresh greenery is gorgeous, but it is still cut plant material, not immortal holiday magic. If you want your DIY Christmas garland using real branches to last through the season, treat it kindly.
- Start with fresh, flexible branches that are not brittle or shedding.
- Keep the garland away from fireplaces, heat vents, radiators, and harsh direct sun.
- Mist the cut ends and underside of the greenery occasionally, especially indoors.
- Make the garland as close to display time as possible for best appearance.
- Use outdoor spaces when possible, since cool temperatures help live greenery last longer.
Indoor garlands generally dry out faster than outdoor ones. That does not mean you cannot use them inside. It just means your mantel garland has a shorter holiday lifespan than your porch rail garland, because central heating is not exactly known for its nurturing personality.
Common Mistakes to Avoid
One of the biggest mistakes is using only one kind of greenery and expecting it to look rich. It can work, but a mix of textures almost always feels fuller and more expensive. Another common issue is making bundles too large. Oversized bunches are harder to wire neatly and can leave visible gaps. Smaller overlapping bundles usually produce a smoother result.
People also underestimate weight. Real branch garlands are heavier than faux ones, especially once you add lights, ribbon, and pinecones. Use enough support points. A drooping garland can look charming; a crashing garland does not. Finally, avoid overdecorating. If the greenery itself is beautiful, let it do some of the talking. It earned the microphone.
Safety Tips for Real Holiday Greenery
Fresh garland is a natural decoration, but natural does not automatically mean harmless. Keep real greenery away from open flames, hot bulbs, fireplaces, and portable heaters. Use LED lights rather than hot incandescent strands. If you are decorating around children or pets, be careful with holly berries, mistletoe, and any decorative plants or berries that could be tempting to taste.
Also be smart about where your greenery comes from. If you are cutting branches from your yard, trim responsibly and avoid taking material from public land unless it is explicitly allowed. If you transport greenery across state lines, be mindful of pest and quarantine concerns. Holiday décor should spread cheer, not invasive insects.
Final Thoughts
A DIY Christmas garland using real branches brings texture, scent, and unmistakable holiday warmth into a home. It can be rustic, elegant, traditional, or modern depending on the greenery and accents you choose. More importantly, it feels personal. You made it. You shaped it. You decided whether it would whisper “classic Christmas” or confidently announce “yes, we are the kind of people who wire magnolia leaves for fun.”
That is the real magic of handmade holiday décor. It does not have to be flawless to be memorable. In fact, the slight bends, irregular drape, and natural movement are exactly what make a real branch garland feel alive. So gather your branches, queue up a playlist, make a little mess, and create a Christmas garland that looks like the season itself decided to move in for a while.
Real-Life Experiences and Lessons From Making DIY Christmas Garland Using Real Branches
One of the funniest truths about making a real Christmas garland is that it always begins with confidence and ends with a floor covered in needles, ribbon scraps, and one mysterious pinecone that somehow rolls into another room. But that is also part of the charm. People who make their own real-branch garlands year after year often say the project becomes less about perfect results and more about the ritual of beginning the season.
A lot of first-time DIYers assume they need florist-level talent to pull it off. Then they make one simple garland for a mantel or doorway and realize the process is more forgiving than expected. Maybe the left side is a little fuller than the right. Maybe one bow is clearly the overachiever of the group. Nobody notices. What they do notice is that the room smells incredible and suddenly feels warm, textured, and festive in a way store-bought décor sometimes does not.
Many people discover that working with real branches changes how they decorate the rest of the house. Once you have a fresh cedar garland on the mantel, plastic accessories can start to look a little too shiny and eager. That often leads to quieter decorating choices: linen ribbon instead of glitter mesh, dried orange slices instead of neon ornaments, brass bells instead of ten different novelty picks shaped like candy canes. The greenery sets the tone, and the rest of the room usually behaves better because of it.
There is also something unexpectedly satisfying about learning which branches work best in your home. Some families swear by cedar because it drapes so beautifully on a staircase. Others love magnolia because it holds shape and adds instant drama. Some people mix in eucalyptus and wonder why they ever spent money on synthetic holiday fragrance when the real thing smells like a luxurious winter morning. Over time, the process becomes less random and more personal. You start building a signature style, even if you never planned to become a “signature garland style” person.
Another common experience is realizing that handmade garland tends to create memories faster than purchased décor. Kids remember helping sort pinecones. A grandparent remembers how their family always used fresh branches on the porch. A partner who claimed not to care somehow becomes deeply invested in whether the garland should have warm white lights or no lights at all. The project turns into an event, and the finished piece becomes proof that the holiday season actually happened in your house, not just on your shopping receipt.
And yes, there are always lessons. Make it closer to the day you plan to display it. Buy more greenery than you think you need. Use better hooks than the sad little ones from the junk drawer. Do not wait until 11 p.m. to add lights unless you enjoy whispered arguments with tangled wire. But even the mistakes become part of the tradition. That is what makes a DIY Christmas garland using real branches so worthwhile. It is beautiful, fragrant, and gloriously imperfect, which is a pretty good description of the holidays themselves.