Table of Contents >> Show >> Hide
- When Is the Best Time to Propagate African Violets?
- What You Need to Propagate African Violets
- The Most Reliable Method: Propagating African Violets From Leaf Cuttings
- Can You Propagate African Violets in Water?
- How Long Does Propagation Take?
- How to Separate and Pot Up Baby African Violets
- Other Ways to Propagate African Violets
- Special Note About Chimera African Violets
- Common Propagation Mistakes to Avoid
- How to Care for New African Violet Plants
- What Experience Teaches You About Propagating African Violets
- Final Thoughts
- SEO Tags
African violets are the overachievers of the houseplant world. They are compact, colorful, charming, and somehow always look like they have their lives together, even when the rest of your windowsill looks like a botanical support group. The good news is that once you own one healthy plant, you can often make more. A lot more. This is where propagation comes in.
If you have ever looked at your favorite African violet and thought, “You know what this living room needs? Five more of you,” you are in exactly the right place. Learning when and how to propagate African violets is surprisingly simple, highly satisfying, and a great way to multiply a treasured plant without spending another dime at the garden center.
In this guide, you will learn the best time to propagate African violets, the easiest propagation methods, how long the process usually takes, and what mistakes tend to ruin the party. We will also cover special cases like chimera varieties, because some violets like to be a little dramatic. By the end, you will know how to turn one plant into a small violet dynasty.
When Is the Best Time to Propagate African Violets?
The short answer: you can propagate African violets any time of year indoors, but spring and early summer usually give you the fastest and most reliable results. During these brighter, warmer months, the plant is actively growing, which means it has more energy to produce roots and baby plantlets.
That said, indoor gardeners are not entirely at the mercy of the seasons. If your home stays warm and your plant gets bright, indirect light, propagation can still work well in fall or winter. It just may move at the speed of a lazy Sunday. In other words, not impossible, just slower.
Signs Your Plant Is Ready
Propagation works best when the parent plant is healthy, actively growing, and free of pests or disease. Choose a plant with firm leaves, steady growth, and no mushy crown, yellowing stems, or suspicious fuzzy patches. This is not the moment to recruit the struggling plant in the corner that has been “going through something.”
The ideal leaf for propagation is usually a mature leaf from the middle row of the plant. Very young inner leaves are often too tender, while the oldest outer leaves may be tired, damaged, or less vigorous. Think of it as choosing the leaf that has energy, but not too much teenage chaos.
What You Need to Propagate African Violets
Before you begin, gather your materials so you are not wandering around the house holding a cut leaf and wondering where you last saw the perlite.
- A healthy African violet plant
- Clean scissors, pruning snips, or a sharp knife
- A small pot or propagation tray with drainage
- Light rooting medium, such as African violet mix, or a fluffy blend with vermiculite, perlite, sand, or peat/coir
- Room-temperature water
- A clear plastic bag, dome, or container lid for humidity
- Optional: rooting hormone
- Optional: a small glass if you want to root in water first
Clean tools matter. Dirty tools can introduce disease, and African violets are not known for shrugging off rot with a brave smile. A quick disinfecting wipe or wash is worth the effort.
The Most Reliable Method: Propagating African Violets From Leaf Cuttings
The classic and most popular method is leaf propagation. It is simple, beginner-friendly, and usually gives excellent results. Here is how to do it without turning a healthy leaf into compost.
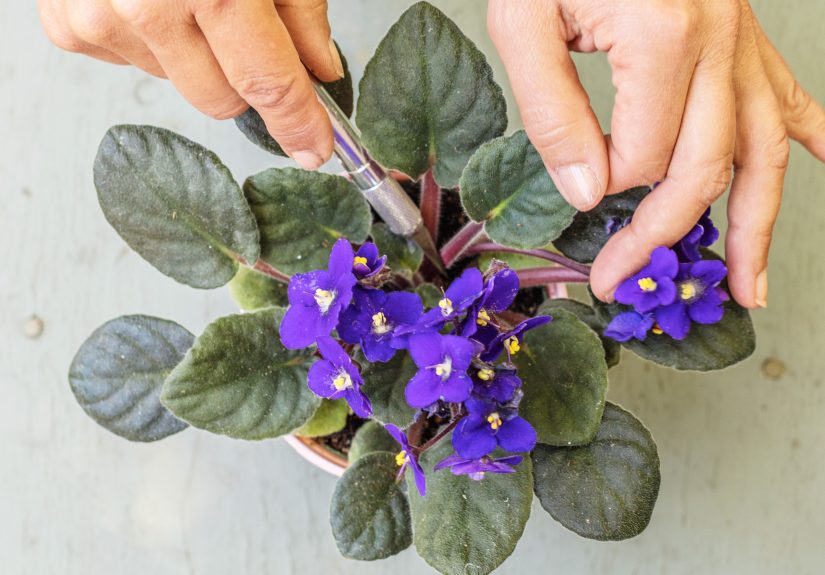
Step 1: Choose the Right Leaf
Select a firm, mature leaf from the middle of the rosette. Avoid leaves that are limp, bruised, yellow, or ancient enough to qualify for retirement benefits. A healthy medium-aged leaf has the best chance of forming roots and producing strong plantlets.
Step 2: Cut the Leaf Cleanly
Remove the leaf with a clean blade, leaving about 1 to 1.5 inches of the petiole, which is the small stem attached to the leaf. Many growers cut the petiole at a 45-degree angle. That angled cut can expose more tissue and may encourage stronger rooting and more baby plants.
Step 3: Prepare the Rooting Medium
Use a light, airy, moist medium rather than dense potting soil. African violet babies prefer a fluffy environment with oxygen around the developing roots. If the mix feels heavy or muddy, it is not the one.
A good propagation mix should hold some moisture while still draining quickly. Think “moist cake crumb,” not “brownie batter.” Wet, soggy media is one of the fastest ways to invite rot.
Step 4: Make a Planting Hole
Use a pencil, chopstick, or similar tool to make a small hole in the medium before inserting the leaf stem. This helps prevent damage to the cut end and keeps you from jamming the petiole into the mix like you are planting a fence post.
Step 5: Insert the Leaf at a Slight Angle
Place the petiole into the medium at about a 45-degree angle, with the leaf blade tilted slightly upward. This position gives developing plantlets a little room to emerge near the base. Gently firm the mix around the stem so the leaf stays put but is not packed into concrete.
Step 6: Add Humidity
Cover the pot with a clear plastic bag or place it under a propagation dome. This helps keep humidity high while the leaf is rooting. Just make sure the plastic does not rest directly on the leaf for long periods, and allow occasional air exchange so mold does not move in like an uninvited roommate.
Step 7: Give It Bright, Indirect Light
Place the cutting in bright, indirect light. An east-facing window often works well. Avoid direct hot sun, which can overheat the cutting and scorch the leaf. African violets like light, not interrogation-lamp intensity.
Step 8: Be Patient and Resist Digging It Up
This is the hardest step for many plant lovers. Roots may begin forming in a few weeks, while plantlets can take several more weeks to appear. Tugging the leaf every few days to “check progress” is not a propagation strategy. It is plant sabotage wearing a curious hat.
Can You Propagate African Violets in Water?
Yes, you can root African violet leaves in water, and many people enjoy watching the roots develop. It is a fun method, especially if you like visible progress. However, soil or a rooting mix often produces sturdier young plants and makes the transition to potting easier.
How to Do It
- Cut a healthy leaf with a short petiole.
- Place the stem in a small glass or jar with the leaf blade above the waterline.
- Keep the water clean and change it regularly.
- Move the rooted cutting into a fluffy potting medium once roots are established.
The main drawback is transplant shock. Roots formed in water are not always thrilled about moving into soil. It can still work well, but if you want the simplest path from leaf to potted plant, rooting directly in medium is usually the smoother route.
How Long Does Propagation Take?
African violets are not outrageously slow, but they are not instant noodles either. Under good conditions, roots often form in about 2 to 4 weeks. Tiny plantlets may appear roughly 6 to 10 weeks later, and it may take around 3 to 4 months total before you have little plants large enough to separate and pot on their own.
Light, warmth, humidity, and the health of the original leaf all affect timing. Cooler homes and dim winter windows can stretch the process. So if your leaf cutting is doing nothing dramatic after a few weeks, that does not always mean failure. Sometimes it is just being deeply committed to a slow reveal.
How to Separate and Pot Up Baby African Violets
Once several baby plantlets have formed at the base of the original leaf and each has a few leaves of its own, it is time for the big move.
What to Do
- Gently remove the rooted leaf and its cluster from the pot.
- Use your fingers or a clean tool to separate the babies carefully.
- Pot each baby into a small container with fresh African violet mix.
- Keep them lightly moist and in bright, indirect light.
- Maintain gentle humidity for the first week or two if needed.
Do not rush them into oversized pots. African violets generally bloom and grow better when slightly snug in their containers. A huge pot just gives extra soil a chance to stay wet too long, which is excellent for root rot and not so excellent for your actual plant.
Other Ways to Propagate African Violets
Division or Suckers
If your African violet produces side shoots, often called suckers or pups, you can separate them and pot them up individually. This is a fast and reliable method because the new growth is already a small plant in progress. It is especially useful when a mature violet starts forming multiple crowns.
Use a clean blade to divide the sucker from the parent plant, keeping as much base tissue intact as possible. Pot it in a small container and treat it like a delicate new plant until it settles in.
Seed Propagation
Yes, African violets can be grown from seed, but that is a slower, more technical route and not the usual choice for casual indoor gardeners. Seed-grown plants can vary from the parent, which is exciting if you enjoy surprises and less exciting if you wanted an exact clone.
Blossom Stem Propagation
This method is more specialized, but it matters for certain varieties. Some African violet chimeras, which have striped or pinwheel-like flower patterns, do not come true from ordinary leaf cuttings. For those, suckers or blossom-stem propagation are more appropriate if you want to preserve the flower pattern.
Special Note About Chimera African Violets
If your African violet is a chimera, standard leaf propagation may produce offspring that lose the distinctive bloom pattern. In plain English, the babies may be pretty, but they may not look like Mom.
That is why chimera African violets are often propagated from suckers or blossom stems instead. If preserving an exact flower pattern matters to you, identify the variety before you snip. This is one of those rare houseplant moments where reading the label can save heartbreak.
Common Propagation Mistakes to Avoid
Using the Wrong Leaf
Very old leaves may root poorly, and very young ones may collapse before they get going. Middle-aged leaves are usually the sweet spot.
Keeping the Mix Too Wet
A constantly soggy medium is rot’s favorite vacation destination. Keep the mix evenly moist, not drenched.
Giving Too Little Light
Low light slows everything down. Your cutting will not necessarily die, but it may just sit there contemplating existence.
Using Cold Water
African violets generally prefer room-temperature water. Very cold water can stress foliage and lead to spotting.
Potting Too Deep
Do not bury the leaf blade or the crown of a young plant. Good airflow around the base helps prevent crown problems.
Expecting Instant Results
Propagation is a slow magic trick. The trick works better if you do not keep interrupting it.
How to Care for New African Violet Plants
Once your new plants are potted up, care becomes fairly straightforward. Give them bright, indirect light, consistent warmth, and a loose, well-draining mix. Water when the surface feels dry to the touch, but do not let the pot stay waterlogged. A little humidity helps, especially while they are settling in.
Feed lightly once the plantlets are actively growing. A weak fertilizer solution is usually better than overdoing it. Too much fertilizer can create soft, unhappy growth and cause more problems than it solves.
If you keep conditions steady, your new African violets can mature into blooming plants that look wonderfully professional, as if you run a tiny floral production house from your kitchen windowsill.
What Experience Teaches You About Propagating African Violets
There is a difference between reading propagation instructions and actually doing it three, five, or twenty times. On paper, African violet propagation sounds very neat: cut leaf, stick leaf, wait, admire babies. In real life, it is a little more human than that. You learn what healthy really looks like. You learn that one leaf can rot while another from the same plant grows like it was born for greatness. You also learn that patience is not optional. It is the whole sport.
One of the first lessons many growers learn is that less fussing usually leads to better results. The beginner instinct is to check constantly. Is it rooting? Is it too wet? Should I move it? Should I mist it? Should I whisper encouragement? The answer is usually to set it up well and then leave it alone. African violet cuttings prefer calm, consistent conditions over enthusiastic interference.
Another common experience is realizing how much the rooting medium matters. A heavy potting soil can turn a promising cutting into a mushy disappointment. A light, airy mix, on the other hand, makes the whole process feel easier. The leaf stays firm, the stem avoids rot, and the babies seem to emerge with less drama. Gardeners often discover this only after trying the “whatever soil I had in the garage” method once and vowing never again.
Light is another practical teacher. A cutting in a dim room may remain technically alive while showing all the ambition of a teenager on summer break. Move that same cutting to bright, indirect light, and suddenly it behaves like it has a plan. Not a wild plan. African violets are still calm plants. But definitely a plan.
Many growers also notice that different leaves have different personalities. Some produce a whole crowd of plantlets. Others give you one baby and act like that should be enough for everyone. This is normal. The parent plant, the variety, the season, and the growing conditions all play a role. Propagation is science, yes, but it also has just enough mystery to keep plant people humble.
Then there is the moment when you finally separate the baby plants. It feels a little like plant kindergarten graduation. Tiny crowns, tiny roots, tiny pots lined up on the table. This is where experience teaches gentleness. Rushing causes snapped stems and broken roots. Slowing down makes the whole process smoother. A patient hand saves a surprising number of future flowers.
Over time, propagation also changes the way you look at your African violets. You stop seeing them as static houseplants and start seeing them as renewable little collections. A leaf broken during repotting is no longer a tragedy. It is a potential new plant. A plant with suckers is not just overgrown. It is an opportunity. Even a gifted leaf from a friend can become a long-term keepsake that flowers for years.
Perhaps the most satisfying part of the experience is the way it rewards consistency rather than perfection. You do not need a greenhouse, a lab coat, or mystical plant powers. You just need a healthy leaf, a suitable mix, decent light, and the self-control not to overwater out of love. That last part is harder than it sounds, but it is one of the great houseplant life lessons.
In the end, propagating African violets is enjoyable because it feels both practical and a little magical. You take one leaf, and after some quiet weeks, a cluster of new life appears where there was none. It never gets old. Even experienced growers still get a small thrill from spotting the first baby leaves pushing up near the base. It is proof that a simple, ordinary houseplant can still surprise you. And honestly, that is part of the charm.
Final Thoughts
If you have been wondering when and how to propagate African violets, the best answer is simple: start with a healthy leaf, choose a bright and warm time if possible, use a light rooting mix, and give the process time. Leaf propagation is the easiest method for most varieties, while suckers or blossom stems are better for chimera types that need to stay true to their unique flower pattern.
Once you get the hang of it, African violet propagation becomes one of the most rewarding indoor gardening projects around. It is affordable, beginner-friendly, and just dramatic enough to stay interesting. One good plant can become a whole collection, a thoughtful gift, or your new excuse to buy more tiny pots. And frankly, that sounds like a win.