Table of Contents >> Show >> Hide
- Why Use a Drill for Pumpkin Carving?
- What You Need Before You Start
- How to Choose the Best Pumpkin for Drilling
- Pumpkin Drilling Steps: The Full DIY Process
- Step 1: Wash and Dry the Pumpkin
- Step 2: Cut an Opening
- Step 3: Scoop Out the Seeds and Pulp
- Step 4: Dry the Surface and Sketch Your Design
- Step 5: Choose the Right Drill Bits
- Step 6: Start Drilling the Smallest Details First
- Step 7: Enlarge Selected Holes for Contrast
- Step 8: Clean Up the Edges
- Step 9: Add Light
- Step 10: Help the Pumpkin Last Longer
- Best Drill-Carved Pumpkin Design Ideas
- Common Mistakes to Avoid
- Pumpkin Drill Safety Tips
- What the Experience Is Really Like: 500 Extra Words From the Pumpkin Front Lines
- Conclusion
- SEO Tags
If classic pumpkin carving makes you feel like you’re entering a tiny orange wrestling match armed with a flimsy saw, good news: there’s a better way. A drill turns an ordinary pumpkin into a glowing piece of Halloween art with less hacking, cleaner circles, and a whole lot more personality. Instead of carving one big grin that looks suspiciously like it survived a knife fight, you can create dotted faces, stars, constellations, floral patterns, spooky words, and elegant lantern effects that look polished without requiring a sculptor’s résumé.
This DIY pumpkin carving method is especially great for beginners, busy parents, and anyone who wants a porch display that looks clever but doesn’t eat up the whole afternoon. Drill-carved pumpkins can be playful, modern, spooky, or surprisingly classy. You can go full haunted-house drama, or keep things chic with neat rows of glowing dots and a battery-powered candle tucked inside. Either way, the drill does the heavy lifting, and your pumpkin gets to live its best glowing life.
Below, you’ll find the full pumpkin drilling process, from picking the right pumpkin to choosing bits, drilling clean holes, adding light, and helping your design last long enough for trick-or-treaters to admire it. In other words, this is your complete guide to DIY pumpkin carving with a drill, minus the panic and plus a little fun.
Why Use a Drill for Pumpkin Carving?
Traditional carving has its place, but drilling gives you a few obvious advantages. First, it makes clean, crisp circles fast. Second, it’s perfect for patterns: dots, swirls, stars, lettering outlines, geometric shapes, and textures all look fantastic when they glow from the inside. Third, a drilled pumpkin often holds up better visually because you’re removing less material than with large carved cutouts. That means the shell stays stronger, the design looks tidier, and your pumpkin is less likely to slump into a tired orange puddle before Halloween night.
There’s also the style factor. A drill-carved pumpkin can look adorable, spooky, or downright designer. Tiny dotted eyes? Cute. A galaxy of holes scattered across a dark heirloom pumpkin? Fancy enough to make your front steps look like they belong in a magazine. Want something easy? Drill a goofy face. Want something dramatic? Trace a moon, spiderweb, cat silhouette, or your house number and drill the outline. This method is flexible, forgiving, and beginner-friendly, which is a lovely combination in any holiday craft.
What You Need Before You Start
Before you channel your inner pumpkin architect, gather the basics:
- A fresh pumpkin with a flat bottom and firm skin
- A cordless drill or lightweight electric drill
- Drill bits in a few sizes, especially small and medium bits
- A pumpkin scoop, large spoon, or scraper
- A marker, pencil, or washable chalk pencil for sketching
- A small knife or pumpkin-cutting tool for the opening
- Paper towels or a rag
- LED tea lights or battery-powered string lights
- Optional: stencil, painter’s tape, petroleum jelly, disposable gloves
If you want a cleaner job, set up on a table outside or cover your work surface with newspaper, kraft paper, or an old towel. Pumpkin slime has a remarkable talent for traveling farther than logic suggests.
How to Choose the Best Pumpkin for Drilling
1. Pick a Pumpkin That Is Firm, Balanced, and Boring in the Best Way
The best pumpkin for drill carving is not necessarily the prettiest one in the patch. What you want is a pumpkin with firm flesh, no soft spots, no deep cuts, and a nice stable base. A pumpkin that wobbles on the table will absolutely wobble while you drill, and that is how “fun Halloween craft” turns into “why is there pumpkin on the garage wall?”
Look for smooth-ish skin if you want precise dotted patterns. Deep ridges can still work, but they make drilling lines and evenly spaced holes trickier. A medium-size pumpkin is often easiest for beginners because it gives you enough room for a design without feeling like you’re decorating an orange boulder.
2. Think About Your Design Before You Buy
If you want to make words, stars, or a dotted border, a round pumpkin gives you the most usable surface. If you want something tall and dramatic, like a ghost face or stacked dot pattern, choose a taller pumpkin. White and pale pumpkins can look especially striking with drilled patterns because the glow feels softer and more elegant. Dark orange pumpkins bring classic Halloween energy. There’s no wrong answer here, only different levels of porch drama.
Pumpkin Drilling Steps: The Full DIY Process
Step 1: Wash and Dry the Pumpkin
Give the outside a quick wash to remove dirt, dust, and whatever mystery field grit tagged along from the patch or grocery store bin. Dry it well. A clean, dry pumpkin is easier to sketch on and easier to handle. This also helps you spot blemishes before you start drilling holes exactly where the pumpkin is already trying to retire.
Step 2: Cut an Opening
You need access to the inside for scooping and lighting. Some people cut the lid at the top, while others prefer cutting an opening in the bottom. A bottom opening keeps the stem intact for a cleaner finished look and makes it easier to set the pumpkin over an LED light source. A top opening is classic and convenient. Either works. Just make the opening wide enough to get your hand and scoop inside without regretting your life choices.
Step 3: Scoop Out the Seeds and Pulp
Now comes the glamorous part: pumpkin guts. Remove the seeds, stringy pulp, and loose interior flesh. Scrape the inside wall where your design will go until it is a little thinner than the rest of the pumpkin. You do not need to make it paper-thin, but reducing thickness in the design area helps the drill move through more neatly and improves the glow once the pumpkin is lit.
Bonus tip: save the seeds if you roast them later. Waste not, want not, snack more.
Step 4: Dry the Surface and Sketch Your Design
Wipe the outside so the marker or pencil doesn’t slide around. Then sketch your design directly on the pumpkin. Keep it simple if this is your first time. Dots are your best friend. Think polka dots, spiral trails, crescent moons, stars, cat whiskers, flower petals, or a classic face made from evenly spaced circular holes.
If freehand drawing is not your thing, tape on a stencil and mark the main points first. For words or shapes, sketch the outline and then plan where the holes will go. Try to keep spacing fairly even so the design looks intentional instead of “possessed pumpkin made this at 2 a.m.”
Step 5: Choose the Right Drill Bits
Small drill bits are excellent for outlines, delicate patterns, and dotted lettering. Medium bits help create bolder dots that show up well from a distance. Larger spade bits can be used for dramatic circles, eyes, or decorative openings, but go slow and use them only when you want a bold effect. For most projects, a mix of small and medium bits gives you the best results.
A smart move is to test one or two holes on the back of the pumpkin first. That lets you see how the shell responds and how much pressure you need. Pumpkins are natural materials, which is a polite way of saying they all behave a little differently.
Step 6: Start Drilling the Smallest Details First
Set the pumpkin on a steady surface. Hold the drill straight, and start with the smallest parts of your design. Use light, steady pressure rather than trying to bulldoze through the shell. Let the bit do the work. Drilling too aggressively can crack the pumpkin skin or tear the edge of the hole.
Work from the center of your design outward when possible. This helps you avoid rubbing away your sketch or bumping into finished areas. If you are creating a dotted outline of a moon, bat, or spooky phrase, drill the anchor points first, then fill in between them until the pattern looks balanced.
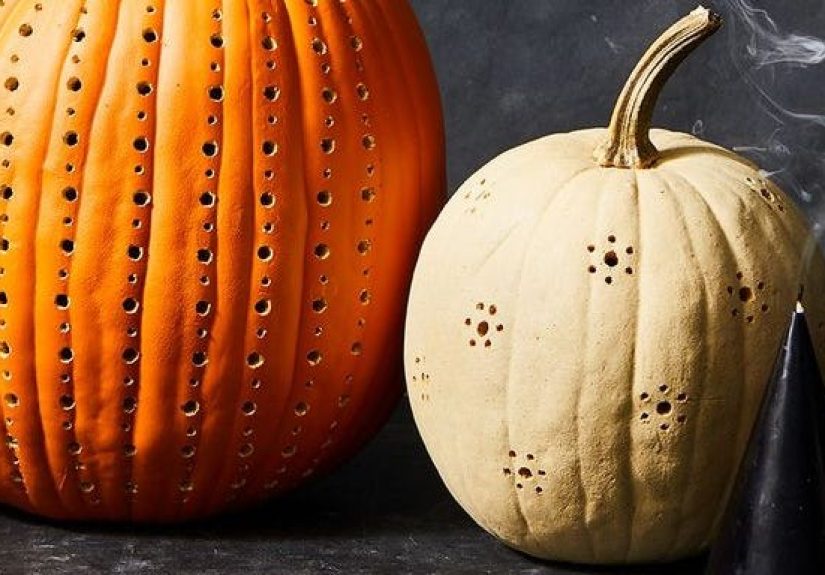
Step 7: Enlarge Selected Holes for Contrast
One of the easiest ways to make a drilled pumpkin look custom is to vary the hole size. Use tiny holes for delicate areas and slightly larger holes to emphasize eyes, stars, petals, or the outer edge of a design. This creates depth and makes the finished pumpkin glow with more visual interest. It is the pumpkin version of good lighting and a decent outfit: same person, much better effect.
Step 8: Clean Up the Edges
After drilling, brush away loose pumpkin bits from the holes and wipe off marker lines if needed. If any hole looks ragged, carefully touch it up with the same bit size or a slightly smaller tool. Do not overwork it. Pumpkins reward restraint.
Step 9: Add Light
This is where the magic happens. Place an LED tea light, flameless candle, or short strand of battery-powered lights inside the pumpkin. LED lighting is easy, cool to the touch, and ideal for drill-carved designs because it gives you a steady glow without the fuss of a real flame. If your pattern has lots of tiny holes, string lights can look especially beautiful because they distribute brightness more evenly.
Set the pumpkin in a dim space and step back. If parts of the design seem too faint, add a few more holes or widen select openings. One of the nice things about drill carving is that it’s easy to build the design gradually.
Step 10: Help the Pumpkin Last Longer
Once your pumpkin is finished, keep it out of harsh sun and bring it into a cool space when possible. If you want to stretch its life, wipe the cut edges and interior clean and keep moisture loss to a minimum. Many DIYers also seal exposed cut edges lightly with petroleum jelly. If your pumpkin starts looking dry, you can sometimes revive it temporarily by soaking it in cool water for a short time. That won’t make it immortal, but it may buy you another evening of glory.
Best Drill-Carved Pumpkin Design Ideas
Not sure what to make? These ideas work beautifully with a drill:
- Dotted jack-o’-lantern face: simple eyes, nose, and grin made from evenly spaced holes
- Constellations: stars and lines for a celestial look
- Polka-dot pumpkin: random or symmetrical dots for modern style
- Monograms or house numbers: perfect for front porch decor
- Spiderweb outline: delicate and dramatic when backlit
- Floral or leaf motifs: more elegant than spooky
- Word art: “Boo,” “Eek,” or “Trick or Treat” in dotted letters
You can also combine drilling with light carving. For example, carve a larger moon shape, then drill smaller stars around it. Or carve a cat silhouette and outline it with tiny dotted holes. Mixing techniques makes the pumpkin look more elaborate without making the process much harder.
Common Mistakes to Avoid
Using a weak pumpkin: if it already has soft spots, your design won’t age gracefully.
Skipping the sketch: freestyle sounds fun until the left eye is in a different time zone than the right one.
Drilling too fast: speed can tear the skin and create messy holes.
Ignoring stability: a rolling pumpkin is not a creative challenge; it’s a warning.
Using only one hole size: variation makes the design pop.
Lighting with a weak source: tiny holes need good illumination to shine.
Pumpkin Drill Safety Tips
Yes, this is a craft. It is also a craft involving a real drill and a large vegetable that refuses to stay perfectly still. So let’s be smart. Use the drill on a stable surface, keep your non-drilling hand clear of the bit’s path, and work slowly. Children can absolutely help with the design, marking, scooping, and lighting, but an adult should handle the drill itself.
If you are working indoors, protect the table and floor from moisture and pumpkin debris. If you are using an electric drill rather than a cordless one, keep cords away from wet surfaces and foot traffic. And unless you enjoy explaining yourself to the fire department, stick with LED lights instead of open flames for heavily drilled pumpkins.
What the Experience Is Really Like: 500 Extra Words From the Pumpkin Front Lines
The first time you try DIY pumpkin carving with a drill, you may feel slightly ridiculous. You’ll be standing there with a pumpkin in one hand, a drill in the other, and the faint awareness that this is either going to become a Pinterest-worthy masterpiece or a cautionary tale for the neighborhood group chat. That feeling is normal. Lean into it.
What surprises most people is how satisfying the process becomes once you start. Traditional carving can feel tense because one wrong cut changes everything. Drilling is different. It’s more forgiving. One small hole rarely ruins the design, and a row of neat dots starts looking intentional almost immediately. You get that rewarding “oh, this is actually working” moment much earlier, which is the emotional support vegetable energy we all deserve in October.
There’s also something strangely calming about the rhythm of it. Sketch, drill, wipe, step back, adjust, drill again. It feels less like surgery and more like decorating. Even people who claim they are “not crafty” often do well with a drill-carved pumpkin because the process is structured without being fussy. You are not carving tiny jagged teeth while praying the wall doesn’t crack. You are making clean marks, building a pattern, and watching the design come together one dot at a time.
Another experience many DIYers notice is that drill carving makes experimentation easier. You can begin with a simple dotted face and then add stars around it. You can outline a moon, realize it looks a little lonely, and add constellations. You can start modern and end whimsical. The pumpkin does not file a complaint. It just keeps glowing.
If you’re doing this with family or friends, the method is especially fun because people of different skill levels can all participate. One person scoops. One person sketches. One person drills. Another arranges lights and judges everyone else’s spacing like a very dramatic art director. It becomes less about making the “perfect” pumpkin and more about creating a display that feels personal. And honestly, slightly wonky pumpkins often have more charm anyway. A too-perfect jack-o’-lantern can feel store-bought. A handmade one with character feels alive, in a cozy seasonal way and not in a cursed-object way.
There’s also a practical joy in seeing the finished result at night. During the day, drilled pumpkins can look subtle, even understated. Then dusk arrives, you switch on the lights, and suddenly those little holes turn into a glowing pattern that looks far fancier than the effort required. It is one of the rare holiday projects with a strong payoff-to-chaos ratio.
Of course, there are always a few truths no tutorial can fully prepare you for. Pumpkin bits will end up somewhere unexpected. Someone will absolutely say, “Should we add just one more hole?” seventeen times. At least one design decision will be made purely because it looked good from six feet away in the dark, which, to be fair, is exactly where porch pumpkins live. But that’s part of the fun. This is not museum conservation. It is seasonal creativity with a power tool and a very cooperative squash.
And that may be the best part of the whole experience. Drill-carved pumpkins feel festive without feeling precious. They let you be creative, a little goofy, a little stylish, and just productive enough to justify the mess. By the time your pumpkin is glowing on the porch, you won’t just have made a Halloween decoration. You’ll have made a tiny orange light sculpture with a backstory, a personality, and probably a few great photos too.
Conclusion
If you want a Halloween project that looks impressive without requiring elite carving skills, pumpkin drilling is the sweet spot. It is easier than detailed knife carving, more flexible than painting alone, and perfect for everything from beginner jack-o’-lantern faces to elegant dotted lanterns and constellation designs. Choose a sturdy pumpkin, sketch before you drill, start with small bits, light it with LEDs, and let the pattern build gradually. The result is clean, glowy, and charmingly dramatic.
In other words, if your usual carving style is “hope for the best and hide the mistakes in the back,” this might become your new favorite fall tradition.