Table of Contents >> Show >> Hide
- What Are Pecan Tassies, Exactly?
- Why You’ll Love This Recipe
- Ingredients
- Equipment You’ll Want (and One You’ll Improvise)
- Step-by-Step: How to Make Pecan Tassies
- Pro Tips for Tassies That Look Bakery-Pretty
- Flavor Variations (Because You’re Allowed to Have Fun)
- Make-Ahead, Storage, and Freezing
- FAQ: Troubleshooting Pecan Tassies
- Serving Ideas
- Conclusion
- Extra Notes From My Pecan Tassies Adventures (Real-Life Experience)
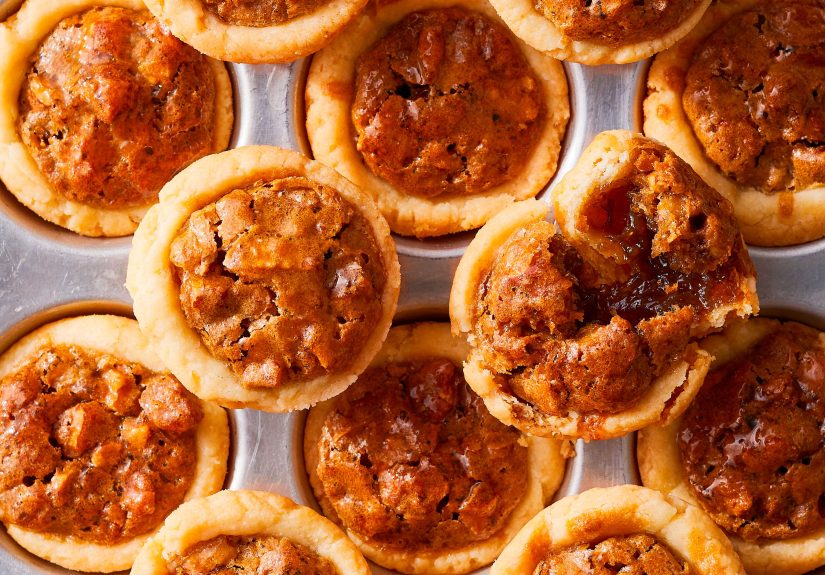
Pecan tassies are what happens when pecan pie and a shortbread cookie fall in love, buy a mini muffin tin, and decide to become the most “just one more” dessert on your holiday table. They’re bite-size, buttery, gooey in the middle, and suspiciously good at disappearing the second you turn your back.
In this guide, you’ll get a classic pecan tassies recipe (with a reliable cream cheese crust), plus smart tips to prevent overflow, keep the crust tender, and level up flavor with toasted pecans, maple, and optional bourbonbecause adulthood.
What Are Pecan Tassies, Exactly?
“Tassie” basically means “little cup,” which is perfect because these are tiny pastry cups filled with a brown-sugar pecan pie-style mixture. The crust often includes cream cheese, which gives it a tender, slightly tangy bite that keeps the sweet filling from getting too clingy.
Why You’ll Love This Recipe
- Big pecan pie energy in a two-bite package.
- Cream cheese crust bakes up tender, rich, and easy to press into the pan.
- Make-ahead friendly (cookie swaps, potlucks, “I forgot I volunteered” parties).
- Flexible flavors: maple, bourbon, orange zest, chocolatechoose your own adventure.
Ingredients
For the Cream Cheese Crust (24 cookie cups)
- 1/2 cup (1 stick) unsalted butter, softened
- 3 oz cream cheese, softened
- 1 cup all-purpose flour
- 1/4 tsp fine salt
- Optional but excellent: 2 tbsp finely ground pecans (adds nutty depth to the crust)
For the Pecan Filling
- 1 large egg (room temperature if possible)
- 3/4 cup packed light brown sugar
- 1 tbsp unsalted butter, melted (or very soft)
- 1 tsp vanilla extract
- 1/4 tsp fine salt
- 2/3 cup chopped pecans (lightly toasted if you have 8 spare minutes)
- Optional flavor boosts: 1–2 tbsp maple syrup, 1 tbsp bourbon, 1/2 tsp orange zest
Equipment You’ll Want (and One You’ll Improvise)
- Mini muffin pan (24-cup)
- Mixing bowls + spatula
- Electric mixer (nice, not mandatory)
- Measuring cups/spoons
- Something to press the dough: tart tamper, small spoon, or a clean wine cork (yes, really)
Step-by-Step: How to Make Pecan Tassies
1) Make the crust dough
- In a mixing bowl, beat the softened butter and cream cheese until smooth and combined (about 1 minute). You’re not trying to aerate it like a cakejust make it cohesive.
- Add flour and salt (and ground pecans if using). Mix just until a soft dough forms. If it looks shaggy at first, keep going for a few more turnsthen stop before it gets tough.
- Cover and chill for at least 45–60 minutes. This helps the dough firm up so it presses cleanly into the pan instead of clinging to your fingers like it pays rent.
2) Press dough into the pan
- Preheat oven to 325°F.
- Roll the chilled dough into 24 balls (about 1 inch each). Place one ball in each mini muffin cup.
- Use a floured tamper/cork/thumb to press the dough into a cup shape: thin on the bottom, up the sides, and with a deep well. A shallow well is how you get pecan lava overflow.
3) Mix the filling
- In a bowl, whisk egg, brown sugar, melted butter, vanilla, and salt until smooth. Add maple/bourbon/orange zest if using.
- Stir in chopped pecans. Give it a stir again every few minutes while filling cups so the pecans don’t all sink to the bottom like they’re avoiding responsibility.
4) Fill and bake
- Spoon filling into each dough cup until about 2/3 full (usually 1 to 1 1/2 teaspoons). Do not top them off unless you enjoy scraping caramelized sugar off a muffin pan with your soul.
- Bake at 325°F for 20–25 minutes, until the filling looks set around the edges and slightly puffed. The centers can still look a little softthey’ll settle as they cool.
- Cool in the pan for 8–10 minutes, then gently loosen and transfer to a rack. Don’t let them cool completely in the pan if any filling bubbled over (sticky happens).
Pro Tips for Tassies That Look Bakery-Pretty
Toast the pecans (but don’t overdo it)
Toasting boosts the nutty flavor and keeps pecans tasting rich instead of slightly… cardboard-adjacent. Spread chopped pecans on a sheet pan and toast at 350°F for 6–8 minutes, stirring once, then cool. If you’re topping each tassie with a pecan half, consider leaving those un-toasted so they don’t over-brown during baking.
Chill is your friend
Warm dough smears; chilled dough presses. If the dough starts cracking while you press, let it sit 2–3 minutes at room temp, then press cracks back together with your fingers.
Deep wells prevent overflow
The filling rises and bubbles. Press the dough high up the sides and make the center hollow enough to hold the filling comfortably.
Unmolding hack for sticky spillover
If a tassie sticks because caramelized sugar escaped, warm the pan in the oven for 1–2 minutes, then run a thin knife along the edge and lift gently.
Flavor Variations (Because You’re Allowed to Have Fun)
- Maple-Bourbon: Add 1–2 tbsp maple syrup + 1 tbsp bourbon to the filling.
- Orange-Pecan: Add 1/2 tsp orange zest for brightness.
- Chocolate Turtle-ish: Add mini chocolate chips to the filling and drizzle caramel after baking.
- Mini “pecan pie bars” vibe: Add a tiny pinch of cinnamon + extra salt for a sweet-salty punch.
Make-Ahead, Storage, and Freezing
Make ahead
- Dough: Make up to 2 days ahead; keep wrapped and chilled.
- Fully baked tassies: Often taste best the day they’re made, but still excellent for several days.
Storage
Store in an airtight container at room temp for up to 3–5 days. If your kitchen is very warm, you can refrigerate, but bring to room temp for the best texture.
Freezing
Freeze baked tassies in a single layer until firm, then move to a freezer bag/container with parchment between layers. Freeze up to about 2 months. Thaw in the fridge or on the counter, and refresh in a low oven for a few minutes if you want the crust perkier.
FAQ: Troubleshooting Pecan Tassies
Why did my crust shrink?
Usually the dough was too warm or overmixed (too much gluten = springy shrinkage). Chill the dough and mix just until combined.
Why did my filling overflow?
Overfilling and/or shallow dough wells. Fill cups only 2/3 full and press the dough higher up the sides.
Why are my tassies stuck in the pan?
Sugar bubbled over and hardened. Warm the pan briefly, then loosen with a thin knife. Next time: remove tassies while still slightly warm.
Serving Ideas
- Dust with powdered sugar for the “I totally meant to do that” finish.
- Serve with coffee, hot chocolate, or eggnog (holiday law).
- Build a cookie tray with shortbread, ginger cookies, and something chocolate for balance.
Conclusion
Pecan tassies are the kind of old-school, party-perfect dessert that feels fancy but bakes like a cookie. Once you’ve made them once, you’ll start “accidentally” owning a mini muffin pan forever. Nail the deep dough wells, don’t overfill, and toast the pecans if you want that extra wow. After that? It’s just you, a plate of tiny pecan pies, and the mystery of how they keep vanishing.
Extra Notes From My Pecan Tassies Adventures (Real-Life Experience)
The first time I made pecan tassies, I treated them like a “casual little baking project,” which is adorablebecause pecan tassies are not difficult, but they are extremely good at teaching you humility in teaspoon-sized lessons. I remember thinking, “Mini muffin pan? Easy. Dough balls? Cute. Filling? Basically pecan pie.” And then I promptly discovered that pecan tassies have exactly one main rule: they will punish overconfidence with overflow.
I overfilled the first batch because I’m an optimist and also because the filling looked so reasonable sitting in the bowl. “Surely,” I told myself, “this will not expand.” Reader, it expanded. Brown-sugar syrup bubbled up and welded a few tassies into the pan like they were applying for permanent residency. The fixwarming the pan for a minute and using a thin knifeworked, but the emotional damage was done. Ever since, I fill each cup only about two-thirds full and I press the dough higher than feels necessary. If the well looks deep, you’re probably doing it right.
The second big learning moment was about pressing the dough. Thumb-pressing looks charming in vintage cookbooks, but in real life your thumbs get warm, the dough gets sticky, and suddenly you’re wearing pastry like hand lotion. A tart tamper is great, but the most unexpectedly perfect tool is a clean wine cork. It presses an even cup, keeps the sides tidy, and makes you feel oddly resourcefullike you’re auditioning for a kitchen survival show.
Over time, tassies became my “bring something to the party” secret weapon. They travel well, people recognize the pecan pie flavor instantly, and they look like you tried very hard even when you didn’t. I’ve brought them to cookie swaps where everyone showed up with decorated sugar cookies that look like snowflakes designed by architects, and my humble little tassies still vanished first. There’s something about that buttery cream cheese crust and sticky nutty center that makes people forget manners. I once watched someone take two, then do the slow shuffle away from the tray as if they were escaping a crime scene.
My favorite “upgrade” is toasting the chopped pecans. It’s a small step that makes the whole batch taste warmer and deeperlike the difference between “pecan” and “PECAN.” I also like a tiny splash of bourbon or a spoonful of maple syrup when the crowd is mostly adults; it doesn’t make them boozy, just more interesting. When I’m baking for kids, I’ll skip the bourbon and sometimes add a couple mini chocolate chips per cup, which turns them into a friendlier, candy-like bite.
If you’re new to tassies, here’s my honest advice: don’t aim for perfection. Aim for consistent and delicious. Even the slightly messy ones taste incredible, and once they’re on a platter, nobody’s grading your crust symmetry. The real win is pulling a tray of shiny, pecan-studded mini pies out of the oven and realizing you just made a dessert that feels like a holiday traditioneven if it’s a random Tuesday.