Table of Contents >> Show >> Hide
- Quick Glossary (So the Steps Make Sense)
- Before You Bridge: The 30-Second Reality Check
- Step 1: Confirm Your Amplifier Actually Supports Bridging
- Step 2: Choose the Right Speaker/Sub and Impedance (Ohms Matter)
- Step 3: Plan Your Channel Pairing (2-Channel vs 4-Channel)
- Step 4: Wire the Speaker Outputs Correctly (This Is the “Don’t Freestyle” Step)
- Step 5: Set Inputs and Controls for Bridged Operation
- Step 6: Set Gain the Smart Way (So You Get Loud, Not Fried)
- Step 7: Test, Verify Polarity, and Watch Heat Like a Hawk
- Common Mistakes (A.K.A. How Amps End Up in “Protect” Mode)
- FAQ: Bridging Amplifiers Without Regret
- Conclusion
- Real-World Experiences and Lessons People Learn the Hard Way (About )
Bridging an amplifier sounds like something you’d do with a tiny audio engineer in a hard hat yelling, “More power!” while holding a miniature traffic sign. In reality, it’s a simple (but not “wing it”) way to combine two amp channels into one stronger outputoften to wake up a subwoofer or beef up a power-hungry speaker. Done right, bridging can be the cleanest upgrade you make without buying a new amp. Done wrong, it can turn your amp into a space heater that only plays the song of its people (thermal protection beeps).
This guide walks you through how to bridge an amplifier in 7 clear steps, with real-world tips for car audio, home audio, and pro amps. We’ll talk impedance (ohms), wiring, gain setting, and the “please don’t do this” scenariosso you end up with louder, cleaner sound instead of expensive regret.
Quick Glossary (So the Steps Make Sense)
- Bridge mode / bridged mono: Two channels work together as one, increasing voltage to the speaker.
- Impedance (ohms, Ω): The load your speaker/sub presents to the amp. Too low = unhappy amp.
- RMS power: The realistic, continuous power rating you should care about.
- Clipping: Distortion from pushing the amp beyond its clean outputbad for speakers and subs.
Before You Bridge: The 30-Second Reality Check
Bridging usually doubles the voltage across the load. In a perfect world, double the voltage could mean up to about four times the power into the same impedancebut in the real world, power supply limits, heat, and protection circuits often make the gain closer to “a lot more” than “math textbook quadruple.”
The big catch: each channel effectively sees half the speaker’s impedance when bridged. That’s why an amp that’s stable at 2Ω per channel in stereo mode often needs a 4Ω (or higher) load when bridged. If you remember one thing, remember this: bridging is amazing, but bridging into too-low impedance is how amps die.
Step 1: Confirm Your Amplifier Actually Supports Bridging
Not every amplifier can be bridged. Many 2-channel and 4-channel amps are “bridgeable,” but some are not, and most mono subwoofer amplifiers can’t be bridged because they already have one output channel. Your owner’s manual or the labeling near the speaker terminals should explicitly show a bridged wiring diagram.
What to look for
- Labels like “Bridge,” “Bridged Mono,” “BTL,” or a diagram printed near terminals.
- A mode switch (common on pro amps) labeled Stereo / Parallel / Bridge.
- Manual text specifying minimum impedance in bridged mode (e.g., “4Ω minimum bridged”).
Step 2: Choose the Right Speaker/Sub and Impedance (Ohms Matter)
Bridging is usually done to drive a single subwoofer (car audio) or a single speaker/cabinet (pro/home) with more power. The speaker load you connect must be safe for the amplifier in bridged mode.
The safe-impedance rule of thumb
If your amp is rated to handle 2Ω per channel in stereo, it often needs 4Ω or higher when bridged. If it’s rated 4Ω per channel in stereo, it may require 8Ω or higher when bridged. Always follow the manufacturer’s minimum bridged impedance.
Car audio example (super common)
You have a 4-channel amp. You want channels 3 and 4 bridged to power a sub. You need a subwoofer wired to a final load the amp can handle bridgedoften 4Ω bridged. A dual voice coil (DVC) sub can be wired in series or parallel to hit the right impedance, but don’t guesscalculate first.
Step 3: Plan Your Channel Pairing (2-Channel vs 4-Channel)
Bridging consumes two channels to make one. So your channel count changes:
- 2-channel amp: becomes 1 bridged mono channel (one speaker/sub).
- 4-channel amp: can become 2 bridged channels (one pair per bridged output), or a popular 3-channel setup (front speakers on channels 1–2, sub bridged on channels 3–4).
- Pro amps: often use a switch to engage bridge mode and may require using Channel 1 input only.
Practical setups people actually use
- Daily driver upgrade: front speakers on 2 channels + bridged sub on the other 2 channels.
- Simple bass boost: bridge a 2-channel amp to run one subwoofer.
- Pro audio sub channel: bridge a stereo amp to drive a single sub cabinet (with correct impedance).
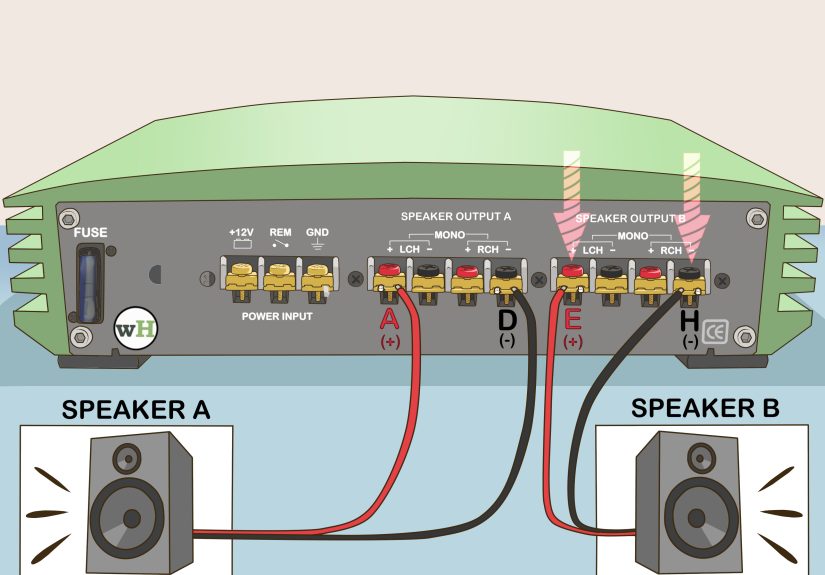
Step 4: Wire the Speaker Outputs Correctly (This Is the “Don’t Freestyle” Step)
Bridged wiring is not “left channel to left speaker terminal, right channel to right speaker terminal.” In bridge mode, the speaker connects across the two channels so the voltage difference increases. Most amps label which terminals to useoften something like L+ and R-, or specifically marked BRIDGED + and BRIDGED –.
Typical car amp bridging pattern
Many 2-channel/4-channel car amps use: Speaker + to the Left channel + and Speaker – to the Right channel –. But some amps reverse or label differentlyalways follow the amp’s printed diagram.
Typical pro amp bridging pattern
Many pro amps use binding posts where you connect the load across two “hot” terminals (often the two red posts), and you may use Channel 1 input only with a rear-panel switch set to Bridge. Some speakON outputs assign bridged output to specific pinsagain, manual wins every time.
Step 5: Set Inputs and Controls for Bridged Operation
Wiring is only half the story. Bridging often changes how you feed signal into the amp and how you set its controls.
Input signal: one channel, Y-cable, or internal summing
- Many pro amps: use Channel 1 input only in bridge mode.
- Some multi-channel car amps: can accept a single input and internally route it to both channels.
- Other amps: may require a Y-adapter so both channels receive the same signal.
Level controls: don’t fight the manual
Some manufacturers specify control settings in bridge mode (for example, setting one channel’s level control down, or using a particular channel’s gain knob as the “master”). If your amp has separate gains for the two channels, keep them matched unless the manual states otherwise.
Crossover basics (especially for subwoofer bridging)
- For a subwoofer: use a low-pass filter (often 60–100 Hz as a starting zone).
- For mids/highs: use a high-pass filter to protect speakers from deep bass.
- If your head unit/DSP already handles crossovers, you may set the amp to “full range” or neutralavoid double-filtering unless intentional.
Step 6: Set Gain the Smart Way (So You Get Loud, Not Fried)
Bridging increases available output, which is greatuntil you crank gain like it’s a volume knob. Gain is input sensitivity, not “more better.” The goal is to match the amp to your source voltage so you reach full clean power without clipping.
A simple, reliable method: use a multimeter (no oscilloscope required)
- Find your target power (RMS) and your speaker impedance (Ω).
- Use the formula: Target Voltage = √(Watts × Ohms).
- Play a test tone (commonly 40 Hz for subs, 1 kHz for mids) at a known, clean head-unit volume.
- Adjust gain until you measure the target AC voltage at the bridged outputs (with speakers disconnected).
Example (bridged sub)
Say you want about 300W RMS into a 4Ω sub in bridged mode: √(300 × 4) = √1200 ≈ 34.6V AC. That number becomes your gain-setting target. (And yes, it’s okay to round a littlethis is audio, not a lunar landing.)
Step 7: Test, Verify Polarity, and Watch Heat Like a Hawk
Once everything is connected, do a controlled test before you celebrate.
Start-up checklist
- Power off before final wiring changes. Then power on and confirm no protection lights.
- Play music quietly first. Listen for distortion, popping, or one-note “mystery bass.”
- Confirm the load is correct (final impedance) and the amp isn’t overheating quickly.
- Check wiring tightness (power, ground, speaker terminals). Loose connections make heat and noise.
Polarity: the “sounds weird but I can’t explain why” fix
With a subwoofer, reversed polarity can cause weak bass up frontespecially if your door speakers and sub are fighting each other. If bass feels hollow around the crossover region, try flipping sub polarity (if your system design supports it) and re-check.
Common Mistakes (A.K.A. How Amps End Up in “Protect” Mode)
1) Bridging into too-low impedance
This is the #1 classic. It often happens with dual voice coil subs wired incorrectly. The amp runs hot, clips early, shuts down, or in worst cases fails. Confirm the final ohm load with a plannot vibes.
2) Using the wrong terminals
“I used the two positives because they were both red” is a sentence that has ended many happy Saturdays. Use the terminals the manufacturer indicates for bridged output.
3) Treating gain like a volume knob
More gain doesn’t magically create clean power. It often creates clipping sooner, which sounds harsh and can destroy speakers.
4) Expecting bridged mode to fix a weak electrical system
Bridging can demand more current from the power supply. In cars, that means a proper power wire gauge, a solid ground, and healthy battery/charging. In home/pro setups, it means adequate mains power and ventilation.
FAQ: Bridging Amplifiers Without Regret
Can I bridge any 4-channel amp?
Only if it’s designed for it. Many are, but you still need the right terminals and the correct minimum bridged impedance.
Is bridging always better than buying a mono sub amp?
Not always. A dedicated mono amp may be more efficient for sub duty and stable at lower impedances. Bridging is great when you already have channels available and your sub/load matches what the amp can handle.
Does bridging hurt sound quality?
It shouldn’tif the amp is built for bridging, the load is safe, and gains are set correctly. Many systems run bridged channels cleanly for years. Problems usually come from heat, clipping, or mismatched impedance, not bridging itself.
Conclusion
Bridging an amplifier is one of the most satisfying “why didn’t I do this sooner?” upgradeswhen you do it with a plan. The recipe is simple: make sure the amp supports bridging, match the impedance to the bridged rating, wire the correct terminals, feed the right input signal, set crossovers appropriately, and dial gain scientifically (not emotionally).
Follow the 7 steps above and you’ll get the payoff bridging is famous for: more usable power, tighter control, and louder output without turning your speakers into smoke machines. And if you ever feel tempted to improvise, remember: audio electronics are allergic to improvisation.
Real-World Experiences and Lessons People Learn the Hard Way (About )
In the real world, bridging success is less about “can I connect two channels together?” and more about the tiny decisions people make while standing over an open trunk or rack, thinking, “This’ll probably be fine.” Here are the most common real-life moments that separate a clean bridged setup from a frustrating weekend.
First: the impedance surprise. A lot of folks buy a dual voice coil sub because it’s flexible, then accidentally wire it into the exact load their bridged amp can’t handle. The system will play at low volume, which is just enough to build confidence… right until the first bass-heavy track. Then the amp gets hot, the protect light comes on, and suddenly the install turns into an impromptu electronics class. The fix is almost always boring: rewire coils to the correct final impedance, or choose a different sub configuration. Boring is good. Boring is reliable.
Second: the terminal mix-up. Many amps print the bridged terminals right on the chassis, but it’s easy to missespecially on older amps or compact designs where the markings are tiny. People will connect to “the two middle terminals” or “the two reds” and wonder why output is weak or distorted. Bridging wiring is not universal. One manufacturer might specify left positive and right negative. Another might assign bridge terminals in a different physical position. The universal rule is: the diagram on your amp/manual wins, even if your friend’s amp “always worked the other way.”
Third: the gain drama. When someone bridges an amp, they expect it to be louder (it usually is), so they turn gain up “to match.” But a bridged channel reaches high voltage quickly, and the head unit volume that used to be safe might now push the amp into clipping. The result is a sound that’s loud but crunchylike your kick drum is chewing aluminum foil. A multimeter-based gain set isn’t just for perfectionists; it’s how you keep “loud” from becoming “loud for three minutes and then silence.”
Fourth: the heat reality. Bridging can increase stress on the amp, especially if airflow is poor. Real installs happen under seats, behind panels, in tight racksplaces where heat collects like it pays rent. If an amp runs warm in stereo mode, expect it to run warmer bridged. The practical lesson: mount with ventilation, avoid carpet-suffocation, and don’t bury it under a pile of “important emergency trunk items” (like three hoodies, a basketball, and a mystery bag of receipts from 2019).
Finally: the “it’s not just power” discovery. People bridge to get more watts, but the best payoff is often better control: tighter bass, less strain, and more headroom at the same listening level. When the load is correct and the signal is clean, bridging can feel like your system grew upstill fun, but way more composed. That’s the sweet spot: not just louder, but better.