Table of Contents >> Show >> Hide
- Why Cookie Cutter Pumpkins Work So Well
- What You Need
- How to Make Cookie Cutter Pumpkins in 20 Minutes
- Best Cookie Cutter Pumpkin Design Ideas
- Tips for Better Results
- Common Mistakes to Avoid
- How to Make Your Cookie Cutter Pumpkin Last Longer
- Why This Is a Great Family Halloween Craft
- Styling Ideas for the Finished Pumpkin
- Real-Life Experiences: What Making Cookie Cutter Pumpkins Actually Feels Like
- Final Thoughts
Some people approach pumpkin carving like they are auditioning for a reality competition show. There are sketches, specialty tools, dramatic sighs, and at least one person saying, “I thought this would be easier.” If that sounds familiar, good news: cookie cutter pumpkins are the shortcut your Halloween porch has been begging for.
This easy pumpkin carving method is fast, beginner-friendly, and surprisingly stylish. Instead of wrestling a tiny knife into a lopsided triangle face, you use metal cookie cutters and a rubber mallet to punch clean shapes into the pumpkin. Stars, bats, moons, flowers, letters, circles, hearts, even a polite little ghost if you are feeling emotionally available. The result looks intentional, festive, and a little fancier than something made in a panic after dinner.
Best of all, you can make cookie cutter pumpkins in about 20 minutes if you keep the design simple and the tools ready. That makes this one of the smartest last-minute Halloween decorating ideas out there. Whether you want a family-friendly craft, a quick front porch upgrade, or a no-fuss pumpkin that still earns compliments, this technique delivers.
Why Cookie Cutter Pumpkins Work So Well
Traditional jack-o’-lantern carving can be charming, but it is not always quick. Freehand carving takes patience, a steady hand, and a willingness to pretend your uneven smile was “meant to look quirky.” Cookie cutter pumpkins remove the hardest part: drawing and cutting detailed shapes by hand.
With this method, the cutter becomes your stencil and your cutting guide. Tap it into the pumpkin, punch out the shape, and repeat. The shapes come out cleaner, the design looks more polished, and the whole project feels more like crafting and less like negotiating with a squash.
It is also flexible. You can make a modern dotted pattern with round cutters, a sweet kid-friendly design with stars and hearts, or a spooky display with bats and crescent moons. If you want something custom, letter cutters can spell out “BOO,” a family name, or a cheeky porch message. Suddenly your pumpkin has branding.
What You Need
- 1 medium or large carving pumpkin
- Metal cookie cutters in simple shapes
- Rubber mallet or small hammer
- Ice cream scoop or sturdy spoon
- Pumpkin carving saw or carving kit
- Marker or dry-erase marker
- Paper towels
- Battery-operated LED tea light or string lights
- Optional: petroleum jelly or a light vinegar solution for preservation
A quick note on tools: metal cutters work best. Flimsy plastic cookie cutters are wonderful for sugar cookies and less wonderful for punching through pumpkin skin. This is not their moment.
How to Make Cookie Cutter Pumpkins in 20 Minutes
Minutes 1–5: Pick the Right Pumpkin and Set Up
Start with a pumpkin that sits flat and does not wobble. Stability matters because you will be tapping shapes into it, and a rolling pumpkin is the kind of Halloween chaos nobody needs. A medium or large pumpkin is easiest for beginners because there is more room for spacing out your design.
Look for a fresh pumpkin with firm skin and a sturdy stem. Avoid soft spots, deep cuts, or mold. If your pumpkin already looks like it has seen things, it is not the ideal candidate for a 20-minute masterpiece.
Set your pumpkin on a flat, sturdy work surface. A kitchen table covered with newspaper, a garage workbench, or an outdoor patio table all work well. Keep the mallet, cutters, scoop, and light within reach so you are not wandering around mid-project with pumpkin slime on your hands.
Minutes 6–10: Cut, Scoop, and Thin the Walls
Use a carving saw to cut an opening in the top, bottom, or back. A back opening is especially nice if you want the front design to stay visually clean. Then scoop out the seeds and stringy pulp. An ice cream scoop works beautifully here because it scrapes quickly and helps thin the walls without much drama.
This part matters more than people think. If the pumpkin wall is too thick, the cookie cutter will not punch through cleanly. Aim for walls that are roughly thin enough to let light shine well but still thick enough to hold their shape. In practical terms, you want the shell thinned around the design area so the cutter can do its job without needing the force of a medieval battering ram.
Wipe the inside dry with paper towels. A cleaner interior reflects light better and helps keep the project tidy. It also makes you feel like a person who has their life together, even if only seasonally.
Minutes 11–15: Tap In the Cookie Cutters
Now the fun starts. Decide where each shape should go. For a clean design, keep spacing even. For a playful look, scatter shapes around the front and sides. If you are nervous, lightly mark placement with a dry-erase marker first.
Set the pumpkin on its side if that gives you a more secure angle. Press the sharp edge of a metal cookie cutter against the pumpkin skin. Hold it firmly with your fingers safely out of the path of the mallet. Then tap gently around the top edge with the mallet until the cutter goes through the shell.
Remove the cutter and push out the cut piece from inside the pumpkin if needed. Repeat with the rest of your shapes. Simple cutters such as stars, circles, moons, bats, flowers, and letters usually work fastest. Very intricate cookie cutters may look cute in a drawer but can be a little too ambitious once pumpkin physics enters the chat.
Minutes 16–20: Finish the Design and Light It Up
Brush away loose pulp and wipe the outside clean. If you want the carved edges to stay fresher a bit longer, lightly dab a thin layer of petroleum jelly on the exposed cut areas. You can also mist the inside with a mild vinegar solution. Do not overdo it. You are preserving a pumpkin, not marinating it.
Place an LED tea light or battery string lights inside. This is the easiest and safest way to get a nice glow without heating the pumpkin. Once lit, the shapes look crisp and charming, and your 20-minute project suddenly looks like you planned your life weeks in advance.
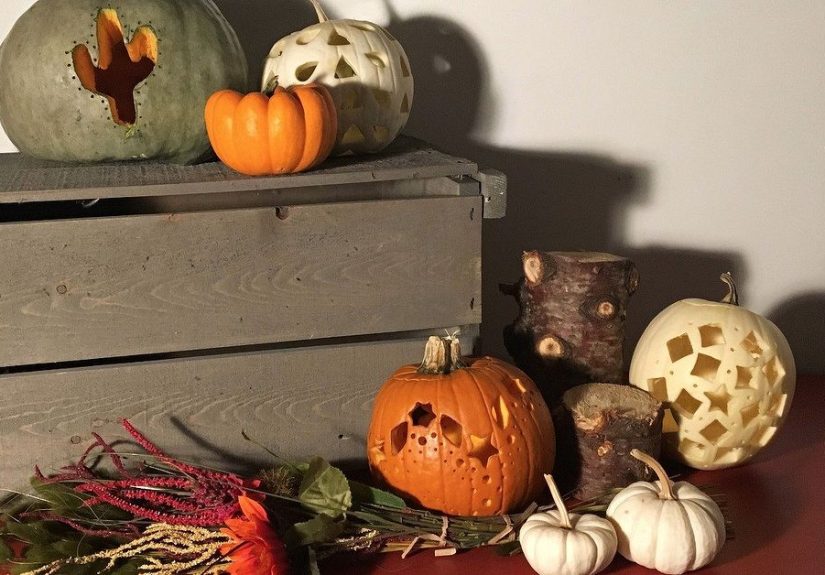
Best Cookie Cutter Pumpkin Design Ideas
1. Starry Night Pumpkin
Use stars in two or three sizes across the front and one side. Add a crescent moon if you have one. This design looks great on both orange and white pumpkins and gives off a clean, modern Halloween vibe.
2. Bat Parade Pumpkin
Arrange bat cutters so they appear to swoop upward across the pumpkin. It is spooky without being nightmare fuel, which is a useful decorating lane.
3. Flower and Leaf Pumpkin
Perfect for early fall decorating before Halloween. This one feels more “autumn porch perfection” than “I answer the door wearing vampire teeth.”
4. Polka Dot Pumpkin
Round biscuit cutters or circle cutters create an easy dotted pattern that looks modern and glows beautifully at night. This is one of the fastest options if you are short on time.
5. Letter Pumpkin
Spell out “BOO,” “EEK,” a child’s initials, or your family name. This is a great option for front steps because it feels personalized without requiring advanced carving skills.
6. Mixed Mini Shapes Pumpkin
Combine stars, hearts, circles, and tiny ghosts for a playful, family-friendly look. Great for kids who want their pumpkin to feel festive rather than frightening.
Tips for Better Results
- Use simple metal cutters with bold outlines for the cleanest punch-outs.
- Thin the wall where you plan to cut. This saves time and effort.
- Keep the pumpkin steady on a flat surface before tapping.
- Space shapes evenly if you want a polished, intentional design.
- Test one shape first before committing to a full pattern.
- Use LED lights instead of candles for a cooler, longer-lasting glow.
Common Mistakes to Avoid
Using a Pumpkin That Is Too Small
Tiny pumpkins are adorable, but they are not ideal for full-size cookie cutters. If the cutter barely fits, the design will look cramped. Give yourself room to work.
Skipping the Wall-Thinning Step
This is the biggest time-waster. If the flesh is too thick, you will spend more energy pounding than carving, and the result may tear instead of cut cleanly.
Choosing Overly Detailed Cutters
That intricate snowflake cutter may be a masterpiece in December cookies, but on a pumpkin it can become a tiny orange engineering problem. Stick with simple shapes.
Using Real Candles Without Thinking It Through
Open flame can heat the pumpkin, shorten its life, and create safety issues. Battery-powered lights are easier, safer, and less likely to turn your pumpkin into a warm vegetable lantern of regret.
How to Make Your Cookie Cutter Pumpkin Last Longer
A carved pumpkin is not forever. It is more of a beautiful, glowing short-term relationship. Still, you can stretch its good looks with a few smart moves.
First, carve close to when you want to display it. If Halloween is the main event, wait until a few days before. After carving, wipe the pumpkin clean and dry, especially inside. A thin layer of petroleum jelly on the cut edges can help slow moisture loss. A light vinegar spray can also help discourage mold.
Keep the pumpkin cool and out of direct sun whenever possible. If the weather is warm, bring it inside overnight or place it in a cooler area. Heat speeds up shriveling, and nobody wants a pumpkin that looks emotionally exhausted before the trick-or-treaters even arrive.
If you display it on a porch, check it daily. Remove pooled moisture, replace the light if needed, and make sure the bottom is not sitting in water. A little maintenance goes a long way.
Why This Is a Great Family Halloween Craft
Cookie cutter pumpkins are especially good for families because the project can be split into safe, simple jobs. Adults can handle the cutting and tapping. Kids can choose shapes, help scoop seeds, plan the pattern, and place the lights inside. That means everyone gets to be involved without turning the kitchen into a low-budget emergency room drama.
It is also less intimidating for beginners. You do not need drawing skills, advanced carving experience, or a craft closet that looks like a small retail store. You just need a pumpkin, a few cutters, and enough confidence to tap metal into produce. Honestly, that is already a solid October personality.
Styling Ideas for the Finished Pumpkin
Once your cookie cutter pumpkin is done, do not just plop it on the step and call it a day. Give it a little stage presence.
- Place it beside mums, hay bales, or lanterns for a cozy porch display.
- Group three pumpkins together using different shapes but the same theme.
- Mix carved pumpkins with no-carve painted pumpkins for texture and variety.
- Use white pumpkins with star or moon cutouts for a softer, more elegant look.
- Put a letter pumpkin near the entryway for a personalized decoration.
The best part is that cookie cutter pumpkins can lean cute, spooky, rustic, modern, or playful depending on the shapes you choose. That is rare range for an object that starts life as a large orange sphere.
Real-Life Experiences: What Making Cookie Cutter Pumpkins Actually Feels Like
One reason this project has become such a favorite is that it feels doable in real life, not just in a perfectly lit craft tutorial where nobody ever drops anything sticky on the floor. The experience of making cookie cutter pumpkins is pleasantly low-pressure. You do not have to be an artist. You do not need to carve a flawless haunted house silhouette. You just need a pumpkin, a shape, and about 20 minutes of seasonal determination.
For many families, the experience starts the same way: someone says, “Let’s do pumpkins,” and everybody agrees until the first scoop of pulp appears. Then there is laughter, dramatic disgust, and at least one child claiming the pumpkin smells “weird but in a fall way.” That is exactly why the cookie cutter method works. It keeps the messy part short and the satisfying part long.
Adults usually love it because it feels efficient. You can get a polished result without spending an hour hunched over the table trying to carve matching triangle eyes. Kids love it because the process feels active. Tapping a cutter with a rubber mallet is exciting. Choosing shapes is exciting. Watching the pumpkin light up at the end is exciting. It is basically a chain reaction of tiny Halloween victories.
There is also something unexpectedly stylish about the finished look. A pumpkin covered in stars or circles feels more curated than chaotic. It looks like the kind of decoration you bought from a boutique, except you made it yourself while wearing an old sweatshirt and pretending you did not just fling pumpkin seeds into the sink like confetti.
Another real-life benefit is flexibility. If your first shape is a little crooked, no one notices once the pumpkin is glowing. If you run out of time, a few well-placed cutouts still look intentional. If your original design plan fails, you can pivot. Add more circles. Make a random dotted pattern. Call it modern art. October is forgiving.
And when the lights go on that evening, the whole experience feels worth it. The pumpkin glows, the shapes shine clearly, and the front step suddenly looks festive. You get that small but excellent feeling of having made something with your hands that is both useful and charming. It is a simple project, but it creates a very specific kind of memory: the sound of tapping metal, the smell of pumpkin, the laughter over oddly shaped seeds, and the little moment when someone says, “Wait, that actually looks really good.”
That is the magic of cookie cutter pumpkins. They are fast enough for busy people, easy enough for beginners, and fun enough to become a tradition. Not every Halloween project needs to be elaborate. Sometimes the best seasonal ideas are the ones that fit into a single evening and still make the house feel special.
Final Thoughts
If you want a fast Halloween project that looks polished without requiring advanced carving skills, cookie cutter pumpkins are the move. They are easy, customizable, family-friendly, and genuinely possible to finish in about 20 minutes. That is a rare gift during a season when every craft seems to require seventeen supplies and the emotional stability of a professional event planner.
Pick a fresh pumpkin, thin the walls, tap in a few simple shapes, add an LED light, and you are done. The result is festive, glowy, and far more impressive than the effort suggests. In other words, exactly the kind of Halloween win we all deserve.