Table of Contents >> Show >> Hide
- Before You Start: Pick the Right Replacement Doorknob
- Tools and Supplies
- How to Replace an Interior Doorknob in 15 Steps
- Step 1: Open the Door and Keep It Steady
- Step 2: Protect the Floor and Door Finish
- Step 3: Inspect the Old Knob for Visible or Hidden Screws
- Step 4: Remove the Interior Screws or Release the Knob Clip
- Step 5: Pull the Knobs Apart
- Step 6: Remove the Latch from the Edge of the Door
- Step 7: Compare the Old Hardware to the New Set
- Step 8: Measure the Backset and Door Thickness
- Step 9: Adjust the New Latch if Needed
- Step 10: Install the New Latch with the Bevel Facing the Jamb
- Step 11: Screw the Latch Plate into Place
- Step 12: Insert the Exterior Knob Assembly
- Step 13: Attach the Interior Knob Assembly
- Step 14: Check the Strike Plate Alignment
- Step 15: Test the Knob, Latch, and Privacy Lock
- Common Doorknob Replacement Mistakes to Avoid
- When You Should Replace an Interior Doorknob Instead of Repairing It
- Real-World Experience: What Replacing Interior Doorknobs Actually Teaches You
- Final Thoughts
Replacing an interior doorknob sounds like one of those tiny home projects that should take five minutes, require zero thinking, and somehow still ends with you squinting at a mysterious spring clip while holding a screwdriver like a confused archaeologist. The good news? It is actually a beginner-friendly DIY job once you know the order of operations. Whether your old knob is loose, ugly, sticky, or just giving off “this house was last updated when flip phones were cool” energy, a fresh interior doorknob can make a door work better and look sharper in less than an hour.
In this guide, you’ll learn exactly how to replace an interior doorknob in 15 clear steps, plus how to choose the right replacement, avoid the most common mistakes, and handle those weird older knobs that seem to have been installed by a goblin with a grudge. We’ll cover the basics of passage knobs, privacy knobs, backset measurements, hidden screws, latch alignment, and the final test that tells you whether you nailed it or merely attached a shiny problem to a door.
Before You Start: Pick the Right Replacement Doorknob
Before you remove anything, make sure the new hardware matches the door’s function. Interior doors usually use one of these styles:
- Passage knob: Best for hallways, closets, and rooms that do not need a lock.
- Privacy knob: Ideal for bedrooms and bathrooms. It locks from the inside but usually has an emergency release on the outside.
- Dummy knob: Decorative only. It does not latch and is usually used on closet doors or pairs of doors. If your current door has a real latch, a dummy knob is not your replacement.
Most modern interior doorknobs fit standard residential doors with a backset of either 2-3/8 inches or 2-3/4 inches and door thicknesses around 1-3/8 to 1-3/4 inches. Translation: many replacement sets are adjustable and forgiving, but your door still deserves a quick measurement before you click “Buy Now” like a hardware gambler.
Tools and Supplies
- Phillips screwdriver
- Flathead screwdriver
- Tape measure
- Needle-nose pliers (optional)
- Utility knife (optional for painted trim or plates)
- Wood filler or touch-up paint if the old hardware leaves marks
- New interior doorknob set
You usually will not need a drill if the new doorknob fits the existing holes. This is a “remove, swap, tighten, test” kind of project, not a “call three friends and borrow power tools” kind of project.
How to Replace an Interior Doorknob in 15 Steps
Step 1: Open the Door and Keep It Steady
Start with the door open so you can access both sides and the edge where the latch sits. Wedge the door with a stopper or hold it steady with your foot while you work. This prevents the door from swinging at the exact wrong moment, which is apparently a law of home repair.
Step 2: Protect the Floor and Door Finish
Place a towel or piece of cardboard under the work area to catch screws and protect the floor. If the door has been painted several times, run a utility knife carefully around trim plates or roses before prying anything off. This helps prevent peeling paint and those suspicious chips that later force you into a side quest with sandpaper.
Step 3: Inspect the Old Knob for Visible or Hidden Screws
Look at the interior side of the knob first. Many interior doorknobs have two visible screws on the inside plate. Others hide the screws behind a decorative rose or use a small release slot or pinhole on the neck of the knob. If your doorknob seems to have no screws at all, do not panic. It is not magic. It is just hiding them.
Step 4: Remove the Interior Screws or Release the Knob Clip
If the screws are visible, remove them with a Phillips screwdriver. If the knob has a hidden release, insert a small flathead screwdriver, pin, or paperclip into the release hole while gently pulling the knob outward. Once the knob slides off, the trim plate or rose should come off next, revealing the mounting screws underneath.
Step 5: Pull the Knobs Apart
After the screws are out, pull the interior and exterior knobs away from the door. Sometimes they come apart easily. Sometimes they cling to the door like they pay rent there. Wiggle gently and pull straight. Avoid twisting too hard, especially on older doors with worn-out holes or loose wood fibers.
Step 6: Remove the Latch from the Edge of the Door
Now move to the edge of the door. Remove the screws holding the latch plate in place, then slide the latch mechanism out of the hole. If it sticks, pull it with pliers or wiggle it loose by hand. At this point, the entire old doorknob assembly should be off the door, leaving you with a clean slate and probably one dusty rectangle where the old plate used to live.
Step 7: Compare the Old Hardware to the New Set
Lay the old doorknob parts next to the new ones. Compare the latch length, plate shape, knob style, spindle or chassis design, and screw placement. This is the moment to confirm you bought a privacy knob for a bathroom instead of a passage knob for a closet. Both are useful. Only one will spare you from awkward bathroom conversations.
Step 8: Measure the Backset and Door Thickness
Measure from the edge of the door to the center of the large cross bore hole. That is the backset. It is typically 2-3/8 inches or 2-3/4 inches on residential interior doors. Also check the door thickness. Many modern knob sets have adjustable latches, which is excellent news for anyone who prefers hardware that meets you halfway.
Step 9: Adjust the New Latch if Needed
If your new latch is adjustable, set it to match the backset. Also check the faceplate. Some sets include a rounded corner faceplate, square corner plate, or drive-in collar option. Use the one that matches your existing door prep. Matching the latch hardware to the door is what keeps this project easy instead of “surprisingly educational.”
Step 10: Install the New Latch with the Bevel Facing the Jamb
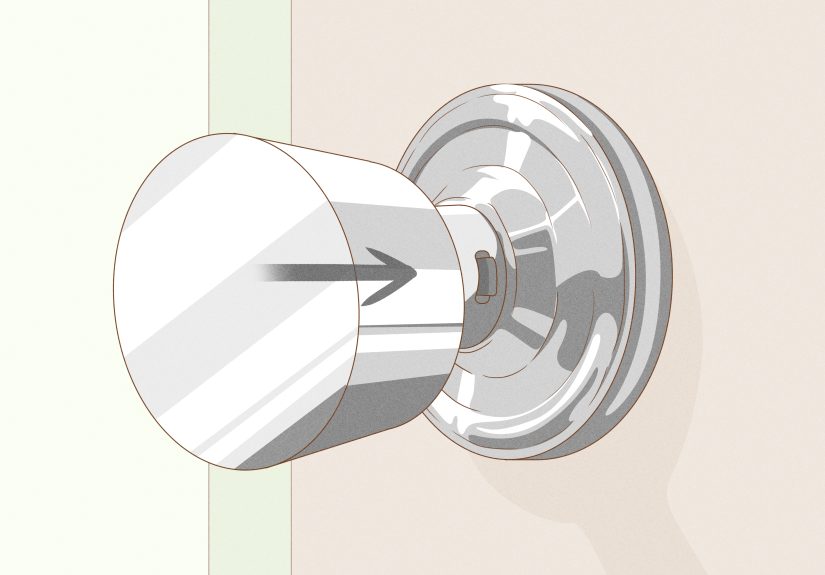
Insert the new latch into the edge of the door. Make sure the beveled side of the latch bolt faces the door jamb, meaning it points in the direction the door closes. If the bevel faces the wrong way, the door may not latch properly and will act offended every time you try to shut it.
Step 11: Screw the Latch Plate into Place
Secure the latch plate with the provided screws. Tighten them until the plate sits flush with the door edge, but do not overtighten. You want snug, not heroic. If the plate does not sit flat because the mortise is too shallow or slightly off, you may need minor trimming or a different faceplate option from the kit.
Step 12: Insert the Exterior Knob Assembly
Slide the exterior knob or lever through the large hole in the door, aligning it with the latch mechanism. Make sure the spindle or center post engages properly with the latch. If it feels forced, stop and realign. Do not try to bully precision hardware into submission. It rarely responds well.
Step 13: Attach the Interior Knob Assembly
Place the interior half of the doorknob onto the mounting posts and line up the screw holes. Insert the screws and tighten them evenly, alternating sides so the assembly stays centered. If the knob feels loose later, uneven tightening is often the culprit. A few careful turns now can save you from future knob wobble, which is never charming.
Step 14: Check the Strike Plate Alignment
Close the door slowly and see whether the latch enters the strike plate cleanly. If the latch rubs, misses, or catches, the issue may not be the new knob at all. It could be an old strike plate that is misaligned or a door that has shifted slightly over time. Minor adjustments to the strike plate can make the whole installation feel professional.
Step 15: Test the Knob, Latch, and Privacy Lock
Turn the knob several times from both sides. Open and close the door repeatedly. If it is a privacy set, lock it, unlock it, and test the emergency release from the outside. The knob should turn smoothly, the latch should retract fully, and the door should shut without shoulder-checking it like you are entering a hockey rink.
Common Doorknob Replacement Mistakes to Avoid
Buying the Wrong Function
One of the most common mistakes is choosing the wrong type of doorknob. A hallway passage knob on a bathroom door is a privacy disaster waiting to happen. A privacy knob on a closet is not the end of the world, but it is unnecessary and a little dramatic.
Ignoring Hidden Screws
If you try to pry off a knob that has a release slot or concealed screws, you can scratch the finish or damage the trim. Always inspect carefully before reaching for brute force. Home hardware rewards patience much more often than enthusiasm.
Installing the Latch Backward
This is the classic DIY banana peel. If the latch bevel faces the wrong direction, the door will not close properly. It is a tiny detail with big consequences, like forgetting to save a document right before your laptop restarts.
Overtightening the Screws
Overtightening can bind the mechanism and make the knob hard to turn. Tight is good. Crushing the life out of the chassis is not. If the knob feels stiff after installation, back the screws off slightly and test again.
Assuming the Door Is the Problem
Sometimes the old knob was not the real villain. The strike plate may be off, the latch opening may be shallow, or the door may have settled in the frame. If the new knob still feels fussy, check alignment before blaming the hardware.
When You Should Replace an Interior Doorknob Instead of Repairing It
A repair may be enough if the screws are loose or the latch just needs lubrication. But replacement makes more sense when the knob is visibly damaged, the lock no longer works reliably, the finish is badly worn, or the hardware style no longer matches the rest of the house. Replacing several interior doorknobs at once can also give your home a cleaner, more intentional look without spending “full renovation” money.
For example, swapping old brass knobs for matte black or satin nickel can update a hallway instantly. In a rental property or resale situation, matching hardware throughout bedrooms, bathrooms, and closets can make the whole place feel more polished. It is a small detail, but homes are basically giant collections of small details pretending to be one big decision.
Real-World Experience: What Replacing Interior Doorknobs Actually Teaches You
The first time I replaced an interior doorknob, I assumed the hardest part would be choosing a finish. Nickel or black? Round or square? Sleek modern lever or classic knob? Turns out the hardest part was realizing the old knob had hidden screws and that I had spent five minutes staring at it like it had personally insulted me. That is the sneaky thing about interior doorknob replacement: it looks simple, and it usually is, but only after you learn the tiny details nobody mentions on the packaging.
One lesson that comes up again and again is that older doors rarely behave like brand-new showroom doors. In older homes, paint builds up around the trim plate, screw heads get stripped, and latch mortises are sometimes just slightly off. Not wildly wrong, just wrong enough to make you mutter under your breath. I once removed a doorknob from a bedroom door that had clearly been painted around at least three different times. The plate was practically fossilized into the door. The trick was not strength. It was patience, a utility knife, and the willingness to stop pretending I was in a speed contest.
Another real-world discovery is that a loose or sticky doorknob is not always the knob’s fault. Sometimes the latch opening in the strike plate is a hair too high or too low because the house settled over time. You install a beautiful new knob, close the door, and suddenly the latch hits metal like two shopping carts colliding in a parking lot. That can feel discouraging until you realize the fix is small. A little strike plate adjustment can make the new hardware feel smooth and expensive, even if it was not expensive at all.
Replacing bathroom and bedroom privacy knobs also teaches you how much function matters. I have seen people accidentally buy passage knobs for bathrooms because the finish was pretty. Pretty is great. Privacy is better. On the flip side, using privacy hardware on every interior door can be overkill unless you want your linen closet to feel emotionally unavailable. Matching the knob type to the room saves money and prevents weird daily inconveniences.
There is also something oddly satisfying about replacing several interior knobs in one weekend. The project is small enough to feel manageable, but visible enough to make a house feel updated immediately. Bedrooms close more smoothly. Bathroom locks work properly. Hall closets stop rattling. Even the sound changes. A worn knob often clicks, sticks, or jiggles. A new one feels solid and quiet, which is the sort of home improvement benefit nobody brags about until they notice it every single day.
Most of all, replacing an interior doorknob teaches confidence. After one successful swap, you stop seeing door hardware as mysterious little machines and start seeing it for what it is: a handful of parts, a latch, a couple of screws, and a simple system that wants to work. Once you understand backset, latch direction, and hidden release clips, the whole task becomes far less intimidating. And that is the beauty of this DIY project. It does not just fix a door. It quietly upgrades your skill set, one turn of the screwdriver at a time.
Final Thoughts
If you can use a screwdriver, you can replace an interior doorknob. The key is choosing the right replacement, removing the old hardware carefully, aligning the latch correctly, and testing the finished installation before calling it done. Follow the 15 steps above, and you can turn a wobbly, outdated, or stubborn knob into a smooth-working upgrade that improves both function and style.
It is one of the best small home improvement projects because the payoff is immediate. Every time the door closes smoothly, every time the knob turns without sticking, and every time a bathroom lock works exactly as it should, you will get a tiny reminder that yes, you did that. With tools already in the junk drawer. Like a legend.