Table of Contents >> Show >> Hide
- Before You Start: Safety Comes First
- Tools and Materials You Will Need
- Know Your Switch Type
- How to Replace a Light Switch Step by Step
- Step 1: Buy the Correct Replacement Switch
- Step 2: Turn Off Power at the Breaker
- Step 3: Test Before Touching Anything
- Step 4: Remove the Wall Plate and Switch Screws
- Step 5: Take Photos and Label the Wires
- Step 6: Disconnect the Old Switch
- Step 7: Connect the New Switch
- Step 8: Tuck the Wires Back Into the Box
- Step 9: Secure the Switch and Wall Plate
- Step 10: Restore Power and Test
- Common Mistakes to Avoid
- When Should You Replace a Light Switch?
- How Much Does It Cost to Replace a Light Switch?
- DIY or Hire an Electrician?
- Practical Experience: What Replacing a Light Switch Teaches You
- Conclusion
- SEO Tags
Replacing a light switch is one of those home projects that looks tiny until you remember there is actual electricity hiding behind that innocent plastic plate. The good news? For many homeowners with basic DIY experience, a simple single-pole light switch replacement can be a manageable project. The not-so-funny news? Electricity does not care about confidence, vibes, or whether you watched three videos at midnight.
This guide explains how to replace a light switch safely, how to identify common switch types, what tools you need, and when the smartest move is calling a licensed electrician. We will focus mainly on replacing an existing standard single-pole switchthe classic on/off switch that controls one light from one location. If your switch controls lights from two or more places, works with a dimmer, connects to a smart system, or has confusing wiring, slow down and read the “when to call a pro” sections carefully.
Before You Start: Safety Comes First
The most important step in replacing a light switch is not removing the cover plate. It is not choosing a stylish new rocker switch. It is turning off the power at the breaker and confirming the power is off with a voltage tester. Never rely only on flipping the wall switch off. A switch can be off while the electrical box still contains live wires.
Also remember that local electrical codes can vary. If your home has old wiring, aluminum wiring, damaged insulation, no ground wire, buzzing sounds, repeated breaker trips, scorch marks, or a switch that feels warm, stop the project and call an electrician. A new switch should fix a worn switch, not hide a bigger electrical problem behind fresh plastic.
Tools and Materials You Will Need
- Replacement light switch with the same function and correct rating
- Flathead and Phillips screwdrivers
- Non-contact voltage tester or appropriate electrical tester
- Needle-nose pliers
- Wire stripper
- Electrical tape
- Flashlight or work light
- Phone camera for taking wiring photos
- New wall plate, if desired
Choose a switch rated for the circuit and the lighting load. Most standard household lighting switches are designed for 15-amp or 20-amp circuits, but never guess. Check the markings on the old switch, the new switch, and the circuit. If you are replacing a dimmer, make sure the dimmer is compatible with your bulbs, especially LEDs. An incompatible dimmer can create flickering, humming, or the electrical equivalent of a bad karaoke night.
Know Your Switch Type
Single-Pole Switch
A single-pole switch controls one light or fixture from one location. It usually has two hot wire terminals plus a green grounding screw. This is the most straightforward replacement and the main type covered in this guide.
Three-Way Switch
A three-way switch controls one light from two locations, such as the top and bottom of a staircase. It has more terminals than a single-pole switch, including traveler wires and a common terminal. Wire placement matters much more here, so take careful photos and label wires before removing anything.
Dimmer or Smart Switch
Dimmers and smart switches may require special wiring, a neutral wire, a minimum load, or compatibility with certain bulbs. Many older switch boxes do not have a neutral wire present. If the wiring in your box does not match the installation instructions, do not improvise. Electricity is not a place for jazz solos.
How to Replace a Light Switch Step by Step
Step 1: Buy the Correct Replacement Switch
Match the new switch to the old switch’s function. If the old switch is single-pole, buy a single-pole replacement. If it is three-way, buy a three-way switch. If it is a dimmer, match the dimmer type to your lighting. Look for the amperage and voltage rating on the device. A typical switch replacement should be like-for-like unless you fully understand the wiring requirements of the upgrade.
Step 2: Turn Off Power at the Breaker
Go to your electrical panel and turn off the breaker that controls the light switch. If your panel is not labeled clearly, this may take a little detective work. Turn on the light first, then flip breakers until the light goes off. Once you find the correct breaker, leave it off. You can also place a piece of tape over the breaker to warn others not to turn it back on while you are working.
Step 3: Test Before Touching Anything
Remove the wall plate carefully, then use a voltage tester to check the switch and wires. Test the voltage tester on a known live source first so you know the tester is working. Then test around the switch terminals and inside the electrical box. If the tester detects power, stop and return to the breaker panel. Do not continue until the tester confirms the circuit is off.
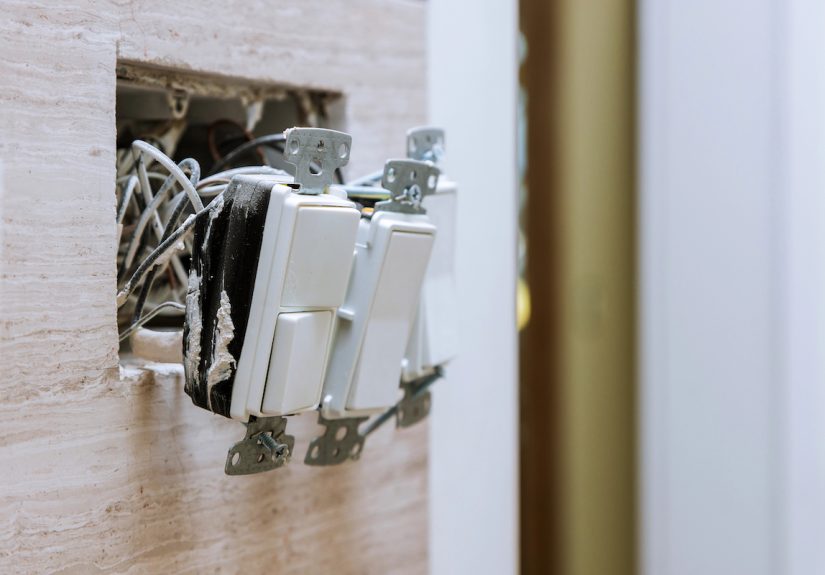
Step 4: Remove the Wall Plate and Switch Screws
Use a screwdriver to remove the cover plate. If the plate is stuck to paint, gently score around it with a utility knife before pulling. Next, remove the screws holding the switch to the electrical box. Pull the switch out slowly without yanking the wires. The goal is to expose the wiring, not audition for a tug-of-war team.
Step 5: Take Photos and Label the Wires
Before disconnecting anything, take clear photos from several angles. This is especially important if the switch has more than two wires attached. For a standard single-pole switch, the two switched hot wires usually connect to the brass screws, and the bare copper or green wire connects to the green ground screw. White neutral wires may be tucked together in the back of the box and usually do not connect to a basic single-pole switch.
If you are dealing with a three-way switch, label the wire connected to the dark or black screw before removing it. That terminal is usually the common terminal, and mixing it up can prevent the switch system from working correctly.
Step 6: Disconnect the Old Switch
Loosen the terminal screws and remove the wires. If the wires are inserted into push-in backwire holes, look for a release slot or follow the switch manufacturer’s removal method. Many DIYers prefer using screw terminals on the new switch because they provide a strong, visible connection when installed correctly.
Inspect the wire ends. If they are nicked, brittle, burnt, or badly bent, stop and consider calling an electrician. If the wire end is only slightly worn and there is enough length, you may trim and re-strip the wire according to the strip gauge on the new switch.
Step 7: Connect the New Switch
Connect the ground wire first to the green grounding screw. For a basic single-pole switch, connect the two hot wires to the two brass terminals. With many single-pole switches, either hot wire can go on either brass screw, but always follow the instructions that came with your device.
If using screw terminals, bend the exposed copper into a small clockwise hook with needle-nose pliers. Place the hook around the screw so tightening the screw pulls the wire in tighter rather than pushing it out. Tighten firmly, but do not crush the wire. No bare copper should extend beyond the terminal area where it could touch the metal box or another wire.
Step 8: Tuck the Wires Back Into the Box
Gently fold the wires back into the electrical box. Do not force them sharply or pinch them behind the switch. The switch should sit flat against the box. If the box is overcrowded, the wires are too short, or the switch cannot fit without pressure, call an electrician. A switch should not be installed like you are stuffing one more sweater into an already full suitcase.
Step 9: Secure the Switch and Wall Plate
Use the mounting screws to attach the switch to the electrical box. Make sure it is straight before tightening fully. Then install the wall plate. Do not overtighten the wall plate screws, especially on plastic plates, because they can crack.
Step 10: Restore Power and Test
Turn the breaker back on and test the switch several times. The light should turn on and off smoothly. Listen for buzzing, crackling, or popping. Feel near the wall plate after the switch has been used for a short time. It should not feel hot. If anything seems wrong, turn the breaker off and call a professional.
Common Mistakes to Avoid
Skipping the Voltage Test
This is the big one. Turning off the breaker is essential, but testing verifies that the circuit is actually dead. A mislabeled panel or shared circuit can create a dangerous surprise.
Replacing the Wrong Type of Switch
A single-pole switch, three-way switch, dimmer, timer, and smart switch are not automatically interchangeable. Match the device to the circuit and follow the wiring diagram.
Ignoring the Ground Wire
The ground wire is an important safety feature. If your old switch was not grounded or your box has no ground wire, do not guess. Ask a licensed electrician how to proceed safely under local code.
Using a Smart Switch Without a Neutral Wire
Many smart switches need a neutral wire to power their electronics. If the box does not have one, choose a compatible device or hire an electrician to evaluate your options.
When Should You Replace a Light Switch?
You may need to replace a light switch if it feels loose, fails to click properly, needs several flips to work, causes flickering, or has visible damage. Discoloration, heat, buzzing, crackling, burning smells, or repeated breaker trips are more serious signs. In those cases, do not simply swap the switch and hope for the best. Those symptoms can point to loose connections, overloaded circuits, damaged wiring, or other hazards.
How Much Does It Cost to Replace a Light Switch?
If you do the job yourself, a basic replacement switch and wall plate may cost only a few dollars to around $25, depending on style and features. Dimmer switches, timers, occupancy sensors, and smart switches cost more. Hiring an electrician typically costs more because you are paying for labor, expertise, travel time, and code-compliant work. The total can vary widely based on your area, the switch type, wiring condition, and whether troubleshooting is needed.
DIY or Hire an Electrician?
A confident DIYer may be able to replace a simple single-pole switch safely by turning off power, testing for voltage, documenting the wiring, and installing a compatible switch. However, hire a licensed electrician if you see damaged wires, aluminum wiring, no ground, unusual wiring colors, multiple cables you do not understand, an overcrowded box, a warm switch, buzzing, sparks, or repeated breaker trips.
Also call a professional if you are upgrading to a smart switch and the wiring does not match the manufacturer’s instructions. Paying for help is cheaper than turning a $10 switch into a wall-opening electrical mystery novel.
Practical Experience: What Replacing a Light Switch Teaches You
The first thing most people learn when replacing a light switch is that the “simple” jobs are simple only when you respect every step. The actual swap may take 20 minutes, but the preparation is what makes the job safe. Finding the right breaker, testing the wires, taking photos, and comparing the old switch with the new one are not optional extras. They are the difference between a clean repair and a confusing afternoon spent wondering why the hallway light now behaves like it has a personal grudge.
One practical habit that helps enormously is taking photos before touching any wire. Take one photo from straight on, one from the left, and one from the right. If the box has multiple switches, label everything with small pieces of tape. Even if you think, “I’ll remember where that wire goes,” take the photo. Future you will be grateful, and future you is the one holding a screwdriver under bad lighting.
Another useful lesson is to work slowly when pushing the switch back into the box. Many beginners wire the switch correctly, then create problems by forcing the device into place. Wires should fold neatly, not kink sharply. The switch should sit flat without pressure. If it feels like you need to shove it into the wall, stop and reorganize the wires. A neat box is safer and easier to service later.
It is also worth upgrading the wall plate if the old one is cracked, painted over, or yellowed with age. A new switch with an old, grimy plate can look like wearing dress shoes with gym socks. Small details matter, especially in kitchens, entryways, bathrooms, and other places where switches are used constantly.
Finally, replacing one switch often teaches homeowners the value of labeling the electrical panel. After you identify the correct breaker, write it clearly on the panel directory. The next time you need to work on that roomor shut something off quicklyyou will not have to play breaker roulette. That one small habit can save time, reduce frustration, and make future maintenance safer.
The best experience-based advice is simple: do not rush, do not guess, and do not let pride make decisions. A light switch is inexpensive. Your safety is not. If the wiring looks different from the guide, if the tester gives unexpected results, or if anything smells burnt or feels hot, turn the power off and call an electrician. A good DIY project should end with a working light, a clean wall plate, and zero dramatic stories for the emergency room.
Conclusion
Learning how to replace a light switch can be a useful DIY skill, especially when you are swapping a worn standard switch for a matching new one. The key is to treat the project with respect: turn off the breaker, verify the power is off, document the wiring, connect the new switch correctly, and test everything carefully. For basic single-pole switches, the process is usually straightforward. For three-way switches, smart switches, dimmers, old wiring, or any signs of electrical damage, professional help is the safer choice.
A fresh switch can make a room feel cleaner, newer, and more reliable. Just remember: the goal is not only to make the light turn on. The goal is to make it turn on safely every single time.