Table of Contents >> Show >> Hide
- Why Chocolate Burns So Easily in the Microwave
- The Best Chocolate to Melt in the Microwave
- What You Need Before You Start
- How to Melt Chocolate in the Microwave Step by Step
- Microwave Timing Chart for Melted Chocolate
- How to Melt Chocolate Chips in the Microwave
- How to Thin Melted Chocolate
- How to Keep Chocolate from Seizing
- How to Avoid Burning Chocolate
- Melting Chocolate for Dipping
- Melting Chocolate for Drizzling
- Melting Chocolate for Ganache
- Melting vs. Tempering Chocolate
- Common Mistakes When Melting Chocolate in the Microwave
- Best Uses for Microwave-Melted Chocolate
- Experience Notes: What Real Kitchen Practice Teaches About Melting Chocolate
- Frequently Asked Questions
- Conclusion
- SEO Tags
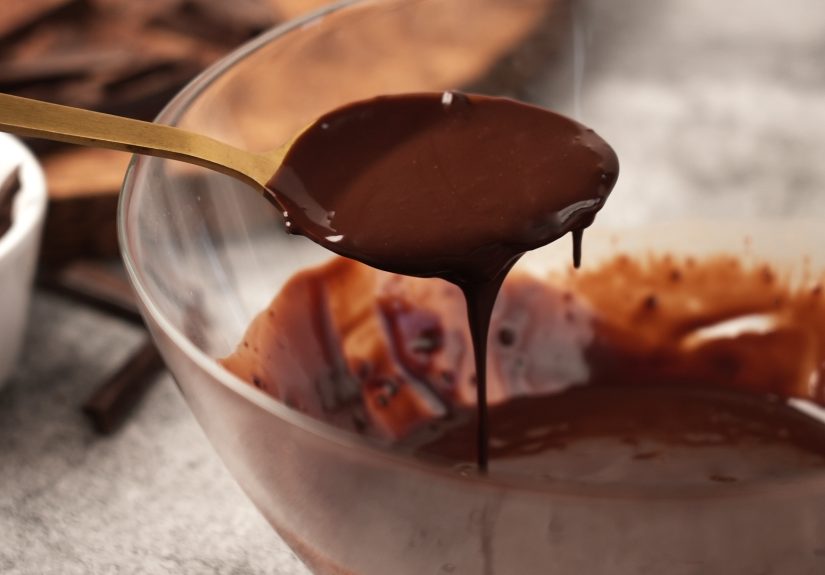
Melting chocolate in the microwave sounds like one of those kitchen tasks that should be wildly simple. Put chocolate in bowl. Push button. Become dessert wizard. Unfortunately, chocolate has a dramatic side. Heat it too fast and it scorches. Let one sneaky drop of water join the party and it can seize into a grainy, stubborn clump. Forget to stir and the edges may burn while the center still looks like innocent little chips. Chocolate is delicious, but it is not emotionally low-maintenance.
The good news? Once you understand the rhythm, learning how to melt chocolate in the microwave is easy, quick, and far less messy than setting up a double boiler. The secret is not fancy equipment. It is gentle heat, short intervals, frequent stirring, and a little patience. In other words, treat chocolate like a tiny celebrity in a dressing room: keep it comfortable, do not rush it, and absolutely do not splash water near it.
This guide explains the best microwave method for melting chocolate chips, chopped chocolate bars, baking chocolate, white chocolate, and chocolate wafers. You will also learn how to fix common problems, when to add oil or shortening, how to keep melted chocolate smooth, and how to use it for dipping, drizzling, ganache, bark, strawberries, pretzels, cookies, and more.
Why Chocolate Burns So Easily in the Microwave
Chocolate is made from cocoa solids, cocoa butter, sugar, and sometimes milk solids, depending on the type. These ingredients do not all respond to heat in exactly the same way. Cocoa butter melts gently, sugar can overheat, and milk solids in milk or white chocolate can scorch faster than dark chocolate. This is why white chocolate can go from silky to sad in what feels like three seconds.
Microwaves heat unevenly, too. The outside edges of the bowl often warm faster than the center. That means chocolate may look unmelted even when parts of it are already very hot. If you keep microwaving because the chips still hold their shape, you can accidentally burn the chocolate before you realize what happened. The cure is simple: stir even when it looks pointless. Stirring spreads heat through the bowl and helps the remaining pieces melt from residual warmth.
The Best Chocolate to Melt in the Microwave
You can melt many kinds of chocolate in the microwave, but some are easier than others. Chocolate melting wafers are designed to melt smoothly and are excellent for dipping. Baking bars also work beautifully when chopped into small, even pieces. Chocolate chips are convenient, but they often contain stabilizers that help them keep their shape in cookies. That does not mean they cannot melt, but they may be thicker than chopped bar chocolate.
Dark Chocolate
Dark chocolate is usually the most forgiving because it contains more cocoa solids and less dairy. It still needs gentle heat, but it is less likely to scorch quickly than milk or white chocolate. Use dark chocolate for bark, dipped fruit, brownie batter, ganache, and elegant drizzles that make you look like you own a pastry torch.
Milk Chocolate
Milk chocolate melts well, but it is softer and sweeter, with milk solids that can overheat if ignored. Use medium or half power and stir often. Milk chocolate is wonderful for strawberries, pretzels, cereal treats, candy clusters, and anything intended to disappear from the counter within eight minutes.
White Chocolate
White chocolate is the diva of the group. It contains cocoa butter but no cocoa solids, and it burns easily. Always melt white chocolate in shorter bursts, usually 15 to 20 seconds at a time, and stir thoroughly between each round. If you are new to melting chocolate, start with a small batch before trusting white chocolate with your emotional stability.
What You Need Before You Start
Before microwaving chocolate, gather a microwave-safe bowl, a dry spatula or spoon, and chocolate chopped into small, even pieces. A glass bowl or glass measuring cup works well because it holds gentle residual heat and lets you see what is happening. Make sure every tool is completely dry. Water is one of the fastest ways to turn melted chocolate from glossy sauce into a gritty paste.
Avoid using a plastic bowl unless it is clearly labeled microwave-safe and does not retain greasy residue. Chocolate is sensitive to both moisture and overheating, so clean, dry, heat-safe equipment matters. Also avoid narrow bowls if you are melting a larger amount. A wider bowl helps the chocolate heat more evenly and gives you room to stir without flinging chocolate onto the microwave wall like abstract dessert art.
How to Melt Chocolate in the Microwave Step by Step
Step 1: Chop the Chocolate Evenly
If you are using a chocolate bar or baking chocolate, chop it into small, similar-sized pieces. Even pieces melt at the same rate, which reduces the risk of hot spots. If you are using chocolate chips or melting wafers, you can use them as they are.
Step 2: Place Chocolate in a Dry Microwave-Safe Bowl
Add the chocolate to a clean, completely dry microwave-safe bowl. Do not cover the bowl. Steam trapped under a lid can drip back into the chocolate, and even a tiny amount of water can cause seizing.
Step 3: Microwave at 50% Power
Set the microwave to medium or 50% power. This is one of the most important steps. Full power may work for some small amounts, but it also increases the chance of scorching. Lower power gives the chocolate time to warm gradually.
Step 4: Heat in Short Bursts
For 4 to 8 ounces of chocolate, start with 30 seconds at 50% power. Remove the bowl and stir well. At first, not much may seem to happen. Keep going. Microwave again in 20- to 30-second bursts for dark or milk chocolate, stirring after each burst. For white chocolate, use 15- to 20-second bursts.
Step 5: Stop Before Everything Is Fully Melted
Stop microwaving when the chocolate is mostly melted but a few small lumps remain. Stir steadily until the remaining pieces melt from residual heat. This final stirring step is the difference between smooth chocolate and chocolate that has been bullied by electricity.
Step 6: Use Immediately or Keep Warm Gently
Once melted, use the chocolate right away for dipping, drizzling, coating, or mixing. If it thickens as it cools, rewarm it at 50% power in 10- to 15-second bursts, stirring each time. Do not blast it back to liquid in one long session. That is how chocolate learns revenge.
Microwave Timing Chart for Melted Chocolate
| Amount of Chocolate | Power Level | Best Interval | Estimated Total Time |
|---|---|---|---|
| 2 ounces | 50% power | 15 to 20 seconds | 30 to 60 seconds |
| 4 ounces | 50% power | 20 to 30 seconds | 1 to 2 minutes |
| 8 ounces | 50% power | 30 seconds | 2 to 3 minutes |
| 12 ounces | 50% power | 30 seconds | 3 to 4 minutes |
These times are estimates because microwaves vary. A powerful microwave may melt chocolate faster than an older or smaller model. The safest rule is to stir often and stop early. You can always add another 10 seconds, but you cannot un-burn chocolate. Science remains rude about that.
How to Melt Chocolate Chips in the Microwave
Chocolate chips are the most common choice for quick melting because they are already small and easy to measure. Place the chips in a dry microwave-safe bowl and heat them at 50% power in 30-second intervals. Stir after every interval, scraping the sides and bottom of the bowl.
Remember that chocolate chips may hold their shape even when warm. Do not judge by appearance alone. Stirring is the real test. When the chips begin to collapse into a glossy mixture, reduce the interval to 10 or 15 seconds. Stop when mostly melted and stir until smooth.
How to Thin Melted Chocolate
Sometimes melted chocolate is smooth but too thick for dipping or drizzling. This often happens with chocolate chips because stabilizers help them stay firm. To thin melted chocolate, stir in a small amount of neutral fat, such as vegetable oil, coconut oil, or shortening. Start with 1 teaspoon per cup of chocolate, stir well, and add more only if needed.
Do not use water, milk, or cold cream to thin plain melted chocolate. Water can cause seizing, and cold liquids can make the chocolate tighten. If you are making ganache, the process is different because warm cream is intentionally combined with chocolate in the right ratio. For simple dipping chocolate, fat is the safer helper.
How to Keep Chocolate from Seizing
Seized chocolate looks thick, grainy, dull, and clumpy. It usually happens when chocolate meets moisture or overheats. To prevent it, dry your bowl and utensils carefully, avoid lids that create condensation, and keep steam away from your chocolate. This is one reason many home bakers prefer the microwave over a double boiler: no simmering water means fewer chances for steam to sneak in.
If your chocolate seizes, it may not be ideal for dipping anymore, but it might still be useful. For sauces, brownies, or batters, you can sometimes rescue it by stirring in warm cream, warm milk, or a little fat, depending on the recipe. The texture may not return to perfect dipping gloss, but it does not have to go straight to the trash. Chocolate deserves a second act.
How to Avoid Burning Chocolate
Burned chocolate smells harsh, tastes bitter, and often becomes thick or grainy. The best prevention is controlled heat. Use 50% power, stir frequently, and never walk away while the microwave is running. Chocolate does not need a lot of heat to melt. In fact, residual heat is your friend.
Another useful trick is to remove the chocolate before it is fully melted. A few small lumps are not a problem. Keep stirring and let the warmth of the bowl finish the job. This approach prevents overheating and gives you a smoother final texture.
Melting Chocolate for Dipping
For dipping strawberries, pretzels, marshmallows, cookies, or dried fruit, choose chocolate that melts fluidly. Melting wafers are the easiest option. Chopped chocolate bars create excellent flavor, while chocolate chips may need a small amount of oil or shortening for a thinner coating.
Dry your fruit or snacks before dipping. Strawberries are especially sneaky because they hold water on their surface. Pat them dry with paper towels and let them sit until no visible moisture remains. Wet fruit can cause chocolate to seize or slide off instead of coating beautifully.
Melting Chocolate for Drizzling
For drizzling, melted chocolate should flow easily from a spoon, fork, piping bag, or zip-top bag with a tiny corner snipped off. If the chocolate is too thick, stir in a teaspoon of oil or coconut oil. Drizzle over cookies, brownies, popcorn, pancakes, ice cream, or fruit. Suddenly, your dessert looks intentional instead of “I found this in the pantry and hoped for the best.”
Melting Chocolate for Ganache
Ganache is made by combining chocolate with warm cream. You can use the microwave to melt the chocolate gently, but many recipes warm the cream separately and pour it over chopped chocolate. Let it sit for a minute or two, then stir until glossy. If you use the microwave for ganache, heat gently and avoid boiling the cream once it meets the chocolate.
Melting vs. Tempering Chocolate
Melting chocolate simply turns it from solid to liquid. Tempering chocolate is more precise. It controls the cocoa butter crystals so the finished chocolate sets with shine, snap, and a firm texture at room temperature. If you are making chocolate bark for casual snacking, basic melting is usually enough. If you are making molded candies, glossy truffles, or chocolate decorations that need a professional finish, tempering is worth learning.
You can temper chocolate with a microwave, but it requires careful temperature control and often a thermometer. For everyday dipping, do not panic about tempering. Melt the chocolate gently, use it promptly, and let the refrigerator help set the coating if needed.
Common Mistakes When Melting Chocolate in the Microwave
Using Full Power for Too Long
Full power is the fast lane to scorched chocolate. Use medium power and short intervals. Your chocolate will not file a complaint about being treated gently.
Not Stirring Enough
Stirring is not optional. It distributes heat and helps unmelted pieces melt smoothly. Stir from the center, scrape the edges, and fold the chocolate until the texture looks even.
Using Wet Tools
A damp spoon can ruin a bowl of chocolate. Make sure your bowl, spatula, cutting board, and knife are dry before you begin.
Overheating White Chocolate
White chocolate needs extra care. Use shorter bursts and stop as soon as it is mostly melted. Stirring will finish the job.
Expecting Chocolate Chips to Melt Like Sauce
Chips can melt thicker than bars because they are designed to hold their shape in baked goods. Add a little fat if you need a smoother dipping consistency.
Best Uses for Microwave-Melted Chocolate
Microwave-melted chocolate is perfect for fast desserts and decorating projects. Use it for chocolate-covered strawberries, pretzel rods, cookie drizzle, brownie topping, chocolate bark, cake pops, cereal clusters, frozen banana bites, homemade candy cups, hot chocolate bombs, or a quick spoonful over ice cream.
It is also handy for baking recipes that call for melted chocolate in batter. Brownies, flourless chocolate cake, chocolate cookies, and some frostings begin with melted chocolate. Let the chocolate cool slightly before mixing it with eggs or butter. If it is steaming hot, it can scramble eggs or melt butter in ways your recipe did not request.
Experience Notes: What Real Kitchen Practice Teaches About Melting Chocolate
After enough batches of microwave chocolate, you start to notice that success is less about the exact number of seconds and more about paying attention. One microwave may melt half a cup of chips in a minute, while another needs closer to two. One bowl may stay warm longer than another. A small batch may overheat faster than a large batch. That is why the best habit is to treat every batch like it has its own personality.
One practical lesson is that the first stir often feels useless. You take the bowl out after 30 seconds, poke the chips, and think, “Nothing happened.” But something did happen. The bowl warmed, the edges softened, and the chocolate began preparing for its grand transformation. By the second or third stir, the chips suddenly slump into a glossy pool. This is why patience matters. Chocolate melts from the inside of the process before it looks melted on the outside.
Another experience-based tip is to avoid multitasking. Melting chocolate is not the moment to check messages, unload the dishwasher, or debate whether one more cookie counts as quality control. The difference between smooth and scorched can be one extra interval. Stay near the microwave, stir every time, and reduce the timing as the chocolate gets closer to melted.
Bowl choice also matters more than people expect. A heavy glass measuring cup is excellent for small batches because it keeps warmth steady and makes pouring easy. A shallow glass bowl works well for larger amounts because the chocolate spreads out and melts evenly. A tiny deep bowl can create hot pockets at the bottom, especially if you forget to scrape it well.
For dipping strawberries, the biggest real-world mistake is moisture. Freshly washed strawberries look innocent, but tiny droplets cling around the leaves and seeds. If those droplets hit the chocolate, the coating can thicken or streak. Wash the berries early, dry them carefully, and let them air-dry before dipping. Your chocolate will behave better, and the coating will set more neatly.
For drizzling, the best trick is to use a zip-top bag. Spoon in the melted chocolate, press out extra air, seal the bag, and snip a very tiny corner. Start smaller than you think. You can always cut the hole bigger, but you cannot make it smaller unless you enjoy chocolate puddles wearing fake mustaches on your cookies.
Finally, never underestimate residual heat. Many beginners keep microwaving until every last chip disappears. Experienced bakers stop earlier. When the chocolate is about 85 to 90 percent melted, steady stirring usually finishes it beautifully. This keeps the flavor clean, the texture smooth, and the kitchen free from that tragic burned-chocolate smell.
Frequently Asked Questions
Can I melt chocolate in the microwave without oil?
Yes. Good-quality chopped chocolate or melting wafers often melt smoothly without added fat. Add oil or shortening only if the chocolate is too thick for dipping or drizzling.
Why did my chocolate get hard and grainy?
It may have seized from moisture or overheated. Use dry tools, microwave gently, and stir often to prevent this problem.
Can I remelt chocolate after it hardens?
Yes. Reheat it at 50% power in 10- to 15-second bursts, stirring each time. If it has already been used for dipping, crumbs or moisture may affect the texture.
Should I refrigerate chocolate-covered strawberries?
Yes, especially if you are not serving them soon. Place them on parchment paper and chill until set. For best texture, enjoy them the same day.
Can I use the microwave chocolate preset?
It is safer to control the process yourself. Presets vary by microwave and may overheat chocolate. Use 50% power, short bursts, and frequent stirring.
Conclusion
Melting chocolate in the microwave is one of the easiest dessert skills to master, as long as you do not rush it. Use a dry microwave-safe bowl, chop chocolate evenly, heat at 50% power, stir after every short burst, and stop before every piece has fully melted. The remaining lumps will smooth out with residual heat.
Whether you are making chocolate-covered strawberries, drizzling cookies, dipping pretzels, preparing ganache, or rescuing a weeknight dessert from boredom, the microwave can be your best friend. Just remember: chocolate likes gentle heat, dry tools, and your full attention. Give it that, and it will reward you with glossy, silky, spoon-licking perfection.