Table of Contents >> Show >> Hide
- What Is Hydroponics?
- Why Beginners Should Try Hydroponic Gardening
- The Best Hydroponic System for Beginners
- Best Plants to Grow Hydroponically for Beginners
- Supplies You Need to Start a Hydroponic Garden
- How to Set Up a Beginner Hydroponic System
- How to Maintain a Hydroponic Garden
- Understanding pH, EC, and Nutrients Without Panicking
- Common Hydroponic Problems and How to Fix Them
- Food Safety Tips for Home Hydroponics
- Beginner Hydroponic Growing Plan: A Simple 30-Day Lettuce Project
- Best Tips for Hydroponic Success
- Beginner Experience Notes: What Growing Hydroponically Teaches You
- Conclusion
Hydroponics sounds like something that belongs in a NASA lab, a futuristic greenhouse, or a very intense YouTube channel run by someone named “Plant Wizard 3000.” But at its core, hydroponic gardening is wonderfully simple: you grow plants without soil, using water, nutrients, light, and a little common sense. That’s it. No mud under your nails, no mystery weeds, and no backyard required.
For beginners, hydroponics can feel intimidating because the vocabulary gets dramatic fast: pH, EC, deep water culture, nutrient film technique, dissolved oxygen. Relax. You do not need to become a chemist in a lab coat to grow lettuce on your kitchen counter. You just need to understand what plants want: support, water, food, air around the roots, enough light, and a clean place to grow.
This beginner-friendly guide explains how to grow plants using hydroponics from scratch, including the best starter systems, supplies, plant choices, step-by-step setup, common mistakes, and practical growing tips. By the end, you’ll be ready to start a small hydroponic garden that actually grows food instead of becoming an expensive science decoration.
What Is Hydroponics?
Hydroponics is a method of growing plants in a water-based nutrient solution instead of soil. Some hydroponic plants grow directly with their roots in water, while others are supported by inert growing media such as coconut coir, perlite, vermiculite, rockwool, clay pebbles, or foam plugs.
In soil gardening, the soil acts like a pantry, sponge, and root anchor all in one. In hydroponics, you replace those jobs with a container, clean water, dissolved plant nutrients, a growing medium, and a structure that holds the plant upright. Think of soil as the traditional full-service restaurant. Hydroponics is meal delivery with very precise instructions.
Why Beginners Should Try Hydroponic Gardening
Hydroponic gardening is especially useful for people with limited space, poor outdoor soil, short growing seasons, or a suspiciously strong talent for forgetting to weed. It can be done indoors or outdoors, and with artificial light, you can grow herbs and greens year-round.
Key Benefits of Hydroponics
- Space-saving: Hydroponic systems work well on shelves, countertops, balconies, patios, and small rooms.
- No soil needed: This is perfect for apartments, urban homes, and areas with contaminated or poor-quality soil.
- Fewer weeds: No soil means no surprise weed jungle trying to move in rent-free.
- Efficient water use: Many hydroponic systems recirculate or hold water, reducing waste compared with traditional watering.
- Fast growth potential: When roots have steady access to water, oxygen, and nutrients, plants can grow quickly.
- Year-round production: Indoors, you can grow leafy greens and herbs even when the weather outside is doing dramatic winter things.
The Best Hydroponic System for Beginners
There are several types of hydroponic systems, including deep water culture, wick systems, nutrient film technique, ebb and flow, drip systems, Dutch buckets, and aeroponics. For beginners, the easiest place to start is usually deep water culture or a simple Kratky-style passive system.
Deep Water Culture: The Beginner Favorite
Deep water culture, often called DWC, suspends plants above a container of nutrient solution. The roots hang down into the water, where they absorb moisture and nutrients. Most DWC systems use an air pump and air stone to add oxygen to the water, because roots need oxygen just like leaves need light.
This system is popular because it is affordable, easy to build, and forgiving. A basic version can be made with a food-safe bucket or storage tote, net pots, growing medium, hydroponic nutrients, and an aquarium air pump. It is not fancy, but neither is a potato, and potatoes are doing just fine.
Kratky Hydroponics: The No-Pump Option
The Kratky method is a passive hydroponic technique that does not require a pump. Plants sit above a container of nutrient solution, and as the water level drops, an air gap forms between the plant base and the solution. The roots absorb nutrients below while also accessing oxygen in the air space.
Kratky systems are excellent for lettuce, basil, bok choy, spinach, and other short-season crops. They are simple, quiet, and inexpensive. However, they work best when the container is sized properly and the crop is harvested before the nutrient solution becomes depleted or unbalanced.
Best Plants to Grow Hydroponically for Beginners
Not all plants are equally beginner-friendly. Could you grow a giant watermelon hydroponically in your living room? Technically, maybe. Should you begin there? Absolutely not, unless you enjoy chaos with vines.
Start with fast-growing, compact crops that do not need pollination or heavy support.
Easy Hydroponic Plants for First-Time Growers
- Lettuce: One of the easiest and fastest hydroponic crops.
- Basil: Loves hydroponic growing and rewards you with pesto-level enthusiasm.
- Mint: Grows vigorously, sometimes too vigorously, like it has a personal mission.
- Parsley and cilantro: Great for kitchen systems, though cilantro prefers cooler conditions.
- Bok choy: Fast, compact, and satisfying for beginners.
- Spinach: Good for cooler indoor spaces with enough light.
- Kale: Hardy, nutritious, and fairly forgiving.
Once you gain confidence, try fruiting crops such as cherry tomatoes, peppers, cucumbers, or strawberries. These need stronger light, more nutrients, larger containers, and sometimes hand pollination or trellising.
Supplies You Need to Start a Hydroponic Garden
A beginner hydroponic setup does not have to look like a spaceship. Start small, learn the basics, and upgrade later if you catch the hydroponic bug. Warning: the bug is real.
Basic Hydroponic Starter Supplies
- Food-safe container: A 5-gallon bucket, storage tote, or opaque reservoir.
- Lid or floating raft: Supports the plants above the nutrient solution.
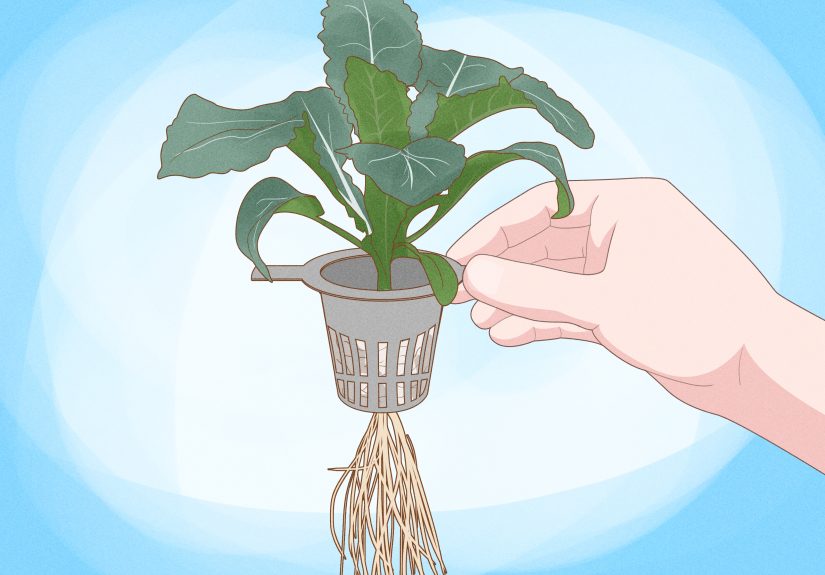
- Net pots: Small baskets that hold the plant and growing medium.
- Growing medium: Clay pebbles, rockwool cubes, coco coir plugs, perlite, or foam plugs.
- Hydroponic nutrients: Use a complete hydroponic fertilizer, not ordinary garden fertilizer.
- pH test kit or pH meter: Helps you keep the nutrient solution in the right range.
- pH up and pH down: Used to adjust the nutrient solution safely.
- Grow light: Needed for indoor growing unless your plants receive strong natural light.
- Air pump and air stone: Recommended for deep water culture systems.
- Seeds or seedlings: Lettuce and herbs are ideal first choices.
Choose an opaque container whenever possible. Light entering the reservoir encourages algae, and algae is basically the roommate who eats your snacks and never pays rent. Keep the nutrient solution dark, clean, and covered.
How to Set Up a Beginner Hydroponic System
Here is a simple step-by-step process for setting up a small deep water culture hydroponic garden. This example works well for lettuce, basil, bok choy, and other leafy greens.
Step 1: Choose the Right Location
Pick a stable location with access to electricity, moderate temperature, and enough space for plants to grow. Indoors, shelves, counters, utility rooms, and bright windows can work. Outdoors, place the system where it gets enough light but is protected from heavy rain, extreme heat, and curious pets who think lettuce water is a luxury beverage.
Step 2: Prepare the Reservoir
Use a clean, food-safe bucket or storage tote. Wash it with mild soap and rinse thoroughly. Avoid containers that previously held chemicals, oils, or anything you would not want near your salad.
Cut holes in the lid for net pots. The holes should hold the pots securely without letting them fall into the water. For lettuce and herbs, 2-inch or 3-inch net pots usually work well.
Step 3: Add Water
Fill the reservoir with clean water. Municipal tap water is often usable, but if it smells strongly of chlorine, let it sit uncovered for about 24 hours before mixing nutrients. If your water is very hard or has unusual mineral content, consider filtered water or have the water tested.
Step 4: Mix Hydroponic Nutrients
Add hydroponic nutrients according to the label instructions. Beginners should use a complete liquid or powder nutrient formula designed specifically for hydroponics. Do not use regular garden fertilizer unless it is clearly labeled as suitable for hydroponic use. Soil fertilizers may lack important micronutrients or contain forms of nitrogen that are less suitable for water culture.
Mix thoroughly. If using a two-part nutrient formula, add each part separately and stir between additions. Do not mix concentrated nutrients together before diluting them in water, unless the product label specifically says to do so. Concentrated nutrients can react with each other and form unusable solids.
Step 5: Check and Adjust pH
Most hydroponic vegetables prefer a slightly acidic nutrient solution. A practical beginner target is usually around pH 5.5 to 6.5, although some crops tolerate a broader range. If the pH is too high or too low, plants may struggle to absorb nutrients even when those nutrients are present. This is called nutrient lockout, which sounds like a nightclub problem but is actually a plant chemistry problem.
Use pH up or pH down products carefully, adding small amounts at a time. Stir, wait a few minutes, and test again. Sneaking up on the right pH is better than playing chemical ping-pong.
Step 6: Add Oxygen
For deep water culture, place an air stone in the reservoir and connect it to an aquarium air pump. Oxygenated water helps roots stay healthy. Without enough oxygen, roots may become brown, slimy, or stressed.
If you are using a passive Kratky system, do not fill the water all the way to the top forever. The plant needs an air gap as the water level drops. That air gap is part of the system, not a mistake.
Step 7: Start Seeds or Transplant Seedlings
You can start seeds in rockwool cubes, coco plugs, peat-free starter plugs, or another clean seed-starting medium. Keep them moist but not drowning. Once seedlings have a few true leaves and roots reaching through the plug, move them into net pots.
Support the plug with clay pebbles or another inert medium. The bottom of the plug should be close enough to wick moisture at first, but the crown of the plant should not sit underwater.
Step 8: Provide Enough Light
Light is food for plants. Nutrients are important, but without enough light, your plants will stretch, flop, and look like they stayed up too late scrolling social media.
Leafy greens and herbs usually need 12 to 16 hours of light per day indoors. Use an LED grow light positioned according to the manufacturer’s instructions. If leaves stretch upward and become pale, the light may be too weak or too far away. If leaves curl, bleach, or crisp, the light may be too intense or too close.
How to Maintain a Hydroponic Garden
Hydroponics rewards consistency. You do not need to fuss over your system every hour, but you should check it regularly. Plants are quiet, but they are not subtle forever.
Daily Checks
- Look at leaves for wilting, yellowing, curling, or spots.
- Check that the pump is running if using deep water culture.
- Make sure the water level is not too low.
- Look for algae, pests, or unusual smells.
Weekly Checks
- Test and adjust pH.
- Top off the reservoir with clean water as needed.
- Check nutrient strength if you have an EC or TDS meter.
- Clean spills and remove dead leaves.
- Inspect roots; healthy roots are usually white to cream-colored.
For small beginner systems, replace the nutrient solution every two to three weeks, or sooner if it smells bad, becomes cloudy, or plants show signs of stress. Some leafy green systems can grow a short crop on one batch of nutrient solution, but fresh solution keeps things simpler for beginners.
Understanding pH, EC, and Nutrients Without Panicking
Hydroponics introduces two measurements that beginners see everywhere: pH and EC. They sound scarier than they are.
pH: The Nutrient Availability Dial
pH measures how acidic or alkaline the nutrient solution is. If the pH drifts too far out of range, nutrients become harder for plants to absorb. You may see yellow leaves, slow growth, or strange deficiency symptoms even though you added fertilizer.
For most beginner leafy greens and herbs, keeping pH around 5.5 to 6.5 is a reliable target. Test after mixing nutrients, then check every few days until you learn how your system behaves.
EC or TDS: The Nutrient Strength Meter
Electrical conductivity, or EC, estimates how many dissolved salts are in the nutrient solution. Since hydroponic nutrients are salts, EC gives you a rough idea of nutrient strength. TDS meters estimate total dissolved solids and are often used by hobby growers.
Too weak, and plants may grow slowly or turn pale. Too strong, and roots may struggle to take up water, causing burnt leaf tips or stress. Beginners can succeed by following nutrient label directions at half strength for young seedlings, then increasing gradually as plants mature.
Common Hydroponic Problems and How to Fix Them
Yellow Leaves
Yellow leaves may be caused by low nutrients, incorrect pH, weak light, old leaves naturally aging, or root problems. Check pH first. Then check light and nutrient strength. Do not immediately dump in extra fertilizer like you are seasoning soup.
Leggy Seedlings
Leggy seedlings usually need more light. Move the grow light closer, increase light duration, or use a stronger lamp. Seedlings should be sturdy, not auditioning to become spaghetti.
Algae Growth
Algae appears when light reaches nutrient-rich water. Use opaque containers, cover unused holes, and block light from the reservoir. A little algae is common; a green swamp is a warning sign.
Brown or Slimy Roots
Brown, slimy roots may indicate poor oxygen, warm water, dirty equipment, or root disease. Clean the system, improve aeration, keep water cooler, and remove severely affected plants.
Tip Burn on Lettuce
Tip burn can happen when fast-growing lettuce cannot move enough calcium to young leaf edges. It may be linked to high heat, poor airflow, inconsistent water movement, or nutrient imbalance. Improve air circulation, avoid excessive heat, and keep the nutrient solution stable.
Food Safety Tips for Home Hydroponics
Hydroponic produce is still fresh produce, so cleanliness matters. Use clean water, wash hands before handling plants, sanitize tools, and keep pets away from the reservoir. Do not use water from ponds, streams, or questionable rain barrels for edible greens unless it has been properly tested and treated.
Harvest with clean scissors or a clean knife. Rinse produce before eating. If the system smells rotten, looks contaminated, or has been exposed to dirty water, do not gamble with your salad.
Beginner Hydroponic Growing Plan: A Simple 30-Day Lettuce Project
If you want a clear first project, grow lettuce in a small deep water culture or Kratky setup. Lettuce grows quickly, does not need pollination, and shows progress fast enough to keep beginners motivated.
Week 1: Start Seeds
Place lettuce seeds in moist starter plugs. Keep them warm, lightly moist, and under gentle light once they sprout. Do not drown the plugs. Seeds want moisture, not a swimming pool membership.
Week 2: Move Seedlings
When seedlings have roots showing and a few true leaves, move them into net pots. Use mild nutrient solution and provide steady light.
Week 3: Monitor Growth
Check pH, water level, and leaf color. Add airflow with a small fan if growing indoors. Gentle air movement strengthens plants and helps reduce disease problems.
Week 4: Begin Harvesting
Harvest outer leaves when they are large enough, or cut the whole head when mature. For loose-leaf lettuce, “cut and come again” harvesting can extend production.
Best Tips for Hydroponic Success
- Start with leafy greens or herbs, not giant fruiting crops.
- Use a complete hydroponic nutrient formula.
- Keep the reservoir covered and dark.
- Test pH regularly, especially after mixing nutrients.
- Give roots oxygen, either through aeration or a proper air gap.
- Do not overcrowd plants; small seedlings become real plants with elbows.
- Keep notes on what you mix, test, change, and harvest.
Beginner Experience Notes: What Growing Hydroponically Teaches You
The first real lesson of hydroponics is that plants are honest. They do not care how expensive your setup is, how beautiful your shelf looks, or whether you bought the fancy grow light with a name that sounds like a superhero. If the pH is wrong, the light is weak, or the roots are suffocating, the plant will tell you. Usually with yellow leaves. Sometimes with dramatic wilting. Occasionally with the silent judgment only a basil plant can deliver.
For a beginner, the smartest experience is to begin smaller than your ambition. A single 5-gallon bucket with one basil plant can teach more than a complicated 30-plant tower that turns maintenance into a part-time job. Small systems make it easier to understand cause and effect. You adjust pH, and the plant improves. You move the light closer, and the seedlings stop stretching. You forget to check the water level, and the plant reminds you with the posture of a tired office worker on Friday afternoon.
Another experience worth knowing: hydroponics is not “set it and forget it.” It is more like “set it, check it, smile at it, test it, and occasionally apologize to it.” The system may look automatic, but plants are living things. Water evaporates. Nutrients get used. pH drifts. Lights generate heat. Roots grow into places you did not expect. The grower’s job is not to control every tiny detail perfectly; it is to notice changes early.
Beginners also learn that clean equipment prevents many headaches. A reservoir that is rinsed between crops, net pots that are scrubbed, and dead leaves removed quickly will save you from algae, odors, and root problems. Cleanliness is not glamorous, but neither is explaining to your family why the kitchen lettuce project smells like a swamp monster.
Light is another big “aha” moment. Many beginners assume nutrients are the main secret, but weak light is often the real problem. A plant with perfect nutrients and poor light is like a student with excellent textbooks in a dark room. It may survive, but it will not thrive. A decent LED grow light, used consistently, can transform slow, floppy growth into crisp, confident leaves.
The most satisfying part is harvest day. Cutting your own lettuce or basil from a system you built yourself feels oddly magical. You know every step: the seed, the first root, the pH checks, the tiny panic when one leaf turned yellow, the final bowl of greens. Hydroponics makes food feel close again. It turns a countertop into a mini farm and a beginner into someone who suddenly says things like, “I need to check my nutrient solution,” at dinner parties.
If your first attempt is imperfect, congratulations. That is normal. Maybe the lettuce grows slowly. Maybe the basil gets leggy. Maybe algae appears because you left one little opening uncovered. Every mistake teaches you something useful. The goal is not a flawless first crop. The goal is to understand the rhythm: clean water, balanced nutrients, good light, oxygen, observation, and patience. Once that rhythm clicks, hydroponics stops feeling technical and starts feeling wonderfully practical.
Conclusion
Learning how to grow plants using hydroponics for beginners is much easier when you start simple. Choose an easy crop like lettuce or basil, use a beginner-friendly system such as deep water culture or Kratky hydroponics, provide enough light, keep the nutrient solution clean, and monitor pH regularly. You do not need a greenhouse, a science degree, or a budget that makes your wallet hide under the bed.
Hydroponics gives beginners a practical way to grow fresh food in small spaces, indoors or outdoors. It removes many traditional gardening barriers, including poor soil, weeds, and limited yard space. At the same time, it teaches careful observation, consistency, and respect for what plants need. Start with one container, one crop, and one clear goal: grow something edible. Once you taste your first homegrown hydroponic harvest, you may find yourself planning shelf number two before the salad bowl is even empty.