Table of Contents >> Show >> Hide
- Why a Butterfly Life Cycle Drawing Works So Well
- What Are the Parts of a Butterfly Life Cycle?
- Supplies You Can Use
- How to Draw the Parts of a Butterfly Life Cycle: 5 Steps
- Tips to Make Your Drawing Better
- Common Mistakes to Avoid
- How to Use This Drawing for School, Blogs, or Printables
- Why This Topic Connects So Well With Beginners
- Experiences Related to Drawing the Butterfly Life Cycle
- Conclusion
If you have ever tried to draw a butterfly life cycle, you already know the first challenge: butterflies are beautiful, but their life story is gloriously weird. One minute you are sketching a tiny egg on a leaf. The next, you are drawing a snack-obsessed caterpillar, a hanging chrysalis, and a winged adult that looks like it showed up dressed for a garden party. That is exactly what makes this topic so fun to illustrate.
A butterfly life cycle drawing is more than a cute science project. It is a visual way to explain metamorphosis, label each stage clearly, and help readers or students remember what happens from egg to adult. Whether you are creating a classroom poster, homeschool worksheet, nature journal page, or blog graphic, learning how to draw the parts of a butterfly life cycle in a clear, organized way can make the entire concept easier to understand.
In this guide, you will learn a simple five-step method to draw the butterfly life cycle, label the main stages, and make the diagram look polished without turning it into an art-school stress test. We will also cover what each stage does, how to make your sketch more realistic, and the common mistakes that can turn a chrysalis into a green potato with ambition.
Why a Butterfly Life Cycle Drawing Works So Well
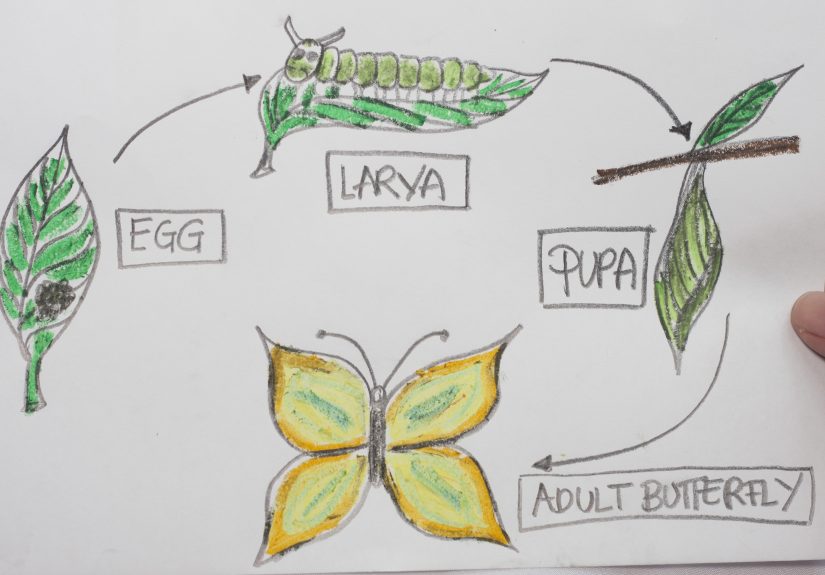
Butterflies go through four major stages: egg, larva, pupa, and adult. Because each stage looks dramatically different, the life cycle is perfect for visual learning. A drawing lets you show transformation in a single image instead of forcing readers to imagine it from text alone.
That is especially useful for beginner science learners. A labeled butterfly life cycle diagram can teach sequence, anatomy, observation, and vocabulary all at the same time. It also naturally supports related search topics such as butterfly metamorphosis drawing, life cycle of a butterfly for kids, and how to label the stages of a butterfly.
Better yet, the drawing can be as simple or detailed as you want. You can create a neat educational diagram with arrows and labels, or you can turn it into a colorful illustration with leaves, flowers, and the kind of caterpillar stripes that make you feel suspiciously proud of yourself.
What Are the Parts of a Butterfly Life Cycle?
Before you draw, it helps to understand what you are actually putting on paper. The butterfly life cycle has four stages, and each one has a distinct appearance and job.
1. Egg
The cycle begins when a butterfly lays eggs on a host plant. In a drawing, the egg is usually shown as a tiny oval or round shape attached to a leaf. Depending on the species, eggs can look smooth, ridged, or slightly textured, but in a simple diagram, a small pale oval on a leaf works perfectly.
2. Larva (Caterpillar)
After hatching, the larva, better known as the caterpillar, spends most of its time eating and growing. This is the “all-you-can-eat buffet” stage of the butterfly life cycle. A caterpillar usually has a segmented body, a small head, true legs near the front, and fleshy prolegs farther back. In a basic drawing, you do not need microscopic detail. Focus on a curved, segmented body and a recognizable caterpillar shape.
3. Pupa (Chrysalis)
Once the caterpillar is fully grown, it forms a chrysalis. This is the pupa stage, where metamorphosis happens. A chrysalis is not the same thing as a cocoon, and that distinction matters if you want your drawing to be accurate. A chrysalis usually hangs from a support and has a smooth, casing-like appearance. In a diagram, it often looks like a small hanging pod.
4. Adult Butterfly
The final stage is the adult butterfly. This is the image most people recognize first: wings, antennae, body, and legs. If you want to draw the adult well, focus on the large wing shapes, symmetrical patterning, and simple body structure. You do not have to recreate every scale on the wings unless you have chosen artistic chaos as your hobby.
Supplies You Can Use
You do not need fancy tools to draw the butterfly life cycle. A pencil, eraser, black pen or marker, and colored pencils are enough. If you are creating a classroom printable or blog illustration, you can also sketch digitally on a tablet. For younger learners, crayons and markers work just fine.
- Pencil for the first sketch
- Eraser for cleanup
- Black pen or fine liner for outlines
- Colored pencils, crayons, or markers
- Ruler if you want tidy label lines
- Blank paper or digital canvas
How to Draw the Parts of a Butterfly Life Cycle: 5 Steps
Step 1: Plan the Layout of the Cycle
Start by deciding how you want the life cycle to flow on the page. The easiest option is a circle because it visually shows that the cycle repeats. Draw a light circle guide or imagine one, then place each stage around it in order: egg, caterpillar, chrysalis, adult butterfly.
You can also use a horizontal or vertical sequence if you prefer a more infographic-style layout. For a school worksheet or educational poster, a circular design usually looks cleaner and makes the concept easy to follow. Leave enough space between each stage for labels and arrows.
At this point, lightly mark four main positions and one extra space for arrows and title balance. This is one reason the article uses five drawing steps instead of four life stages: the layout is the secret ingredient. Without planning the page first, your butterfly may end up giant, your egg may look lost, and your chrysalis may be shoved into a corner like it missed rehearsal.
Step 2: Draw the Egg on a Leaf
Choose one spot on your layout and draw a simple leaf. Then add one or more tiny eggs on the surface of the leaf. For a clean beginner drawing, make each egg a small oval standing upright. Keep the lines delicate so the egg looks tiny compared with the later stages.
If you want a little more realism, add a center vein to the leaf and a few curved side veins. That small detail makes the egg stage feel grounded and gives the viewer a clue that butterfly eggs are laid on plants for a reason. Add the label Egg underneath or beside the drawing.
You can also include a mini caption such as “laid on a leaf” if your audience is young learners. Simple labels make the diagram easier to scan and more SEO-friendly if you are turning the artwork into web content.
Step 3: Draw the Caterpillar
Next, sketch the larva stage. Draw a curved caterpillar body made of connected rounded segments. Add a small head at one end and a line beneath the body for the plant stem or leaf it is crawling on. If you want the drawing to look lively, make the body gently arch instead of lying flat like a dropped sock.
Add tiny legs near the front and a few small prolegs under the middle and rear sections. For a simpler version, you can suggest the legs with short strokes rather than drawing every single one. A few stripes or dots can help make the caterpillar more interesting.
Label this stage Larva (Caterpillar). That double label is useful because many readers know the word caterpillar better than larva, while science-based materials often use both terms together.
Step 4: Draw the Chrysalis
Now draw the pupa stage. Sketch a short hanging stem or twig, then attach a tapered chrysalis shape below it. Think of it as a smooth little casing that narrows toward the top. It should look still and contained, the exact opposite of the caterpillar stage, which is basically a tiny moving appetite.
Do not overcomplicate this part. A clear outline matters more than extra decoration. If you want to hint at realism, add a subtle line or ridge along the chrysalis body. Color choices such as green, pale brown, or gold accents can make it stand out later.
Label it Pupa (Chrysalis). This helps distinguish the scientific term from the more familiar word chrysalis. If your diagram is for kids, that paired label also teaches vocabulary without feeling like a quiz ambush.
Step 5: Draw the Adult Butterfly and Connect the Cycle
For the adult stage, start with a narrow body in the center of the butterfly. Add a small head, two antennae, and four wings: two larger upper wings and two smaller lower wings. Keep the wings symmetrical. If one wing looks elegant and the other looks like a tortilla chip, pause and adjust before inking.
Once the wing outline is in place, add simple patterns such as spots, curved borders, or teardrop shapes. Then label the stage Adult Butterfly. If you want to emphasize the anatomy of the adult, you can add small callouts for antennae, wings, thorax, abdomen, and proboscis.
Finally, draw arrows from one stage to the next: egg to caterpillar, caterpillar to chrysalis, chrysalis to butterfly, and butterfly back to egg. Those arrows are what turn four separate sketches into one clear butterfly life cycle diagram.
Tips to Make Your Drawing Better
Keep the Stages Different in Size
The egg should be tiny. The caterpillar should look longer and more active. The chrysalis should feel compact and still. The butterfly should be the most visually striking stage. Size contrast helps viewers understand the sequence at a glance.
Use Color Purposefully
Green leaves, a striped caterpillar, a soft green chrysalis, and bright patterned wings can make the whole page more memorable. You do not need photorealism. Clean, consistent color choices are more helpful than trying to win a butterfly beauty pageant with 46 markers.
Add Labels That Are Easy to Read
If your labels are tiny, slanted, or floating in random places, your diagram will look chaotic. Use simple printed text and position labels consistently near each stage. For web graphics, readable labels are especially important on smaller screens.
Show Motion with Arrows
Arrows are not just decoration. They tell the story. A butterfly life cycle without arrows can look like four unrelated doodles that happened to arrive at the same party.
Common Mistakes to Avoid
- Drawing a cocoon instead of a chrysalis for the butterfly pupa stage
- Forgetting the leaf under the egg stage
- Making the caterpillar look exactly like a worm
- Skipping labels or putting the stages out of order
- Overloading the wings with so much detail that the adult butterfly steals all the attention
How to Use This Drawing for School, Blogs, or Printables
If you are making a butterfly life cycle drawing for a classroom, keep the shapes bold and the labels large. If you are designing for a blog, use headings and alt-text-friendly language such as “labeled butterfly life cycle diagram showing egg, caterpillar, chrysalis, and adult butterfly.” If you are creating printable worksheets, leave blank lines beneath each stage so learners can label them independently.
You can also adapt the same drawing into a coloring page, science notebook prompt, or anchor chart. That flexibility is one reason butterfly life cycle content remains popular online. It blends science, art, vocabulary, and hands-on learning in a way that feels useful instead of dry.
Why This Topic Connects So Well With Beginners
There is something satisfying about drawing a process that transforms so completely. The butterfly life cycle is one of the rare science topics that feels instantly visual. Even people who do not think of themselves as artists can usually sketch the stages with a little guidance, and the finished result often looks more polished than they expected.
It also gives beginners permission to simplify. You are not trying to paint a museum mural. You are trying to explain a cycle clearly. When the viewer can recognize the egg, larva, pupa, and adult in seconds, your drawing is doing its job beautifully.
Experiences Related to Drawing the Butterfly Life Cycle
One reason this topic stays memorable is that people usually do not experience it as just a drawing lesson. They experience it as a moment of discovery. A child sees the egg stage and realizes butterflies do not simply appear as tiny butterflies. A student draws the chrysalis and finally understands that metamorphosis is not a vague magic trick from a science textbook. An adult making an educational printable discovers that the life cycle is surprisingly elegant when laid out on paper.
In classrooms, this kind of project often starts with excitement and a little confusion. Someone always wants to draw the butterfly first because it is the flashy one. The egg gets ignored because, frankly, it does not look like much. But by the end of the activity, the quiet little egg suddenly feels important. Without that tiny beginning, there is no caterpillar, no chrysalis, and no butterfly. That shift in understanding is part of what makes the drawing experience valuable.
At home, parents and kids often turn the project into a mini art-and-science event. The paper comes out, the colored pencils roll off the table at least twice, and somebody asks whether a chrysalis is the same as a cocoon. That question alone tends to spark a longer conversation, which is exactly the point. A simple drawing becomes a doorway into observation, vocabulary, and curiosity. It feels less like memorizing facts and more like building a story with pictures.
Nature journaling adds another layer to the experience. When people have actually seen a caterpillar on a leaf or spotted a butterfly hovering over flowers, the drawing becomes more personal. They start paying attention to details they would have skipped before, like the curve of a leaf, the segmentation of a caterpillar, or the shape of the wings. Even if the final illustration is simple, the act of noticing becomes richer. That is the sneaky superpower of drawing: it trains attention while pretending to be a craft project.
Teachers also tend to notice that butterfly life cycle diagrams work well for mixed skill levels. Strong artists can add details and shading. Beginners can stick to clean shapes and labels. Younger learners can color the stages, while older students can add notes about metamorphosis, anatomy, and habitat. In other words, the same topic scales beautifully. It is educational without being rigid and creative without becoming chaotic.
There is also an emotional reason people connect with this subject. Transformation is easy to understand on a human level. The life cycle of a butterfly feels symbolic, hopeful, and visually dramatic. That does not mean every drawing session turns into a profound life lesson with inspirational background music. But it does mean the project often sticks in memory longer than a standard worksheet would.
For bloggers, illustrators, and content creators, drawing the butterfly life cycle can be especially rewarding because it combines evergreen search value with genuinely useful information. Readers want visuals that make science easier to grasp. A clean diagram does that quickly. It can support educational articles, homeschooling content, printable resources, and seasonal spring topics without feeling repetitive.
In the end, the experience of drawing the butterfly life cycle is usually a blend of learning, creativity, and small moments of surprise. You begin with a blank page and a few oddly shaped stages. You end with a complete visual story of transformation. That is a pretty good trade, especially for a project that starts with one tiny egg and ends with wings.
Conclusion
Learning how to draw the parts of a butterfly life cycle is easier when you break it into a few clear moves: plan the layout, sketch the egg, draw the caterpillar, add the chrysalis, and finish with the adult butterfly and arrows. The result is a labeled, easy-to-follow diagram that explains butterfly metamorphosis in a way words alone often cannot.
Whether you are creating a science worksheet, blog illustration, homeschooling resource, or simple art project, this five-step approach keeps the process organized and beginner-friendly. Start simple, focus on the sequence, and remember that clarity beats perfection every time. If your butterfly looks cheerful, your caterpillar looks hungry, and your chrysalis does not resemble a mystery vegetable, you are already doing great.