Table of Contents >> Show >> Hide
- Why a Banana Is a Great Drawing Subject for Beginners
- What You Need Before You Start
- How to Draw a Single Banana Step by Step
- How to Draw a Banana Bunch
- How to Make Your Banana Drawing Look More Realistic
- Easy Coloring Tips for a Banana Drawing
- Common Mistakes Beginners Make
- Practice Exercises to Improve Fast
- Why This Tutorial Helps More Than Just Banana Drawing
- Extra Beginner Experiences: What It Really Feels Like to Learn to Draw a Banana
- Conclusion
- SEO Tags
If you have ever looked at a banana and thought, “That seems easy,” congratulationsyou have already taken the first step into one of drawing’s oldest traps. A banana looks simple, but the moment your pencil touches paper, it can turn into a boomerang, a sleepy moon, or a suspicious yellow submarine. The good news? Learning how to draw a banana or banana bunch is actually one of the best beginner drawing exercises because it teaches you shape, curve, proportion, overlap, and shading without making you wrestle a complicated subject.
In this easy beginner tutorial, you will learn how to draw a single banana, how to draw a banana bunch, how to shade it so it looks more three-dimensional, and how to avoid the common mistakes that make fruit look flat or oddly inflatable. Whether you are sketching for fun, building your drawing basics, or trying to impress exactly one person with your fruit artistry, this guide will help you get there.
Why a Banana Is a Great Drawing Subject for Beginners
There is a reason beginner artists often practice with fruit. Fruit is familiar, affordable, easy to observe, and full of natural form. A banana is especially friendly because it has a clear silhouette, soft curves, and enough texture to be interesting without being chaotic.
When you practice drawing a banana, you learn how to:
- Break an object into simple shapes
- Draw smooth contour lines
- Show volume with light and shadow
- Handle tapering ends without panic
- Create overlap when drawing a banana bunch
In other words, the banana is not just a snack. It is a tiny curved art coach.
What You Need Before You Start
You do not need fancy supplies to follow this banana drawing tutorial. Keep it simple:
- A pencil
- An eraser
- Plain paper or a sketchbook
- Optional colored pencils, markers, or crayons
If you are working in graphite, a regular HB pencil is enough. If you want smoother shadows, having a softer pencil can help, but it is not required. The main tool you need is patienceplus the emotional strength to draw one weird banana before you draw a good one.
How to Draw a Single Banana Step by Step
Step 1: Start with the Main Curve
Begin by lightly drawing a long, gentle curve. Think of it as the spine of the banana. This first line sets the direction and energy of the drawing, so do not press too hard. A banana is usually curved, but not like a dramatic cartoon crescent. Keep the bend natural and relaxed.
If your first curve feels too stiff, draw it again lightly. You are aiming for a smooth, organic line that suggests the fruit’s overall movement.
Step 2: Add the Second Outer Line
Next, draw a second curve above or below the first one to create the banana’s thickness. The shape should be wider in the middle and narrower toward the ends. This is where beginners often go wrong by making both sides identical. Real bananas are not perfect mirror images. One side usually feels fuller, while the opposite side may look slightly flatter or tighter.
At this stage, think of the banana as a curved, tapered form rather than a flat symbol.
Step 3: Shape the Ends
Now connect the two long curves at each end. One end should have the small pointed tip. The other should be a little thicker where the banana connects to the stem. Do not make both ends sharp. That can make the fruit look like a cartoon fish or a decorative mustache with identity issues.
The stem end is usually chunkier and more squared-off, while the opposite end narrows to a softer point.
Step 4: Add Subtle Edges and Surface Details
A banana is not a perfectly smooth tube. It often has soft ridges or planes running lengthwise. Lightly suggest one or two lines that follow the curve of the fruit from stem to tip. These should be subtle, not harsh. Their job is to show form, not turn your banana into a striped sports car.
You can also add a few tiny marks near the stem or tip to make the drawing feel more natural.
Step 5: Clean the Outline
Erase extra construction lines and refine the silhouette. Try to keep your final outer line confident and clean. If the banana outline gets too fuzzy from repeated sketching, it can lose its clarity. A simple subject benefits from simple line work.
Step 6: Shade the Banana
Pick a light source. Decide whether the light is coming from the left, right, or above. Then add light shading to the side facing away from the light. Keep the brightest area where the light hits the banana most directly.
Because bananas are rounded, the shadow should shift gradually, not change suddenly. Use soft pencil strokes that follow the curve of the form. You can make the banana look more three-dimensional by darkening:
- The underside
- The side away from the light
- The area near the stem
- A cast shadow underneath the banana
This is the moment the drawing stops looking like a sticker and starts feeling like an object sitting in real space.
How to Draw a Banana Bunch
Once you can draw one banana, you are ready to draw a banana bunch. This is where things get more interesting because now you are dealing with overlap, spacing, and composition. It sounds fancy, but really it just means figuring out how several bananas hang together without becoming a yellow spaghetti situation.
Step 1: Draw the Central Stem Area
Start with a rough shape for the top area where the bananas connect. This can look like a rounded block or thick stem cluster. Keep it loose at first. This part acts like the anchor of the whole bunch.
Step 2: Place the Main Bananas with Gesture Lines
Instead of fully drawing each banana right away, sketch the center curve for each one first. Fan them out from the stem area. Some can point outward, some downward, and some slightly behind others. Varying the direction is important because real banana bunches are not arranged like perfect copies in a spreadsheet.
Try starting with three to five bananas if you are a beginner. That is enough to create the look of a bunch without overwhelming the page.
Step 3: Build Each Banana Around Its Center Line
After placing the gesture lines, add the thickness of each banana one at a time. Focus on the front bananas first, then draw the ones partially hidden behind them. Overlap is what makes the bunch believable. If every banana is fully visible, the drawing can feel flat and staged.
Let some tips peek out. Let some stems disappear behind others. Those little choices create depth.
Step 4: Connect Them Naturally
Make sure each banana feels attached to the top cluster. If one looks like it is floating off to pursue an independent lifestyle, adjust the connection point. A banana bunch should feel grouped and unified.
Step 5: Add Shading to Separate the Forms
With multiple bananas, shading becomes even more important. Use shadows where one banana overlaps another. These contact shadows help show which fruit is in front and which is behind. Darken the small spaces between bananas and keep the outer surfaces lighter where the light hits.
This creates depth fast. It is one of the simplest tricks for making a banana bunch look convincing.
How to Make Your Banana Drawing Look More Realistic
Observe Before You Draw
Do not rely only on the banana icon stored in your brain. Look at an actual banana if you can. Notice whether it is long or short, gently curved or strongly bent, smooth or speckled, bright yellow or slightly green. Drawing improves when you draw what you see, not what you assume.
Use Light Pressure at First
Begin with faint lines so you can adjust the shape easily. Dark outlines too early can trap mistakes. Think of the first sketch as a rehearsal, not the final performance.
Follow the Form with Your Strokes
When shading, let your pencil marks move along the curve of the banana. That helps describe the rounded surface. Random scribbling can flatten the object, while directional strokes support volume.
Keep Highlights
Do not shade everything equally. Leave lighter areas where the light hits the banana. Even a simple white strip or patch can make the fruit feel shiny and full.
Add Imperfections
Real bananas are charmingly imperfect. A few tiny spots, a slightly uneven edge, or a darker stem can make your drawing feel more believable. You are not drawing a plastic display banana from a furniture catalog. Let it look lived-in.
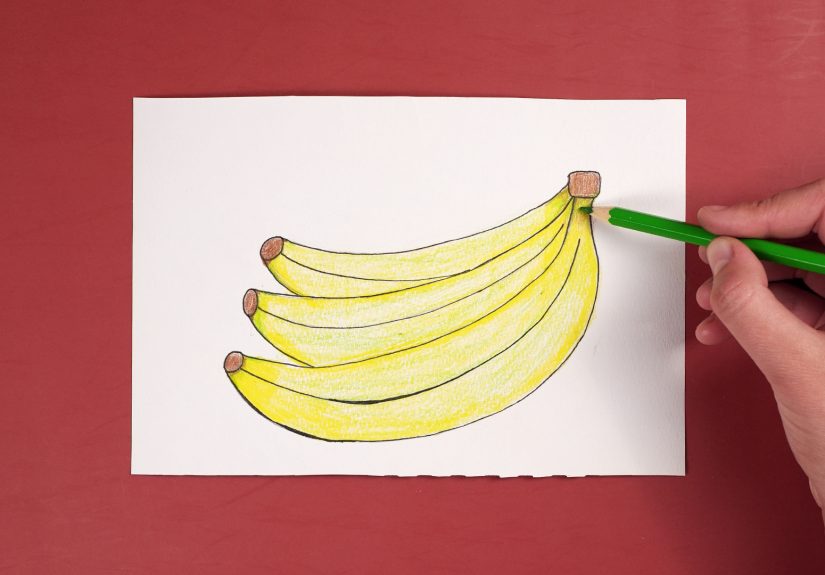
Easy Coloring Tips for a Banana Drawing
If you want to color your banana, start with a base of yellow. Then add gentle layers of darker yellow, golden brown, or light green depending on ripeness. The stem and tip are often darker than the middle. Brown freckles can be added with restraint.
For a banana bunch, avoid coloring every banana exactly the same way. Small shifts in tone make the group more natural. One can be brighter, one slightly greener, and one a little more speckled. Variety adds life.
Common Mistakes Beginners Make
Making the Banana Too Symmetrical
If both sides match too perfectly, the drawing can feel stiff. Natural objects usually have subtle asymmetry.
Using a Harsh Outline Only
A dark outline with no shading can make the banana look flat. Contour lines are useful, but values give the form weight and depth.
Ignoring the Stem End
The thicker top end helps identify the object. If both ends are tiny points, your banana may start auditioning for another role.
Forgetting the Cast Shadow
A cast shadow under the banana helps place it on a surface. Without it, the fruit may seem to float in space like a magical grocery item.
Overcomplicating the Details
Beginners sometimes try to add too many lines too soon. Start with the big shape. Add only the details that support the drawing.
Practice Exercises to Improve Fast
If you want to get better at drawing bananas quickly, try these simple exercises:
- Draw five bananas using only outline shapes
- Draw one banana from different angles
- Practice shading a banana with one clear light source
- Draw a bunch with three bananas, then with five
- Sketch a banana in under two minutes to loosen up
Repeating the subject helps more than drawing one perfect version. The goal is not to create the world’s most emotionally complex banana on day one. The goal is to build skill through observation and repetition.
Why This Tutorial Helps More Than Just Banana Drawing
When you learn how to draw a banana or banana bunch, you are also learning bigger drawing fundamentals. You are practicing contour, proportion, overlap, value, and form. Those same skills transfer to drawing leaves, flowers, hands, shoes, mugs, and other everyday objects.
That is why beginner drawing tutorials focused on simple subjects are so useful. They teach the eye and the hand to work together. Bananas may be humble, but the lessons they offer are surprisingly solid.
Extra Beginner Experiences: What It Really Feels Like to Learn to Draw a Banana
One of the funniest things about learning to draw a banana is how quickly your confidence can rise and fall within ten seconds. Before you begin, you think, “This is easy. It is literally one fruit.” Then you draw the first outline and suddenly your banana looks like a bent canoe. This is normal. In fact, it is practically part of the experience.
Most beginners discover that the hard part is not recognizing the banana. The hard part is noticing the tiny differences that make one drawing feel believable and another feel awkward. You start to realize the curve is not just a curve. The top edge and bottom edge change at different rates. The thickness is not the same all the way through. The stem is not just a rectangle stuck on the end. These small observations are where drawing skill begins to grow.
Another common experience is learning that slow looking beats fast guessing. Many beginners rush into details because details feel productive. But when you pause and study the object first, the drawing usually improves. You notice where the banana is widest, which side catches the light, and how the tip points slightly differently than you expected. That momentwhen you stop drawing from memory and start drawing from observationis a huge breakthrough.
There is also a confidence boost that comes from drawing the same subject more than once. Your first banana may feel clumsy. Your second may still be weird, but in a more sophisticated way. By the third or fourth, your hand begins to understand the rhythm of the shape. The lines get cleaner. The shading becomes more controlled. You stop fighting the form and start following it. That is a satisfying shift, and it happens faster than many beginners expect.
Drawing a banana bunch creates another level of growth. Suddenly you are thinking about overlap, spacing, and how objects relate to one another. You begin to see that good drawing is not just about one accurate shape. It is about how several shapes work together on the page. A bunch that feels balanced and dimensional can teach composition in a way a single object cannot.
There is also something pleasantly low-pressure about drawing fruit. Unlike portraits, fruit does not care if you get the nose wrong. Unlike architecture, fruit does not require ruler-straight precision. A banana is forgiving. It bends. It varies. It ages. It has spots. That makes it a fantastic subject for beginners who want real practice without the stress of perfection.
Over time, you may notice a funny side effect: you start looking at everyday objects differently. A banana on the kitchen counter becomes an arrangement of lines, planes, values, and edges. You notice reflected light, cast shadows, and subtle color changes. That change in perception is one of the best parts of learning to draw. You are not just making better pictures. You are learning to see more carefully.
So if your first banana looks odd, keep going. If your bunch looks like it is having an argument with gravity, keep going. Skill often arrives disguised as repetition. The more bananas you draw, the more your eye sharpens, your hand relaxes, and your drawings begin to feel alive. That is the real beginner experience: not instant perfection, but visible progress. And honestly, that is far more rewarding than one flawless piece of fruit.
Conclusion
Learning how to draw a banana or banana bunch is a fun and practical way to build beginner drawing skills. By starting with simple curves, shaping the form carefully, and adding shading with a clear light source, you can turn a basic fruit sketch into something lively and believable. A single banana teaches structure and softness. A banana bunch adds overlap and depth. Together, they make an excellent drawing exercise for anyone who wants to improve without feeling overwhelmed.
So grab a pencil, find a banana, and give yourself permission to draw a few goofy versions before the good one arrives. Art gets better the same way bananas ripen: gradually, quietly, and with a little character along the way.