Table of Contents >> Show >> Hide
- Why Crochet a Bag?
- Best Yarn for an Easy Crochet Bag
- Tools and Materials You Need
- Beginner-Friendly Stitches for Crochet Bags
- The Easiest Crochet Bag Method: Make a Rectangle
- How to Crochet a Bag with a Base
- How to Make Crochet Bag Handles
- How to Keep a Crochet Bag from Stretching
- Easy Crochet Bag Pattern for Beginners
- Design Ideas to Customize Your Crochet Bag
- Common Beginner Mistakes and How to Fix Them
- Care Tips for Crochet Bags
- Extra Experience Notes: What Actually Makes Crocheting a Bag Easier
- Conclusion
- SEO Tags
Learning how to crochet a bag easily is one of those craft goals that sounds ambitious until you realize the secret: a crochet bag is basically a rectangle, a circle, or a tube with confidence. Add handles, weave in the ends, and suddenly you have a handmade tote that looks like it came from a cute weekend market instead of your couch at 11:43 p.m.
The best part? A crochet bag does not require advanced wizardry. You do not need to know 47 stitches, own a yarn room, or understand why your cat believes every skein is a personal enemy. With the right yarn, a simple stitch pattern, and a practical construction method, beginners can make a sturdy, stylish crochet tote, market bag, purse, or everyday carryall.
This guide walks you through the easiest way to crochet a bag from start to finish. You will learn what materials to choose, which stitches work best, how to build the base, how to shape the body, how to make handles that do not stretch into jump ropes, and how to finish your bag so it survives real life.
Why Crochet a Bag?
A handmade crochet bag is useful, customizable, reusable, and oddly satisfying. Unlike a scarf that waits patiently for cold weather, a crochet tote can go grocery shopping, carry library books, hold beach snacks, or become your “I definitely have my life together” accessory.
Crochet bags are also perfect for practicing basic techniques. You repeat simple stitches, learn shaping, test gauge, join pieces, and finish edges. In one project, you get a mini crochet boot campwithout anyone yelling “drop and give me twenty single crochets.”
Best Yarn for an Easy Crochet Bag
The yarn you choose matters more than many beginners expect. Bags need structure. They carry weight. They rub against clothing. They may hold keys, phones, water bottles, snacks, and mysterious receipts from three months ago.
Cotton Yarn Is a Great Choice
For an easy crochet bag, cotton yarn is usually the most beginner-friendly option. Cotton is strong, washable, and less stretchy than many acrylic yarns. That means your bag is more likely to keep its shape instead of slowly becoming a hammock for your belongings.
Medium-weight cotton yarn, often labeled worsted weight or category 4, works well for tote bags and market bags. It is thick enough to create structure but not so bulky that your hands feel like they are wrestling a garden hose.
Bulky Yarn Works for Quick Bags
If you want a faster project, bulky yarn can make a cute handbag or chunky tote. A thicker yarn paired with a larger crochet hook creates a bag quickly, which is wonderful if your patience is currently stored in a very small container.
The trade-off is that bulky yarn can stretch or feel heavy, depending on the fiber. For a beginner bag, use bulky yarn for small purses, casual totes, or decorative bags rather than a grocery bag expected to carry potatoes like a tiny weightlifter.
Tools and Materials You Need
Before you begin, gather your supplies. Having everything nearby prevents the classic crafter’s cardio routine: stitch three rows, stand up, search for scissors, sit down, realize the tapestry needle is missing, repeat forever.
- Medium-weight cotton yarn, about 250 to 500 yards depending on bag size
- Crochet hook recommended on the yarn label, often 4.5 mm to 6 mm
- Stitch markers
- Tapestry needle for weaving ends and sewing seams
- Scissors
- Measuring tape
- Optional fabric lining
- Optional button, magnetic snap, zipper, leather handles, or D-rings
If you are brand new, keep the extras simple. A basic crochet tote with crocheted handles is enough. Fancy hardware can wait until your second bag, when you begin saying things like “I could totally make that” in craft stores.
Beginner-Friendly Stitches for Crochet Bags
You can crochet a bag using only basic stitches. In fact, simple stitches often create the strongest fabric.
Single Crochet
Single crochet creates a dense, sturdy fabric. It is excellent for the base of a bag, the bottom corners, and handles. If you want your phone to stay inside the bag instead of peeking through holes like a nosy neighbor, single crochet is your friend.
Half Double Crochet
Half double crochet is slightly taller than single crochet, so it works up faster while still offering decent structure. It is a great stitch for the body of a tote bag.
Double Crochet
Double crochet is taller and airier. It is useful for market bags or lightweight totes, especially when paired with chain spaces for a mesh effect. Use it when you want a flexible bag that expands at the farmers market.
Moss Stitch
Moss stitch, also called linen stitch, alternates single crochet and chain spaces. It creates a neat woven texture that looks polished but is surprisingly simple. It is ideal for beginners who want their bag to look “boutique” without needing boutique-level patience.
The Easiest Crochet Bag Method: Make a Rectangle
The simplest way to crochet a bag is to make one large rectangle, fold it, seam the sides, and add handles. This method is forgiving, customizable, and perfect for beginners.
Step 1: Choose Your Bag Size
Decide what kind of bag you want. A small purse might start as a rectangle about 10 inches wide and 20 inches long. A medium tote might use a rectangle about 14 inches wide and 28 inches long. A market bag may be larger and looser, especially if you want it to stretch around produce, yarn, or one emergency baguette.
Step 2: Make a Foundation Chain
Chain until your foundation is the desired bag width. For a medium tote, chain approximately 40 to 50 stitches with worsted cotton yarn and a 5 mm hook. Your exact number depends on your yarn, hook, and tension.
Do not panic if your chain looks like a nervous caterpillar. Many foundation chains relax after the first row.
Step 3: Crochet the Rectangle
Work rows of single crochet, half double crochet, or moss stitch until the piece is twice the desired bag height. For example, if you want the finished bag to be 14 inches tall, crochet until the rectangle is about 28 inches long.
Try to keep your edges straight. Count stitches every few rows, especially at the beginning. Beginners often accidentally add or lose stitches at row ends. Crochet is sneaky like that.
Step 4: Fold and Seam
Fold the rectangle in half with the right sides facing each other. Use a tapestry needle and matching yarn to sew the side seams. You can also slip stitch or single crochet the sides together for a visible decorative edge.
Leave the top open. This may sound obvious, but every crafter has had a moment. We respect the learning process.
Step 5: Reinforce the Top Edge
Turn the bag right side out. Crochet one or two rounds of single crochet around the top opening. This cleans up the edge and adds strength. If the top looks wavy, use a slightly smaller hook for the edging.
How to Crochet a Bag with a Base
If you want a tote that stands more neatly, start with a flat base instead of a folded rectangle. A simple oval base is one of the easiest options.
Step 1: Crochet a Starting Chain
Chain about 25 to 35 stitches, depending on the desired width. This chain becomes the center line of the base.
Step 2: Work Around the Chain
Single crochet into each chain across. At the end, work several single crochets into the final chain to curve around the end. Continue crocheting along the opposite side of the chain. This creates an oval.
Step 3: Increase at the Ends
For the next few rounds, increase only at the rounded ends. Keep the long sides even. After several rounds, you will have a flat oval base. This style works beautifully for market bags, beach bags, and everyday totes.
Step 4: Build the Body
Once the base is large enough, stop increasing. Crochet one stitch into each stitch around. The sides will begin to rise naturally. Congratulations: you have entered the “this is actually becoming a bag” stage.
How to Make Crochet Bag Handles
Handles are important because they take the most stress. A gorgeous bag with weak handles is basically a dramatic yarn bowl.
Option 1: Crochet Handles Directly Into the Bag
Mark where you want the handles on the front and back. Crochet around the top edge until you reach the first marker, then chain enough stitches to create a handle opening. Skip the same number of stitches on the bag and continue crocheting. Repeat on the other side.
On the next round, crochet into each chain to strengthen the handle. Work several rounds of single crochet around the top and handles. This method is easy and seamless.
Option 2: Make Separate Straps
For stronger handles, crochet separate straps using rows of single crochet. Make each strap the same length, then sew them firmly to the inside or outside of the bag. Stitch a square with an X through it at each attachment point if you want extra durability.
Option 3: Use Ready-Made Handles
Wooden, bamboo, leather, or faux leather handles can instantly upgrade a crochet bag. Attach them with crocheted tabs, yarn stitching, or metal rings. This is a smart choice if you want a handbag look rather than a soft market tote.
How to Keep a Crochet Bag from Stretching
Crochet fabric naturally has some give. That is lovely in a sweater and less lovely when your tote handle grows three inches while carrying oranges.
To reduce stretching, use cotton yarn, choose a smaller hook than usual for a tighter fabric, crochet dense stitches for the base and handles, and avoid overly loose tension. You can also add a fabric lining, especially if the bag will carry keys, books, makeup, or anything with corners.
A lining helps the bag hold its shape, prevents small items from slipping through stitch gaps, and protects the yarn from friction. It does not have to be complicated. A basic rectangle of cotton fabric sewn into a pouch and hand-stitched inside the bag works well.
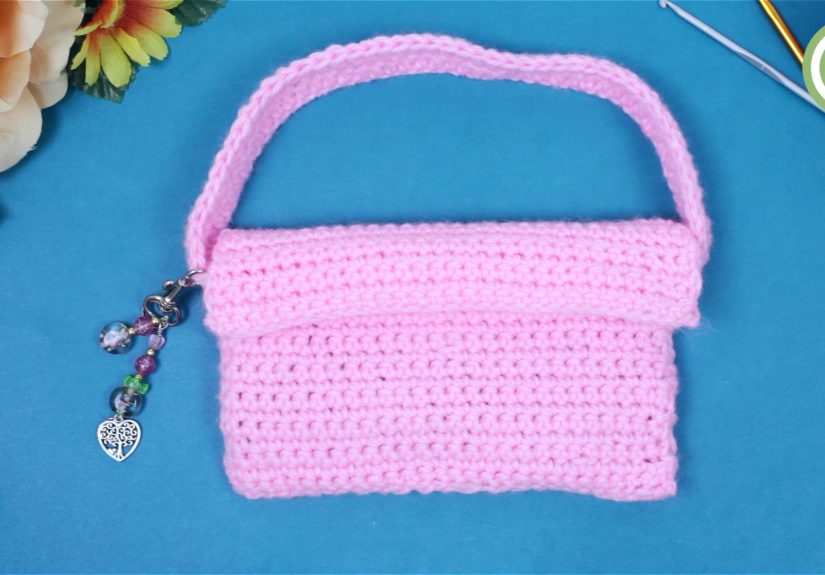
Easy Crochet Bag Pattern for Beginners
Here is a simple beginner-friendly crochet tote pattern you can adapt.
Finished Size
About 13 inches wide by 14 inches tall, not including handles.
Materials
- 300 to 400 yards worsted weight cotton yarn
- 5 mm crochet hook
- Stitch markers
- Tapestry needle
- Scissors
Pattern
Foundation: Chain 45.
Row 1: Single crochet in the second chain from the hook and in each chain across. Chain 1 and turn.
Rows 2–80: Single crochet in each stitch across. Chain 1 and turn. Continue until the rectangle measures about 28 inches long.
Seaming: Fold the rectangle in half. Seam both sides using a whipstitch, mattress stitch, slip stitch, or single crochet seam.
Top edge: Join yarn at one side seam. Single crochet evenly around the top opening. Join with a slip stitch. Repeat for two more rounds.
Handles: Mark the center 12 stitches on the front and back. On the next round, single crochet to the first marker, chain 30, skip 12 stitches, and single crochet to the next handle section. Repeat on the opposite side. On the following round, single crochet into each chain and each stitch around. Work two to three more rounds for strength.
Finish: Fasten off, weave in all ends, and lightly steam or block if needed. Do not iron acrylic yarn directly, and always check yarn care instructions first.
Design Ideas to Customize Your Crochet Bag
Once you understand the basic structure, you can customize your crochet bag in endless ways. Add stripes by changing colors every few rows. Use a contrasting color for the top edging. Make a granny square panel for a retro look. Add tassels if your bag seems like it wants to attend a music festival.
You can also change the stitch texture. Try moss stitch for a woven appearance, half double crochet for speed, or a mesh pattern for a lightweight market bag. For a beach tote, use breathable stitches and strong handles. For a purse, use tighter stitches and add a lining or closure.
Common Beginner Mistakes and How to Fix Them
The Bag Is Getting Wider or Narrower
You are likely adding or losing stitches at the row ends. Count your stitches regularly and use stitch markers in the first and last stitch of each row.
The Handles Stretch Too Much
Work handles in single crochet with tight tension. Consider crocheting around the handles several times or sewing fabric ribbon to the underside for hidden support.
The Bag Has Holes That Are Too Large
Use a smaller hook or switch to a denser stitch. Mesh is great for produce, but not ideal for lip balm, coins, or tiny objects with escape plans.
The Bag Looks Uneven
Blocking can help. Lightly wet or steam the bag according to the yarn label, shape it gently, and let it dry flat. For cotton bags, blocking often makes the finished piece look more professional.
Care Tips for Crochet Bags
Most cotton crochet bags can be hand washed or machine washed on a gentle cycle, depending on the yarn label. Place the bag in a mesh laundry bag if machine washing. Reshape it while damp and let it air dry.
Avoid hanging a wet crochet bag by the handles because the weight of the water can stretch them. Lay the bag flat on a towel instead. Treat handmade bags kindly, and they will reward you by carrying your stuff without complaining.
Extra Experience Notes: What Actually Makes Crocheting a Bag Easier
After making a few crochet bags, one lesson becomes very clear: the easiest bag is not always the smallest bag. Tiny purses can be fiddly because every stitch, seam, and handle placement is highly visible. A medium tote is often easier for beginners because the fabric has room to behave, the stitches are easier to see, and the final shape is more forgiving.
Another useful experience is to choose a yarn color you can actually see. Black cotton yarn may look chic, but crocheting with it at night can feel like stitching inside a cave while wearing sunglasses. Light neutrals, soft brights, and heathered shades make it easier to count stitches and spot mistakes early. Save the dramatic midnight yarn for later, when you and your hook have established trust.
It also helps to make a small test swatch before starting the bag. Many beginners skip this step because they want to get straight to the exciting part. Fair enough. But a swatch tells you whether your fabric is too loose, too stiff, or just right. For bags, you usually want a firm fabric. If the swatch flops like a tired pancake, go down a hook size. If it feels like cardboard with ambitions, go up a hook size.
When sewing the sides of a bag, take your time. Seams decide whether the bag looks handmade in a charming way or homemade in a “my rectangle had a disagreement” way. Use stitch markers or pins to line up the edges before sewing. Start at the bottom corners and check that both sides match. A neat seam can make a simple bag look polished, even if the stitch pattern is basic.
Handles deserve extra attention. The first time many people crochet a tote, they make the handles too long. Then the bag hangs near the knees, which is dramatic but not always practical. Before finishing, hold the bag against your shoulder and test the length. Remember that handles may stretch slightly with use, especially if the bag carries heavier items.
If you are adding a lining, do not overthink it. A lining does not need to impress a sewing judge. It simply needs to fit inside the bag and protect your belongings. Choose a cotton fabric, sew a basic pouch shape, tuck it inside, and hand stitch it just below the top edge. Even a simple lining makes the bag feel more finished and helps prevent stretching.
Finally, enjoy the imperfections. A crochet bag is a practical object, not a museum artifact guarded by tiny yarn security. If one stitch is slightly uneven, the bag will still carry groceries. If a stripe is a row taller than planned, call it a design feature. Handmade items have personality, and a crochet bag with personality is far more interesting than a plastic bag with a logo and emotional emptiness.
Conclusion
Crocheting a bag easily comes down to choosing strong yarn, using simple stitches, building a practical shape, and reinforcing the parts that handle stress. Start with a rectangle tote if you want the simplest path. Try an oval base when you are ready for more structure. Keep the handles sturdy, weave in ends carefully, and add a lining if your bag needs extra support.
Once you make one crochet bag, you will probably want to make another. That is normal. Crochet bags are useful, giftable, and endlessly customizable. They are also a wonderful reminder that a ball of yarn can become something practical, stylish, and proudly handmadeone stitch at a time.