Table of Contents >> Show >> Hide
- What Makes an Adirondack Chair Different?
- Best Wood for Building an Adirondack Chair
- Tools and Materials You Will Need
- Before You Cut: Choose a Plan and Make Templates
- Step-by-Step: How To Build an Adirondack Chair
- Step 1: Mill and Inspect the Lumber
- Step 2: Cut the Main Frame Pieces
- Step 3: Shape the Arms and Back Slats
- Step 4: Build the Two Side Assemblies
- Step 5: Connect the Sides With Stretchers
- Step 6: Install the Seat Slats
- Step 7: Attach the Back Supports
- Step 8: Install the Back Slats
- Step 9: Attach the Arms
- Step 10: Round Edges and Sand Everything
- Finishing Your Adirondack Chair
- Common Adirondack Chair Building Mistakes
- How Long Does It Take To Build an Adirondack Chair?
- How Much Does a DIY Adirondack Chair Cost?
- Maintenance Tips for a Long-Lasting Chair
- Design Ideas and Custom Upgrades
- Experience Notes: What Building an Adirondack Chair Teaches You
- Conclusion
- SEO Tags
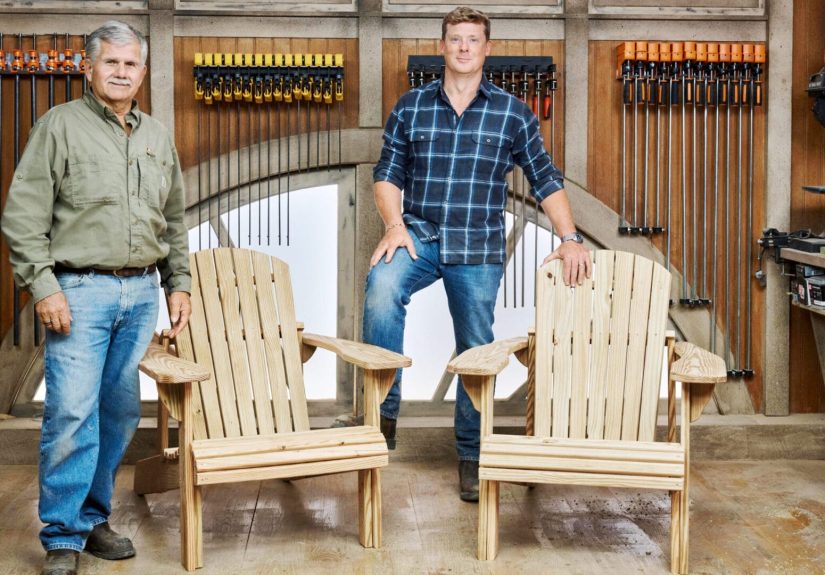
Few backyard projects say “I have officially upgraded my life” quite like learning how to build an Adirondack chair. It is the throne of porches, patios, lakeside cabins, fire pits, and any place where a cold drink and a lazy afternoon might accidentally turn into a three-hour nap. With its wide arms, reclined back, sloped seat, and classic outdoor silhouette, an Adirondack chair looks fancy enough to impress guests but is simple enough for a determined DIYer with basic tools, patience, and a healthy respect for measuring twice.
The beauty of a DIY Adirondack chair is that it is both practical and personal. You can build it from cedar for a warm natural look, paint it coastal blue, stain it dark walnut, or leave it rustic enough to look like it belongs beside a mountain cabin. This guide walks through the complete process: choosing wood, planning cuts, assembling the frame, shaping the seat and back, sanding, finishing, and avoiding the little mistakes that make a chair wobble like it has had one too many lemonades.
Whether you are building one chair for your deck or a matching set for a backyard fire pit, the steps below will help you create a sturdy, comfortable, good-looking Adirondack chair that can handle real outdoor use.
What Makes an Adirondack Chair Different?
An Adirondack chair is not just a regular outdoor chair with a dramatic posture. Its design is built around relaxation. The seat slopes downward toward the back, the backrest leans at a comfortable angle, and the arms are wide enough to hold a book, phone, snack plate, or suspiciously oversized glass of iced tea. Traditional versions sit low to the ground, while modern Adirondack chair plans often raise the seat slightly to make sitting down and standing up easier.
The most recognizable features include a slanted seat, tall back slats, broad armrests, outdoor-friendly construction, and a sturdy frame made from weather-resistant lumber. The shape looks simple, but small details matter. A few degrees of back angle can change the chair from “luxury cabin retreat” to “why does my spine hate me?” That is why using a printed template or carefully drawn pattern is worth the extra time.
Best Wood for Building an Adirondack Chair
For outdoor furniture, the wood matters as much as the design. Adirondack chairs live outside, where sun, rain, humidity, insects, and temperature swings all take their turn testing your craftsmanship. The best lumber choices are stable, durable, and reasonably easy to work with.
Cedar
Cedar is one of the most popular choices for a wooden Adirondack chair because it is lightweight, attractive, and naturally resistant to moisture, rot, and insects. Western red cedar is especially loved for outdoor furniture because it cuts cleanly, sands beautifully, and ages into a handsome gray patina if left unfinished. It is also forgiving for beginners, which is good news if your jigsaw skills are still in their “character-building” phase.
Redwood
Redwood is durable, beautiful, and excellent for outdoor furniture, though it can be more expensive or harder to find in some areas. Like cedar, it has natural weather resistance and looks great with a clear or semi-transparent finish.
Pressure-Treated Lumber
Pressure-treated lumber is budget-friendly and widely available. It works well for outdoor projects, but it is heavier and often wetter when purchased. Let it dry properly before painting or staining, and choose straighter boards whenever possible. Avoid warped boards unless you enjoy wrestling lumber in your driveway.
Pine or Fir
Pine and fir can be used if the chair will be painted and kept under partial cover. They are more affordable but need excellent sealing, priming, and maintenance because they are less naturally weather-resistant than cedar or redwood.
Tools and Materials You Will Need
You do not need a professional cabinet shop to build an Adirondack chair, but you do need accurate tools and a clean workspace. A beginner can complete this project with common garage tools, though a few upgrades make the job smoother.
Recommended Tools
- Jigsaw for curved parts and back slats
- Circular saw, miter saw, or table saw for straight cuts
- Drill and driver
- Countersink bit
- Clamps
- Tape measure and combination square
- Random orbital sander or sanding block
- Pencil, cardboard, or MDF for templates
- Safety glasses, hearing protection, and dust mask
Recommended Materials
- Outdoor-rated lumber such as cedar, redwood, or pressure-treated boards
- Exterior deck screws in common lengths such as 1 5/8 inch and 2 1/2 inch
- Stainless steel or coated exterior fasteners
- Exterior wood glue or waterproof construction adhesive
- Sandpaper in 80, 120, 180, and 220 grits
- Exterior primer and paint, penetrating exterior oil, or outdoor stain and sealer
Stainless steel screws cost more than basic screws, but they are a smart investment for outdoor furniture, especially with cedar or redwood. Cheaper fasteners can rust, stain the wood, or fail earlier. Nobody wants a chair that slowly disassembles itself while Uncle Dave is telling a barbecue story.
Before You Cut: Choose a Plan and Make Templates
A good Adirondack chair plan saves time, lumber, and frustration. You can draw your own pattern, but for your first build, a reliable template is the better choice. Adirondack chairs include angled seat rails, shaped arms, curved back supports, and slats that need to line up neatly. A template helps both sides match so the chair sits squarely.
If you plan to build more than one chair, transfer your paper pattern to thin plywood, cardboard, or 3/4-inch MDF. This lets you trace repeat parts quickly. It also prevents one chair from looking like it came from a boutique furniture shop and the next one from looking like it survived a tornado.
Label every template clearly: left rear leg, right rear leg, seat rail, arm, back support, back slat, and front leg. Mark screw locations and reference lines where parts overlap. This small organization step makes assembly much easier.
Step-by-Step: How To Build an Adirondack Chair
Step 1: Mill and Inspect the Lumber
Start by choosing the straightest boards you can find. Sight down the length of each board and avoid major twists, cracks, large knots near screw locations, or bowed boards that look like they are trying to escape. If using rough cedar, plane or sand it to a consistent thickness before layout. For standard store-bought boards, lightly sand rough faces before cutting.
Lay out all parts on the boards before cutting. This helps reduce waste and ensures the best-looking grain lands on visible areas such as arms and back slats. Keep knots away from narrow parts, curves, and screw holes whenever possible.
Step 2: Cut the Main Frame Pieces
Cut the rear legs, front legs, seat rails, lower back support, front stretcher, and side supports according to your plan. The rear legs often form part of the seat angle, so accuracy matters. Use a square to mark straight cuts and a jigsaw for curves. Cut just outside curved lines, then sand back to the line for a cleaner shape.
When two pieces need to match, cut one carefully and use it as a pattern for the second. Better yet, clamp both blanks together and sand their edges at the same time. Matching parts are one of the secrets to a chair that feels solid instead of “handmade in the most chaotic sense.”
Step 3: Shape the Arms and Back Slats
The arms are one of the most visible parts of an Adirondack chair, so take your time. Many designs use gently rounded front corners. You can trace a paint can, jar lid, or compass arc to create a smooth curve. Cut with a jigsaw, then sand the edges until they feel comfortable under your hands.
Back slats may be straight, tapered, rounded, or fan-shaped depending on your design. If your plan includes a curved top, arrange the slats side by side, mark the arc across the full group, then cut and sand. Number the slats on the back so they return to the same order during assembly.
Step 4: Build the Two Side Assemblies
Most Adirondack chair builds become easier when you assemble the left and right sides first. Attach the front leg to the seat rail, then attach the rear leg and side support according to the angle in your plan. Use clamps to hold parts in position before drilling.
Always predrill screw holes, especially near board ends. Predrilling reduces splitting, keeps screws aligned, and makes the final assembly look cleaner. Add exterior wood glue at structural joints if your plan calls for it, then drive exterior screws snugly. Do not overdrive them; burying screw heads too deeply weakens the surface and creates little water-catching craters.
Step 5: Connect the Sides With Stretchers
Stand both side assemblies upright and connect them with the front stretcher and lower rear crosspiece. This is the moment when your pile of lumber starts looking like furniture, so feel free to pause and admire it. Then check for square before the glue sets.
Measure diagonally from corner to corner. If the two diagonal measurements match, the frame is square. If they do not, gently shift the frame until they do. Clamp the assembly and tighten the screws. A square frame makes every later step easier, from seat slats to arms.
Step 6: Install the Seat Slats
Lay the seat slats across the seat rails, starting at the front. Leave small, even gaps between slats so rainwater can drain and the wood can expand slightly. A scrap piece of 1/4-inch plywood, a carpenter’s pencil, or a stack of washers can work as a spacer.
Predrill and countersink each screw hole. Secure the slats with exterior screws, checking that the front edge looks even. If your seat slats are curved, dry-fit them first and adjust the spacing until the seat feels natural. The goal is comfort, not a medieval interrogation device.
Step 7: Attach the Back Supports
The back supports set the recline angle and support the back slats. Attach the lower back rail first, then the upper support if your design uses one. The angle usually leans back enough for lounging but should not be so extreme that getting out of the chair requires a motivational speech.
Use clamps and temporary blocks to hold the back support in place while you test the angle. If you prefer a more upright chair, reduce the recline slightly. For a classic lounge feel, keep the deeper angle. For older users or anyone who wants easier exit, a slightly taller seat and more upright back can be more comfortable.
Step 8: Install the Back Slats
Place the center back slat first, aligning it with the middle of the seat and back support. Then add the remaining slats outward on both sides. Keep the spacing consistent at the bottom and adjust the fan shape at the top. Step back every few minutes to check the visual line; your eyes will catch uneven spacing faster than a ruler sometimes.
Once everything looks balanced, predrill and fasten the slats. If using cedar, be gentle with the driver. Cedar is soft, and a screw can sink too far before you realize it. A clutch setting on your drill helps prevent overdriving.
Step 9: Attach the Arms
The arms make the Adirondack chair famous, so mount them securely. They should sit level from side to side and feel stable enough to support light pressure. Attach them to the front legs and rear supports with exterior screws. Some plans use carriage bolts at key stress points for extra strength.
Check that the arms are comfortable and symmetrical. Sit in the chair carefully before final sanding. Your arms should rest naturally, and the chair should not twist, rock, or complain. If it does rock, check the leg bottoms and frame square before blaming your patio.
Step 10: Round Edges and Sand Everything
Sanding is where a good DIY Adirondack chair becomes a great one. Start with 80-grit paper to smooth saw marks and shape curves. Move to 120 grit for general smoothing, then 180 or 220 grit for touch surfaces such as arms, seat fronts, and back slats.
Round over sharp edges by sanding or using a router with a roundover bit. Outdoor chairs get used with bare hands, bare legs, swimsuits, shorts, and occasionally someone who flops down with the grace of a falling suitcase. Smooth edges make the chair safer and more comfortable.
Finishing Your Adirondack Chair
Finishing protects the chair from sun and moisture while giving it personality. Your best finish depends on the look you want and how much maintenance you are willing to do.
Paint
Exterior paint offers excellent protection when applied over a quality exterior primer. It is a smart choice for pine, fir, or pressure-treated lumber, and it gives you unlimited color options. White, navy, forest green, red, and soft gray are all classic Adirondack chair colors. Paint hides grain but provides strong UV and moisture protection.
Stain and Sealer
Exterior stain lets the wood grain show while adding color and weather protection. Semi-transparent stains are popular for cedar and redwood because they preserve the natural look. Reapply as needed based on exposure and climate.
Penetrating Oil
Penetrating exterior oil gives wood a natural appearance and is easier to refresh than film-forming finishes. It usually needs more frequent maintenance, but it does not peel like some surface coatings can.
Clear Varnish
Clear outdoor varnish looks beautiful at first but can require more maintenance because sunlight breaks down clear finishes faster than pigmented coatings. If you want a low-maintenance chair, paint or pigmented stain is usually easier to live with.
Common Adirondack Chair Building Mistakes
Skipping Pilot Holes
Outdoor lumber can split near the ends if screws are driven without pilot holes. Predrilling takes extra time but prevents ugly cracks and weak joints.
Using Interior Screws
Interior screws are not made for rain, humidity, and outdoor movement. Use stainless steel or coated exterior screws. Your future self will appreciate not seeing rust streaks running down your beautiful chair.
Ignoring Comfort Angles
Do not build only for looks. Seat height, seat slope, back angle, and arm height all affect comfort. If possible, test-fit the chair before final assembly and adjust the back or arms if needed.
Forgetting Drainage
Leave small gaps between seat slats and back slats. Water needs a way out. A chair that traps water will age faster, especially in wet climates.
Rushing the Finish
Finish all visible surfaces, end grain, and screw holes. End grain absorbs moisture quickly, so seal it well. Let paint, stain, or oil cure properly before putting the chair outside.
How Long Does It Take To Build an Adirondack Chair?
A beginner can usually build one Adirondack chair over a weekend. Cutting and assembly may take one full day, while sanding and finishing may take another day or more depending on drying time. If you make reusable templates, the second chair goes much faster. This is why many people start with one chair and somehow end up building six. Outdoor seating multiplies like rabbits once neighbors start complimenting it.
How Much Does a DIY Adirondack Chair Cost?
The cost depends on lumber, fasteners, and finish. A basic chair made from pressure-treated lumber can be very budget-friendly. Cedar or redwood costs more but offers better natural outdoor performance and a premium look. Stainless steel screws, exterior glue, and high-quality finish add to the upfront cost, but they improve durability.
Compared with buying a high-quality wooden Adirondack chair, building your own can save money, especially if you already own the tools. More importantly, you get control over the size, color, shape, and finish. Also, you get bragging rights, which are technically priceless.
Maintenance Tips for a Long-Lasting Chair
Once your Adirondack chair is built, a little maintenance will keep it looking good. Wash it occasionally with mild soap and water. Inspect screws once or twice a year and tighten any that loosen from seasonal wood movement. Refresh oil or stain when the surface looks dry or faded. If painted, touch up chips before moisture gets under the finish.
During winter or long rainy seasons, store the chair under cover if possible. If it stays outside year-round, place it where the legs are not sitting directly in mud or standing water. Patio stones, deck boards, or small furniture glides can help protect the leg bottoms.
Design Ideas and Custom Upgrades
Once you understand the basic build, you can personalize your Adirondack chair. Add a cup holder to one arm, build a matching footrest, make a taller version for easier sitting, or create a two-chair set connected by a small table. You can also round the back into a fan shape, use contrasting wood plugs, or paint each chair a different color for a cheerful patio set.
For a modern Adirondack chair, use straighter lines, square arms, and a more upright back. For a rustic cabin style, keep the curves generous and finish the wood with a warm exterior stain. For a coastal look, paint the chair white, blue, or sea-glass green. For a fire pit area, darker stain hides soot and dirt better than pale paint.
Experience Notes: What Building an Adirondack Chair Teaches You
Building an Adirondack chair is one of those projects that teaches more than the instructions promise. On paper, it looks simple: cut some boards, attach some screws, sand it smooth, and sit down like a victorious backyard monarch. In real life, the project quietly trains you in layout, patience, symmetry, comfort, and the ancient woodworking truth that a board can look straight in the store and reveal its villain origin story once you get home.
The first big lesson is that templates are worth the time. Many DIYers want to skip straight to cutting because cutting feels productive. But Adirondack chairs rely on matching curves and angles. If one rear leg is slightly different from the other, the chair may still stand, but it may also develop a tiny wobble that haunts you every time you sit in it. Making templates from cardboard or MDF feels slow at first, but it turns the rest of the project into a more relaxed process. You trace, cut, test, and repeat with confidence.
The second lesson is that comfort is built in small decisions. A quarter inch of seat spacing, a slightly rounded front slat, a softened arm edge, or a back angle that supports your shoulders can make the difference between a chair people admire and a chair people fight over. During assembly, it helps to temporarily clamp parts and sit carefully before final fastening. Yes, sitting in a half-built chair looks ridiculous. Do it anyway. The chair does not care about your dignity, and your lower back will thank you.
The third lesson is that sanding is not punishment; it is furniture therapy. Rough edges are easy to ignore while building, but they become obvious the first time someone rests an arm on the chair. Sand the arms until they feel like something you want to touch. Ease the seat edges so they do not press into the backs of your legs. Round the top of the back slats. These small details make the finished Adirondack chair feel handmade in the best possible way, not homemade in the “watch out for splinters” way.
The fourth lesson is that outdoor finishes require honesty. A natural cedar chair looks gorgeous, but it will change color outside. Paint gives stronger color and protection, but it needs good prep. Oil is easy to refresh, but it needs regular care. There is no magic finish that lets wood live outdoors forever without attention. Choose the finish that matches your maintenance personality. If you enjoy seasonal touch-ups, stain or oil can be satisfying. If you want bold color and longer intervals between maintenance, exterior primer and paint may be the smarter route.
Finally, building one Adirondack chair often creates a dangerous sense of confidence. You finish the first chair, sit down, and immediately think, “I could make another one faster.” This is true. It is also how a quiet Saturday becomes a full patio furniture production line. But that is part of the fun. A DIY Adirondack chair is more than outdoor seating; it is a practical project with a visible reward. Every time you sit in it, you get the small pleasure of knowing your own hands turned plain boards into the best seat in the yard.
Conclusion
Learning how to build an Adirondack chair is a rewarding woodworking project because it combines comfort, style, and usefulness in one classic piece of outdoor furniture. With the right lumber, exterior-rated fasteners, careful templates, patient sanding, and a durable finish, you can build a chair that looks great on a porch, patio, deck, garden, or fire pit area. The process is beginner-friendly but still satisfying for experienced DIYers because every detail matters, from the slope of the seat to the smoothness of the armrests.
Start with one chair, focus on accuracy, and do not rush the finish. Once you have built your first Adirondack chair, the next one will be faster, cleaner, and probably requested by someone who “just happened” to see yours. That is the hidden danger of good DIY furniture: success attracts orders.
SEO Tags
Note: Always verify measurements against your chosen Adirondack chair plan, wear proper safety gear, predrill screw holes, and test the chair carefully before full use.