Table of Contents >> Show >> Hide
- Why Flooring Success Starts Below the Surface
- Choosing the Best Flooring for Each Room
- Planning the Installation Like a Pro
- How Installation Usually Works
- Common Flooring Repairs and What They Usually Mean
- DIY or Hire a Professional?
- How to Make Your Floors Last Longer
- Real-Life Experiences With Home Flooring Installation and Repair
- Conclusion
Floors do a lot of heavy lifting. They handle muddy shoes, rolling chairs, dog zoomies, dropped spaghetti, and that one mystery scuff nobody in the house is willing to confess to. So when it comes to home flooring installation and repair, the smartest move is not just picking something pretty. It is choosing a floor that fits your room, your budget, your lifestyle, and your tolerance for future headaches.
A great floor starts long before the first plank snaps together or the first tile meets thinset. It starts with the subfloor, moisture conditions, room traffic, and a brutally honest question: “Am I doing this myself, or am I one bad cut away from calling a pro?” The good news is that modern flooring options make it easier than ever to get a polished result. Luxury vinyl plank has become the darling of busy households, laminate still offers strong style on a budget, tile remains a champion in wet zones, and hardwood keeps winning hearts because it ages with character instead of looking tired after a single holiday season.
This guide breaks down how to choose the right flooring, install it correctly, repair common problems, and avoid the classic mistakes that turn a weekend project into a dramatic three-week saga involving dust, regret, and takeout.
Why Flooring Success Starts Below the Surface
The visible floor gets all the glory, but the hidden layers decide whether your project lasts. A beautiful finish installed over an uneven, damp, squeaky, or damaged subfloor is basically a fancy outfit on a bad foundation. It may look great on day one and start complaining by month three.
Before any installation, inspect the existing floor and subfloor carefully. Look for sagging areas, soft spots, old adhesive buildup, cracked concrete, swelling near plumbing lines, and signs of past leaks. A floor can only be as stable as what sits underneath it. Skipping prep is one of the fastest ways to end up with popping planks, cracked grout lines, peaking seams, and a general sense that the house is mocking you.
Moisture is another major troublemaker. Concrete slabs, bathrooms, basements, kitchens, and entry zones can all introduce moisture that weakens adhesives, swells wood-based products, and shortens the life of flooring. That is why material compatibility matters so much. Some floors forgive a little humidity. Others react like they have just read a terrible online review about themselves.
Choosing the Best Flooring for Each Room
Hardwood and Engineered Wood
Hardwood remains the gold standard for warmth, resale appeal, and timeless style. It can be sanded and refinished, which gives it a long life when properly maintained. But solid hardwood is not ideal everywhere. Moisture-prone rooms like full bathrooms, laundry rooms, and some basements are risky territory.
Engineered wood is often a more flexible choice because it has a real wood surface over a layered core built for better dimensional stability. If you want the wood look without as much seasonal drama, engineered flooring is often the practical compromise. Think of it as hardwood’s calmer cousin.
Luxury Vinyl Plank and Luxury Vinyl Tile
Luxury vinyl flooring is wildly popular for a reason. It is durable, easier on the budget than hardwood, and often a strong fit for kitchens, mudrooms, family rooms, and basements. It handles splashes and routine messes better than many wood-based products, and many homeowners like the click-lock formats because they are relatively DIY-friendly.
That does not mean vinyl is invincible. Heavy furniture can dent it, poor prep can telegraph every bump underneath, and careless cleaning can weaken seams over time. Still, for households with kids, pets, traffic, and a habit of spilling coffee at the exact worst moment, vinyl is often a smart pick.
Laminate Flooring
Laminate flooring offers a wood-look finish with a hard wear layer that stands up well to everyday scuffs. It is often appealing for bedrooms, living rooms, hallways, and other dry areas where homeowners want style without premium pricing. Many systems are designed for floating installation, which speeds up the project.
Its biggest weakness is moisture. While some newer products advertise better water resistance, laminate still does best when spills are handled quickly and wet zones are approached with caution. Laminate is like that friend who is fun at brunch but terrible in a crisis.
Tile Flooring
Porcelain and ceramic tile are workhorses in bathrooms, laundry rooms, kitchens, and entryways. They resist water well, clean up easily, and come in everything from classic stone looks to bold modern patterns. Tile also wins on longevity when installed over a solid, properly prepared base.
The tradeoff is comfort and installation complexity. Tile is harder underfoot, colder in winter unless paired with radiant heat, and less forgiving during installation. If your subfloor moves, your tile may eventually complain through cracked grout or loose pieces.
Planning the Installation Like a Pro
Measure More Than Once
Accurate measuring is step one, not step optional. Measure each room, add waste for cuts and odd angles, and double-check transitions into closets, hallways, and adjoining spaces. Ordering too little flooring creates delays. Ordering too much is less tragic, especially if it leaves you with spare pieces for future repairs.
Let Materials Adjust to the Space
Some flooring materials need time to acclimate to room conditions before installation. This is especially important with wood and some laminate products. A box of flooring that has been sitting in a cold garage or a humid delivery truck does not magically become room-ready the moment it crosses your threshold.
Prep the Subfloor Ruthlessly
Clean, dry, flat, and structurally sound is the goal. Remove staples, scrape old adhesive, patch dips, fill cracks where appropriate, and correct squeaks before new flooring goes down. If a manufacturer calls for underlayment, moisture barrier, backer board, or membrane, follow that instruction instead of improvising with leftover materials from another project. Flooring products are not fond of creative reinterpretation.
Plan the Layout
A good layout prevents tiny slivers of flooring at the wall, awkward seams, and visual imbalance. Dry-lay a few rows if needed. Stagger plank ends for a natural look. In tile work, center the layout where it makes sense visually and make sure cuts at the perimeter do not look accidental. Flooring is part construction, part geometry, and part ego management.
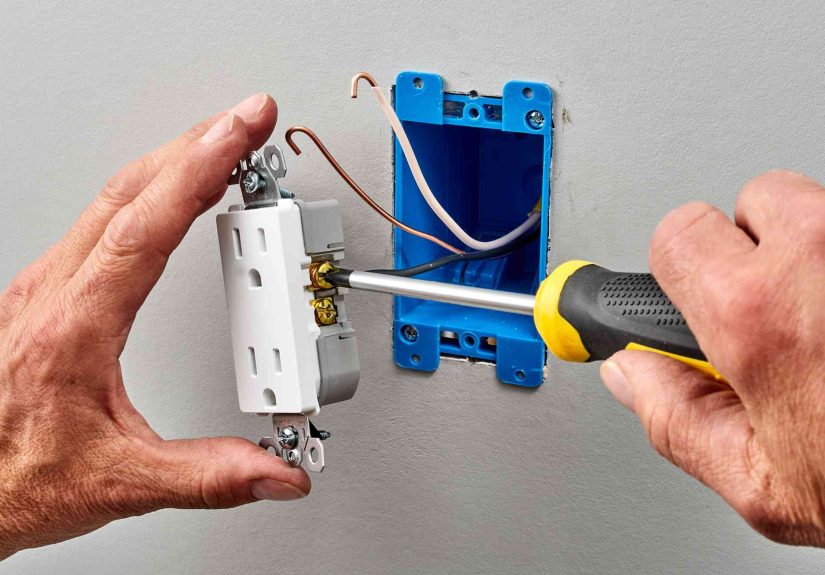
How Installation Usually Works
1. Remove Old Flooring Carefully
Take off baseboards or shoe molding if you plan to reinstall them. Pull carpet, scrape adhesive, and lift old planks or tiles without damaging the subfloor when possible. If the existing flooring is old enough to raise concern about asbestos, stop and assess before disturbing it. That is not the moment for bold improvisation.
2. Repair the Surface Underneath
Fix soft spots, replace water-damaged sections, tighten loose panels, and level low areas. In wood subfloors, squeaks can often be reduced by securing loose panels or boards. In concrete, patching and leveling are often essential before installing floating floors or tile.
3. Install the Correct Underlayment or Prep Layer
Depending on the flooring type, this may be foam underlayment, a moisture barrier, cement backer board, or a decoupling membrane. This layer is not glamorous, but it is often the difference between a floor that feels solid and one that sounds like a snack bag every time someone walks across it.
4. Install the Flooring System
Floating floors rely on locking edges and expansion space. Glue-down flooring depends on adhesive selection and spread rate. Nail-down hardwood needs the right fastener schedule and direction. Tile requires proper mortar coverage, spacing, and curing time. Different materials have different personalities, and they do not appreciate being treated interchangeably.
5. Finish the Edges and Transitions
Install transition strips where needed, reattach trim, and avoid pinning floating floors so tightly that they cannot move as designed. A clean finish at doorways, cabinets, vents, and stair edges is what separates “nice job” from “did something happen here?”
Common Flooring Repairs and What They Usually Mean
Scratches and Surface Wear
Minor scratches on hardwood can often be improved with touch-up products, blending pencils, or spot refinishing. Deeper damage may require sanding and refinishing, though engineered wood has less sanding room than solid hardwood. Vinyl and laminate can sometimes be disguised with repair kits, but severe damage often calls for plank replacement.
Gaps Between Boards or Planks
Gaps can show up from seasonal movement, poor installation, or subfloor issues. In hardwood, some seasonal movement is normal. In floating floors, gaps may indicate locking failure, debris in joints, or movement caused by an uneven base. Small problems can sometimes be corrected without tearing up the whole room. Large or recurring gaps usually point to a bigger underlying issue.
Squeaks
Squeaky floors usually mean movement somewhere below the finished surface. It could be subfloor panels rubbing, loose fasteners, or friction between structural components. Surface fixes can sometimes quiet the noise, but a durable repair often means addressing the movement itself from above or below.
Loose Tile or Cracked Grout
Loose tile rarely happens just because the tile woke up grumpy. Usually the cause is movement, poor mortar coverage, or moisture trouble. Replacing a single tile is possible if you have a matching spare. If several tiles are affected, investigate the substrate instead of playing endless whack-a-mole.
Lifting Vinyl or Damaged Laminate
Lifting edges, seam issues, bubbling, or warped sections often point to moisture, bad prep, or adhesive failure. In floating vinyl systems, a damaged plank can sometimes be swapped out. In glued products, repairs may be more involved. Laminate that has swollen from water exposure usually needs replacement, not wishful thinking.
DIY or Hire a Professional?
DIY installation makes sense when the room is straightforward, the material is DIY-friendly, and you are comfortable making precise cuts and following product instructions. Vinyl plank and many laminate systems are usually the easiest places to start. A simple bedroom is a better classroom than a complicated kitchen full of islands, transitions, and curves that seem designed by chaos itself.
Professional installation is often worth it for tile, large open areas, stairs, uneven subfloors, radiant heating systems, glue-down products, and any job where moisture conditions need serious evaluation. Hiring a pro can also protect your warranty if the product requires specific installation methods. Sometimes the smartest home improvement decision is knowing when not to turn your living room into a trade school.
How to Make Your Floors Last Longer
Installation matters, but maintenance is the long game. Use felt pads on furniture, clean spills quickly, keep grit off the floor with mats at entries, and follow care instructions for your specific material. Avoid over-wetting laminate and wood. Be cautious with harsh cleaners, steam, or abrasive scrubbing. The best repair strategy is often a boringly effective maintenance routine that prevents damage in the first place.
It also helps to save leftover flooring after installation. Store a few planks or tiles in a dry place. Future-you will be grateful when a repair calls for a perfect match and the original product has disappeared from stores like it entered the witness protection program.
Real-Life Experiences With Home Flooring Installation and Repair
The most useful flooring lessons often come from real houses, not showroom displays. One homeowner replaces old carpet in a bedroom with laminate and learns that the easy part is clicking the boards together. The hard part is discovering that the subfloor slopes just enough to create bounce near one wall. Suddenly the project becomes less about flooring and more about humility, leveling compound, and several trips to the hardware store. The result still looks great, but the real victory is learning that prep is not a side quest. It is the plot.
Another common story happens in kitchens. A family chooses luxury vinyl plank because they want something durable, affordable, and less stressful than hardwood around kids, pets, and everyday spills. The installation goes smoothly until the refrigerator has to move back in. That is when they realize flooring projects are also logistics projects. Appliances, door clearances, transitions into adjacent rooms, and baseboard details all matter more than they expected. Once finished, though, the room feels brighter, quieter, and easier to clean. Their biggest surprise is not the look. It is how much the new floor changes the way the whole house feels.
Bathrooms tell a different story. Many homeowners love the clean look of tile, but tile teaches patience. Spacing, layout, cuts around the toilet flange, mortar consistency, cure time, and grout cleanup can test even a motivated DIYer. Some people finish the job thrilled and ready to tile every surface in sight. Others decide by row three that tile installers deserve every dollar they charge. Both reactions are valid.
Repair experiences can be even more educational. A scratched hardwood floor may seem like a disaster until a homeowner learns that minor surface damage can often be blended well enough that only the person who caused it notices. A cracked tile in an otherwise healthy floor can be a manageable repair if spare tile exists. A loose plank in a floating floor may be a quick fix. But water damage is where optimism usually meets reality. Once moisture gets into the wrong material, replacement is often cleaner, faster, and more reliable than trying to save everything with hope and a fan.
There is also the emotional side of flooring work, which nobody mentions enough. Flooring projects are oddly personal. They are literally underfoot every single day. When the job is done well, people notice the room feels calmer, cleaner, newer, and somehow more “finished.” When the job is done poorly, every squeak, gap, and crooked cut becomes a tiny daily insult.
That is why the best flooring experiences usually have the same ingredients: realistic planning, the right product for the room, careful prep, and a willingness to slow down. Not glamorous, not flashy, but dependable. In home improvement, dependable is underrated. Floors are not supposed to be exciting after installation. They are supposed to disappear into daily life and quietly do their job. Honestly, that is a beautiful kind of success.
Conclusion
Home flooring installation and repair is part design decision, part technical process, and part common sense. The floor that works beautifully in a dry bedroom may fail in a damp basement. The product that looks like a bargain can become expensive if it is installed over a bad subfloor. And the repair that seems cosmetic may actually point to moisture, movement, or structural trouble underneath.
If you remember one thing, let it be this: good floors begin with good prep. Choose materials based on the room, respect the manufacturer’s installation method, address problems below the surface, and keep a few spare pieces for future repairs. Do that, and your floor has a much better chance of staying beautiful, sturdy, and blissfully uninteresting for years. Which, for a floor, is pretty much superstar status.