Table of Contents >> Show >> Hide
- Why a Paper Napkin Garland Is Such a Smart DIY
- Supplies You Need
- How to Make a Paper Napkin Garland: Step-by-Step Tutorial
- Budget Tips to Keep This Craft Truly Inexpensive
- Common Mistakes to Avoid
- Creative Ways to Use a Paper Napkin Garland
- How to Store and Reuse It
- Final Thoughts
- Real-Life Experiences With Making a Paper Napkin Garland
- SEO Tags
Note: This is HTML body content only, written for web publishing and intentionally presented without source links.
If your walls are looking a little too blank, your party table feels a little too “meh,” or your budget says “absolutely not” to expensive decor, a paper napkin garland is here to save the day. This simple DIY turns everyday paper napkins into soft, fluffy flowers or layered shapes that look far fancier than their price tag suggests. It is one of those magical crafts that makes guests think you spent all afternoon in a boutique craft studio, when really you were at the table with scissors, string, and a snack nearby.
The best part? This project is wonderfully forgiving. Your folds do not need to be perfect. Your flower edges do not need to be identical. And if one bloom comes out a little quirky, congratulationsyou have made it look handmade on purpose. A paper napkin garland is inexpensive, beginner-friendly, and easy to customize for birthdays, baby showers, bridal brunches, seasonal decorating, classroom parties, or a random Tuesday when your mantel needs a glow-up.
In this tutorial, you will learn how to make a beautiful paper napkin garland using affordable supplies, simple folding techniques, and a few styling tricks that make the final result look polished. I will also share budget tips, common mistakes to avoid, creative variations, and a longer section at the end about real-life experiences with this craft so your article has the extra depth you requested.
Why a Paper Napkin Garland Is Such a Smart DIY
There are a lot of reasons this craft wins the “cheap but charming” award. First, paper napkins are easy to find. You can grab solid colors, florals, stripes, seasonal prints, or cocktail napkins from grocery stores, craft stores, dollar stores, or the party aisle you swore you were “just browsing.” Second, they are already soft, lightweight, and easy to fluff, which makes them perfect for flower-style garlands. Third, because napkins come in coordinated colors and patterns, you can build a custom look without buying a dozen different specialty papers.
This project also works for many skill levels. If you can fold an accordion, trim a rounded edge, and tie a string in the middle of something, you are very much in business. Kids can help with folding or sorting colors, while adults can handle the cutting and final shaping. It is the kind of craft that feels easy enough for a casual afternoon but still delivers results pretty enough for photos, parties, and holiday decorating.
Supplies You Need
- Paper napkins, luncheon or cocktail size
- Twine, yarn, thin ribbon, or sturdy string
- Scissors
- Floral wire, thin craft wire, or pipe cleaners for tying the center
- Optional: hole punch, thumbtack, glue dots, or paper fasteners
- Optional: greenery, tassels, paper leaves, or mini tags for embellishment
For a fuller flower garland, solid-color napkins usually work best because they create a soft, layered look. Printed napkins can be gorgeous too, especially for spring or holiday decor, but bold patterns may hide some of the petal detail. If you want a more delicate, airy result, cocktail napkins are great. If you want bigger, puffier flowers, use larger luncheon napkins.
How to Make a Paper Napkin Garland: Step-by-Step Tutorial
Step 1: Pick Your Color Palette
Before you start folding anything, decide what kind of mood you want. Soft blush, ivory, and sage feel romantic. Red, pink, and coral feel festive. White and metallics look clean and elegant. Bright rainbow colors scream celebration in the best possible way. A simple trick is to use two or three main colors instead of seven random ones. That keeps the garland from looking chaotic, unless chaos is your theme, in which case I support you wholeheartedly.
For a balanced garland, try alternating light and dark napkins. You can also mix solid napkins with one subtle pattern. If your space already has a lot going on, keep the garland colors simple. If the room is neutral, let the garland do the talking.
Step 2: Cut Your String to Size
Measure the area where the garland will hang, then add extra length on both ends for tying or draping. A little extra slack is better than discovering your masterpiece is two inches too short and now living a life of disappointment. For a mantel, doorway, or headboard, a length of 6 to 8 feet is a good place to start. For a party backdrop, you can go longer or make several shorter strands.
If you want the flowers attached directly to the line, keep your twine or ribbon nearby while assembling each piece. If you prefer to make the flowers first and add them later, create all the blooms in a pile and thread them afterward.
Step 3: Stack and Accordion-Fold the Napkins
Open one or two napkins, depending on how full you want each flower. Stack them neatly. Then fold them accordion-style, back and forth, like a paper fan. Aim for folds around 1 inch wide. They do not need to be engineering-level accurate. Just try to keep them fairly even so the flower opens nicely.
If you want a fluffier bloom, use more layers. If you want something smaller and daintier, use fewer. You can also stack two colors together to create a two-tone flower. This is an especially pretty trick for baby showers, weddings, and spring decorating.
Step 4: Shape the Ends
Now comes the part that changes the flower’s personality. Trim both ends of the folded napkin stack into your preferred shape. Rounded ends create a soft peony-like bloom. Pointed ends make the petals look more dramatic. Scalloped edges add a playful feel. If you are not sure which style you like best, make one of each and hold them up. The craft will reveal its truth.
This tiny cutting step makes a huge difference. It is what turns “folded napkin lump” into “oh wow, that looks cute.” So do not skip it.
Step 5: Tie the Center
Fold the accordion stack gently in half to find the center. Wrap floral wire, thin craft wire, or a pipe cleaner around the middle and twist it snugly. Not “I am crushing the life out of this paper” tight, but secure enough that the layers do not slip apart. If you plan to attach the flower directly to your garland line, you can wrap the center around the twine or ribbon itself.
Another easy option is to make the flower first, then use the extra wire tail to attach it to the garland later. This method gives you more flexibility when spacing the flowers.
Step 6: Fluff the Petals
This is the most satisfying step and also the one that requires the most patience. Gently pull each layer upward and toward the center, one sheet at a time. Thin paper tears easily, so work slowly. Think “coax the petals open” rather than “wrestle them into existence.” Start with one side, then flip and repeat on the other side until the flower looks full.
If a petal rips a little, do not panic. Once the flower is hanging with the others, nobody will notice. In fact, slight imperfections often make paper flowers look more natural.
Step 7: Attach Flowers to the Garland
Now string the flowers onto your base line. If each flower already has wire at the center, simply twist that wire around the twine or ribbon. Space them evenly, usually about 3 to 4 inches apart for a fuller look, or farther apart if you want something lighter and more delicate. You can also group flowers in clusters and leave small gaps between each cluster for a more styled effect.
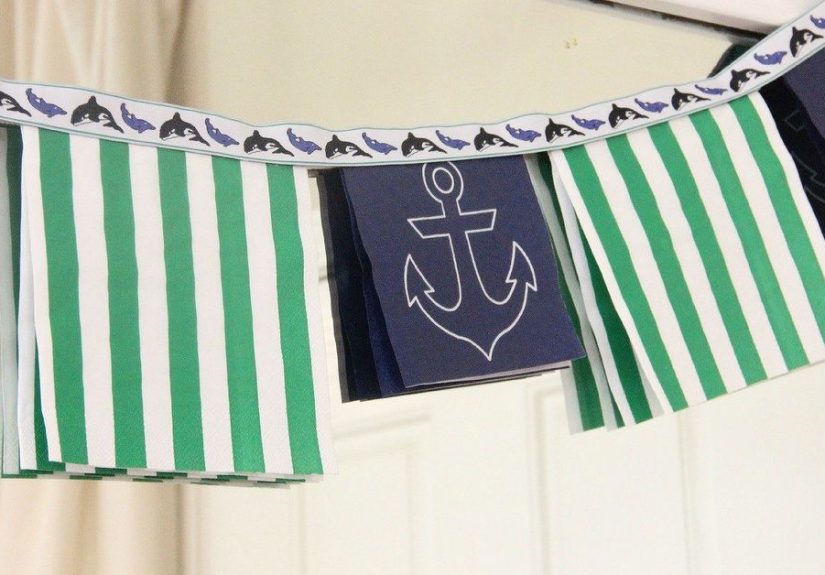
Want a different method? Try folding napkins over the garland string and securing them with tiny holes and paper fasteners. That creates a flatter, graphic garland style, which is especially cute if your napkins have bold prints or geometric patterns.
Step 8: Add Extra Details
Once the flowers are in place, step back and decide whether the garland needs embellishment. A few paper leaves can add contrast. Small tassels can make it feel more festive. Mini clothespins, tags, or tiny bells can give it seasonal flair. For a holiday version, weave in faux greenery. For a birthday version, add paper stars or circles. For a bridal shower, stick to elegant ribbon and soft neutrals.
The key is restraint. This garland is charming because it looks airy and handmade. Too many add-ons can make it feel bulky. Decorate like you are seasoning pasta: enough to make it interesting, not enough to create a crisis.
Budget Tips to Keep This Craft Truly Inexpensive
If the whole point is affordability, let us keep it that way. Shop the party aisle after holidays for discounted napkins in colors you can reuse. White napkins are always a safe bet because they work year-round and can be mixed with any accent color. Check dollar stores, clearance bins, or leftover entertaining supplies in your own kitchen before buying anything new.
You also do not need fancy twine or specialty ribbon. Basic yarn, cotton string, or thin ribbon from your gift-wrap stash will work. Pipe cleaners can stand in for floral wire. Scrap paper can become leaves. Even leftover gift tags can become cute decorative accents. This is the kind of project that rewards resourcefulness, not perfectionism.
Common Mistakes to Avoid
Using napkins that are too thick
Some paper napkins are heavily embossed or very stiff. Those can be harder to fluff and shape. Softer napkins usually work better.
Pulling the layers too fast
This is the easiest way to tear petals. Open the layers slowly and gently, especially near the center.
Making all the flowers the exact same size
A little variety adds charm. Mix larger blooms with a few smaller ones for a more natural, styled look.
Overcrowding the garland
It is tempting to add flower after flower until the line looks like a fluffy paper snake. Give the blooms some room so their shapes can be seen.
Creative Ways to Use a Paper Napkin Garland
- Hang it across a mantel for spring or Easter decor
- Use it as a party backdrop behind a dessert table
- Drape it over a bookshelf, mirror, or headboard
- Make mini versions for a child’s room or reading nook
- Wrap it around a doorway for birthdays and showers
- Layer it with greenery or string lights for holiday decorating
You can even make several strands and hang them vertically to create a floating floral curtain effect. It looks lovely in photos and adds a lot of visual impact without a lot of cost. That is basically the dream.
How to Store and Reuse It
Because paper napkin garlands are lightweight, they are easier to store than you might think. Lay the garland flat in a shallow box or wide bin. Avoid crushing the flowers beneath heavier decor. If the blooms flatten a little, you can usually re-fluff them with your fingers before rehanging. Store in a dry area away from moisture, because paper and humidity are not exactly best friends.
If you made the garland in neutral colors, you may be able to reuse it for multiple occasions. White, blush, ivory, and gold are surprisingly versatile. A garland made for brunch today can become baby shower decor next month and mantel decor later in the season. That is good decorating math.
Final Thoughts
An easy paper napkin garland is proof that lovely decor does not need to be expensive or complicated. With a stack of napkins, some string, and a little folding magic, you can create something soft, cheerful, and surprisingly stylish. It is one of the best low-cost craft projects because it is adaptable, beginner-friendly, and genuinely fun to make. Plus, the end result looks far more boutique than bargain-bin, which is always a satisfying plot twist.
If you want a DIY project that is fast enough for a weeknight, affordable enough for a tight budget, and pretty enough for a celebration, this tutorial is worth trying. Grab your favorite napkins, clear off the table, and prepare to become emotionally attached to paper flowers.
Real-Life Experiences With Making a Paper Napkin Garland
The first time I made a paper napkin garland, I expected a cute little craft and nothing more. What I got instead was one of those rare DIY wins that looks better in real life than it does in your imagination. That almost never happens. Usually the imagination is generous and the final craft looks like it needs “character.” But with paper napkin garlands, even the slightly messy versions tend to come out charming.
One thing I noticed right away is that this craft changes personality depending on where you make it and who helps you. Make it alone at a quiet table, and it feels oddly relaxing. The repetitive folding is simple enough to be calming, and fluffing the petals becomes a slow, satisfying process. Make it with friends or family, and it turns into one of those low-pressure group crafts where everyone talks, snacks, and debates whether rounded petals are superior to pointed ones. For the record, both are good. I believe in floral equality.
I have also learned that lighting matters more than people think. A paper napkin garland can look sweet in a craft pile, but once it is hung near a window, over a mantel, or behind a party table, the texture really comes alive. The thin paper catches light beautifully and creates shadows between the layers, which makes the whole thing look softer and more dimensional. In photos, especially, it gives that airy handmade look people often try to fake with expensive party decor.
There is also a practical side to the experience. This is one of the few decorations I have made where the cost stays low without the final result screaming “I was made for $6.” That is a valuable talent in a craft. I have seen expensive decor that looked less thoughtful than a napkin garland made from sale-bin supplies and leftover ribbon. It is hard not to feel a little smug in the best way when that happens.
Another honest observation: the first flower usually looks rough. The second looks better. By the fourth or fifth, you suddenly feel like a person who has opinions about petal volume. That learning curve is part of the fun. The project gets easier fast, which makes it especially good for beginners. You do not need to be naturally crafty. You just need five minutes, a decent pair of scissors, and the willingness to accept that the first bloom may be your “practice child.”
I also think this project works because it is flexible. Fancy brunch? Use ivory and blush. Kids’ birthday? Go bright and loud. Seasonal mantel? Try white and green, orange and rust, or soft pastels. The same basic folding technique works across all of them, which means you learn the method once and reuse it forever. That kind of craft is worth keeping in your back pocket.
Most of all, making a paper napkin garland feels cheerful. It is hard to explain, but lightweight paper flowers bring a kind of low-stakes joy. They are not trying too hard. They are not precious. They are just pretty, affordable, and fun. In a world of expensive decor trends and complicated tutorials, that is refreshing. Sometimes the best project is the one that uses ordinary materials, makes the room feel happier, and leaves you thinking, “Wait, why don’t I make these all the time?”