Table of Contents >> Show >> Hide
- Why Duplicate Contacts Happen on Android
- Before You Delete Duplicate Contacts: Back Up First
- Way 1: Delete or Merge Duplicate Contacts with Google Contacts
- Way 2: Delete Duplicate Contacts on Samsung Galaxy Phones
- Way 3: Manually Find, Review, and Delete Duplicate Android Contacts
- How to Stop Duplicate Contacts from Coming Back
- Common Problems When Deleting Duplicate Contacts on Android
- Real-World Experience: What It Is Actually Like Cleaning Duplicate Android Contacts
- Conclusion
Duplicate contacts on Android are like socks in the laundry: you do not know where they came from, but suddenly there are too many of them, and none of them seem to match properly. One “Mom” has a phone number, another “Mom” has an email address, and a third “Mom” is somehow saved under an old SIM card from 2017. It is not chaos, exactly. It is more like digital confetti.
The good news is that cleaning up duplicate contacts on Android is easier than it looks. You do not need to be a phone wizard, and you definitely do not need to spend your Saturday manually deleting every suspicious entry while questioning your life choices. Android gives you several practical ways to merge, delete, and organize duplicate contacts, especially if you use Google Contacts or a Samsung Galaxy phone.
In this guide, you will learn 3 ways to delete duplicate contacts on Android: using Google Contacts, using Samsung Contacts, and manually reviewing contacts when automatic tools miss something. You will also learn how to back up your contacts first, avoid losing important numbers, and keep your contact list from turning into a sequel called “Duplicate Contacts: The Return.”
Why Duplicate Contacts Happen on Android
Before deleting anything, it helps to understand why duplicate contacts appear in the first place. Android phones often pull contact information from several sources at once. Your Google account may sync contacts. Your SIM card may store older numbers. WhatsApp, Telegram, Outlook, work accounts, and device storage may also display contact details. When all of these sources pile into the same Contacts app, duplicates can appear.
Common causes of duplicate Android contacts include importing the same .VCF file more than once, switching phones, syncing multiple Google accounts, saving one person separately under device storage and Google Contacts, or restoring a backup that already contained older entries. Sometimes the phone is not “duplicating” contacts at all; it is simply showing the same person from different accounts.
That is why the best solution is not always to delete first. In many cases, merging duplicates is safer. Merging combines matching details into one contact, so you keep the phone number, email address, birthday, company name, photo, and notes in one place. Deleting, on the other hand, removes an entry. If that duplicate had the only working number, congratulations: you just made your phone book tidier and less useful at the same time.
Before You Delete Duplicate Contacts: Back Up First
Here is the boring but important part: back up your contacts before cleaning them. Yes, it sounds like the kind of advice people ignore right before disaster. But a contact backup can save you from accidentally deleting your dentist, your boss, your cousin, or that one repair guy who actually answers calls.
On most Android phones, you can export contacts to a .VCF file from the Contacts app. Open Contacts, go to Fix & manage or Organize, choose Export to file, select the account you want to export, and save the .VCF file somewhere safe, such as Google Drive, Downloads, or another cloud folder.
If your contacts are synced with Google, changes usually sync across devices signed in to the same Google account. That is convenient, but it also means a deletion on your phone may appear on your tablet, browser, or another Android device. A backup gives you a safety net before you start cleaning.
Way 1: Delete or Merge Duplicate Contacts with Google Contacts
The easiest method for most Android users is the Google Contacts app. It is clean, built into many Android phones, and especially useful if your contacts are saved to a Google account. Google Contacts can automatically detect possible duplicates and suggest merging them.
How to Use Google Contacts Merge & Fix
- Open the Contacts app on your Android phone or tablet.
- Check the profile icon or account selector to make sure you are viewing the correct Google account.
- Tap Fix & manage or Organize, depending on your app version.
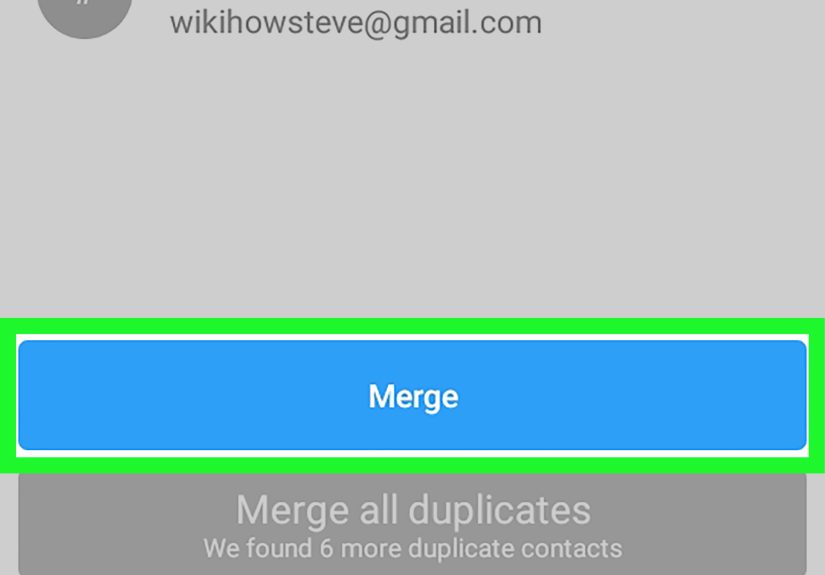
- Select Merge & fix.
- Tap Merge duplicates if the option appears.
- Review each suggestion carefully.
- Tap Merge for one duplicate or Merge all if you trust all suggestions.
If you do not see “Merge duplicates,” that usually means Google Contacts does not currently detect obvious duplicate entries in that account. It does not always mean your contact list is perfect. It simply means the automatic scanner did not find strong matches.
Why Merging Is Usually Better Than Deleting
Google Contacts focuses on merging because duplicate contacts often contain different pieces of useful information. For example, one entry may have your friend’s phone number, while another has their Gmail address and birthday. If you delete one too quickly, you may lose useful details. When you merge them, Android creates a cleaner contact card while preserving more information.
This method works best when the duplicates are obvious: same name, same phone number, same email address, or similar saved information. It is especially effective after switching phones, importing contacts, or syncing an older Google account.
When to Manually Delete in Google Contacts
Sometimes you do not want to merge. You want to delete. Maybe a contact is outdated, saved twice under different names, or belongs to an old account you no longer use. To delete a contact in Google Contacts, open the contact, tap the menu or contact settings icon, choose Delete, and confirm. For multiple contacts, touch and hold one contact, select the others, then delete them together.
Deleted Google contacts are usually moved to Trash before they are permanently removed. This is helpful if your thumb gets too confident and deletes the wrong person. If you catch the mistake within the recovery window, you can restore the contact from Trash.
Way 2: Delete Duplicate Contacts on Samsung Galaxy Phones
If you use a Samsung Galaxy phone, the Samsung Contacts app has its own built-in tools for duplicate contacts. Samsung’s method is slightly different from Google’s, but the goal is the same: find repeated names, numbers, or emails and combine them into cleaner contact cards.
How to Merge Duplicate Contacts on Samsung
- Open the Contacts app on your Samsung Galaxy phone.
- Tap the Menu icon, usually shown as three horizontal lines.
- Tap Manage contacts.
- Select Merge contacts.
- Choose whether to find duplicates by number, email, or name.
- Review the suggested duplicates.
- Select the contacts you want to combine.
- Tap Merge.
This is a strong option for Samsung users because it is built directly into the Galaxy contact experience. It is also useful when duplicates are stored in different places, such as Samsung account contacts, Google contacts, device contacts, or SIM contacts.
Deleting Duplicates Instead of Merging on Samsung
Some Samsung phones also include options for deleting duplicate contacts directly. The exact wording may vary depending on your phone model and software version, but the feature usually lives under Contacts > Menu > Manage contacts. If your phone offers a delete duplicate contacts option, review the list carefully before confirming.
Do not rush this step. A contact that looks like a duplicate may actually be a separate listing from another account. For example, “Alex Work” and “Alex Personal” may both belong to the same person, but you might want to keep them separate if they contain different numbers or notes. The “cleanest” contact list is not always the one with the fewest entries; it is the one that helps you find the right person quickly.
Samsung Contact Cleanup Tips
After merging duplicates, check which account is used as your default save location. If new contacts are saved randomly to Samsung account, Google account, device storage, and SIM card, duplicates can return. A simple habit helps: choose one primary account, preferably the one you actually use for backup and syncing, and save new contacts there consistently.
Way 3: Manually Find, Review, and Delete Duplicate Android Contacts
Automatic tools are helpful, but they are not mind readers. They may miss duplicates with nicknames, typos, old numbers, or different formatting. For example, “Jonathan Miller,” “Jon Miller,” and “J. Miller Office” could all be the same person, but your phone may not connect the dots. This is where manual cleanup becomes useful.
How to Manually Delete Duplicate Contacts
- Open your Contacts app.
- Use the search bar to search for a name, number, company, or email domain.
- Open each possible duplicate and compare the details.
- Move important information into the contact you want to keep.
- Delete the outdated or unnecessary duplicate.
- Repeat for common duplicate names, old SIM contacts, and imported entries.
This method takes more time, but it gives you the most control. It is ideal when duplicates are messy, such as one contact saved as “Mike Plumber,” another as “Michael Pipes,” and another as “Guy fixed sink.” Your phone cannot always understand your personal naming system, especially when your naming system was clearly invented during a household emergency.
Use Search Terms to Speed Up Manual Cleanup
Instead of scrolling through hundreds of contacts, search smartly. Try searching for repeated first names, old company names, “unknown,” email providers, or area codes. If you imported contacts from a SIM card, search for people you know were saved long ago. If duplicates came from a work account, search company names or work email domains.
You can also clean contacts from a browser by visiting Google Contacts on a computer. A larger screen makes it easier to compare names, phone numbers, and emails. This is especially useful if your contact list is large or if you need to edit many entries at once.
Be Careful with Third-Party Duplicate Contact Apps
There are third-party Android apps that scan, merge, back up, and delete duplicate contacts. Some can be helpful, especially for large contact lists. However, contacts are sensitive personal data. A contact list may contain names, phone numbers, emails, addresses, job titles, and notes. Before using any third-party cleaner app, check its permissions, reviews, developer reputation, privacy policy, and backup options.
For most people, Google Contacts and Samsung Contacts are enough. Third-party apps should be treated as optional tools, not the first stop. If an app asks for more access than seems reasonable, skip it. Your contacts deserve better than being handed to a mystery app wearing a fake mustache.
How to Stop Duplicate Contacts from Coming Back
Deleting duplicate contacts on Android is satisfying, but keeping them away is even better. The main trick is to control where contacts are saved and synced.
Choose One Main Contact Account
Pick one primary account for saving contacts. For many Android users, that will be a Google account. On Samsung phones, you may also have a Samsung account. Work accounts may appear too. The more places you save contacts, the more likely duplicates become.
When adding a new contact, check the “Save to” field. If it says device, SIM, Google, Samsung, or another account, choose the account you want to use long term. Consistency prevents future clutter.
Review Contact Display Settings
Some phones let you choose which contacts appear in the Contacts app. You may be able to show only Google contacts, only Samsung contacts, or contacts from all accounts. If duplicates appear after syncing, your phone may simply be displaying multiple sources. Adjusting display settings can make the list look cleaner without deleting anything.
Avoid Importing the Same Backup Twice
Importing a .VCF file is useful when moving phones, but importing the same file multiple times can create duplicates. After importing contacts, wait for sync to finish before importing again. If you are not sure whether the import worked, search for a few names first instead of immediately repeating the process.
Clean Up After Switching Phones
Phone upgrades are a classic duplicate-contact factory. You restore from Google, import from SIM, transfer from the old phone, and sign in to messaging apps. Suddenly, your contact list looks like it had a meeting and invited everyone twice. After setting up a new Android phone, run Merge & fix once, check your sync settings, and confirm that new contacts are being saved to the right account.
Common Problems When Deleting Duplicate Contacts on Android
“Merge Duplicates” Does Not Appear
If the merge option does not appear, your Contacts app may not detect duplicates in the selected account. Switch accounts using the profile icon and check again. Also make sure you are using the latest version of the Contacts app.
Duplicates Return After Deleting
If deleted contacts come back, another account or device may be syncing them again. Check all accounts connected to your phone. Look at Google, Samsung, Outlook, WhatsApp, work accounts, and SIM contacts. The duplicate may be restored from another source.
Contacts Are Missing After Cleanup
If contacts disappear after cleanup, check Trash or the recycle bin in your contact app. If the contacts were synced with Google, you may be able to restore deleted contacts within the available recovery period. This is another reason backing up first is worth the tiny effort.
Real-World Experience: What It Is Actually Like Cleaning Duplicate Android Contacts
Cleaning duplicate contacts sounds simple until you actually open your Contacts app and discover five versions of the same person. One has a phone number. One has an email. One has a photo from 2014. One is saved to your SIM card. One is saved as “Do Not Answer Maybe John,” which raises more questions than it answers.
In real use, the fastest cleanup usually starts with Google Contacts or Samsung Contacts. The automatic merge suggestions handle the obvious duplicates first, which gives you quick progress. That matters because contact cleanup is not exactly a thrilling weekend activity. Nobody wakes up thinking, “Today I will alphabetize my digital acquaintances.” A quick automatic merge makes the job feel less painful.
The biggest lesson is to avoid deleting too aggressively. At first glance, duplicates can look useless. But when you open them, you may find that one entry has an old phone number, another has a current email address, and another has a note like “met at conference” or “apartment repair.” If you delete without checking, you may lose context that is surprisingly helpful later.
A practical approach is to clean in layers. First, back up the contacts. Second, use Merge & fix or Samsung’s Merge contacts tool. Third, manually review only the messy leftovers. This saves time and reduces mistakes. It also makes the process less overwhelming because you are not trying to fix everything one contact at a time.
Another useful habit is checking the account attached to each contact. Many Android users do not realize they are saving some contacts to Google, some to device storage, some to Samsung, and some to SIM. That mixed setup works until you change phones or sync accounts. Then duplicates appear like mushrooms after rain. Choosing one default save location makes future cleanup much easier.
Manual cleanup is best done when you are not in a hurry. If you are waiting in line, half-asleep, or trying to multitask, do not start deleting contacts. That is how “Grandma” becomes “Trash” and panic becomes your evening plan. Use a larger screen if possible, especially through Google Contacts on a browser, because it is easier to compare details.
Finally, accept that a perfect contact list may not be necessary. The goal is not to create a museum-quality address book. The goal is to find the right person quickly, call or text without confusion, and avoid scrolling past three identical entries every time you need one number. If your contacts are accurate, searchable, and backed up, you have already won.
Conclusion
Deleting duplicate contacts on Android does not have to be a frustrating chore. Start with the safest option: back up your contacts. Then use Google Contacts Merge & fix if your contacts are saved to Google, or Samsung’s Merge contacts feature if you use a Galaxy phone. For stubborn duplicates, manually compare and delete entries after moving important details into the contact you plan to keep.
The best long-term fix is prevention. Save new contacts to one main account, avoid importing the same backup multiple times, and check your sync settings after changing phones. A clean contact list makes calling, texting, emailing, and searching easier. It also saves you from the awkward moment of texting the wrong “Chris,” which, depending on your life, may be a minor inconvenience or a full social emergency.