Table of Contents >> Show >> Hide
- What Is Mint Jelly?
- Why This Homemade Mint Jelly Recipe Works
- Ingredients for Homemade Mint Jelly
- How to Make Homemade Mint Jelly
- How to Can Mint Jelly Safely
- Refrigerator Mint Jelly Option
- Tips for the Best Mint Jelly
- How to Use Homemade Mint Jelly
- Flavor Variations
- Troubleshooting Homemade Mint Jelly
- Storage and Serving Tips
- My Kitchen Experience With Homemade Mint Jelly
- Conclusion
Homemade mint jelly is one of those old-fashioned kitchen treasures that looks fancy, tastes bright, and quietly proves that fresh herbs deserve more than a supporting role in iced tea. With fresh mint, sugar, lemon juice, and pectin, you can turn a handful of green leaves into a glossy, sweet-tart jelly that wakes up roast lamb, pork chops, biscuits, cheese boards, and even weeknight sandwiches that were previously living very beige lives.
This homemade mint jelly recipe is designed for real home cooks: no mystery steps, no culinary acrobatics, and no pretending that everyone owns a copper preserving pan inherited from a French grandmother. The method follows the classic jelly-making rhythm: steep the mint, strain the infusion, boil with sugar and acid, add pectin, jar it hot, and process it safely if you want shelf-stable jars.
The result is clean, refreshing, gently herbal, and much better than the neon-green store-bought version that somehow tastes like candy met toothpaste at a holiday buffet. You can add a drop or two of food coloring if you love that traditional green sparkle, but the natural version is usually pale golden-green and just as delicious.
What Is Mint Jelly?
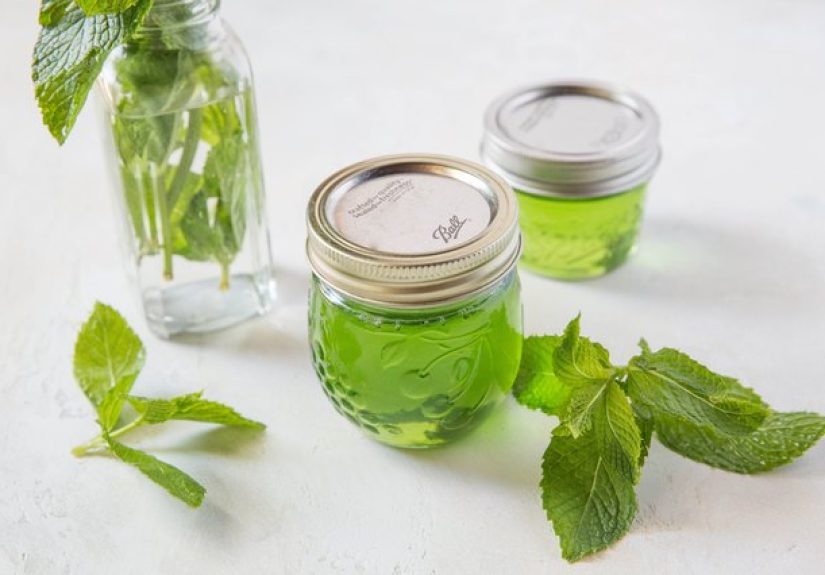
Mint jelly is a clear, sweet, herb-flavored jelly made from fresh mint infusion, sugar, acid, and pectin. Unlike jam, which contains crushed fruit, jelly is made from strained liquid, giving it that smooth, jewel-like texture. In this recipe, fresh mint leaves and tender stems are steeped in hot water to create a strong mint “tea,” then combined with lemon juice, sugar, and liquid pectin.
The flavor is sweet first, then lively and cooling, with enough acidity to keep it from tasting flat. Traditionally, mint jelly is served with roast lamb, but stopping there would be a terrible underuse of a very charming condiment. Try it with roasted chicken, grilled pork tenderloin, cream cheese and crackers, warm biscuits, or a sharp cheddar board. A spoonful also makes a surprisingly good glaze for carrots, peas, or roasted Brussels sprouts.
Why This Homemade Mint Jelly Recipe Works
The secret to great mint jelly is balance. Mint brings fragrance but very little natural pectin. Sugar adds sweetness and helps the jelly set. Lemon juice supplies acidity, which supports gel formation and brightens the flavor. Liquid pectin gives the jelly structure so it firms into a spoonable, spreadable consistency instead of becoming mint syrup with big dreams.
This recipe uses a tested-style ratio: fresh mint steeped in water, 1 3/4 cups strained mint infusion, 3 1/2 cups sugar, 2 tablespoons lemon juice, and one 3-ounce pouch of liquid pectin. That combination produces about three to four half-pint jars, depending on how much foam is skimmed and how generously you fill the jars.
Ingredients for Homemade Mint Jelly
Main Ingredients
- 1 1/2 cups firmly packed fresh mint leaves and tender stems
- 2 1/4 cups water
- 3 1/2 cups granulated sugar
- 2 tablespoons bottled or fresh lemon juice
- 1 pouch liquid pectin, 3 ounces
- 1 to 3 drops green food coloring, optional
Spearmint is the classic choice because it tastes fresh, sweet, and familiar. Peppermint can be used, but it is stronger and cooler, so the jelly may taste more like a dessert mint. Garden mint works beautifully as long as it is fresh, clean, and not sprayed with chemicals. Tender stems are fine because they hold plenty of aroma, but discard woody stems and any bruised, slimy, or yellow leaves.
Equipment You Will Need
- Large saucepan or preserving pot
- Fine mesh strainer, jelly bag, or damp cheesecloth
- Measuring cups and spoons
- Wooden spoon or heat-safe spatula
- Half-pint canning jars with two-piece lids
- Boiling-water canner or deep stockpot with rack
- Jar lifter, clean towel, and ladle
Use a pot larger than you think you need. Jelly boils dramatically once sugar and pectin join the party, and nobody wants to clean mint lava off the stovetop. Choose a wide, heavy-bottomed pot if possible, because it helps heat distribute evenly and reduces scorching.
How to Make Homemade Mint Jelly
Step 1: Prepare the Mint
Rinse the mint gently under cool running water. Shake off excess moisture, then roughly chop or crush the leaves and tender stems. Crushing matters because it releases the aromatic oils that give homemade mint jelly its fresh garden flavor. Think of it as politely waking the mint up before asking it to perform.
Step 2: Make the Mint Infusion
Place the chopped mint in a saucepan and add 2 1/4 cups water. Bring it quickly to a boil over medium-high heat. Once it reaches a boil, remove the pan from the heat, cover it, and let the mint steep for 10 minutes. The liquid should smell fresh and intensely herbal.
Strain the mixture through a jelly bag, damp cheesecloth, or a fine mesh strainer. Let it drip naturally for the clearest jelly. If you press hard on the mint solids, you may squeeze out extra flavor, but you may also cloud the jelly. Cloudy jelly still tastes good, so do not panic if your batch looks a little rustic. Rustic is just fancy for “I made this myself.”
Step 3: Measure the Infusion
Measure exactly 1 3/4 cups of strained mint infusion. If you are short, add a little water to reach the correct amount. If you have extra, save it for tea, lemonade, or a minty cocktail experiment that may or may not make you feel like a porch-sitting genius.
Step 4: Combine Mint Infusion, Sugar, and Lemon Juice
Pour the measured mint infusion into a large saucepan. Add 3 1/2 cups granulated sugar and 2 tablespoons lemon juice. Stir well. Place the pan over high heat and stir constantly until the mixture reaches a full rolling boil that cannot be stirred down.
A full rolling boil is not a few lazy bubbles around the edge. It is a vigorous boil across the surface, even while you are stirring. This moment is important because proper heat helps the sugar dissolve completely and prepares the mixture for the pectin.
Step 5: Add the Liquid Pectin
Stir in the full 3-ounce pouch of liquid pectin. Return the mixture to a full rolling boil and boil hard for 1 minute, stirring constantly. Set a timer. One minute is enough. Overcooking can weaken the gel, darken the color, and steal some of the mint’s fresh sparkle.
Remove the pan from the heat. Skim off foam with a spoon. If using food coloring, stir in one or two drops now. The coloring is optional and purely cosmetic. Natural mint jelly usually looks more golden than green, which is normal and, frankly, much less suspicious.
How to Can Mint Jelly Safely
For shelf-stable homemade mint jelly, use clean, hot, sterilized half-pint jars and two-piece canning lids. Ladle the hot jelly into hot jars, leaving 1/4 inch headspace. Wipe each rim with a clean damp towel, apply the lid, and screw the band on until fingertip-tight.
Process the jars in a boiling-water canner. For half-pint or pint jars, process for 5 minutes at elevations from 0 to 1,000 feet, 10 minutes from 1,001 to 6,000 feet, and 15 minutes above 6,000 feet. Keep the jars covered by boiling water during processing. When the time is complete, turn off the heat, remove the lid, let the jars rest briefly, then lift them onto a towel-lined counter.
Let the jars cool undisturbed for 12 to 24 hours. Check seals after cooling. A sealed lid should be concave and should not flex up and down when pressed in the center. Refrigerate any unsealed jars and use them first. Do not use wax or paraffin seals for mint jelly; modern guidance favors proper lids and boiling-water processing for safer, better-quality storage.
Refrigerator Mint Jelly Option
If you do not want to can the jelly, you can make it as a refrigerator jelly. Pour the hot jelly into clean heat-safe jars, let it cool, cover it, and refrigerate. Refrigerator mint jelly should be kept chilled and used within several weeks for best quality. This is a good choice if you are making a small batch for a holiday dinner, a Sunday roast, or a cheese board that needs a little green personality.
Tips for the Best Mint Jelly
Use Fresh, Fragrant Mint
Fresh mint should smell lively as soon as you rub a leaf between your fingers. If it smells dull, grassy, or musty, the jelly will taste dull too. Store fresh mint in the refrigerator wrapped in a damp paper towel or standing in a jar of water like a tiny edible bouquet. Use it while the leaves are bright and perky.
Do Not Reduce the Sugar in a Standard Pectin Recipe
Regular pectin recipes are designed with specific sugar levels. Reducing sugar may prevent the jelly from setting properly. If you want a low-sugar mint jelly recipe, use a pectin specifically labeled for low- or no-sugar recipes and follow that product’s directions. Regular pectin is not in the mood to improvise.
Measure Accurately
Jelly making is part cooking, part chemistry. Measure the mint infusion, sugar, acid, and pectin accurately. Guessing may work for soup, but jelly remembers every shortcut. Too much liquid can make a soft set; too little acid can dull the flavor; too much cooking can break down the gel.
Make One Batch at a Time
Doubling jelly recipes often causes problems because the mixture may not heat evenly or reach the proper concentration at the right time. If you want more jars, make separate batches. Yes, it takes a little longer, but it beats producing a gallon of mint pancake syrup by accident.
How to Use Homemade Mint Jelly
The classic pairing is roast lamb, and for good reason. Lamb has a rich, savory flavor, while mint jelly brings sweetness, acidity, and herbal freshness. But homemade mint jelly is more versatile than many people realize. Brush it over grilled pork chops during the last few minutes of cooking. Spoon it beside roasted chicken. Melt a little with vinegar and olive oil for a quick glaze. Add it to a cheese board with goat cheese, cream cheese, brie, or sharp cheddar.
For breakfast, spread mint jelly on biscuits, toast, or English muffins. For appetizers, spoon it over cream cheese and serve with crackers. For vegetables, toss a teaspoon with buttered peas or glazed carrots. For desserts, use it sparingly between layers of chocolate cake or as a surprise filling for thumbprint cookies. Mint and chocolate are already best friends; this jelly simply introduces them in a more grown-up outfit.
Flavor Variations
Apple Mint Jelly
Replace part of the mint infusion with unsweetened apple juice for a softer, fruitier jelly. Apple pairs naturally with mint and gives the finished jelly a rounder flavor. This variation is lovely with pork, biscuits, and holiday leftovers.
Pepper Mint Jelly
Add a small amount of finely minced jalapeño or a pinch of crushed red pepper for gentle heat. Keep the amount modest so the mint remains the star. Pepper mint jelly is excellent with cream cheese, grilled chicken, and snack boards.
Extra-Lemon Mint Jelly
Add a little finely grated lemon zest during the steeping stage for a brighter citrus note. Strain it out with the mint solids. This version tastes especially fresh with fish, roast chicken, or spring vegetables.
Troubleshooting Homemade Mint Jelly
Why Did My Mint Jelly Not Set?
Soft jelly usually comes from inaccurate measuring, old pectin, reducing sugar, under-boiling after adding pectin, or making too large a batch. Give the jars 24 hours before judging the set. Some jellies firm as they cool completely. If it remains loose, use it as mint syrup for tea, lemonade, cocktails, pancakes, or glazing meat. A failed set can still live a meaningful life.
Why Is My Jelly Cloudy?
Cloudiness may happen if the mint solids were squeezed hard during straining or if the mixture was disturbed too much. It is usually a quality issue, not a safety issue, assuming the recipe was followed and the jars were processed correctly. For clearer jelly, let the infusion drip slowly through damp cheesecloth without pressing.
Why Is My Mint Jelly Not Bright Green?
Natural mint jelly is often pale yellow, light gold, or faintly green. The vivid green color many people expect usually comes from food coloring. Add a drop or two if you like the traditional look, or skip it for a more natural homemade appearance.
Storage and Serving Tips
Properly processed and sealed mint jelly should be stored in a cool, dark, dry place. For best flavor and color, use it within one year. Once opened, refrigerate the jar and use a clean spoon each time. If you notice mold, off odors, gas bubbles, leakage, or a damaged seal, discard the jar. Homemade preserves are delightful, but they are not worth arguing with your stomach.
Serve mint jelly chilled, room temperature, or gently warmed depending on the dish. For roast meats, room temperature or slightly warmed jelly spreads more easily. For cheese boards, chilled jelly holds its shape and looks beautiful spooned into a small bowl.
My Kitchen Experience With Homemade Mint Jelly
The first time I made homemade mint jelly, I expected a calm little project. After all, it is mostly leaves and sugar. How dramatic could it be? Then the pot hit a full rolling boil and rose like it had just remembered an urgent appointment. Lesson one: use a big pot. A very big pot. Jelly is polite in jars but theatrical on the stove.
The best batches I have made started with mint picked early in the day, before the leaves had been bullied by afternoon heat. Freshly harvested mint has a cleaner aroma, almost sparkling, and that freshness carries into the finished jelly. If you are buying mint from the grocery store, open the bunch and smell it before using. If it smells like a garden after rain, wonderful. If it smells like a wet paper bag with ambition, choose another bunch.
I also learned that patience during straining pays off. My impatient side wants to squeeze the cheesecloth like it owes me money. That does produce more liquid, but it can make the jelly cloudy. When I let the infusion drip on its own, the finished jelly looks clearer and more elegant. Still, if you are cooking for family and not entering the county fair, cloudy jelly is not a disaster. People will be too busy eating it with biscuits to complain.
Another experience worth sharing: do not judge the flavor while the jelly is boiling hot. At that stage, the sugar dominates and the mint can seem shy. Once the jelly cools, the mint steps forward and the lemon sharpens the edges. By the next day, the flavor is usually smoother and more balanced. Homemade mint jelly is like a guest who needs a few minutes to settle in before becoming delightful.
Food coloring is a personal decision. I have made batches with no coloring, one drop, and the full “classic green” treatment. The natural batch looked honey-gold and tasted beautiful. The lightly tinted batch looked most like what people expect. The very green batch made everyone smile because it looked cheerful and slightly retro, like it belonged beside a holiday ham and a casserole with crushed crackers on top. Choose the look that makes you happy.
My favorite way to use homemade mint jelly is not actually with lamb, although that pairing is famous for a reason. I love it spooned over a block of cream cheese with cracked black pepper and served with buttery crackers. It takes two minutes and somehow disappears faster than appetizers that require chopping, roasting, drizzling, and emotional commitment. I also like brushing a little over pork tenderloin during the final minutes of roasting. The sugar caramelizes, the mint stays bright, and dinner suddenly tastes like you planned harder than you did.
If you grow mint, this recipe is also a delicious form of garden management. Mint can spread with alarming confidence, as if it has signed a lease on your entire yard. Turning it into jelly is one of the most satisfying ways to reclaim control. You trim the plant, fill jars, and end up with gifts that look thoughtful instead of desperate. Tie a ribbon around a jar, add a tag that says “Homemade Mint Jelly,” and people will assume you are organized. Let them believe it.
Most of all, homemade mint jelly reminds me that preserving does not have to be complicated to feel special. A few cups of herbs, a little sugar, a splash of lemon, and a pouch of pectin become something bright, useful, and giftable. It is the kind of recipe that makes your kitchen smell alive and gives future meals a secret weapon hiding in the pantry.
Conclusion
Homemade mint jelly is simple, classic, and far more versatile than its reputation suggests. With fresh mint, sugar, lemon juice, and liquid pectin, you can create a glossy jelly that tastes clean, bright, and garden-fresh. Serve it with lamb if you love tradition, but do not stop there. Try it with pork, chicken, cheese, biscuits, vegetables, and appetizers that need a little sweet herbal sparkle.
The key is to follow the recipe carefully: measure the mint infusion, use the full amount of sugar for standard pectin, boil hard for the right amount of time, and process jars properly if you want shelf-stable preserves. Once you master the basic homemade mint jelly recipe, you can experiment with apple, lemon, or pepper variations. It is a small-batch kitchen project with big payoffand a very pleasant way to turn fresh mint into something that lasts.