Table of Contents >> Show >> Hide
- Before You Carve: Let the Turkey Rest
- Tools You Need for Easy Turkey Carving
- Set Up the Turkey for Carving
- How to Carve a Turkey Step by Step
- Common Turkey Carving Mistakes to Avoid
- How to Keep Carved Turkey Warm
- White Meat vs. Dark Meat: How to Serve Both Well
- How Much Turkey Should You Carve at First?
- Best Sauces and Sides for Carved Turkey
- Experience Notes: What Turkey Carving Teaches You in Real Kitchens
- Conclusion: Carve with Confidence, Not Panic
Carving a turkey can feel like the final boss of Thanksgiving dinner. You have roasted, basted, checked the temperature, survived the side-dish traffic jam, and now everyone is staring at the bird like it is a delicious golden trophy. The good news? Learning how to carve a turkey is not nearly as dramatic as it looks. You do not need a culinary degree, a sword, or the confidence of a TV chef wearing a crisp apron. You need a rested turkey, a sharp knife, a sturdy board, and a simple plan.
This step by step turkey carving guide will walk you through the whole process: when to carve, what tools to use, how to remove the legs and wings, how to slice turkey breast neatly, how to separate dark meat, and how to arrange everything so the platter looks intentional instead of “someone wrestled a bird and lost.” Whether you are carving a Thanksgiving turkey, a Christmas turkey, or a Sunday roast that got promoted to holiday status, the method is the same: work with the bird’s natural joints, slice cleanly, and let the meat tell you where to cut.
Before You Carve: Let the Turkey Rest
The first rule of turkey carving is simple: do not rush the bird. After the turkey comes out of the oven, let it rest for about 20 to 30 minutes before carving. Resting gives the juices time to settle back into the meat, which helps keep each slice moist instead of sending all that flavor onto the cutting board. It also makes the turkey easier to handle because a blazing-hot bird is not exactly friendly to fingers.
Food safety still matters here. A whole turkey should reach a safe internal temperature of 165°F in the thickest parts before it is served. Use a reliable food thermometer and avoid touching bone when checking the temperature. The color of the meat is not enough to prove doneness. A turkey can look beautifully browned and still need more time, which is why the thermometer is the calm, practical friend every holiday kitchen needs.
Tools You Need for Easy Turkey Carving
You do not need a professional carving station. A few dependable tools will do the job beautifully:
- A sharp chef’s knife or carving knife: Sharp is more important than fancy. A dull knife tears the meat and makes carving harder.
- A large cutting board: Choose one with a juice groove if possible. Turkey juices have a talent for escaping.
- Kitchen shears: Helpful for cutting twine or trimming skin.
- A carving fork or clean towel: Use it to steady the turkey without poking the meat repeatedly.
- A warm serving platter: This keeps slices looking good and tasting better.
- Paper towels: Useful for gripping slippery pieces and cleaning as you go.
An electric knife can work, especially for breast slices, but it is not required. In fact, many home cooks get cleaner results with a sharp chef’s knife because it gives more control. Think smooth strokes, not sawing like you are building a log cabin.
Set Up the Turkey for Carving
Place the turkey breast-side up on the cutting board with the legs facing you. Remove any kitchen twine from the legs and take out the stuffing if you cooked stuffing inside the bird. If there are large puddles of juice, carefully pour them into a bowl or gravy pan. Those drippings are liquid gold, and wasting them would be a holiday tragedy.
If your turkey was presented whole at the table for the “wow” moment, great. Smile, accept compliments, and then take it back to the kitchen to carve. Carving in the kitchen is easier, safer, and much less stressful than trying to perform surgery in front of Aunt Linda while someone passes cranberry sauce behind your elbow.
How to Carve a Turkey Step by Step
Step 1: Remove the Leg Quarters
Start with one leg. Slice through the skin between the breast and the thigh. Once the skin is open, gently pull the leg away from the body. You will see the natural separation between the thigh and the breast. Bend the leg outward until the joint pops or loosens. Then guide your knife through the joint. If you hit hard bone, stop and adjust the angle. The right spot should cut with surprisingly little resistance.
Repeat on the other side. Now you have two leg quarters, each made up of a drumstick and thigh. Set them aside on the board or platter while you work on the rest of the bird.
Step 2: Separate the Drumsticks from the Thighs
Place one leg quarter skin-side down on the cutting board. Look for the natural seam between the drumstick and thigh. Cut through that joint, not through the bone. Again, if your knife is fighting you, you are probably not in the joint. Move slightly and try again.
The drumsticks can go straight to the platter. For the thighs, remove the bone if you want easy serving. Run the knife along both sides of the thigh bone, lift it out, and slice the thigh meat into thick, juicy pieces. Dark meat is forgiving, rich, and full of flavor, so do not hide it in a corner like a backup singer. Give it a proud place on the platter.
Step 3: Remove the Wings
Pull each wing away from the body and cut through the joint where it connects to the breast. Wings are smaller and can be a little awkward, but the same rule applies: follow the joint. Some cooks serve the wings whole; others save them for stock. Either way, do not forget them. A turkey wing left behind on the carcass is basically a snack waiting to happen.
Step 4: Remove the Breast Meat
Now it is time for the part everyone notices: the turkey breast. There are two main ways to carve turkey breast. The first is slicing directly on the bird. The second, and often cleaner method, is removing each breast half first and slicing it on the cutting board. For neat, restaurant-style slices, remove the breast meat first.
Find the breastbone running down the center of the turkey. Place your knife on one side of the breastbone and cut down along it. Follow the curve of the rib cage, using long, smooth strokes. Let the bones guide the blade. As the breast meat loosens, gently pull it away with your hand or carving fork while continuing to cut along the carcass. When you reach the wing joint area, release the breast completely.
Repeat on the other side. You should now have two whole turkey breast halves ready for slicing.
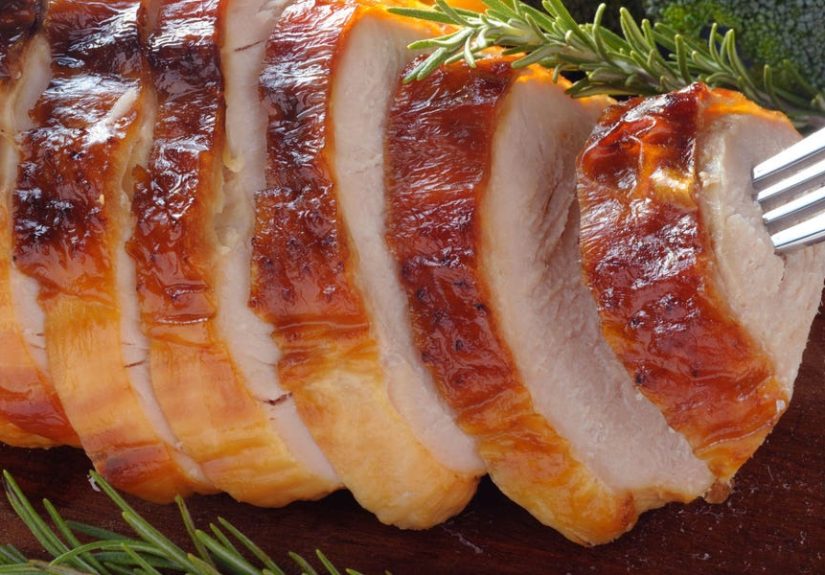
Step 5: Slice the Turkey Breast Against the Grain
Place one breast half skin-side up on the cutting board. Slice crosswise into even pieces, about 1/4 to 1/2 inch thick. Cutting against the grain shortens the muscle fibers, making each bite more tender. Keep the crispy skin attached as much as possible because turkey skin is not decoration; it is a reward.
Use smooth, confident strokes. Do not press too hard. If the knife is sharp, it will glide through the meat. After slicing, slide the knife or a spatula under the slices and transfer them to the platter in a neat, slightly overlapping row. This creates that beautiful “holiday magazine cover” look without needing tweezers or food-styling wizardry.
Step 6: Arrange the Turkey on a Platter
Presentation matters, but it does not need to be fussy. Place the sliced breast meat in the center or along one side of the platter. Arrange drumsticks and wings around the edges. Add sliced thigh meat in a separate section so guests can choose white meat, dark meat, or a little of both.
For a polished finish, garnish with fresh herbs, citrus halves, roasted garlic, or small clusters of grapes. Keep it simple. The turkey is the star; the garnish is just there to make the platter look like it has its life together.
Common Turkey Carving Mistakes to Avoid
Carving Too Soon
Cutting into the turkey immediately after roasting is one of the fastest ways to lose moisture. The juices need time to redistribute. Rest the bird first, then carve.
Using a Dull Knife
A dull knife does not slice; it shreds, squashes, and causes frustration. Sharpen your knife before dinner day or use a well-maintained carving knife.
Trying to Cut Through Bone
Turkey carving is about finding joints, not battling bones. If your knife hits a hard barrier, pause and reposition. The joint is usually close by.
Slicing Breast Meat With the Grain
Always slice turkey breast across the grain. This makes the meat easier to chew and helps the slices stay tender.
Overcrowding the Platter
A mountain of meat may taste great, but it can look messy. Use two platters if needed: one for white meat and one for dark meat. Nobody has ever complained about extra turkey presentation space.
How to Keep Carved Turkey Warm
Carved turkey cools faster than a whole bird, so timing matters. If dinner is not ready yet, cover the platter loosely with foil. You can also place carved turkey in a low oven for a short period, but avoid drying it out. A spoonful of warm broth or pan juices over the sliced meat helps preserve moisture.
Do not leave carved turkey sitting out for hours while everyone “just grabs one more roll.” Refrigerate leftovers within two hours of cooking or serving. Store turkey in shallow containers so it cools quickly. Leftover turkey is usually best used within three to four days when refrigerated, or frozen for longer storage.
White Meat vs. Dark Meat: How to Serve Both Well
White meat from the breast is lean, mild, and ideal for neat slices. Dark meat from the thighs and drumsticks is richer, more tender, and often more flavorful because it contains more connective tissue and fat. A good turkey platter celebrates both.
For guests who love sandwiches, thinner breast slices are perfect. For guests who want a hearty plate with gravy, thicker thigh pieces are excellent. Drumsticks are casual, dramatic, and beloved by anyone who enjoys eating like a medieval festival champion.
How Much Turkey Should You Carve at First?
If you have a large gathering, carve most of the turkey before serving so guests can move through the meal easily. For a smaller group, carve enough for the first round and keep extra pieces loosely covered. This helps prevent the entire bird from drying out at once.
A practical approach is to carve both breast halves, one thigh, and both drumsticks first. Keep additional dark meat and smaller pieces available for second servings, sandwiches, and the person who says they are full but mysteriously returns with a tiny plate.
Best Sauces and Sides for Carved Turkey
Carved turkey is delicious on its own, but sauces and sides make it shine. Classic gravy is the obvious choice, especially if made from pan drippings. Cranberry sauce adds brightness and acidity. Herb butter can be brushed over slices for a glossy finish. A little warm broth is useful if the turkey was slightly overcooked or if slices have been sitting for a few minutes.
For sides, turkey plays well with mashed potatoes, stuffing, green beans, sweet potatoes, roasted carrots, cornbread dressing, and dinner rolls. In leftover form, carved turkey becomes sandwiches, soups, pot pies, casseroles, tacos, and late-night fridge raids conducted with suspicious silence.
Experience Notes: What Turkey Carving Teaches You in Real Kitchens
The first time many people carve a turkey, they treat it like a test they forgot to study for. The bird is hot, the family is hungry, and someone is already asking whether the gravy has lumps. In real kitchens, the best turkey carving experience usually starts with accepting that perfection is not the goal. Clean slices are great, but a delicious platter matters more than flawless geometry.
One practical lesson is that resting time changes everything. A turkey carved too early feels slippery, steamy, and chaotic. The breast meat releases juice too quickly, the skin slides around, and the cutting board becomes a small lake. A rested turkey, by contrast, behaves better. The meat firms slightly, the joints are easier to manage, and the slices hold together. Those 20 to 30 minutes are not wasted time. They are when you finish gravy, warm rolls, gather serving spoons, and quietly prepare yourself for applause.
Another real-world lesson is that the knife matters more than the carver’s confidence. A sharp, comfortable chef’s knife can make an average home cook look skilled. A dull knife can make even a careful person look like they are pulling turkey apart with office supplies. Before the holiday, sharpen your knife or have it sharpened. This one small step can save you from ragged slices, tired hands, and dramatic sighing.
It also helps to carve in stages. Instead of trying to slice everything while the turkey is still whole, break it down first: legs off, wings off, breast halves removed, thighs separated. Once the big pieces are off the carcass, the job becomes much easier. You are no longer working around a round, wobbly bird. You are slicing manageable pieces on a flat board. This is the difference between carving and wrestling.
One of the most useful serving tricks is to separate white meat and dark meat clearly on the platter. Guests appreciate choices, and the platter looks more organized. Place breast slices in overlapping rows, tuck thigh slices nearby, and use drumsticks and wings as visual anchors. If a few pieces are less than picture-perfect, place them toward the center and spoon a little gravy or warm pan juice over them. Holiday cooking is part technique, part hospitality, and part strategic camouflage.
Finally, do not throw away the carcass immediately. After carving, the bones still hold flavor. Save the carcass, wing tips, and extra bits for turkey stock. Simmer them with onion, celery, carrot, bay leaf, and peppercorns, and you have the beginning of soup, gravy, or risotto. The best turkey carving does not just create a beautiful dinner platter; it sets you up for leftovers that taste intentional rather than desperate.
Conclusion: Carve with Confidence, Not Panic
Learning how to carve a turkey is mostly about preparation, patience, and following the bird’s natural structure. Rest the turkey before carving. Use a sharp knife. Remove the legs, thighs, wings, and breast meat in sections. Slice breast meat against the grain. Arrange everything neatly, keep it warm, and store leftovers safely.
Once you understand the process, turkey carving becomes less intimidating and more satisfying. You are not just cutting meat; you are delivering the grand finale of the meal. And if one slice falls apart? Put it near the stuffing, add gravy, and carry on like a professional. That is not failure. That is Thanksgiving realism.