Table of Contents >> Show >> Hide
- What Is Pavlova?
- Pavlova vs. Meringue: What’s the Difference?
- The Simple Science (So You Don’t Have to Panic-Whisk)
- What You Need: Ingredients and Equipment
- How to Make Pavlova (Step-by-Step, No Drama Edition)
- Topping Ideas That Make Pavlova Look Like a Magazine Cover
- Pavlova Troubleshooting: Fix the Usual Suspects
- Make-Ahead and Storage (So You Can Host Without Chaos)
- Variations: Mini Pavlovas, Wreaths, and Other Show-Off Shapes
- Final Thoughts: The Secret to Pavlova Is Confidence (and a Closed Oven Door)
- of “Pavlova Experiences” (The Emotional Journey, Explained)
Pavlova is the dessert equivalent of showing up to a potluck in sweatpants… and somehow still winning “best dressed.” It looks fancy, tastes like a cloud married a fruit salad, andbest of allrequires exactly zero cake-layer math. If you can whip egg whites and resist opening the oven like a curious raccoon, you can make pavlova.
What Is Pavlova?
Pavlova is a meringue-based dessert baked into a big, swooshy “nest” (or a few smaller ones), with a crisp, crackly outside and a soft, marshmallow-like center. It’s typically topped with whipped cream and fresh fruitthe classic sweet-and-tart combo that makes every bite feel balanced instead of “oops, I ate straight sugar again.”
Why the name “pavlova”?
The dessert is widely associated with Australia and New Zealand and is commonly said to be named in honor of the Russian ballerina Anna Pavlova. The exact origin story is… let’s call it “politely contested,” which is the culinary version of a sibling rivalry. (You don’t have to take sides to enjoy it. Eat dessert. Choose peace.)
What does pavlova taste and feel like?
Think: delicate vanilla sweetness, then a shattery crisp shell, then a center that’s chewy-soft like a marshmallow that went to finishing school. Add whipped cream (cool, creamy) and fruit (juicy, bright), and you get a dessert that tastes light even though it absolutely counts as dessert.
Pavlova vs. Meringue: What’s the Difference?
Pavlova and meringue are close cousins, but they do not have the same personality. A classic baked meringue is usually dry and crisp all the way through. A pavlova aims for contrast: crisp outside, plush inside.
The “pavlova texture” usually comes from technique (slow baking, proper whipping, gradual cooling) and a couple of common helpers: an acid (like vinegar or lemon juice) and cornstarch.
The Simple Science (So You Don’t Have to Panic-Whisk)
Sugar: structure, shine, and stability
Sugar doesn’t just sweetenit stabilizes the whipped egg whites and helps build that glossy, strong shell. Many well-tested recipes rely on a generous sugar-to-egg-white ratio for a meringue that’s smooth, crisp, and sturdy enough to hold toppings.
Acid: keeps your egg whites from throwing a tantrum
A small amount of acid (cream of tartar, vinegar, or lemon juice) helps stabilize the foam so it holds volume instead of deflating at the first sign of trouble (like you turning your back to grab a spatula).
Cornstarch: the anti-weeping insurance policy
Cornstarch is often used to help manage moisture and encourage that marshmallowy interior instead of a fully dry crunch. It can also help reduce weeping (that sticky syrupy moisture that sometimes shows up like an uninvited guest).
Low heat + slow cool: how you avoid cracks and collapse
Pavlovas like gentle heat. Baking at a relatively low temperature sets the shell without blasting it into beige territory, and letting it cool gradually in the oven helps prevent dramatic cracking and sinking.
What You Need: Ingredients and Equipment
Ingredients (classic base + topping)
- Egg whites (from 4 large eggs; room temp whips easier)
- Superfine sugar (caster sugar) or regular granulated sugar (see tips below)
- Cornstarch
- Acid: white vinegar, lemon juice, or cream of tartar
- Vanilla extract (optional but highly recommended)
- Heavy cream + a little sugar (for whipped cream)
- Fruit: berries, kiwi, passion fruit, mango, peacheswhatever looks great
Equipment
- Stand mixer or hand mixer (your arms deserve rights)
- Clean mixing bowl + whisk (grease is the enemy)
- Baking sheet + parchment paper
- Spatula
- Optional: kitchen scale (helpful for precision and for feeling like a baking wizard)
How to Make Pavlova (Step-by-Step, No Drama Edition)
This method makes one large pavlova (about 8–9 inches), serving 6–8. You can also split it into 6–8 mini pavlovassame batter, smaller swirls, slightly shorter bake.
Step 1: Prep the oven and pan
- Preheat oven to 250°F (some recipes go lower, some slightly higher; 250°F is a friendly starting point).
- Line a baking sheet with parchment. Trace an 8–9 inch circle on the parchment, then flip it so the ink/pencil is underneath.
Step 2: Make your bowl “meringue-safe”
Any grease can keep egg whites from whipping properly. Make sure your bowl and whisk are very clean and dry. Pro move: wipe them with a little vinegar or lemon juice, then dry. Also: keep even a speck of yolk out of the whites. Yolks are delicious. Yolks are also sabotage.
Step 3: Whip egg whites to soft peaks
- Add 4 egg whites to the bowl.
- Beat on medium until foamy, then keep going until you get soft peaks (peaks that droop).
- If using cream of tartar, add it once foamy (about 1/2 teaspoon for this size batch).
Step 4: Add sugar slowly (this is the big secret)
With the mixer running on medium-high, add sugar one spoonful at a time, letting it incorporate before adding more. Rushing this step is how you get gritty meringue and regret.
Keep beating until the mixture is thick, glossy, and holds stiff peaks (the peak stands straight up). Want to check sugar dissolution? Rub a tiny bit between your fingersif you feel grains, keep beating a bit longer.
Step 5: Add cornstarch, acid, and vanilla
- Sprinkle in 1 teaspoon cornstarch.
- Add 1 teaspoon vinegar or lemon juice (or skip if you already used cream of tartareither approach works).
- Add 1 teaspoon vanilla.
- Mix on low just until combined. Don’t overmix.
Step 6: Shape the pavlova “nest”
- Dollop the meringue onto the traced circle.
- Use a spatula to shape it into a tall mound with slightly higher edges and a shallow center (a “crater” for toppings).
- Feel free to make swoops and swirlspavlova is supposed to look artsy, not engineered.
Step 7: Bake low and slow
- Bake at 250°F for about 75–90 minutes, until the outside feels dry and set.
- Turn the oven off and let it cool in the oven (at least 1 hour; longer is even better).
Important: avoid opening the oven during baking and early cooling. Temperature changes can cause cracking and collapse. (You can peek through the window like a Victorian ghost. That’s allowed.)
Step 8: Whip cream and top right before serving
- Whip 1 cup heavy cream with 1–2 tablespoons sugar and a splash of vanilla until softly billowy.
- Spread whipped cream into the pavlova center.
- Top with fruit. Add a drizzle of passion fruit pulp, berry sauce, lemon curd, or shaved chocolate if you’re feeling extra.
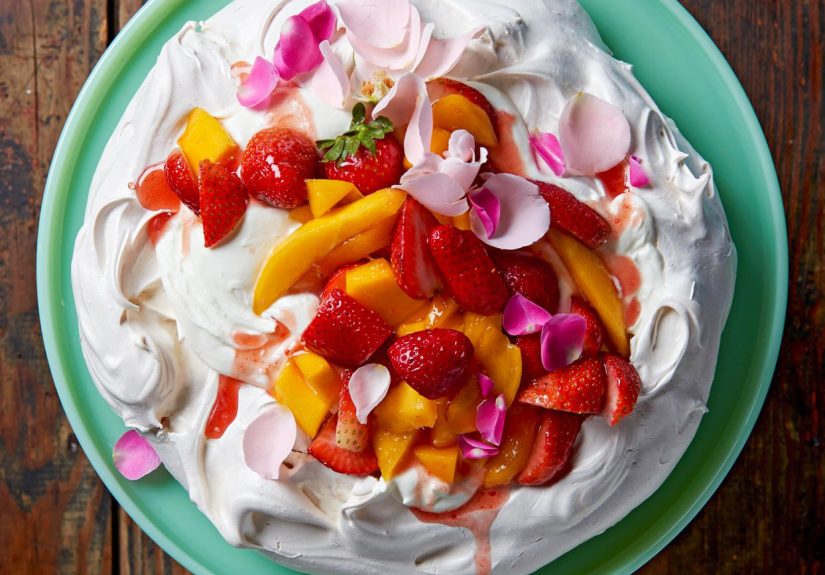
Topping Ideas That Make Pavlova Look Like a Magazine Cover
Classic crowd-pleasers
- Mixed berries + mint (fresh, bright, easy)
- Strawberries + kiwi (iconic, colorful, “I definitely planned this”)
- Passion fruit + mango (tropical, tangy, dramatic in a good way)
Grown-up (but still fun) combos
- Lemon curd + berries (sweet + sharp = addictive)
- Chocolate drizzle + cherries (dessert noir vibes)
- Whipped cream + roasted peaches (summer in dessert form)
Pavlova Troubleshooting: Fix the Usual Suspects
“It cracked!”
First: congratulations, you made a real pavlova. Cracks happen. They’re not failure; they’re ventilation. Common causes include oven temp swings or cooling too fast. Next time, cool longer in the oven and avoid opening the door. And remember: whipped cream covers a multitude of sins.
“It wept syrup / got sticky.”
Meringue can weep if sugar didn’t dissolve fully, if it’s humid, or if it sat too long with toppings. Beat longer after adding sugar, use cornstarch, and keep the baked shell in an airtight container. Assemble close to serving time.
“It collapsed.”
Underbaking, sudden temperature changes, or over-whipping can do it. Aim for a dry shell, cool gradually, and stop whipping once you have stiff glossy peaks (not dry, clumpy ones).
“It’s beige.”
Beige usually means the oven ran hot or the bake was too aggressive. Lower the temperature slightly next time. Pavlova should be pale and elegant, like it’s wearing pearls.
“It feels gritty.”
Sugar didn’t dissolve. Add sugar more slowly and whip longer after all sugar is added. Superfine/caster sugar helps, but patience is the real MVP.
Make-Ahead and Storage (So You Can Host Without Chaos)
- Make the shell ahead: Yesoften 1–2 days ahead, sometimes longer if the air is dry. Store airtight at room temperature.
- Do not top early: Whipped cream and fruit add moisture and will soften the shell.
- Leftovers: It will soften in the fridge, but it’ll still taste greatthink “dessert trifle energy.”
Variations: Mini Pavlovas, Wreaths, and Other Show-Off Shapes
Pavlova is basically edible sculpture, and you get to be the sculptor.
Mini pavlovas
Spoon or pipe individual nests. Bake a little less (often 45–60 minutes depending on size) and cool in the oven. Everyone gets their own dessert, and nobody has to negotiate slices like it’s a group project.
Pavlova wreath
Pipe a ring of meringue “kisses” into a wreath and fill the hollows with cream and fruit. It’s festive, dramatic, and suspiciously easy once you realize it’s still just whipped egg whites.
Dairy-free option
Use chilled coconut cream (the thick part) whipped with a little powdered sugar and vanilla. Top with fruit and a squeeze of citrus. Still gorgeous. Still gluten-free. Still gone in ten minutes.
Final Thoughts: The Secret to Pavlova Is Confidence (and a Closed Oven Door)
Pavlova looks like a dessert that requires a pastry diploma, but it’s really a reward for good technique: clean tools, gradual sugar, gentle heat, and patience while it cools. Once you nail the base, toppings can change with the season and the contents of your fridgemaking it one of the most flexible “wow” desserts you can keep in your back pocket.
of “Pavlova Experiences” (The Emotional Journey, Explained)
The first time most people make pavlova, there’s a momentusually around minute 6 of whipping egg whiteswhen the mixture transforms from “sad bubble bath” into something glossy and powerful, and you suddenly feel like you’ve unlocked a secret level in baking. That’s the pavlova effect: it starts humble, then becomes weirdly majestic.
Then comes the shaping. You’ll try to be neat for about twelve seconds before embracing the fact that pavlova is supposed to look a little wild. You make a crater in the middle and think, “Yes. This is a nest.” You add swoops along the sides and convince yourself it’s intentional. (It is. Congratulations, you are now an artist.)
Next is the hardest experience of all: leaving the oven alone. Pavlova teaches patience the way a toddler teaches humility. You’ll want to open the door to check if it’s browning, cracking, doing taxes, or building a small city in there. But you don’t. You stand strong. You peer through the glass like a concerned museum guard. This is growth.
When you finally pull it out (or, ideally, when it cools in the oven and you lift it out later), you’ll notice the surface might have a few cracks. That’s when you experience the most important pavlova truth: cracks are not a crisis; they’re a feature. Pavlova isn’t a flawless wedding cakeit’s a dramatic dessert meant to be piled with whipped cream and fruit. The toppings don’t just add flavor; they add confidence.
The topping moment is pure joy. Whipped cream goes on like snowdrifts, fruit lands like confetti, and suddenly your kitchen looks like it hosted a photoshoot. This is also when pavlova becomes deeply personal: you choose the fruit based on season, mood, and what you found on sale. Summer berries feel bright and effortless. Winter citrus and pomegranate feel bold and festive. A spoonful of lemon curd makes everything taste like sunshine with boundaries.
Serving pavlova is its own experience, because it doesn’t slice like cakeit shatters and swoons. The crisp shell breaks, the center yields, and everyone gets a messy, perfect scoop. People usually go quiet for the first bite, which is the highest compliment a dessert can receive. Then someone says, “Wait… you made this?” and you get to shrug casually, as if you didn’t spend an hour acting as the Oven Door Police.
And if there are leftovers (rare, but let’s pretend), the next-day pavlova experience is oddly comforting. The shell softens a bit in the fridge, turning into something like an icebox cake with fruit and cream. It’s different, but still deliciousproof that pavlova is forgiving, even when life isn’t. Ultimately, pavlova is less about perfection and more about contrast: crisp and soft, sweet and tart, fancy and friendly. It’s the dessert that teaches you to relax… right after it teaches you to stop touching the oven door.