Table of Contents >> Show >> Hide
- Why a DIY Spice Rack Is Worth It
- Choose the Right Type of Spice Rack Before You Build
- What You Need for a Simple Wooden Spice Rack DIY
- How to Build a Basic Wall-Mounted Spice Rack
- Design Tips That Make a Homemade Spice Rack Better
- Best Ways to Organize Spices After the Rack Is Built
- Budget-Friendly DIY Spice Rack Ideas
- Mistakes to Avoid
- Real-Life Experiences With Spice Rack DIY
- Conclusion
If your kitchen cabinet sounds like a tiny maraca every time you reach for paprika, it may be time for a proper Spice Rack DIY project. A good spice rack does more than look cute on Pinterest. It saves space, speeds up cooking, reduces duplicate purchases, and prevents that classic kitchen tragedy: buying cumin three times because the other two jars disappeared into the dark abyss behind the flour.
The beauty of a DIY spice rack is that it can be built for your kitchen, not some imaginary showroom kitchen with endless drawers and zero snack clutter. Maybe you need a slim wall-mounted rack. Maybe the inside of a cabinet door is your golden ticket. Maybe you want a drawer organizer so your seasonings sit neatly in rows like tiny overachievers. The point is simple: when your spices are easy to see and easy to grab, cooking gets easier, faster, and a lot less irritating.
In this guide, you’ll learn how to plan, build, and organize a homemade spice rack that looks good, works hard, and doesn’t require advanced carpentry skills or a reality-TV renovation budget.
Why a DIY Spice Rack Is Worth It
A homemade spice rack is one of those rare kitchen projects that checks every box. It is practical, affordable, customizable, and satisfying in a way that says, “Yes, I am now the kind of person who owns labeled jars.” Whether you cook every night or only appear in the kitchen when tacos are involved, organized spices make daily life easier.
Here is what a smart DIY spice rack can do:
- Free up cabinet and counter space
- Keep frequently used spices visible and within reach
- Reduce clutter and duplicate purchases
- Help you rotate older seasonings before they lose flavor
- Add decorative charm to the kitchen
It also makes meal prep feel more efficient. You are not rummaging through twelve half-open jars while your onions start to brown like they’re trying to escape the pan. A solid DIY spice rack turns chaos into a system.
Choose the Right Type of Spice Rack Before You Build
Before you cut wood, grab screws, or announce to the household that you are “doing a kitchen upgrade,” decide where the rack will live. The best design depends on your layout, cooking habits, and how many spices you actually use. If you own six spices, life is simple. If you own twenty-seven because every recipe promised “bold flavor,” planning matters.
Wall-Mounted Spice Rack
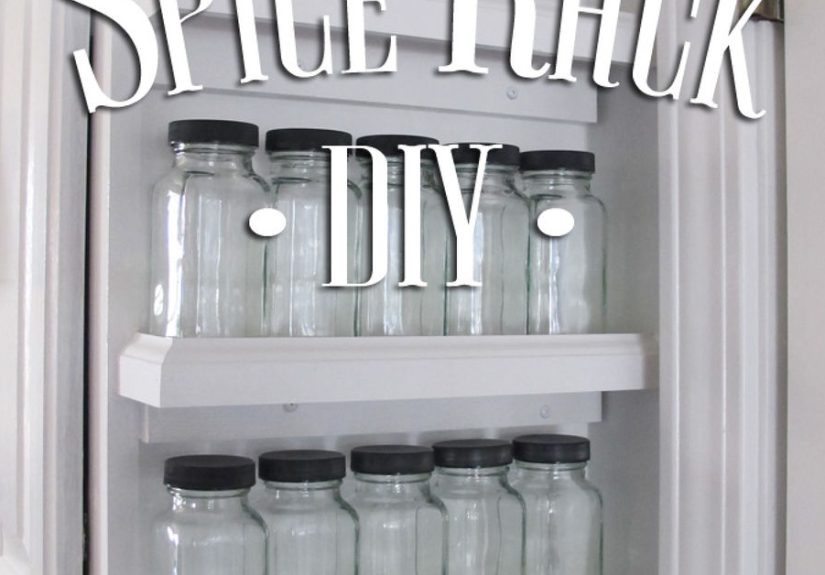
This is a classic for a reason. A wall-mounted spice rack is great for small kitchens, narrow walls, and cooks who want everything visible. It can be made with thin wood shelves, small ledges, or even floating shelf-style rails. This option looks especially nice when you use matching jars.
Inside-the-Cabinet-Door Rack
If you want storage without visual clutter, mount a narrow rack inside a pantry or cabinet door. This works best with lightweight jars and shallow shelves. Just be sure to measure depth carefully so the door still closes. Nothing humbles a DIY project faster than realizing your oregano now prevents cabinet access.
Drawer Spice Organizer
A drawer-based setup is ideal if you want a clean, streamlined kitchen. Spices can sit flat on a slight angle or stand upright if the drawer height allows it. This is one of the easiest ways to scan labels quickly, especially if the tops are marked clearly.
Countertop Spice Rack
A countertop rack works well for people who use the same group of seasonings every day. It is fast, easy, and portable. The downside is obvious: it uses visible surface area, so it is best in kitchens with enough breathing room.
Pull-Out or Narrow Filler Rack
If you have a slim gap beside cabinets or appliances, a pull-out spice rack can turn wasted space into storage gold. This type is slightly more advanced, but it is excellent for compact kitchens where every inch counts.
What You Need for a Simple Wooden Spice Rack DIY
You do not need a fancy workshop to build a useful spice rack. For a basic wall-mounted or cabinet-mounted version, the materials are refreshingly simple:
- 1×2 or 1×3 wood boards, plywood strips, or reclaimed wood
- Wood glue
- Screws or finishing nails
- Sandpaper
- Drill and drill bits
- Saw or pre-cut boards from a hardware store
- Measuring tape
- Level
- Wood stain or paint, if desired
- Wall anchors or mounting hardware
If you want a little extra security, especially for wall shelves, add a front rail or trim piece. That small lip can keep jars from tipping or sliding off when somebody shuts a nearby cabinet like they are closing a bank vault.
How to Build a Basic Wall-Mounted Spice Rack
Step 1: Measure Your Space
Measure the width, height, and depth of the area where the rack will go. Then measure your spice jars. This is not a “close enough” moment. Your shelves need to be deep enough for the jars and tall enough to let you remove them without finger gymnastics.
A practical rack usually has multiple shallow shelves rather than one deep shelf. Deep shelves let spices hide from you. Shallow shelves force order. That is what we want.
Step 2: Plan Shelf Spacing
Lay out your jars and decide how many tiers you want. Most DIYers do best with two to four shelves, depending on wall height. Leave enough clearance above each shelf so jars are easy to grab. If you use taller grinders or specialty bottles, account for that now instead of pretending they will magically shrink later.
Step 3: Cut the Wood
Cut two vertical side pieces and the shelf boards. If you are using a simple rectangular design, your side pieces create the frame and the shelves fit in between or across them. Hardware stores can often cut boards for you if you do not have a saw at home, which is excellent news for people whose tool collection currently consists of one screwdriver and ambition.
Step 4: Sand Everything
Sand all edges and surfaces until smooth. This step matters more than people think. Rough wood can snag towels, scratch hands, and make even a nice build look unfinished. Smooth wood immediately looks more polished and intentional.
Step 5: Assemble the Frame
Use wood glue and screws or finishing nails to attach the shelves to the side supports. Check for level spacing as you go. If you want a front guard rail, attach a thin strip of wood across the front of each shelf.
Keep checking your measurements during assembly. The difference between “custom built” and “wonky” is usually about five extra minutes of patience.
Step 6: Paint, Stain, or Seal
Finish the rack in a style that fits your kitchen. Natural wood feels warm and timeless. White paint reads clean and classic. Black adds contrast and a modern look. If your kitchen already has a lot going on visually, a neutral finish will help the rack blend in rather than scream for attention.
Step 7: Mount It Securely
Use a level and secure the rack to wall studs when possible. If studs are not available, use proper wall anchors rated for the load. Even a small spice rack can get surprisingly heavy once filled with glass jars. Cinnamon may seem innocent, but together those jars mean business.
Design Tips That Make a Homemade Spice Rack Better
A good-looking rack is nice. A rack that stays useful six months later is better. These design decisions make a big difference:
Keep It Shallow
Shallow shelves improve visibility. When every jar can be seen at a glance, you actually use what you own.
Add a Lip or Rail
A front edge helps prevent spills, especially on wall-mounted shelves or racks attached to doors.
Match the Rack to the Kitchen Zone
Store everyday spices near your prep or cooking area, but not directly above the stove where heat, grease, and steam can affect freshness and make cleaning annoying.
Use Uniform Containers
Matching jars create a cleaner look and make shelf spacing easier to plan. They also turn your spice rack into part of the decor instead of a collection of mismatched survivors from three grocery stores and a warehouse club.
Label the Tops and Fronts
If spices lie flat in a drawer, label the lids. If they sit upright on shelves, label the fronts. If you want to be extra organized, add the purchase or refill date too.
Best Ways to Organize Spices After the Rack Is Built
Building the rack is only half the job. The other half is creating a system that keeps it functional.
Sort by Cooking Frequency
Put everyday basics like salt, pepper, garlic powder, chili flakes, paprika, oregano, and cumin in the easiest-to-reach spots. Rarely used spices can live higher up or off to the side.
Group by Cuisine or Category
Try grouping baking spices together, grilling blends together, and international flavors together. This works especially well if you cook a variety of meals and want your rack to support how you actually cook.
Remove Duplicates and Check Freshness
A spice rack is not a museum. If a jar is ancient, clumpy, or smells like faint disappointment, let it go. Dried herbs and spices last longer than many foods, but they do lose strength over time, especially when stored in heat, steam, or direct light.
Keep Refill Stock Elsewhere
Do not overload the main rack with backup containers. Store refills in a pantry bin or labeled box and keep only your active jars on the rack.
Budget-Friendly DIY Spice Rack Ideas
If you want the Spice Rack DIY look without a big materials bill, there are plenty of clever options.
- Use reclaimed wood for a rustic shelf rack
- Repurpose a shallow drawer or small crate as a wall unit
- Mount narrow picture ledges as instant spice shelves
- Turn baby food jars or mini glass jars into labeled spice containers
- Use magnetic tins on a metal board or refrigerator side panel
- Convert a small cabinet door interior into hidden storage
DIY kitchen storage works best when you stay flexible. Sometimes the “perfect” plan is less useful than the simple one you can actually finish this weekend.
Mistakes to Avoid
Even easy projects can go sideways. Here are the most common mistakes people make with a homemade spice rack:
- Making shelves too deep, which hides jars
- Mounting the rack too close to heat or steam
- Ignoring cabinet door clearance
- Skipping wall anchors or secure mounting
- Forgetting to measure actual jar height and width
- Overcrowding the rack from day one
- Using a system that looks pretty but does not match real cooking habits
The best spice organization system is not the fanciest one. It is the one you will keep using after the excitement of the build wears off and real life returns with taco night, pasta night, and the occasional desperate “What can I make with chicken?” night.
Real-Life Experiences With Spice Rack DIY
The funniest thing about building a spice rack is how innocent the project seems at first. You start by thinking, “I just need a small shelf for my spices.” Two hours later, you are standing in the kitchen holding a tape measure, a jar of smoked paprika, and a level, suddenly behaving like the general contractor of a cooking show. But that is part of the charm. A DIY spice rack is small enough to finish without losing your mind, yet useful enough to make you feel dramatically more organized than you actually are.
One of the most common experiences people have is realizing that their spice problem was never really about the spices. It was about visibility. Once jars are arranged in rows instead of stacked in a dark cabinet, cooking feels easier almost immediately. You stop forgetting what you own. You stop buying cinnamon again just because you could not find the other one. You stop knocking over five bottles just to reach onion powder. That alone can make the project feel like a massive quality-of-life upgrade.
Another real-world lesson is that location matters more than style. A beautiful rack installed in the wrong spot becomes decorative clutter. A simple rack placed near the prep zone becomes the MVP of the kitchen. Many people learn this the slightly annoying way: by first choosing the prettiest wall, then noticing it is across the room from the stove, beside harsh sunlight, or too close to steam. The second attempt is usually smarter, less glamorous, and far more useful.
There is also something unexpectedly satisfying about transferring spices into matching containers. It feels orderly in a way that is almost suspicious. Suddenly the kitchen looks calmer. More intentional. More like a place where meals are thoughtfully prepared instead of assembled in a panic at 6:17 p.m. Of course, this phase can go too far. Some people begin with a rack and end up labeling everything in sight like a suburban monarch of domestic efficiency. But even a basic set of neat jars and readable labels makes a real difference.
DIY spice rack projects also teach patience. A shelf that is just a little crooked will somehow look ten times more crooked once filled with perfectly vertical jars. A cabinet-door rack that seems fine while empty may rattle when loaded. A drawer insert that looked brilliant on paper may need an extra adjustment after you realize your curry jars are taller than your thyme jars. These are normal project moments, not proof that you should abandon the mission and order takeout forever.
Perhaps the best experience tied to this kind of project is how quickly the result becomes part of everyday life. Unlike some DIY jobs that are mostly decorative, a spice rack earns its keep. You use it while scrambling eggs, seasoning vegetables, mixing dry rubs, or trying to make soup taste like you knew what you were doing all along. It supports daily routines. That makes the effort feel worthwhile in a very practical way.
And finally, there is the small but glorious emotional payoff: opening your kitchen cabinet or drawer and seeing everything in order. It feels competent. Peaceful. Slightly smug, if we are being honest. A good Spice Rack DIY project is not just about storage. It is about making the kitchen work better for real life, one tiny jar at a time.
Conclusion
A successful Spice Rack DIY project is all about thoughtful planning and simple execution. Measure your space, pick the rack style that fits your kitchen, build for visibility, and organize in a way that matches how you actually cook. Whether you go with a rustic wall shelf, a hidden cabinet-door organizer, or a sleek drawer insert, the goal is the same: make your kitchen easier to use and a whole lot less cluttered.
You do not need a giant renovation budget or elite woodworking skills to create a smart spice storage system. You just need a clear plan, a little patience, and a willingness to stop letting cayenne pepper live behind the pancake mix.

![45 Video Marketing Statistics for 2025 [New Data]](https://cashxtop.com/wp-content/uploads/2026/04/45-video-marketing-statistics-for-2025-new-data-nLAUxxiv-thumb.jpg)