Table of Contents >> Show >> Hide
- Before You Start: What Can Actually Be Transferred?
- Simple Ways to Transfer Games from Switch to Switch: 14 Steps
- Step 1: Update Both Nintendo Switch Consoles
- Step 2: Connect Both Consoles to the Internet
- Step 3: Decide What You Want to Move
- Step 4: Link Your Nintendo Account on the New Switch
- Step 5: Transfer Your User Data If You Are Moving to a New Main Console
- Step 6: Use “Transfer Your Save Data” for One Game at a Time
- Step 7: Redownload Digital Games from Nintendo eShop
- Step 8: Download DLC and Game Updates
- Step 9: Set the New Switch as Your Primary Console
- Step 10: Move Software Between System Memory and microSD Card
- Step 11: Do Not Rely on the microSD Card to Transfer Save Files
- Step 12: Use Save Data Cloud If You Have Nintendo Switch Online
- Step 13: Transfer Special Games Carefully
- Step 14: Test Everything Before Wiping the Old Switch
- Best Method by Situation
- Common Mistakes to Avoid
- Troubleshooting: Why Your Games or Saves Are Missing
- Real-World Experience: What It Feels Like to Transfer Games from Switch to Switch
- Conclusion
- SEO Tags
Moving games from one Nintendo Switch to another sounds like it should be as easy as handing over a sandwich. Sadly, the Switch is a little pickier than that. Digital games are tied to your Nintendo Account, save data lives in system memory, microSD cards have rules, and your “primary console” status can decide whether your library behaves nicely or throws a tiny electronic tantrum.
The good news? Transferring games from Switch to Switch is absolutely manageable once you understand what you are actually moving. In most cases, you are not dragging a game file from Console A to Console B like a folder on a laptop. Instead, you are linking your Nintendo Account, redownloading purchased games, transferring your user profile and save data, and setting the correct console as your main system.
This complete guide walks you through 14 simple steps to transfer games from Switch to Switch, including digital games, physical cartridges, save files, DLC, cloud saves, microSD card limits, and the common mistakes that make players shout “Where did my island go?” at an innocent piece of plastic.
Before You Start: What Can Actually Be Transferred?
Before pressing buttons with heroic confidence, it helps to know the difference between game ownership, game data, and save data. These three things sound similar, but they behave very differently on Nintendo Switch.
Digital games
Digital games purchased from Nintendo eShop are connected to the Nintendo Account that bought them. To play them on another Switch, you typically sign in with that same Nintendo Account and redownload the games from the eShop or your account’s redownload menu.
Physical games
Physical game cards are the easiest case. Insert the cartridge into the new Switch, install any required updates, and play. The game itself moves with the cartridge, but your save data does not live on the cartridge. Your progress is stored separately on the console.
Save data
Save data is stored in the Switch system memory, not on the microSD card. That means copying a microSD card will not copy your The Legend of Zelda progress, your Animal Crossing island, or your heroic collection of half-finished RPGs.
DLC and updates
DLC and update data can usually be redownloaded along with the game, provided you are using the Nintendo Account that owns the content. Some games may require updates before save files work correctly on the new console.
Simple Ways to Transfer Games from Switch to Switch: 14 Steps
Step 1: Update Both Nintendo Switch Consoles
Start by updating both systems. On each console, go to System Settings > System > System Update. This helps make sure both Switch consoles support the same transfer options and reduces the chance of weird menu differences.
This is especially important if one console has been hiding in a drawer since 2021 like a tiny sleeping tablet. Updates can affect user transfers, save data transfers, eShop access, and newer digital game management features.
Step 2: Connect Both Consoles to the Internet
Most transfer options require an internet connection. Connect both systems to Wi-Fi by going to System Settings > Internet > Internet Settings. Choose your network, enter the password, and confirm that both consoles can go online.
For a smoother experience, keep both Switch consoles close to your router. Nothing ruins a transfer day faster than a console losing Wi-Fi halfway through and acting like it has never heard of your account before.
Step 3: Decide What You Want to Move
Ask yourself one question: are you moving everything to a new Switch, or just moving one game’s save data?
If you are upgrading to a new Nintendo Switch, Switch OLED, or another console for regular use, choose a full user transfer. If you only need one game’s save data on another nearby console, use the save data transfer tool. If you simply want your digital library on the new console, sign in and redownload your games.
Choosing the right route saves time. It also prevents the classic “I transferred the game but not the save” situation, which is the gaming equivalent of moving into a new house and forgetting your bed.
Step 4: Link Your Nintendo Account on the New Switch
On the new console, go to System Settings > Users > Add User. You can create a new user or import an existing user. When prompted, sign in with the Nintendo Account that owns your digital games.
This part matters a lot. Digital purchases are tied to the Nintendo Account, not just the console. If your old Switch had three users and only one of them bought the games, make sure you sign in with the correct account. Otherwise, your new Switch may politely pretend those games do not exist.
Step 5: Transfer Your User Data If You Are Moving to a New Main Console
If you want to move your full user profile and save data from the old Switch to the new one, use the built-in transfer option. On both consoles, go to System Settings > Users > Transfer Your User Data. Follow the prompts and choose the old console as the source and the new console as the target.
This process moves the selected user profile and associated save data to the new system. Keep both consoles nearby, plugged in or well charged, and connected to the internet. Do not turn either system off during the transfer unless you enjoy unnecessary drama.
Step 6: Use “Transfer Your Save Data” for One Game at a Time
If you only need to move save data for a specific game, use System Settings > Data Management > Transfer Your Save Data. On the old console, choose Send Save Data to Another Console. On the new console, choose Receive Save Data.
This works for individual save files and is useful when you are not transferring the entire user profile. However, the same Nintendo Account must be linked to the user on both consoles. Save data is transferred one title at a time, so if you have a library the size of a small dragon’s treasure pile, plan accordingly.
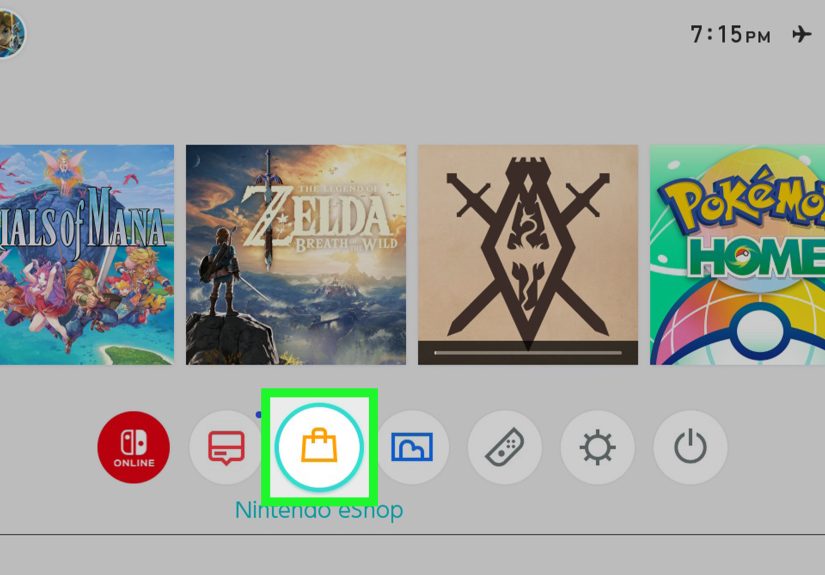
Step 7: Redownload Digital Games from Nintendo eShop
Once your Nintendo Account is on the new Switch, open Nintendo eShop using the account that purchased the games. Go to your account icon, find your redownload list, and select the games you want to install.
This is the main way to get digital games onto a different Switch. You are not “copying” the purchased game from the old console; you are downloading it again under the same account. Make sure the new console has enough storage space before starting a large download, especially if you are installing games with chunky updates or DLC.
Step 8: Download DLC and Game Updates
After redownloading a game, check for updates. Highlight the game icon on the HOME Menu, press the + or – button, and choose Software Update. If the game has DLC, open the eShop page or the game’s in-game menu to confirm the downloadable content is installed.
This step is easy to forget, but it can matter. Some save files expect the same DLC or update version that existed on the old console. If a save file looks missing or a game complains, update first before panicking.
Step 9: Set the New Switch as Your Primary Console
If the new Switch is now your main system, you may want to make it the primary console for your Nintendo Account. Open Nintendo eShop on the old console, select your account icon, and look for the primary console setting. Deregister the old system if needed. Then open Nintendo eShop on the new Switch with the same account, and it should become the primary console automatically.
The primary console affects how digital games are shared and played. On your primary console, other users on that same system can usually play your purchased digital games. On a non-primary console, the purchasing account typically needs an internet check to launch digital games. In plain English: set the console you use most as primary, unless you enjoy explaining licensing rules to your family at 9 p.m.
Step 10: Move Software Between System Memory and microSD Card
If storage is tight, insert a compatible microSD card into the new Switch. Then go to System Settings > Data Management > Move Data Between Console/microSD Card. You can move downloadable software between internal storage and the microSD card.
Remember, this moves software data, not save data. Your progress stays in system memory. Also, do not expect a microSD card from one Switch to work like a magic game suitcase on another Switch. Software downloaded to a microSD card on one system is not meant to be played directly on a different system.
Step 11: Do Not Rely on the microSD Card to Transfer Save Files
This deserves its own step because it is one of the most common misunderstandings. A microSD card can store downloaded software, update data, DLC, screenshots, and videos. It does not store your game progress.
If you want your saves on the new Switch, use user transfer, save data transfer, or Save Data Cloud where available. Simply moving the microSD card will not carry your save data with it. The Switch is portable, but your save files are not that portable without the proper tools.
Step 12: Use Save Data Cloud If You Have Nintendo Switch Online
If you subscribe to Nintendo Switch Online, many games support Save Data Cloud backup. On the old console, highlight a game, press the + or – button, and check the Save Data Cloud options. Upload the save from the old console, then download it on the new console with the same Nintendo Account.
This method is convenient because it does not require both consoles to sit next to each other. However, not every game supports cloud saves. Some titles use special transfer tools or have restrictions. Always check cloud support before assuming your save has floated safely into the digital sky.
Step 13: Transfer Special Games Carefully
Some games need extra attention. Animal Crossing: New Horizons, for example, has its own island transfer process. Certain competitive or online-focused games may handle save data differently. Before moving a beloved save file, check the game’s official support notes or in-game transfer option.
This is the part where being cautious pays off. If you have hundreds of hours in a game, do not treat the transfer like a speedrun. Read the prompts carefully, confirm the correct user, and make sure the target console is ready.
Step 14: Test Everything Before Wiping the Old Switch
After transferring and redownloading, open each important game on the new console. Confirm that the game launches, DLC appears, and save data is correct. Check your screenshots and videos if you care about them. Make sure the right console is set as primary if that matters for your household.
Only after testing should you consider formatting, selling, gifting, or resetting the old Switch. A little patience here can save you from the awful moment of realizing your favorite save file stayed behind like a suitcase at the airport.
Best Method by Situation
If You Bought a New Switch for Yourself
Use Transfer Your User Data, then redownload your digital games. This is the cleanest option when the new Switch is replacing the old one.
If You Want the Same Digital Games on a Second Console
Link the same Nintendo Account on the second Switch and redownload the games. Then decide which console should be primary. Keep in mind that playing digital games on a non-primary console can require internet access.
If You Have Physical Game Cards
Insert the game card into the new console, install updates, and transfer save data separately. The cartridge handles the game, but your progress still needs a proper transfer.
If You Only Need One Save File
Use Transfer Your Save Data for that specific game, or use Save Data Cloud if the game supports it and you have Nintendo Switch Online.
Common Mistakes to Avoid
Mistake 1: Thinking the microSD Card Contains Everything
The microSD card is not a full backup of your Switch. It can hold downloaded software and media, but your save files are stored in system memory. Treating the card as a total transfer tool is a quick way to become very confused.
Mistake 2: Signing In With the Wrong Nintendo Account
If your games are missing from the redownload list, check the account. The games appear under the account that purchased them. Family consoles often have multiple users, so this mistake is more common than a Joy-Con drifting into the wrong menu.
Mistake 3: Forgetting DLC
If a game looks incomplete or a save file will not load correctly, confirm that all DLC and updates are installed. Some games depend on extra content being present.
Mistake 4: Resetting the Old Switch Too Soon
Never wipe the old console until you have tested the new one. Open your most important games first. Confirm that saves, DLC, and account access are working. Then you can reset the old system with confidence instead of regret.
Troubleshooting: Why Your Games or Saves Are Missing
The Game Is Not in Your Redownload List
You may be using the wrong Nintendo Account. Try signing into the eShop with another user that may have purchased the game. Also check whether the game was bought physically, borrowed, or owned by another family member.
The Game Opens but the Save Is Gone
The game software transferred or redownloaded, but the save data did not. Use user transfer, save data transfer, or Save Data Cloud. For special games, look for a dedicated transfer tool.
The New Switch Says You Need Internet to Play
The new console may not be set as the primary console for that Nintendo Account. If this is your main device, deregister the old primary console and open the eShop on the new console with the purchasing account.
The microSD Card Does Not Work on the New Console
A microSD card used with one Switch is not a plug-and-play game library for another Switch. You may need to format the card for the new console and redownload software. Back up screenshots and videos first if they matter to you.
Real-World Experience: What It Feels Like to Transfer Games from Switch to Switch
In real life, transferring games from Switch to Switch is less like moving boxes and more like checking into a hotel where every suitcase has its own password. The process is simple once you understand it, but the first time can feel strangely mysterious. One minute you are excited about your shiny new Switch OLED; the next minute you are staring at the HOME Menu wondering why your games did not march over in a neat little parade.
The biggest lesson from actual transfer experience is this: slow down and separate the tasks. First, move the user. Second, move or download the saves. Third, redownload the games. Fourth, check DLC and updates. When people try to do everything at once, they often miss one of those pieces. The Switch does not always explain this in big flashing letters, so it is easy to assume something went wrong when really the game software and save data are just handled separately.
Another practical tip is to prepare the new console before transfer day. Charge it fully, connect it to Wi-Fi, update the system, and make sure you know your Nintendo Account email and password. Password recovery in the middle of a transfer is not fun. It has the same emotional energy as looking for your keys while already late for school, work, or a boss fight.
Storage planning also matters more than people expect. A new Switch may not have enough internal storage for a large digital library. If you own many downloadable games, use a good microSD card from the start. It is easier to install everything neatly once than to play storage Tetris later, deleting and redownloading games like you are negotiating with a very small warehouse.
For families, the primary console setting is where confusion often begins. A parent may own the games on one Nintendo Account, while kids play on separate users. On the primary console, that setup usually feels smooth. On a second console, the rules can become stricter. If a child suddenly cannot open a game on the new Switch, the issue may not be the download. It may be account ownership or primary console status.
The safest habit is to test your top five games before touching the old console. Open each game. Check the save file. Confirm DLC. Make sure the right user is selected. This tiny checklist can prevent huge headaches. It is much easier to fix a missing save while the old Switch is still sitting nearby than after it has been reset, sold, or handed to a cousin who immediately names it “Nacho Machine.”
Finally, remember that physical cartridges are wonderfully simple but not magical. The card brings the game, not your personal progress. If you lend someone a physical copy of Mario Kart 8 Deluxe, they get the game, not your trophies, settings, or emotional history with Rainbow Road. Save data still belongs to the user profile and console system memory.
Once you know these rules, the whole transfer process becomes much less intimidating. Nintendo Switch game transfers are not difficult; they are just specific. Follow the steps, read the prompts, keep both consoles online, and do not wipe the old system too early. Your games will make the move, your saves will survive, and your new Switch will feel like home instead of a confusing plastic escape room.
Conclusion
Transferring games from Switch to Switch is simple when you use the right method for the right type of data. Digital games are redownloaded through the Nintendo Account that purchased them. Save data moves through user transfer, save data transfer, or Save Data Cloud. Physical games move with the cartridge, while DLC and updates usually need to be downloaded again.
The key is not to treat every type of data the same. Games, saves, accounts, DLC, and microSD card files each have their own role. Once you understand that, moving to a new Nintendo Switch becomes a calm checklist instead of a mysterious ritual performed under the glow of a loading screen.
Note: This guide is based on current Nintendo Switch transfer behavior and official support guidance. Menu names and account features may change with future system updates, so always read on-screen prompts carefully before confirming a transfer.