Table of Contents >> Show >> Hide
- What Is Leaf Mold?
- Leaf Mold vs. Compost: What Is the Difference?
- Why Leaf Mold Is Great for Organic Gardening
- The Best Leaves for Making Leaf Mold
- How to Make Leaf Mold Step by Step
- How to Speed Up Leaf Mold
- How to Use Leaf Mold in the Garden
- Common Mistakes to Avoid
- Seasonal Leaf Mold Plan for Organic Gardeners
- Practical Experiences: What Gardeners Learn from Making Leaf Mold
- Conclusion
If autumn leaves had a marketing department, they would stop being called “yard waste” immediately. Imagine the slogan: Free soil conditioner, delivered by trees, no subscription required. That is essentially what leaf mold is: a dark, crumbly, earthy material made from decomposed leaves. It is simple, cheap, low-effort, and wonderfully useful in organic gardening.
Leaf mold is not exactly the same as finished compost. Compost usually breaks down a balanced mix of “greens” and “browns,” such as kitchen scraps, grass clippings, garden trimmings, and dry leaves. Leaf mold, on the other hand, is made mostly or entirely from leaves. It decomposes slowly through fungal action, producing a soft, moisture-holding material that improves soil structure, supports soil life, and makes garden beds feel less like concrete and more like chocolate cake. Please do not eat it. Your tomatoes, however, will be delighted.
For organic gardeners, learning how to make and use leaf mold is one of the easiest ways to build healthier soil without buying bag after bag of amendments. Whether you grow vegetables, herbs, flowers, shrubs, or container plants, leaf mold can help you recycle nutrients, reduce waste, protect bare soil, and create a more resilient garden ecosystem.
What Is Leaf Mold?
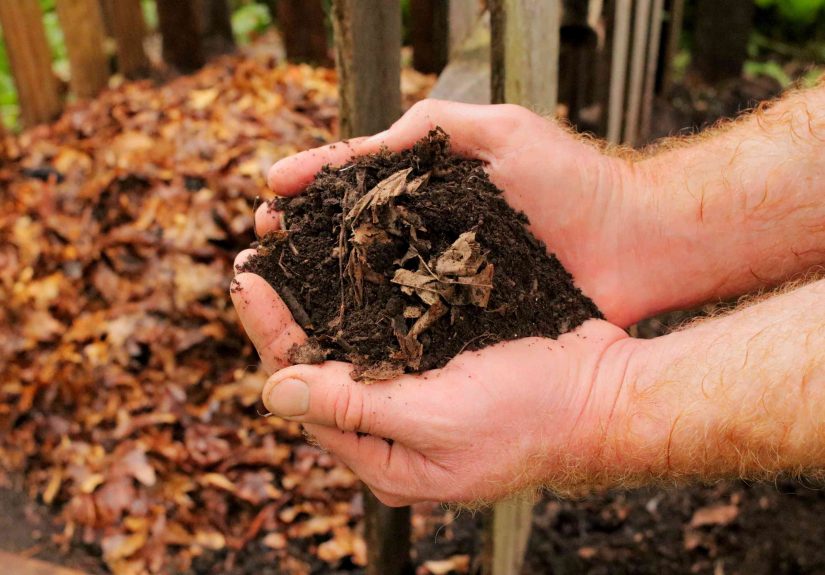
Leaf mold is partially or fully decomposed tree leaves. When leaves are collected, moistened, and left to break down over time, fungi, bacteria, worms, beetles, and other decomposers transform them into a dark brown, fluffy material with a forest-floor smell. Finished leaf mold usually looks crumbly, soft, and rich, though it is not especially high in plant nutrients compared with compost or manure.
Its main value is not fertilizer power. Leaf mold shines as a soil conditioner. It helps sandy soil hold moisture longer, loosens heavy clay, encourages earthworm activity, reduces surface crusting, and protects garden beds from erosion. Think of it as a cozy blanket for your soil rather than a full dinner plate for your plants.
Leaf Mold vs. Compost: What Is the Difference?
Leaf mold and compost are cousins, not twins. Both are made from decomposed organic matter, and both improve soil. However, they work a little differently.
Compost
Compost is usually made from a mixture of carbon-rich materials, such as dry leaves and straw, plus nitrogen-rich materials, such as grass clippings, vegetable scraps, and fresh garden waste. A well-managed compost pile can heat up and break down quickly. Finished compost tends to contain more nutrients than leaf mold and is commonly mixed into garden soil before planting.
Leaf Mold
Leaf mold is mostly leaves. It usually decomposes cold and slow, relying heavily on fungi instead of the fast, heat-loving bacteria that dominate hot compost piles. Because leaves are carbon-rich and relatively low in nitrogen, the process can take six months to two years depending on leaf type, moisture, pile size, and whether the leaves are shredded.
In practical terms, compost feeds plants more directly, while leaf mold improves the soil environment. A smart organic garden uses both when available: compost for fertility, leaf mold for structure, moisture retention, and mulch.
Why Leaf Mold Is Great for Organic Gardening
Organic gardening is built on a simple idea: healthy soil grows healthier plants. Leaf mold supports that goal in several ways.
1. It Improves Soil Structure
Heavy clay soils often drain slowly, compact easily, and become sticky after rain. Sandy soils drain too quickly and struggle to hold nutrients. Leaf mold helps both. In clay, it adds organic matter that opens tiny spaces for air and water movement. In sandy soil, it acts like a sponge, helping moisture stay near plant roots longer.
2. It Holds Moisture
Leaf mold is famous for improving water retention. When used as mulch or mixed into soil, it helps reduce evaporation and keeps the root zone more evenly moist. This is especially helpful during hot summers, dry spells, or those weeks when your garden appears to be personally offended by the sun.
3. It Supports Soil Life
Worms, fungi, beneficial bacteria, and tiny soil organisms all benefit from organic matter. Leaf mold creates habitat and food for this underground workforce. The result is more active soil, better aggregation, and a healthier garden bed over time.
4. It Reduces Waste
Bagging leaves and sending them away is like throwing out free garden gold. Making leaf mold keeps organic material on-site, reduces disposal needs, and turns a seasonal chore into a long-term soil-building habit.
5. It Makes Excellent Mulch
As a mulch, leaf mold helps suppress weeds, cushion soil from heavy rain, regulate soil temperature, and protect roots. It is softer and less likely to mat into a water-shedding layer than whole, unshredded leaves.
The Best Leaves for Making Leaf Mold
Most deciduous tree leaves can be turned into leaf mold. Maple, ash, birch, fruit tree, linden, elm, poplar, and beech leaves are all useful. Some leaves break down faster than others. Thin leaves usually decompose quickly, while thick, waxy, or tough leaves take longer.
Fast-Breaking Leaves
Maple, ash, fruit tree, birch, willow, and linden leaves are generally easier to decompose. If shredded and kept moist, they may turn into usable leaf mold within a year or less.
Slow-Breaking Leaves
Oak, magnolia, holly, sycamore, and beech leaves are tougher. They still make good leaf mold, but they need more time. Shredding them first makes a big difference. Oak leaves are sometimes blamed for making soil too acidic, but in normal garden use, decomposed leaves usually have only a modest effect on soil pH. The bigger issue is simply that oak leaves can be slow and leathery.
Leaves to Use Carefully
Avoid adding leaves heavily contaminated with herbicides, road salt, petroleum residue, or unknown chemicals. Also be cautious with leaves from plants showing serious disease problems. Many common leaf spots will break down naturally, but if you know a disease overwinters on leaves and repeatedly infects your plants, it is better to hot compost that material or dispose of it according to local guidance.
How to Make Leaf Mold Step by Step
Making leaf mold is beautifully uncomplicated. There is no need for fancy equipment, dramatic turning schedules, or a compost thermometer named Harold. You need leaves, moisture, air, and patience.
Step 1: Collect Fallen Leaves
Gather leaves in fall when they are dry enough to handle but not so windy that you end up chasing them down the street like a cartoon character. Use a rake, tarp, mower bag, leaf blower, or lawn mower. If leaves are on your lawn, avoid letting a thick blanket sit there all winter because it can smother grass and contribute to turf problems.
Step 2: Shred the Leaves
Shredding is optional, but it speeds the process significantly. Whole leaves can mat together, reducing airflow and slowing decomposition. Shredded leaves have more surface area, allowing fungi and microbes to work faster. Run over leaves with a lawn mower, use a leaf shredder, or pile them on the driveway and mow over them a few times. The goal is not leaf confetti perfection; rough chopping is enough.
Step 3: Choose a Leaf Mold System
You can make leaf mold in several simple ways:
- Wire bin: Make a cylinder from wire fencing or hardware cloth. A bin about three feet wide and three feet tall is a practical size.
- Wooden bin: Use pallets or scrap lumber to create a breathable leaf mold cage.
- Open pile: Pile leaves in a back corner of the garden. This is the easiest method, though wind may rearrange your plans.
- Plastic bags: Fill heavy-duty bags with damp shredded leaves, poke holes for air, and store them out of the way.
Step 4: Moisten the Leaves
Moisture is essential. Dry leaves can sit for ages looking exactly like dry leaves, which is not the inspirational transformation we are after. Water the pile until it feels like a wrung-out sponge: damp but not dripping. If you squeeze a handful, it should feel moist without releasing a stream of water.
Step 5: Let Fungi Do the Work
Unlike hot compost, leaf mold does not require frequent turning. You can turn it once or twice a year to add oxygen and check moisture, but you can also leave it mostly alone. Keep the pile damp during long dry periods. If the surface dries out, water it. If it smells sour or swampy, it is probably too wet or compacted; fluff it with a garden fork and add some dry shredded leaves.
Step 6: Wait Until It Looks and Smells Right
Usable leaf mold may be ready in six to twelve months if the leaves were shredded, the pile was kept moist, and the leaf types decomposed quickly. Whole leaves or tough leaves may need one to two years. Finished leaf mold should be dark, crumbly, soft, and earthy-smelling. You may still see a few leaf fragments, and that is perfectly fine for mulch.
How to Speed Up Leaf Mold
Leaf mold is a slow recipe, but there are ways to move things along.
Shred Before Piling
This is the biggest time-saver. Smaller pieces decompose faster and resist matting.
Keep It Moist
A pile that dries out stops decomposing efficiently. Check during dry weather and water when needed.
Build a Big Enough Pile
A pile around three feet tall and three feet wide holds moisture better than a tiny pile. Small piles dry out quickly and break down more slowly.
Add a Little Nitrogen If Desired
Pure leaf mold does not need nitrogen, but a small amount of grass clippings, used coffee grounds, or finished compost can encourage microbial activity. Do not overdo it. Too many greens can turn your calm leaf mold project into a regular compost pile, which is not bad, just different.
Turn Occasionally
Turning once in spring and once in late summer can refresh airflow and help mix dry outer leaves into the moist center. If you enjoy turning piles weekly, congratulations on your cardio plan, but leaf mold does not demand that level of attention.
How to Use Leaf Mold in the Garden
Once you have leaf mold, you can use it almost anywhere you want to protect, enrich, or improve soil.
Use It as Mulch
Spread a one- to two-inch layer around vegetables, herbs, perennials, shrubs, and young trees. Keep it a few inches away from plant stems and tree trunks to prevent excess moisture against bark or crowns. Leaf mold mulch helps reduce weeds, conserve moisture, and soften rain impact.
Mix It Into Garden Beds
Work leaf mold into the top few inches of soil before planting, especially in vegetable beds or new flower borders. It improves texture and helps roots move through the soil more easily. For no-dig gardens, simply spread it on top and let worms and weather incorporate it gradually.
Add It to Raised Beds
Raised beds often settle as organic matter decomposes. Leaf mold is an excellent ingredient for topping up beds because it adds bulk, improves water retention, and keeps the soil lively. Blend it with compost when you want both structure and nutrients.
Use It in Containers
Screened, mature leaf mold can be used as part of a homemade potting mix. It helps retain moisture and supports a loose texture. For containers, avoid using fresh, chunky, or unfinished leaf mold as the main ingredient because it may continue breaking down and shrink. A balanced container mix usually needs ingredients that provide drainage, structure, and nutrition.
Make Seed-Starting or Potting Mix Ingredients
Very fine, fully decomposed leaf mold can be screened and blended with other ingredients for potting mixes. However, seed-starting mixes must be light, clean, and well-drained. If your leaf mold is coarse, full of weed seeds, or not fully decomposed, save it for mulch instead.
Improve Paths and Bare Soil
Leaf mold can be spread over muddy paths, around berry bushes, or between rows in vegetable gardens. It helps keep soil from splashing onto leaves, which may reduce some disease pressure and make harvesting cleaner.
Common Mistakes to Avoid
Using Leaves Too Thickly on Lawns
A light layer of chopped leaves can benefit turf, but a heavy, wet mat can block light and air. Remove or shred thick layers before winter.
Letting the Pile Dry Out
Dry leaves do not become leaf mold quickly. Moisture is the magic button.
Using Whole Leaves as Thick Mulch
Whole leaves can mat together and shed water. Shred them first or compost them into leaf mold before using heavily around plants.
Piling Mulch Against Stems and Trunks
Keep leaf mold away from direct contact with stems, crowns, and tree trunks. Mulch volcanoes may look dramatic, but plants are not asking for a volcano lifestyle.
Expecting Leaf Mold to Replace Fertilizer
Leaf mold improves soil, but it is not a high-nutrient fertilizer. Heavy-feeding crops like tomatoes, corn, squash, and cabbage may still need compost or an organic fertilizer based on soil test results.
Seasonal Leaf Mold Plan for Organic Gardeners
Fall
Collect leaves, shred them, wet them, and build your pile. Use extra shredded leaves as winter mulch over empty beds or around perennials after the soil cools.
Winter
Mostly ignore the pile. This is one of leaf mold’s finest features. Snow and rain may help maintain moisture.
Spring
Check the pile. Turn it if you want faster breakdown. Use partially decomposed leaves as mulch around established plants, but avoid mixing unfinished material deeply into planting holes.
Summer
Water the pile during drought. Use finished leaf mold around vegetables to conserve moisture and reduce weeds. Save some as a brown material for composting fresh summer greens.
Practical Experiences: What Gardeners Learn from Making Leaf Mold
The first lesson most gardeners learn is that leaf mold rewards laziness, but only the right kind of laziness. If you pile up dry whole leaves and forget them completely, you may still have recognizable leaves next fall. If you shred them, water them, and then forget them, you are much more likely to discover dark, crumbly treasure later. The difference is small at the beginning and huge at the end.
In a small backyard garden, a simple wire bin often works better than an open pile. Leaves stay contained, air can move through the sides, and the bin does not take up much space. A gardener with one maple tree may fill a bin in a single afternoon. By spring, the pile may shrink by half. By the following fall, the bottom layer often looks like soft forest soil. The top may still contain leaf pieces, but that is not a failure. It is just mulch with ambition.
Vegetable gardeners often notice the biggest difference during hot weather. Beds mulched with leaf mold usually stay moist longer than bare soil. Lettuce wilts less quickly, peppers look less stressed, and the soil surface does not crust as badly after watering. In raised beds, leaf mold also helps replace volume lost as compost and other organic materials break down. A yearly top-dressing of compost plus leaf mold can keep raised beds productive without constant digging.
Flower gardeners appreciate leaf mold for another reason: it looks tidy without looking artificial. Wood chips are useful, but in a cottage garden or perennial border, dark leaf mold blends naturally around plants. It makes the bed look finished while quietly feeding soil organisms underneath. Around hydrangeas, hostas, ferns, native perennials, and shrubs, leaf mold creates a woodland-style surface that feels right because it copies what forests already do.
Container gardeners learn to be more selective. Finished, screened leaf mold can improve moisture retention in large planters, but chunky unfinished material can shrink and become uneven. The best approach is to test small batches. Mix mature leaf mold with compost and drainage-friendly materials, then watch how the container behaves after watering. If the mix stays soggy, use less leaf mold next time. If it dries out too fast, a little more may help.
One surprisingly useful habit is keeping two piles: one “fresh leaves” pile and one “almost ready” pile. The fresh pile receives this year’s shredded leaves. The older pile quietly finishes decomposing. This rotation gives you a steady supply instead of forcing you to choose between using immature leaves and waiting forever. Labeling the piles is optional, but it may prevent the classic gardener problem of standing in the yard muttering, “Was this last year’s pile or the year before?”
Another real-world tip: do not chase perfection. Leaf mold does not need to look like bagged potting soil to be useful. Coarse material can mulch paths and shrub beds. Fine material can top-dress vegetables. The most decomposed layer at the bottom of the pile can be saved for containers or seedling-area experiments. Use each texture where it makes sense.
Over time, making leaf mold changes how you see fall cleanup. Leaves stop being a nuisance and become a seasonal harvest. You start noticing which trees drop leaves that shred beautifully, which piles dry out fastest, and which beds respond best to a leafy blanket. It is a quiet, practical habitbut in organic gardening, quiet practical habits are often the ones that transform the soil year after year.
Conclusion
Learning how to make and use leaf mold for organic gardening is one of the simplest ways to build better soil with materials you already have. Collect fallen leaves, shred them if possible, keep them moist, let fungi and soil organisms do their work, and use the finished material as mulch, soil conditioner, raised bed booster, or container mix ingredient. Leaf mold will not replace compost or fertilizer in every situation, but it will improve soil structure, conserve water, support beneficial organisms, and make your garden more resilient.
Best of all, it turns fall cleanup into an act of soil care. Every leaf you save is one less bag hauled away and one more step toward a healthier organic garden. The trees already did the hard part by growing the leaves. Your job is simply to gather them, give them a little moisture, and let nature show off.
Note: This article is based on research-backed organic gardening guidance from U.S. university extension programs and public environmental resources, rewritten as original web-ready content without direct source links.