Table of Contents >> Show >> Hide
- Why Make Your Own Upholstered Headboard?
- What You’ll Need
- Choose the Right Size and Shape
- How To Make an Upholstered Headboard Step by Step
- Best Fabric Choices for an Upholstered Headboard
- Mistakes To Avoid
- How Much Fabric Do You Need?
- How To Clean and Maintain It
- Extra : What the Experience of Making an Upholstered Headboard Really Feels Like
- Final Thoughts
If your bedroom feels a little unfinished, a DIY upholstered headboard can fix that faster than you can say, “Why does this room still look like a mattress ad from 2007?” A padded headboard adds comfort, texture, color, and that polished custom look people usually assume came from a pricey furniture showroom. The funny part is that making one is surprisingly doable, even for beginners who own a staple gun and a healthy respect for YouTube-level confidence.
The beauty of an upholstered headboard is that it can be simple or dramatic. You can make a clean rectangle in linen for a calm, hotel-inspired look, or go bold with velvet, curves, tufting, nailhead trim, or oversized proportions. Best of all, you control the size, fabric, shape, and budget. No wandering through thirty-seven furniture listings wondering why every headboard is either boring, beige, or mysteriously expensive.
This guide walks you through how to make an upholstered headboard step by step, from measuring and cutting to padding, stapling, mounting, and maintaining it. By the end, you’ll know how to build one that looks polished, feels comfortable, and doesn’t scream, “I made this at 11:45 p.m. with panic and leftover fabric.”
Why Make Your Own Upholstered Headboard?
A DIY upholstered headboard makes sense for three big reasons: customization, comfort, and cost. You can tailor the dimensions to your exact bed, choose a fabric that fits your room, and decide whether you want a slim modern silhouette or a tall statement piece. Because it’s padded with foam and wrapped in batting, it also feels much nicer to lean against than plain wood or metal. If you read in bed, scroll in bed, sip coffee in bed, or simply enjoy pretending you live in a boutique hotel, the comfort upgrade is real.
It is also one of those rare home projects that feels high-end without requiring a full workshop. Many hardware stores will cut plywood for you, so your role becomes less “master carpenter” and more “confident decorator with a staple gun.” That is a very manageable job description.
What You’ll Need
Basic Materials
- Plywood or MDF, usually 1/2-inch to 3/4-inch thick
- Foam padding, usually about 1 to 2 inches thick for a simple headboard
- Batting
- Upholstery fabric
- Spray adhesive
- Staples
- Screws or hanging hardware
- Optional trim, buttons, piping, or nailhead accents
Basic Tools
- Measuring tape
- Staple gun
- Scissors or fabric shears
- Utility knife or electric carving knife
- Drill or screwdriver
- Straight edge
- Tracing paper for curves, if needed
- Safety glasses, gloves, and a respirator if using spray adhesive
If you’re making a basic rectangular upholstered headboard, that list is more than enough. If you plan to make a tufted headboard, add a button kit, upholstery needle, and extra fabric. Tufting is gorgeous, but it also likes to turn a simple afternoon project into a “where did my entire Saturday go?” project.
Choose the Right Size and Shape
Before buying fabric or foam, decide how big you want the headboard to be. A basic upholstered headboard can match the width of the mattress, but many DIYers make it slightly wider for a more substantial look. Height is personal. Some people prefer a modest panel that rises just above the pillows, while others want a tall, dramatic piece that visually anchors the whole wall.
For a queen bed, a simple DIY headboard often lands somewhere around 60 to 64 inches wide, with heights commonly ranging from about 40 to 48 inches depending on style. A twin is obviously narrower, and a king needs more width, but the principle stays the same: measure the bed, account for your frame, and decide whether you want practical padding or full-on bedroom theater.
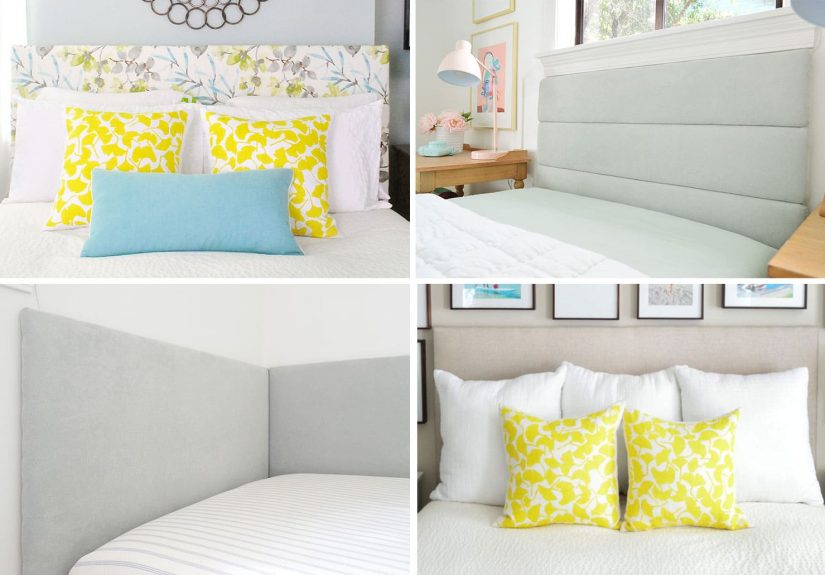
Popular Shape Options
- Rectangle: easiest for beginners
- Arched top: softer and more classic
- Wingback-inspired: more advanced and dramatic
- Panel style: modern and custom-looking
- Tufted: traditional, plush, and a little extra in the best way
If your top edge is curved, tracing paper helps you transfer the shape accurately onto the board, foam, and fabric. This step may feel fussy, but it saves you from the heartbreak of a lopsided arch that looks less “designer” and more “potato with ambition.”
How To Make an Upholstered Headboard Step by Step
1. Measure Your Bed and Plan the Mounting Style
Start by measuring the width of your bed and deciding how high you want the finished headboard to sit. Also decide how you want to install it. You can attach the headboard to the bed frame with legs, or mount it to the wall using a French cleat or heavy-duty wall hardware. A wall-mounted version often looks more custom and can be especially useful if you want a tall headboard or if your bed frame isn’t ideal for mounting.
If you’re building legs, measure from the floor to the top of the mattress and allow extra length below the panel so the headboard can attach securely. If you’re wall-mounting it, mark your desired height before you build so you do not end up with a headboard floating awkwardly like a confused wall panel.
2. Cut the Wood Base
Cut your plywood or MDF to size. If you’re going with a simple rectangle, this is straightforward. If you want curves, draw the shape first and cut carefully. Sand rough edges so the fabric won’t snag later.
Many DIYers use plywood because it is sturdy and widely available. Thickness depends on the design, but a panel in the 1/2-inch to 3/4-inch range is common. If you do not own a saw, have the home center cut it for you. That is not cheating. That is excellent project management.
3. Cut and Attach the Foam
Lay the wood panel on top of the foam and trace the outline. Cut the foam to match using a utility knife, foam cutter, or electric carving knife. A clean cut matters because sloppy foam edges can show through the fabric.
Then attach the foam to the wood using spray adhesive. Some DIYers glue only the main surface and leave the edges free to curve softly over the front perimeter. That subtle curve helps the finished headboard look less sharp and more professionally upholstered.
For a standard upholstered headboard, 1- to 2-inch foam usually gives you a comfortable padded look. If you want a chunkier, more luxurious appearance, go thicker. Just remember that extra foam adds bulk, weight, and fabric demand.
4. Wrap It With Batting
Once the foam is attached, cover the panel with batting. Batting smooths the foam, softens the edges, and helps the finished piece look fuller and more refined. It also adds a little protection between the foam and fabric.
Cut the batting slightly larger than the panel so you can wrap it around the edges and staple it to the back. Pull it taut, but not so tight that it compresses the foam flat. The goal is softness with structure, not “I accidentally shrink-wrapped my headboard.”
Work from the center outward as you staple. This helps keep the surface even and reduces bunching. If you want especially rounded edges, leave a bit of extra batting around the perimeter.
5. Cut and Position the Fabric
Spread your upholstery fabric face down on a clean surface, then place the padded panel on top with the foam side facing down. Cut the fabric with enough extra material to wrap around all sides and staple it securely to the back. A few extra inches on each side is the smart move, especially if your fabric frays, your panel is thick, or your corners need folding.
If your fabric has stripes, florals, or another obvious pattern, take time to center it properly before stapling. This is one of those details that separates “custom and intentional” from “why is the pattern drifting off to the left like it has somewhere better to be?”
Iron the fabric first if necessary. Wrinkles pressed into place by staples are stubborn little monsters.
6. Staple the Fabric for a Smooth Finish
Pull the fabric up and over one side of the headboard, keeping it smooth and taut, then staple it to the back. Move to the opposite side next, then the remaining two sides. Working from the center outward helps maintain even tension and prevents ripples.
Pay close attention to the corners. Fold them neatly so they look crisp instead of bulky. If the headboard has legs or unusual edges, trim and fold carefully before stapling. The back does not need to be pretty-pretty, but it should be secure and tidy enough that nothing loosens over time.
A good rule is to keep the fabric snug, not strangled. Pull too little and you get wrinkles. Pull too hard and you can distort the weave or create weird tension lines on the front. Upholstery is basically the art of controlled stubbornness.
7. Add Optional Details
At this point, you can stop and admire your work, or you can keep going with decorative touches. Popular upgrades include:
- Nailhead trim for a tailored look
- Tufting for classic depth and texture
- Piping for a crisp edge
- A contrasting border for drama
- Oversized scale for a boutique-hotel vibe
These details can look amazing, but they also multiply the time and patience required. If this is your first DIY upholstered headboard, a clean, well-finished plain panel already looks fantastic.
8. Mount the Headboard
Now attach the finished headboard to the bed frame or wall. A bed-frame mount works well for standard designs with legs. A French cleat is a popular option for wall-mounted headboards because it distributes weight well and creates a snug, polished installation.
If mounting to the wall, make sure you use appropriate hardware for the wall type and weight of the piece. If possible, anchor into studs. This is the least glamorous part of the job, but it is the part that keeps your headboard from becoming a dramatic midnight surprise.
Best Fabric Choices for an Upholstered Headboard
Choose a durable upholstery-weight fabric whenever possible. Linen-look fabrics, velvet, polyester blends, performance fabrics, and faux leather are all common choices. Your best option depends on your room, your style, and how much chaos lives in your household.
Good Options for Real Life
- Performance fabric: smart for homes with kids or pets
- Velvet: rich, cozy, and dramatic
- Linen or linen blend: casual and airy
- Faux leather: easy to wipe down and sleek-looking
- Polyester upholstery fabric: durable and budget-friendly
If the headboard will sit behind your actual human head on a regular basis, think beyond looks. Hair oils, dust, pet fur, and life in general all happen. A beautiful fabric that cannot tolerate reality is not helping anyone.
Mistakes To Avoid
- Choosing fabric before measuring the panel
- Using fabric that is too thin or too stretchy
- Skipping batting and wondering why the edges look harsh
- Pulling fabric unevenly and creating wrinkles
- Ignoring pattern alignment
- Using spray adhesive without ventilation or protective gear
- Mounting a heavy headboard without proper support
The most common issue is rushing the stapling stage. Slow, even tension makes the project look expensive. Fast, chaotic tension makes it look like the headboard lost a fight.
How Much Fabric Do You Need?
The answer depends on the size, shape, thickness, and style of the headboard. A simple rectangular queen headboard may take only a couple of yards of fabric, while a taller or tufted version can require much more. Tufted projects especially tend to be fabric-hungry because the folds and depth eat yardage quickly.
When in doubt, buy a little extra. Running short on fabric when you are halfway through upholstering is a deeply humbling experience. Also, extra fabric is handy if you want matching pillows, a bench cushion, or a backup plan for mistakes.
How To Clean and Maintain It
Once your upholstered headboard is installed, basic upkeep is simple. Vacuum it regularly using a soft brush attachment to remove dust, hair, and dander. Spot-clean stains quickly by blotting gently instead of scrubbing. For deeper cleaning, follow the care guidance for your specific fabric. Some materials can handle hand-cleaning or an upholstery machine, while others prefer a gentler touch.
If allergies are a concern, keeping the headboard clean matters more than people think. Fabric-covered surfaces love collecting dust quietly and dramatically, like tiny textile hoarders.
Extra : What the Experience of Making an Upholstered Headboard Really Feels Like
The experience of making an upholstered headboard is part decorating project, part confidence exercise, and part lesson in patience. On paper, it sounds wonderfully simple: cut a board, add foam, wrap it in fabric, staple everything down, and bask in the glory of your upgraded bedroom. In real life, the process is still very doable, but it teaches you a few things fast.
First, it teaches you that measuring matters more than optimism. At the beginning, a lot of people assume they can “eyeball it” because the headboard is just a rectangle, right? Then suddenly they are standing in the bedroom holding a panel that is either too narrow, oddly tall, or visually off-center above the bed. The fix is not difficult, but the moment is humbling. The project rewards people who slow down early so they can relax later.
Second, the fabric choice feels much bigger once the project begins. A swatch in your hand is one thing. A full upholstered panel leaning against the wall is another. Texture becomes more important, color becomes more emotional, and pattern suddenly starts making major decisions about the mood of the room. People often discover that the fabric they thought was “safe” looks a little dull, while the one they thought was “too bold” ends up giving the whole bedroom personality. That is one of the most satisfying parts of the project: seeing a flat material become a real focal point.
There is also a funny moment during the stapling phase when the headboard looks worse before it looks better. The fabric is bunching on the back, the batting seems too fluffy, and one corner is acting like it has never heard of geometry. Then you adjust the tension, smooth the front, fold the corners more neatly, and suddenly it clicks. It starts to look intentional. That shift is incredibly rewarding because the project stops feeling like a pile of supplies and starts feeling like furniture.
Another common experience is realizing that comfort changes how you use the room. A padded headboard is not just decorative. It makes reading in bed nicer, turns lazy Sunday mornings into a slightly more luxurious event, and gives the whole space a softer, calmer mood. Even people who start the project for style usually end up loving it most for comfort.
And finally, there is the pride factor. A DIY upholstered headboard has a custom look that people notice. Guests assume it cost more than it did. You get to say you made it yourself, which is satisfying in a deeply specific way. It is not just that you saved money. It is that you made something useful, attractive, and personal with your own decisions. That changes how a room feels. It stops being a place you furnished and starts being a place you shaped.
So yes, the experience includes measuring twice, re-folding corners, and maybe muttering at a staple gun once or twice. But it also includes the moment you step back, look at the finished bed, and think, “Well, hello there, fancy bedroom.” That moment is worth it.
Final Thoughts
Learning how to make an upholstered headboard is one of the most rewarding bedroom DIY projects because it combines function, comfort, and style in one manageable build. With a wood base, quality foam, batting, durable fabric, and careful stapling, you can create a headboard that looks custom-made for your space. Keep the shape simple if you are new to upholstery, focus on smooth fabric tension, and take installation seriously. The result can look polished enough to fool people into thinking you hired it from a catalog.
In other words, this project is practical, stylish, and surprisingly beginner-friendly. It is also a great excuse to give your bedroom the upgrade it has been politely requesting for quite some time.