Table of Contents >> Show >> Hide
- Why Dried Orange Garlands Work So Well
- What You’ll Need
- Step 1: Pick Your Drying Method
- Step 2: Slice the Oranges Like You Mean It
- Step 3: Dry the Orange Slices (Oven Method)
- Step 3 (Alternate): Dry the Orange Slices (Dehydrator Method)
- Step 3 (Alternate): Air-Dry Method
- Step 4: Plan Your Garland (Length, Spacing, and Style)
- Step 5: String the Dried Oranges
- Step 6: Hang It Like a Pro
- Troubleshooting: Fix the Common Problems
- Fun Variations (Because Plain Orange Is Only the Beginning)
- How to Store Your Garland for Next Year
- of Real-Life Making Experiences (What It’s Actually Like)
- Conclusion
A dried orange garland is the rare DIY that checks every box: it’s pretty, it smells like winter magic,
it costs less than one fancy coffee, and it makes your home look like you casually host magazine-worthy
holiday gatherings (even if you’re wearing sweatpants and eating popcorn over the sink).
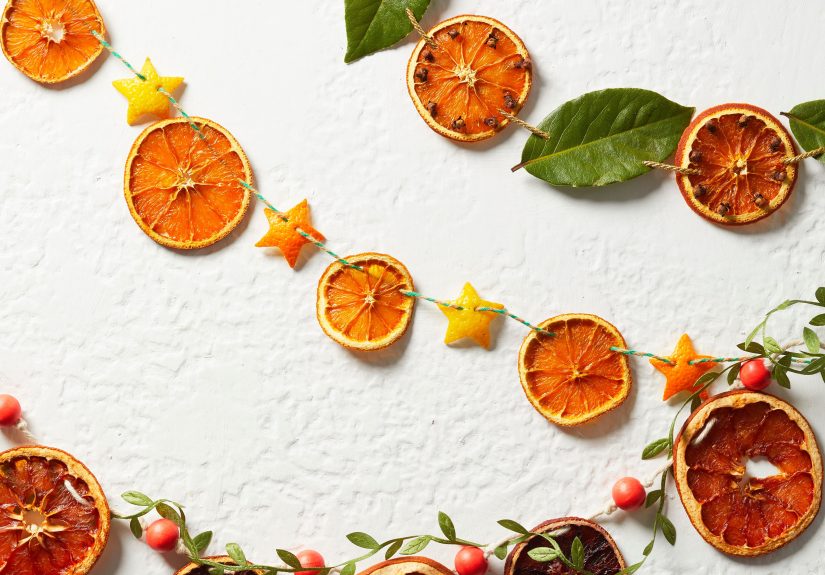
The idea is simple: slice oranges, dry them low and slow, then string the “citrus stained glass” into a garland
you can drape on a mantel, window, staircase, or tree. The trick is making slices that dry evenly and stay
brightnot sad, scorched little wheels of regret. Let’s do it right.
Why Dried Orange Garlands Work So Well
Oranges have translucent flesh and a sturdy peel, which means once they’re dehydrated they look like little
glowing suns. When light hits them (especially near a window or twinkle lights), they give off that warm,
amber “stained glass” vibe that instantly makes a space feel cozy.
- Budget-friendly: You can make a long garland with just a few oranges.
- Low-waste: Natural materials, no plastic packaging, and compostable when you’re done.
- Flexible style: Minimalist Scandinavian? Classic Christmas? Rustic farmhouse? Citrus doesn’t judge.
- Customizable: Add spices, herbs, beads, ribbons, bellsyour garland, your rules.
What You’ll Need
Materials
- 2–6 oranges (navel oranges are a great all-purpose choice)
- Stringing material: twine, cotton string, embroidery floss, thin ribbon, or clear fishing line
- Optional: cinnamon sticks, bay leaves, eucalyptus sprigs, star anise, wooden beads, mini bells
- Optional (for scent and sparkle): cinnamon, cloves, nutmeg, or a light dusting of confectioners’ sugar
Tools
- Sharp knife (serrated works well) or a mandoline for even slices
- Cutting board
- Baking sheets
- Parchment paper or a silicone baking mat
- Highly recommended: wire rack(s) that fit on your baking sheets
- Paper towels or a clean kitchen towel
- Large-eye needle, embroidery needle, or yarn needle
- Scissors
Step 1: Pick Your Drying Method
You’ve got three realistic options: oven, dehydrator, or air-dry. Oven is the most common (and fastest).
Dehydrator is the most consistent. Air-dry is the “I’m patient and I want my house to look like a cottagecore
photo shoot for a week” method.
Quick comparison
- Oven: 2.5–6 hours, depending on temperature, slice thickness, and your oven’s personality.
- Dehydrator: usually 8+ hours; very even drying and minimal browning.
- Air-dry: several days; can curl and takes the most time.
Step 2: Slice the Oranges Like You Mean It
The #1 secret to a good garland is even slices. If some are thick and some are thin,
you’ll end up babysitting the oven, pulling out the “done” ones while the thicker slices stay squishy.
Aim for slices around 1/8 to 1/4 inch. Thinner dries faster and looks more translucent;
thicker is sturdier but takes longer.
- Wash and dry the oranges (you’re decorating with the peel, so let’s keep it clean).
- Slice into rounds. Remove any visible seeds.
- Blot both sides with paper towels to remove surface juice (this speeds up drying and reduces stickiness).
Pro tip: If you’re using a mandoline, use the hand guard. A dried orange garland is festive.
A sliced fingertip is not.
Step 3: Dry the Orange Slices (Oven Method)
Most successful batches come from the “low and slow” approach. Your goal is to remove moisture without
cooking the oranges like a sad little citrus chip.
Oven setup
- Preheat the oven somewhere between 170°F and 250°F.
- Line baking sheets with parchment or a silicone mat, or place slices on wire racks set over baking sheets.
How to bake
- Arrange slices in a single layer. It’s okay if they touch, but don’t overlap.
- Optional: Dust lightly with confectioners’ sugar for a slightly sparkly look and a brighter finish.
Or sprinkle a tiny amount of cinnamon for a warm, cozy vibe. - Bake until the slices are dry and no longer tacky. Expect about 3–4 hours for many ovens.
- Flip slices every 30–60 minutes (or at least halfway through). If you’re using two racks, rotate the pans
and swap positions halfway to even out hot spots. - When they feel mostly dry, turn off the oven and let them sit inside with the door cracked for 15–30 minutes.
- Cool completely on a wire rack.
How to tell they’re done
- The peel should feel dry, not damp.
- The flesh should look translucent and feel firm (not wet or squishy).
- If they’re even slightly sticky, they’re not ready for storagesticky slices invite mold.
Reality check: Drying times vary a lot. Slice thickness, how juicy the oranges are,
whether you used a rack, and your oven’s temperature accuracy all matter. Start checking earlier than you think,
then keep checking in short intervals near the end.
Step 3 (Alternate): Dry the Orange Slices (Dehydrator Method)
If you have a dehydrator, you’re about to feel extremely smug (in a wholesome way). Dehydrators move air
consistently, so you get even drying with less risk of browning.
- Arrange slices in a single layer on dehydrator trays.
- Set dehydrator around 130–135°F (or your machine’s fruit setting).
- Dry until fully dehydrated, usually 8–12+ hours, checking periodically.
Step 3 (Alternate): Air-Dry Method
Air-drying can work, but it’s slow and slices often curl. If you want to try it:
- Slice oranges thinner rather than thicker.
- Lay on a rack in a warm, dry area with good airflow.
- Turn daily. Expect several days.
Air-drying is best when your home is dry (low humidity). If your climate is humid, the oven or dehydrator will
be more reliable.
Step 4: Plan Your Garland (Length, Spacing, and Style)
Before you start stringing, decide the look you want:
- Minimal & modern: Space slices 2–4 inches apart on twine or fishing line.
- Full & classic: String slices close together so the garland looks lush and abundant.
- Textured & styled: Alternate oranges with bay leaves, cinnamon sticks, wooden beads, or bells.
If you’re hanging it over a mantel or across a window, measure the area first. Add extra length for drape
(garlands always look better with a little “swoop,” like they’re lounging).
Step 5: String the Dried Oranges
Once your slices are completely cool, it’s time to turn your kitchen into a craft studio.
Put on music, a movie, or whatever makes you feel like a protagonist.
Method A: Needle-and-string (classic and sturdy)
- Thread a large-eye needle with twine or sturdy string.
- Push the needle through the peel near the top of the slice (closer to the edge holds better).
- Slide the slice down the string.
- Add spacing (knots, beads, or simply leave gaps) if desired.
- Repeat until your garland reaches the length you want.
- Tie loops at both ends for hanging.
Method B: Ribbon weave (pretty and gift-like)
If you want a softer look, use ribbon instead of twine. Rather than punching a hole with a needle,
cut two small slits near the top edge of each slice and weave ribbon through. It’s slower, but it looks
extra polishedlike your garland owns at least one cashmere sweater.
Method C: Ornament-style tie (quick and flexible)
Make each slice an “ornament” by tying short lengths of string through the top of each slice, then knotting
them onto a longer garland line. This lets you rearrange spacing without re-threading the whole thing.
Step 6: Hang It Like a Pro
Dried orange garlands are lightweight, but they can still sag if the string is thin or the garland is long.
Here are a few easy placement ideas:
- Windows: The slices glow when sunlight hits them.
- Mantels: Layer with greenery or twinkle lights for instant holiday drama.
- Stair rails: Tie with ribbon at intervals so it stays in place.
- Tree: Wrap loosely for a natural, old-school look.
Keep your garland away from direct moisture and steam (kitchens can be tricky). Also keep it away from open
flame, candles, or very hot bulbsno one wants “scorched citrus eau de disaster.”
Troubleshooting: Fix the Common Problems
“My slices are brown.”
- Lower the oven temperature and dry longer.
- Use a rack so air circulates and slices dry more evenly.
- Flip and rotate pans more often near the end of drying.
“They’re dry on the edges but wet in the middle.”
- Your slices are probably a bit thick. Next time, go thinner.
- Blot more juice before baking.
- Extend drying time and check in short intervals.
“They feel dry, but got moldy in storage.”
- They weren’t fully dehydrated. “Mostly dry” is the enemy of “stored safely.”
- Cool completely before storing to avoid trapped condensation.
- Store in an airtight container in a dry place. Add a silica packet if you have one.
“They curled up.”
- Flip more often, or use a rack.
- Air-dried slices curl more than oven-dried onesthis can be a feature, not a bug.
Fun Variations (Because Plain Orange Is Only the Beginning)
Citrus mix garland
Combine oranges with lemons and grapefruit for different sizes and shades. The mix looks intentional and
designer-y, like you planned it months ago instead of “I had extra citrus and ambition.”
Spice-and-herb garland
Alternate orange slices with cinnamon sticks, bay leaves, or star anise. It’s cozy, fragrant, and very
“holiday simmer pot, but wearable.”
Victorian-inspired add-ons
Add popcorn or cranberries for a nostalgic look. Just know those additions don’t store well long-term,
so consider them a one-season garland.
How to Store Your Garland for Next Year
If you want your garland to last beyond one season, storage matters as much as drying.
- Make sure every slice is fully dry (no tacky centers).
- Cool completely.
- Store flat or gently coiled in an airtight container.
- Keep in a cool, dry spot away from humidity.
Over time, slices may darken naturally. That’s normal. Think of it as your garland developing “vintage character,”
like a leather jacketonly fruitier.
of Real-Life Making Experiences (What It’s Actually Like)
Here’s the part nobody tells you until you’re already committed: making a dried orange garland is less like a
10-minute craft and more like a tiny seasonal ritual. The first time you do it, you’ll probably start with
unreasonable optimism. You’ll slice oranges and think, “Wow, this is going to be done in an hour.” Then you’ll
meet the truth: moisture has opinions.
The early oven stage smells amazingbright, sweet citrus with a warm bakery noteeven before you add spices.
At some point, you’ll walk past your oven and think you’ve opened a boutique candle store inside your kitchen.
This is also when you’ll learn whether your oven runs hot, cool, or “wildly unpredictable in a way that keeps
life exciting.” Many makers end up adjusting mid-batch: lowering the temperature when edges brown too fast,
switching to a wire rack after discovering parchment makes slices a bit stickier, or turning on convection to
help moisture escape.
The most satisfying moment is when the slices cool and suddenly look like tiny stained-glass windowsespecially
if you hold one up to the light. If you’re drying multiple citrus types, this is when you notice how different
they behave: lemons often dry faster and curl less, grapefruit can take longer because it’s juicier, and oranges
are the reliable middle child that keeps the peace.
Stringing is a vibe. Some people love the quiet repetition of threading slice after slice; others discover that
a “quick DIY” becomes an accidental movie marathon. You’ll probably experiment with spacingstarting close
together, then realizing a little gap makes the garland look more modern and lets the light shine through each
slice. If you add wooden beads, you’ll notice they visually “break up” the orange color in a pleasing way,
like punctuation marks in a very festive sentence.
And then there’s hanging daythe day your house suddenly looks upgraded. Draping the garland across a window
is usually the crowd-pleaser because sunlight does the heavy lifting. On a mantel, it looks best layered with
greenery or lights. On a tree, it’s charming in a “grandma made this, and grandma had taste” kind of way. The
funny part is how often people keep finding new uses for leftover slices: topping gift wrap, tucking into wreaths,
or dropping a couple into a bowl with pinecones to make an instant centerpiece.
If you store your garland for next year, you’ll likely notice the color deepens a bit over time. It’s not
necessarily worsejust different. Some people actually prefer that slightly darker, antique look because it reads
more rustic. The biggest “lesson learned” most makers share is simple: dryness is everything. When in doubt, dry
longer, cool fully, and store airtight. The reward is a garland you can reuse, admire, and brag aboutbecause
yes, you made home decor out of fruit, and that’s objectively cool.
Conclusion
A dried orange garland is one of those rare crafts that looks high-end but stays refreshingly simple:
slice evenly, dry low and slow, string thoughtfully, and store carefully. Once you’ve made one, you’ll start
seeing “garland potential” in every piece of citrus you pass at the grocery store. Consider yourself warned.