Table of Contents >> Show >> Hide
- Why Grow Your Own Fishing Worms?
- The Best Worms for a Simple Home Setup
- How to Grow Your Own Fishing Worms: 11 Steps
- Step 1: Pick the Right Container
- Step 2: Add Air Holes and Drainage
- Step 3: Choose a Cool, Shady Location
- Step 4: Make the Bedding Soft, Fluffy, and Moist
- Step 5: Add a Handful of Soil or Grit
- Step 6: Introduce the Worms and Let Them Settle In
- Step 7: Feed Small Amounts and Chop Food Fine
- Step 8: Keep Moisture and Temperature in the Sweet Spot
- Step 9: Rotate Feeding Areas and Refresh Bedding
- Step 10: Harvest Worms Without Wrecking the Colony
- Step 11: Store Fishing Worms Properly and Keep the Colony Going
- Common Mistakes That Turn a Worm Bin Into a Horror Story
- Is Growing Your Own Fishing Worms Worth It?
- Experience Notes: What It’s Really Like to Raise Your Own Fishing Worms
If you fish often enough, you eventually reach the same conclusion many anglers do: bait costs money, bait shops close early, and worms somehow vanish exactly when the bite turns on. Growing your own fishing worms solves all three problems. It also gives you a steady supply of lively bait, a side benefit of rich worm castings for the garden, and the deeply satisfying feeling that your tackle setup now starts in a bin instead of a checkout line.
The good news is that raising fishing worms is not complicated. The bad news is that worms are excellent at exposing human laziness. Forget to manage moisture, and they sulk. Overfeed them, and your bin smells like a refrigerator drawer that lost the will to live. But if you keep things cool, damp, airy, and reasonably clean, a worm colony can thrive for months and even multiply.
This guide breaks the process into 11 clear steps so you can start a simple home worm farm that works for anglers, gardeners, and anybody who enjoys tiny livestock with zero barking. For most beginners, the easiest choice is a shallow bin stocked with composting worms that reproduce well, handle confinement, and stay active in moist bedding. The result is a reliable bait supply without the last-minute scramble to find an open store.
Why Grow Your Own Fishing Worms?
Before we get into the wormy details, let’s talk payoff. A home worm setup gives you more control over bait quality, availability, and cost. Instead of buying a small cup of tired worms before each trip, you can pull lively bait from your own colony. You also learn how worm behavior changes with temperature, bedding, and food, which makes you better at keeping bait healthy once you get to the water.
There is also a practical bonus: worm bins turn food scraps and paper bedding into castings, a dark, crumbly material prized by gardeners. So your fishing hobby quietly starts producing a side hustle for tomato plants. That is not a bad arrangement.
The Best Worms for a Simple Home Setup
If your goal is to grow your own fishing worms at home, start with red wigglers or similar composting worms rather than random worms dug from the yard. Backyard earthworms and common nightcrawlers often prefer deeper soil and do not adapt as well to shallow bins. Composting worms, by contrast, are surface-oriented, comfortable in decaying organic matter, and much easier for beginners to raise indoors or in protected outdoor spaces.
Can you fish with them? Absolutely. Smaller bait presentations, panfish rigs, trout hooks, and cut-worm setups all work well with home-raised worms. If you want giant hook baits for bigger species, you may eventually branch out into larger worms, but for a beginner-friendly, productive system, red wigglers are the sensible choice.
How to Grow Your Own Fishing Worms: 11 Steps
Step 1: Pick the Right Container
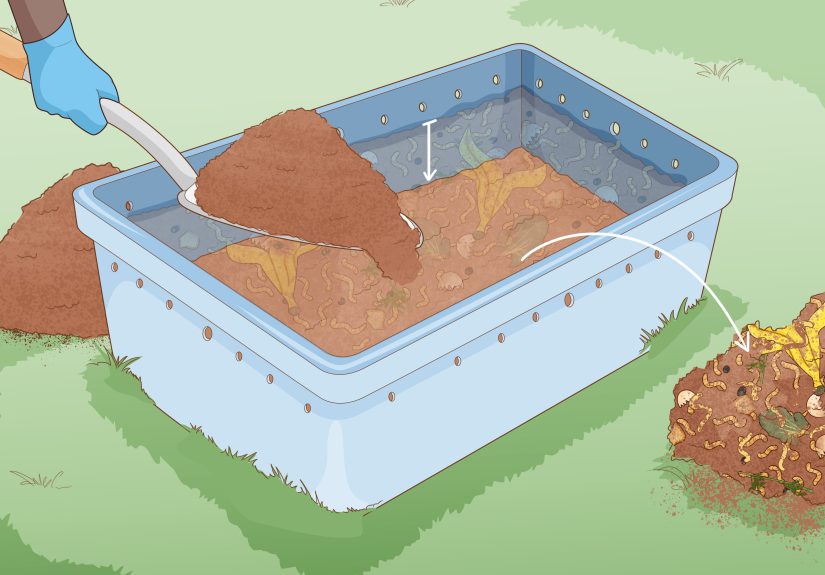
Start with a shallow plastic or wooden bin with a lid. A container around 8 inches deep works well because composting worms prefer the upper layer of bedding rather than deep soil. You do not need a fancy worm condo with more features than a studio apartment. A basic storage tote can do the job just fine.
A good starter bin should be easy to move, simple to clean, and large enough to hold bedding, food, and a growing worm population. If you are just testing the waters, begin small. It is much easier to expand a healthy colony than rescue a giant soggy mistake.
Step 2: Add Air Holes and Drainage
Worms need oxygen, and they also need protection from excess moisture. Drill or punch ventilation holes in the sides and lid. Depending on your setup, small drainage holes in the bottom can also help prevent water from pooling. Place the bin on a tray or another surface that can catch drips.
The goal is balance. Bedding should stay damp, but the bin should never become a swamp. A worm bin is not a bait jacuzzi.
Step 3: Choose a Cool, Shady Location
Location matters more than people expect. Keep your worm bin in a cool, shaded, well-ventilated place such as a garage, basement, mudroom, covered porch, or sheltered shed. Avoid direct sun, freezing temperatures, and places that swing wildly from cool mornings to oven-like afternoons.
If the bin gets too hot, the worms slow down or die. If it gets too cold, activity and reproduction stall. Stable conditions win. Worms love boring weather, which may make them the only creatures on earth excited by a predictable basement corner.
Step 4: Make the Bedding Soft, Fluffy, and Moist
Your bedding is the worms’ home, backup food source, and moisture buffer. Use shredded newspaper, cardboard, coconut coir, aged leaves, or a mix of those materials. Wet the bedding thoroughly, then squeeze it out until it feels like a wrung-out sponge. Not dripping. Not dusty. Think “damp laundry,” not “mini flood.”
Fill the bin with several inches of fluffy bedding. Fluff matters because worms need air spaces as much as they need moisture. Packed bedding compresses, reduces airflow, and makes the bin more likely to smell bad.
Step 5: Add a Handful of Soil or Grit
A small handful of garden soil or another gentle gritty material helps support the worm environment and aids digestion. Worms do not have teeth, so fine grit helps them process food in the gizzard. You do not need much. This is seasoning, not a full layer.
At this stage, your bin should look like a fluffy, damp pile of shredded paper with a little grit mixed in. If that sounds underwhelming, welcome to worm farming: the beginning is not glamorous, but the results are surprisingly useful.
Step 6: Introduce the Worms and Let Them Settle In
Add your worms on top of the bedding and leave the lid off for a short while under indoor light. Because worms avoid light, they will naturally burrow down into the bedding. This helps them settle in without much fuss.
Do not dump in a mountain of food immediately. Let the colony adjust first. A calm, boring first day is ideal. Worms are not impressed by grand opening ceremonies.
Step 7: Feed Small Amounts and Chop Food Fine
Feed your worms fruit and vegetable scraps, coffee grounds, paper filters, tea bags without staples, and crushed eggshells. Chop or tear scraps into small pieces so they break down faster. Bury the food under bedding rather than leaving it exposed on top. This helps control odors and discourages flies.
Go easy in the beginning. Overfeeding is the classic beginner mistake. If yesterday’s food is still sitting there looking untouched, do not add more. Worm bins fail less from starvation than from human optimism.
Avoid meat, dairy, oily foods, heavily salted leftovers, and anything likely to rot into a stinking mess. Also skip the idea of scraping full dinner plates into the bin. Worms are hardworking, but they are not a garbage disposal with feelings.
Step 8: Keep Moisture and Temperature in the Sweet Spot
Check the bin regularly. Bedding should remain damp like a wrung-out sponge. If it is too dry, mist it lightly or add a bit of water. If it is too wet, mix in dry bedding such as shredded cardboard or newspaper and back off watery food scraps for a while.
Watch temperature too. Worms stay active and productive in cool to moderate conditions. When a bin overheats, worms become sluggish, try to escape, or die. When it stays cold, reproduction slows and your bait supply grows at the pace of a DMV line.
Step 9: Rotate Feeding Areas and Refresh Bedding
Do not bury food in the exact same spot every time. Rotate feeding zones around the bin. This spreads out moisture, encourages worms to move through the bedding, and keeps one area from becoming a soggy science project.
As the bedding breaks down, add fresh material on top or in empty sections of the bin. Fresh bedding keeps the structure loose, gives the worms more habitat, and helps balance moisture. Think of it as changing the sheets for residents who never once said thank you.
Step 10: Harvest Worms Without Wrecking the Colony
Once the colony is established, you can remove worms for fishing as needed. The easiest way is to bait them into one area with fresh food, then gently collect the number you want. Another method is migration harvesting: push older finished material to one side, add new bedding and food to the other side, and let the worms move over time.
Do not strip the bin bare before every trip. Leave plenty of healthy adults and younger worms behind so the colony keeps producing. A worm farm should feel like a renewable resource, not a liquidation sale.
Step 11: Store Fishing Worms Properly and Keep the Colony Going
When you pull worms for a trip, place them in cool, moist bedding for transport. Keep them shaded and out of extreme heat. At home, continue the regular cycle of light feeding, moisture checks, bedding refreshes, and selective harvesting so the colony stays stable.
One more important note: never dump leftover bait worms in the woods, garden edges near natural areas, or near the water. Dispose of unused worms responsibly if needed. That habit helps reduce the spread of invasive earthworms and other hitchhiking pests. Good anglers protect the places they fish.
Common Mistakes That Turn a Worm Bin Into a Horror Story
The fastest way to fail is to use the wrong worm species, overfeed the bin, or let the bedding swing between dust-dry and soup-wet. Strong odors usually mean too much food, poor airflow, or excess moisture. Worms crawling out usually mean the environment is off. They are not plotting a prison break for fun.
Another mistake is keeping the bin in direct summer sun. A worm bin can heat up faster than beginners realize, especially in dark plastic. If the weather is hot, move the bin somewhere cooler, improve shading, and monitor moisture more often.
Finally, do not expect instant abundance. A healthy worm colony grows steadily, not magically. Give it a few months, and your bait supply becomes more dependable. Rush the system, and you mostly grow frustration.
Is Growing Your Own Fishing Worms Worth It?
For frequent anglers, yes. Growing your own fishing worms is practical, affordable, and oddly satisfying. You get bait on hand, less dependence on store hours, and the bonus of nutrient-rich castings. The process is simple once you understand the basic rules: right species, shallow bin, damp bedding, moderate temperatures, light feeding, and regular maintenance.
In other words, worms are easy once you stop trying to outsmart them. Give them the conditions they want, and they quietly go to work. Ignore those conditions, and they file a very dramatic complaint in the form of odor, escape attempts, and general worm disapproval.
Experience Notes: What It’s Really Like to Raise Your Own Fishing Worms
The first surprise most people have when they start raising fishing worms is how quickly the bin becomes part of a routine. At first, it feels experimental. You set up the container, shred the paper, add the bedding, and stare at the worms like you have just launched a tiny underground cattle ranch. Then, after a couple of weeks, the whole thing becomes normal. You toss in chopped scraps, fluff the bedding a little, check moisture, and move on with your day. The system starts feeling less like a project and more like a useful household habit.
Another common experience is learning that worms are excellent teachers of moderation. Many beginners assume more food means faster growth, so they load the bin like they are catering a banquet. The worms respond by doing absolutely nothing fast enough to prevent odors. That lesson sticks. Once you learn to feed lightly and let the colony catch up, the bin becomes cleaner, calmer, and much easier to manage. In that sense, worm farming is a master class in not overcomplicating things.
There is also a strange satisfaction in opening a healthy worm bin. It should smell earthy, not rotten. The bedding should look loose and active. You may spot different worm sizes, small cocoons, and dark castings building up over time. That is when the whole process clicks. You realize you are not just storing bait; you are maintaining a living cycle that turns scraps into something useful. It is efficient in a very old-school, common-sense way.
From a fishing perspective, one of the biggest benefits is convenience. On a spontaneous trip, there is a huge difference between saying, “I need to stop and buy bait,” and saying, “Give me two minutes, I’ve got worms ready.” That convenience changes how often people actually go fishing. When bait is already available, short evening trips become easier, early-morning departures become smoother, and the odds of talking yourself out of going drop quite a bit.
People also learn that healthy bait is better bait. Worms raised in stable bedding and kept cool tend to be lively, firm, and easier to handle on the hook. Store-bought worms are not always in bad shape, of course, but home-raised worms give you more control over moisture, cleanliness, and storage. You can harvest only what you need, keep the rest undisturbed, and avoid the usual problem of forgetting a bait cup in the garage until it becomes a biology lesson.
One practical lesson that comes up again and again is that the bin reflects your habits. If you are consistent, the worms reward you. If you ignore them for too long during hot weather, they let you know. If you keep adding dry bedding when things get wet, the colony stabilizes. If you bury food well, flies stay down. Small actions matter, and the feedback is immediate enough that even beginners improve quickly.
Perhaps the most unexpected experience is that raising fishing worms tends to make people more observant outdoors. You start noticing moisture, temperature, shade, decomposition, soil texture, and how living systems respond to conditions. That awareness carries into gardening, composting, and even fishing itself. You begin to think more like a caretaker and less like a last-minute customer. And honestly, that shift is part of the charm. A worm bin may be humble, but it teaches patience, thrift, and practical know-how. Not bad for a box of damp newspaper and a crowd of silent workers.