Table of Contents >> Show >> Hide
- What You’ll Need (A Quick, No-Stress Checklist)
- Step 1: Prep the Tree Like You Mean It
- Step 2: Choose a Tree “Story” (Theme + Color Palette)
- Step 3: Add Christmas Tree Lights (Your Foundation Layer)
- Step 4: Add Ribbon and Garland (The “Designer” Layer)
- Step 5: Hang Ornaments in the Best Order
- Step 6: Add Picks, Sprays, and Filler (The “Fuller Tree” Secret)
- Step 7: Topper and Base (The Grand Finale)
- Step 8: The Walk-Around Test (Make It Look Great From Every Angle)
- Five Quick “Tree Recipes” You Can Copy Tonight
- Safety and Care (Because Holiday Cheer Shouldn’t Spark)
- Conclusion: Your Best Tree Is the One That Feels Like You
- Experiences Related to Decorating a Christmas Tree (Real-Life Lessons People Learn)
Decorating a Christmas tree is basically the holiday version of plating food: the “ingredients” are simple,
but the difference between “cute” and “why does it look like it fell into a craft store?” is all in the order
and a few sneaky tricks. The good news: you don’t need a designer budget or a PhD in ribbon physics.
You just need a plan, a little patience, and permission to step back and judge your work like a tiny, festive art critic.
This step-by-step guide walks you through Christmas tree decorating from bare branches to topper glory
with practical tips, theme ideas, and easy ways to make your tree look fuller, brighter, and more “intentional”
(the word everyone uses when they mean “expensive-looking”).
What You’ll Need (A Quick, No-Stress Checklist)
- The tree: real or artificial, pre-lit or unlit
- Tree stand (and a tree skirt or collar for the base)
- Lights: warm white, cool white, or multicolor
- Garland and/or ribbon (optional but highly “wow”)
- Ornaments: a mix of sizes, finishes, and sentimental favorites
- Tree topper (star, angel, bow, spray, or something delightfully weird)
- Filler: picks, sprays, faux berries, florals, extra greenery, or pinecones
- Tools: ornament hooks, twist ties or floral wire, scissors, and a step stool
Step 1: Prep the Tree Like You Mean It
Pick the right spot (before the tree picks it for you)
Place your tree where it can shine without causing daily traffic jams. Keep it away from obvious heat sources,
avoid blocking doorways, and make sure an outlet is reachable without creating a cord obstacle course.
If you have pets, toddlers, or a clumsy uncle who gestures with a drink, give your tree a little extra breathing room.
Real tree prep: make “fresh” your first decoration
If you’re using a real Christmas tree, treat watering like a holiday traditionright up there with cocoa and
pretending you didn’t eat all the peppermint bark. A well-watered tree stays greener, smells better, and holds needles longer.
Set it in a sturdy stand and keep the water level consistent.
Artificial tree prep: fluff first, judge later
If your artificial tree came out of a box, it’s going to look like it just woke up from a nap. Fluff it.
Open each branch, separate tips, and work from the trunk outward. This step is not optional if you want a full,
luxe look. Put on a movie, recruit a helper, and pretend it’s a calming hobby instead of a commitment.
Step 2: Choose a Tree “Story” (Theme + Color Palette)
Your tree doesn’t have to match your living room like it’s applying for a job, but it helps to pick a direction.
Think of it as giving your ornaments a group chat and a shared purpose.
Easy theme shortcuts that always work
- Classic: red, green, gold, and sentimental ornaments
- Winter white: whites, silvers, glassy textures, snowflake ornaments
- Cozy rustic: wood, burlap ribbon, plaid, pinecones, warm lights
- Modern: monochrome ornaments, minimal ribbon, bold topper
- Whimsical: bright colors, candy ornaments, playful picks, unexpected shapes
Build an ornament “mix,” not an ornament “argument”
The most beautiful Christmas tree decorating looks usually combine:
shiny + matte, large + small, and special + simple.
Pick a few ornament finishes (gloss, velvet, glitter, glass-look) and repeat them around the tree for balance.
Then add sentimental or quirky ornaments as highlightslike the punchline in a good holiday joke.
Step 3: Add Christmas Tree Lights (Your Foundation Layer)
Lights are the secret sauce. Even if your ornaments are stunning, uneven lighting can make your tree look flat.
Aim for a warm, even glow that reaches into the branchesnot just the outer edges.
How to string lights so the tree looks deeper and brighter
- Test the strands first so you don’t discover one dead section after you’ve wrapped the entire tree.
- Start near the base and work upward, weaving lights inward as well as around the outside.
- Use the “in-and-out” method: tuck lights closer to the trunk, then bring them back out to the tips.
- Step back often and check for dark zones. Add a short strand to fill gaps if needed.
Pre-lit trees: still do a quick check. Sometimes you’ll want to add one extra strand for sparkle,
especially if you’re using lots of deep ornaments or garland that can visually “eat” the light.
Step 4: Add Ribbon and Garland (The “Designer” Layer)
Ribbon, garland, or both create movement and structurelike contouring, but for evergreens.
This layer helps guide the eye and makes the tree feel intentionally styled.
Three ribbon styles that look polished (without needing a degree in bows)
- Vertical cascade: Start near the top and tuck ribbon down in loose, flowing drops.
Great for “waterfall” ribbon looks and for making a tree appear taller. - Loose spiral: Wrap ribbon around the tree in gentle waves. Don’t pull it tightaim for soft curves.
- Loop-and-tuck: Create loops and tuck them into branches every few inches.
This looks full and hides sparse spots (a very kind and seasonal act).
Garland tips: texture is the point
Garland can be beaded, metallic, fabric, greenery, or homemade (popcorn and cranberries, anyone?).
Drape it loosely rather than wrapping it like a belt. If you’re using multiple garlands, vary thickness and texture:
for example, a soft fabric garland plus a subtle bead strand creates depth without chaos.
Step 5: Hang Ornaments in the Best Order
If you want that layered, “styled” Christmas tree look, don’t place every ornament at the same depth.
Use the tree’s branches like shelves: some items go deep, some sit mid-branch, and a few sparkle right at the tips.
The ornament order that keeps things balanced
- Start with larger ornaments and spread them evenly around the tree.
- Add medium ornaments next, filling in areas that look empty.
- Finish with smaller ornaments to add detail and “twinkle” moments.
Pro styling tricks (that are actually simple)
- Hang some ornaments deeper inside branches for dimension.
- Create mini “clusters” (2–4 ornaments close together) instead of perfect spacing everywhere.
- Repeat your standout colors in several places so the tree looks cohesive from every angle.
- Use shatterproof ornaments lower on the tree if kids or pets are part of your holiday cast.
Step 6: Add Picks, Sprays, and Filler (The “Fuller Tree” Secret)
If your tree looks a little sparseor you want it to look extra luxethis is the step that changes everything.
Picks and sprays add height, shape, and texture. Think faux berries, metallic stems, florals, eucalyptus, or extra pine.
How to place filler without making it look “stuck on”
- Insert at angles so it looks like it grew there (holiday magic, but believable).
- Work in zones: add a few pieces, then move to another section so you don’t overload one spot.
- Repeat your filler style around the tree for consistency.
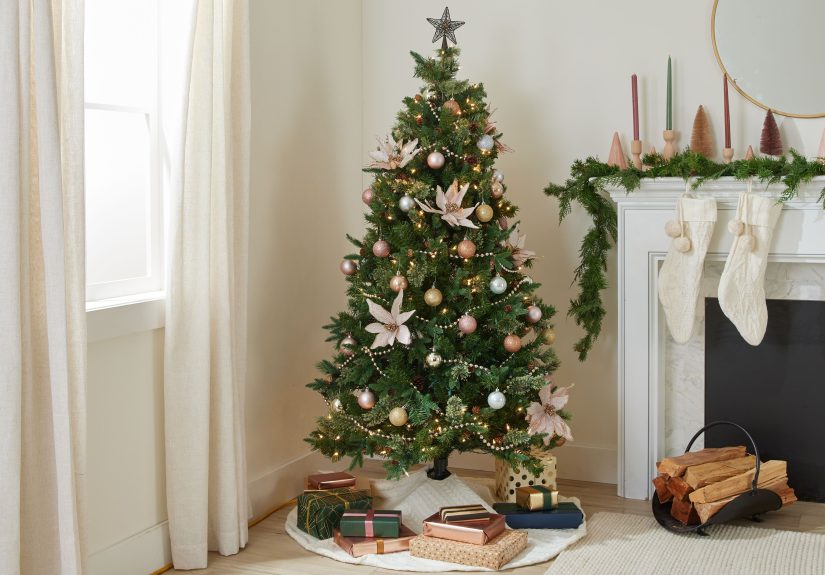
Step 7: Topper and Base (The Grand Finale)
Choose a topper that matches your vibe
The tree topper is the exclamation point. Traditional stars and angels are classics, but big bows, floral sprays,
or a cluster of picks can look modern and dramatic. If your topper is heavy, secure it with floral wire or
a sturdy branch to prevent the dreaded holiday lean.
Don’t forget the base (it’s in every photo)
A tree skirt, collar, or woven basket-style wrap instantly makes the setup look finished. This is also where you
can hide cords and the stand. Add wrapped gifts, storage-friendly decorative boxes, or a cozy blanket moment
(especially for minimalist or Scandinavian-inspired looks).
Step 8: The Walk-Around Test (Make It Look Great From Every Angle)
Step back. Walk around. Look at it from your couch (the most honest viewpoint). Then adjust:
- If one side looks heavier, move a few ornaments to the lighter side.
- If a section looks flat, add a pick or a shiny ornament near the tips.
- If ribbon disappears in places, tuck and puff it back out.
- If you keep staring at one weird gap, congratulationsyou found where the “hero ornament” should go.
Five Quick “Tree Recipes” You Can Copy Tonight
1) The Classic Family Tree
Warm white lights + mixed ornaments (old and new) + simple garland + meaningful toppers. Keep sentimental ornaments
front-and-center and let matching colors appear naturally across the tree.
2) The Winter White Tree
Cool white or soft white lights + white, silver, and glass-look ornaments + snowflake accents + frosted picks.
Add a fluffy skirt for a snowy base.
3) The Cozy Rustic Tree
Warm lights + plaid or burlap ribbon + pinecones + wooden ornaments + greenery garland. Finish with a big bow topper
and wrapped gifts in kraft paper for a cabin feel.
4) The Modern Minimal Tree
Warm lights + a limited palette (like black/white/gold or all metallics) + fewer, larger ornaments placed with lots
of breathing room. Choose one standout topper and keep garland subtle.
5) The Kid-Friendly Tree
Multicolor lights + durable ornaments + fun themes (candy, animals, cartoons) + soft or non-breakable décor near the bottom.
Put the heirlooms higher upbecause gravity loves drama.
Safety and Care (Because Holiday Cheer Shouldn’t Spark)
- Turn lights off when you leave home or go to sleep.
- Check cords and plugs before decorating; replace damaged strands.
- Keep real trees watered so they don’t dry out quickly.
- Use sturdy anchors if your tree is tall, top-heavy, or in a high-traffic area.
- Keep décor away from heat and avoid anything that could snag or overheat near bulbs.
Conclusion: Your Best Tree Is the One That Feels Like You
The secret to how to decorate a Christmas tree isn’t owning the “perfect” ornamentsit’s building your tree in layers:
prep, lights, ribbon or garland, ornaments, filler, topper, and final tweaks. Whether your style is elegant, nostalgic,
playful, or proudly chaotic, your tree should make you smile every time you walk by it.
And if you mess up? That’s not a failure. That’s called “redecorating,” which is basically a holiday hobby.
Experiences Related to Decorating a Christmas Tree (Real-Life Lessons People Learn)
Ask a handful of households about Christmas tree decorating, and you’ll hear the same theme in different packaging:
the tree always looks better after the second round. People often start with a mental picturesparkly, balanced, magazine-worthy
and then discover that real life includes uneven branches, ornaments that vanish into greenery, and at least one strand of lights
that mysteriously tangles itself into a knot worthy of its own documentary.
One common experience is the “fluffing regret.” Many people skip thorough fluffing on an artificial tree because it feels tedious,
only to realize later that no amount of ornaments can hide flat branches. When they finally take ten extra minutes to shape the tips,
the whole tree instantly looks fullereven before adding décor. That’s why seasoned decorators tend to treat fluffing as the true start
of the process, not an optional warm-up.
Another classic lesson shows up when people try ribbon for the first time. The expectation is a smooth spiral, but the result can look
like a sash from a beauty pageant… on a tree. The fix is usually simple: looser draping, more tucking, and letting the ribbon form soft
waves rather than tight loops. Once people learn to “puff” ribbon like they would fluff a bow, their tree gains depth fastespecially
when ribbon is placed at different heights and angles instead of in perfect rows.
Families also tend to develop a “tree strategy” based on who lives in the home. Houses with pets or small kids often have a shared
experience of hearing a mysterious clink in the middle of the night and discovering an ornament relocation project underway. Over time,
many families switch to shatterproof ornaments on the lower half, reserve breakable keepsakes for higher branches, and treat the base
as a “safe zone” for soft décor like fabric garland or plush accents. It’s not just practicalit can become part of the tradition:
kids decorate the lower branches, adults handle the fragile favorites, and everyone agrees not to mention the one ornament that disappears
every single year.
People who decorate together also learn the value of stepping back often. Up close, it’s easy to over-decorate one area because it’s
right in front of you. Then you sit down and realize the tree looks lopsided, like it’s leaning into the conversation. Experienced
decorators tend to rotate around the tree every few minutes, placing a few ornaments on each side rather than finishing one section
completely. This simple habit usually creates a more balanced tree without extra effort.
Finally, there’s the “sentimental reality” that shows up in many homes: the most loved trees are rarely the most perfectly themed.
They’re the ones where a sleek ribbon sits next to a handmade ornament, a vacation souvenir, and that one glittery bauble someone insists
is “vintage” (even though it’s from the clearance bin three years ago). Over time, people often realize the best-looking Christmas tree is
the one that reflects their householdits style, its humor, and its memories. In other words: a great tree isn’t just decorated. It’s lived in.