Table of Contents >> Show >> Hide
- What Is a DIY Mason Jar Christmas Snow Globe?
- Why Mason Jars Are Perfect for Christmas Snow Globes
- Supplies You Need
- Step-by-Step Guide: How to Make a DIY Mason Jar Christmas Snow Globe
- Creative DIY Mason Jar Christmas Snow Globe Ideas
- Helpful Tips for the Best Results
- Common Mistakes to Avoid
- Safety Notes for Kids and Families
- How to Display or Gift Your Snow Globe
- How Long Does a Homemade Mason Jar Snow Globe Last?
- Real-Life Experience: What I Learned Making DIY Mason Jar Christmas Snow Globes
- Conclusion
Note: This article is written as original, publish-ready web content based on widely used DIY snow globe methods from reputable U.S. craft, home, and holiday decorating sources.
A DIY Mason Jar Christmas Snow Globe is one of those holiday crafts that looks fancy enough to impress guests but is secretly simple enough to make while wearing fuzzy socks and sipping cocoa. It turns an ordinary glass jar into a tiny winter scene filled with glitter, miniature trees, cheerful figurines, and just enough sparkle to make your mantel feel like it got invited to the North Pole.
The best part? You do not need a professional craft studio, a giant budget, or a degree in “advanced glitter management.” With a clean mason jar, waterproof glue, distilled water, glycerin, and a few festive decorations, you can create a handmade Christmas snow globe that works as a gift, centerpiece, ornament display, kids’ craft, or cozy holiday decoration.
This guide walks you through everything: supplies, design ideas, step-by-step instructions, troubleshooting tips, safety notes, and real-world crafting experience. Whether you want a classic Santa scene, a farmhouse-style winter forest, or a tiny reindeer who looks like he pays rent inside a jar, this project is flexible, affordable, and wonderfully festive.
What Is a DIY Mason Jar Christmas Snow Globe?
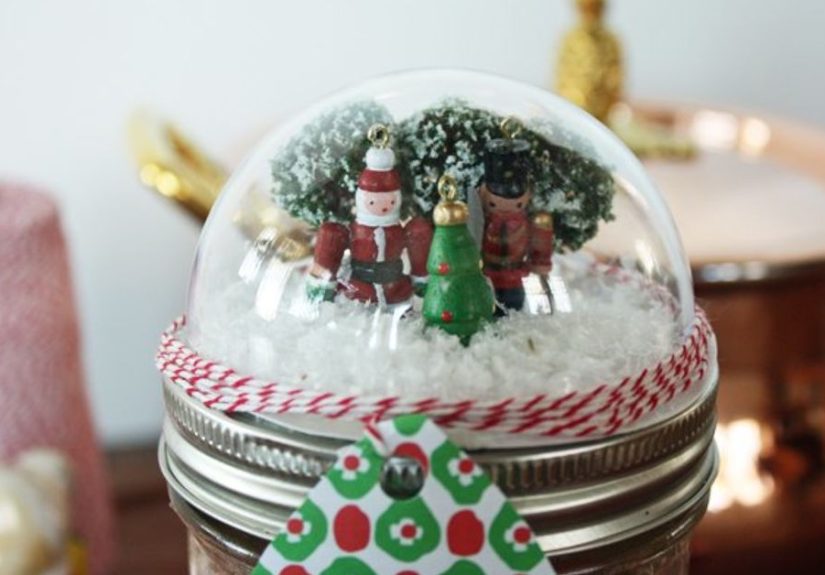
A DIY Mason Jar Christmas Snow Globe is a homemade snow globe created inside a mason jar or similar lidded glass container. Most versions use the jar upside down, so the lid becomes the base. You glue a small waterproof Christmas scene to the inside of the lid, fill the jar with water, glitter, and glycerin, seal it tightly, and flip it over. When shaken, the glitter swirls like falling snow around your miniature holiday world.
There are two popular styles. A liquid snow globe uses water and glycerin for a classic shaking effect. A waterless mason jar snow globe uses faux snow, cotton, mini trees, lights, and figurines without liquid. The liquid version feels magical and traditional, while the waterless version is easier for younger kids and safer if you worry about spills or broken glass.
For this article, the main tutorial focuses on the liquid version, but you will also find waterless options and creative variations later.
Why Mason Jars Are Perfect for Christmas Snow Globes
Mason jars are practically holiday craft royalty. They are clear, sturdy, easy to find, and available in several sizes. Wide-mouth mason jars work especially well because they give you more room to arrange mini trees, snowmen, deer, tiny houses, or a small family photo sealed in laminate.
Another advantage is the two-piece lid. The flat disk creates a useful surface for attaching your miniature scene, while the screw band helps lock everything in place. Once decorated with ribbon, twine, bells, buffalo-check fabric, or faux greenery, the lid can look like a charming rustic base instead of, well, the top of last summer’s pickle jar.
Supplies You Need
Before you start, gather everything on a protected work surface. Glitter has a mysterious ability to travel across a room, enter another zip code, and appear on your face three days later, so a tray, newspaper, or silicone mat is your friend.
Basic Materials
- One clean mason jar with a tight-fitting lid
- Miniature Christmas figurines, bottlebrush trees, tiny houses, deer, Santa, snowmen, or ornaments
- Waterproof craft glue, epoxy, or silicone adhesive
- Distilled water
- Liquid glycerin
- Fine glitter or snow globe glitter
- Ribbon, twine, small bells, or faux greenery for decorating the lid
- Optional: waterproof sealer, clear silicone, sandpaper, spray paint for the lid, or a small plastic base riser
Best Jar Size
A pint-size mason jar is a great beginner choice. It is large enough to hold a small scene but not so big that you need a gallon of glitter to make it feel snowy. Mini mason jars are adorable as party favors or ornaments, while quart jars are better for dramatic centerpieces with multiple figures.
Best Decorations to Put Inside
Choose items that can handle water. Plastic, resin, ceramic, glass, and waterproof ornaments are usually good choices. Avoid untreated wood, paper, fabric, cardboard, and anything painted with water-soluble paint. If you use a photo, laminate it carefully or seal it completely before placing it inside.
Step-by-Step Guide: How to Make a DIY Mason Jar Christmas Snow Globe
Step 1: Clean and Dry the Mason Jar
Wash the jar and lid with warm, soapy water. Rinse well and let everything dry completely. Any dust, oil, food residue, or mystery jar smell can cloud the water or weaken the glue. If you are reusing a jar, remove the label and sticky residue before beginning.
For the clearest result, wipe the inside of the jar with a lint-free cloth. This tiny step makes a big difference, especially if you plan to display the snow globe near lights where every smudge suddenly becomes the star of the show.
Step 2: Test Your Scene Before Gluing
Turn the jar upside down and place your mini decorations on the inside of the lid. Carefully lower the jar over them to check the fit. This is the moment to discover that your adorable miniature Christmas tree is too tallnot after you have glued it down like a festive skyscraper.
Leave space around the sides so the jar can screw on easily. Also think about viewing angles. The front of your scene should face outward when the lid is tightened. If you want to be extra precise, mark the front of the lid lightly with a pencil before arranging the decorations.
Step 3: Raise the Scene if Needed
Many mason jar lids sit slightly below the jar opening, which can make tiny figurines look hidden. To fix this, glue a small waterproof riser to the lid first. A plastic bottle cap, a trimmed piece of foam sealed with waterproof coating, or a small resin base can help lift the scene into better view.
Keep the riser narrow enough that the lid still seals properly. The goal is “cute snowy hill,” not “structural engineering project with plumbing problems.”
Step 4: Glue the Miniatures to the Lid
Use waterproof adhesive to attach the decorations to the inside of the flat lid. Epoxy, silicone adhesive, or strong waterproof craft glue is usually more reliable for liquid snow globes than ordinary school glue. Hot glue can work for waterless globes, but it may loosen over time in water.
Apply glue generously to the bottom of each figurine, press it into place, and let it cure according to the glue instructions. Do not rush this step. If the glue is not fully dry, your tiny snowman may float away and spend Christmas bobbing around like he abandoned his post.
Step 5: Add Water, Glitter, and Glycerin
Fill the mason jar almost to the top with distilled water. Distilled water is preferred because it has fewer minerals than tap water, which helps reduce cloudiness and residue. Leave a little space to account for the decorations that will displace water when inserted.
Add a small amount of glycerin. Glycerin thickens the water slightly, helping glitter fall more slowly instead of dropping like sad confetti. For a pint jar, start with about half a teaspoon to one teaspoon. Add too much and the glitter may clump or move like it is swimming through syrup.
Next, add glitter. Fine glitter creates a soft snow effect, while chunky glitter creates more sparkle. A mix of white, silver, iridescent, or gold glitter looks beautiful for Christmas. Start small. You can always add more, but removing glitter from water is about as fun as untangling last year’s Christmas lights.
Step 6: Insert the Lid and Check the Water Level
Hold the decorated lid upside down and slowly lower the figurines into the jar. Some water may spill, so do this over a sink, bowl, or towel. Screw the lid on tightly and flip the jar over to test the look.
If there is a large air bubble at the top, open the jar and add a little more water. A tiny bubble is normal and can help with movement, but too much air makes the globe look unfinished. Once you like the water level, dry the outside of the lid thoroughly.
Step 7: Seal the Lid
For extra leak protection, apply a thin bead of waterproof glue or clear silicone around the inside or outside edge of the lid. Let it cure fully before shaking the globe. This is especially important if the snow globe will be handled by children, wrapped as a gift, or displayed on a wooden table that does not appreciate surprise puddles.
Step 8: Decorate the Base
Now for the fun finishing touches. Wrap the lid band with ribbon, jute twine, lace, plaid fabric, or metallic cord. Add a small bell, cinnamon stick, pine sprig, faux berries, or a gift tag. You can also spray paint the lid before assembling the globe. White, gold, red, matte black, and forest green all look festive.
For a farmhouse Christmas look, use burlap ribbon and tiny pinecones. For a glamorous style, try velvet ribbon and gold glitter. For a playful kids’ version, use red-and-white baker’s twine and a handwritten tag that says, “Shake me!”
Creative DIY Mason Jar Christmas Snow Globe Ideas
Classic North Pole Scene
Use a mini Santa, a tiny mailbox, bottlebrush trees, and white glitter. Add a red ribbon around the lid and a little tag that says “Letters to Santa.” This design is cheerful, traditional, and perfect for a family craft night.
Rustic Winter Forest
Skip bright colors and use small evergreen trees, deer, white snow glitter, and natural twine. A wide-mouth jar works well for this style because the arrangement can feel like a peaceful woodland scene.
Personalized Photo Snow Globe
Print a small photo, laminate it, and trim it neatly. Glue it to a waterproof backing or small base, then add glitter and mini decorations around it. This makes a thoughtful handmade gift for grandparents, parents, teachers, or anyone who enjoys sentimental holiday decor.
Waterless Mason Jar Snow Globe
If you want a no-spill version, skip the water and glycerin. Glue your scene to the bottom of the jar or inside the lid, add faux snow, and place the jar upright or upside down. You can even add battery-operated fairy lights for a warm glow. This style is great for mantels, shelves, and homes with curious pets.
Mini Ornament Snow Globes
Use small plastic mason jars or lightweight mini jars to create tree ornaments. Add a tiny figure, a pinch of faux snow, and ribbon for hanging. Plastic jars are safer for kids and less likely to break if the ornament takes an unexpected trip from the tree to the floor.
Helpful Tips for the Best Results
Use Less Glitter Than You Think
Glitter expands visually once it is floating in water. Too much glitter can hide your scene and make the jar look cloudy. Start with a small pinch or quarter teaspoon, test it, and add more only if needed.
Choose Waterproof Everything
The inside of a liquid snow globe is a tiny aquarium for decorations. If an item is not waterproof, it may fade, peel, swell, or shed color into the water. Resin figurines, plastic miniatures, and waterproof ornaments are the safest choices.
Let Glue Cure Fully
Dry to the touch does not always mean fully cured. Follow the adhesive label. Some glues need several hours or even overnight to reach full strength. Patience here prevents floating trees, loose reindeer, and other holiday drama.
Do a Leak Test
Before gifting or displaying your snow globe, place it upside down on a paper towel for several hours. If the towel stays dry, you are good to go. If not, reseal the lid and test again.
Common Mistakes to Avoid
Using Tap Water
Tap water may contain minerals that leave residue or make the globe cloudy over time. Distilled water gives a cleaner, clearer finish.
Adding Too Much Glycerin
Glycerin is helpful, but more is not always better. Too much can make glitter clump, stick to the decorations, or move too slowly. Start small and adjust gradually.
Skipping the Fit Test
Always test the scene inside the jar before gluing. Miniatures can look small on the table but become surprisingly large once trapped under glass.
Using Weak Glue
Regular white glue is not ideal for liquid snow globes. Choose a waterproof adhesive that can handle long-term contact with water.
Safety Notes for Kids and Families
A DIY Mason Jar Christmas Snow Globe can be a wonderful family project, but adults should handle glass jars, strong adhesives, hot glue guns, sharp scissors, and sealing materials. For younger children, consider using plastic jars and waterless designs.
Keep glitter, small figurines, and tiny decorations away from toddlers who may put them in their mouths. Work in a ventilated area when using epoxy, silicone, spray paint, or strong craft glue. Also, label the finished snow globe as decoration only. It may look like a magical holiday drink, but it is definitely not cocoa.
How to Display or Gift Your Snow Globe
Mason jar snow globes look charming on mantels, bookshelves, entryway tables, kitchen counters, and holiday dinner tables. Group three jars of different heights together for a cozy centerpiece. Add evergreen branches, battery candles, ornaments, and pinecones around the base to make the display feel intentional.
For gifting, tie a ribbon around the lid and attach a small card with care instructions. A handmade snow globe is perfect for teachers, neighbors, coworkers, grandparents, holiday hosts, or anyone who loves a thoughtful DIY Christmas gift. You can also personalize the scene with colors, names, tiny pets, favorite hobbies, or meaningful family photos.
How Long Does a Homemade Mason Jar Snow Globe Last?
A well-made liquid mason jar snow globe can last through the holiday season and often longer if it is sealed properly, stored upright, and kept away from heat or direct sunlight. Over time, water may cloud slightly, glitter may settle, or decorations may fade depending on the materials used.
To extend its life, store the snow globe in a cool place, wrap it carefully, and avoid dropping or over-shaking it. If you want a keepsake that lasts year after year, use high-quality waterproof decorations, strong adhesive, distilled water, and a reliable seal.
Real-Life Experience: What I Learned Making DIY Mason Jar Christmas Snow Globes
The first time I made a DIY Mason Jar Christmas Snow Globe, I was convinced it would take ten minutes. Technically, assembling it did not take long. Emotionally, however, I had to survive three glitter decisions, one glue mishap, and a tiny bottlebrush tree that refused to stand straight. Holiday crafting has a way of humbling a person.
The biggest lesson was simple: test everything before gluing. I arranged a charming little scene with a snowman, a red truck, and two trees. It looked perfect on the lid. Then I placed the jar over it and discovered the truck was too wide. The jar would not close, the snowman looked judgmental, and I had to start over. Since then, I always do a “jar rehearsal” before opening the glue.
The second lesson was to use less glitter. In my imagination, more glitter meant more magic. In reality, too much glitter turned the water into a sparkly blizzard where no one could see the decorations. A small amount of fine white glitter mixed with a pinch of silver created a much prettier snow effect. Chunky glitter is fun, but it can dominate the scene if you go overboard.
I also learned that glue curing time matters. One year, I rushed the process because I wanted to finish several snow globes before guests arrived. A few hours later, one tiny tree floated to the top like it had decided to leave the forest and pursue a career in synchronized swimming. Now I let the glued lid dry overnight whenever possible. It is not exciting, but neither is repairing a leaking snow globe at midnight.
Another practical tip is to decorate the lid last. I once wrapped the lid beautifully with ribbon before testing for leaks. Naturally, the jar leaked, the ribbon got wet, and the whole thing looked like a craft project that had been rescued from a puddle. Seal first, test second, decorate third. That order saves time and keeps your finished globe looking polished.
For family crafting, waterless globes are a fantastic backup plan. Kids can still build tiny winter scenes, sprinkle faux snow, and decorate the outside without waiting for glue to cure or worrying about spills. Adults can make the liquid versions while children create dry snow globe jars beside them. Everyone gets a finished craft, and nobody has to explain why the dining table is suddenly sparkling like Times Square.
My favorite finished design is still the simplest: one small bottlebrush tree, one deer, white glitter, and a twine-wrapped lid. It looks calm, nostalgic, and slightly magical. That is the beauty of this project. You do not need complicated supplies or perfect technique. A mason jar, a little creativity, and a controlled amount of glitter can create a decoration that feels personal, festive, and full of holiday charm.
Conclusion
A DIY Mason Jar Christmas Snow Globe is more than a cute holiday craft. It is a small handmade world you can shake, display, gift, and customize in endless ways. With the right jar, waterproof decorations, distilled water, glycerin, glitter, and patience, you can create a sparkling Christmas keepsake that feels thoughtful and festive without costing much.
Whether you make one elegant winter forest or a whole lineup of glittery North Pole scenes, this project brings together the best parts of holiday crafting: creativity, nostalgia, affordable materials, and just enough mess to prove you had fun. Start simple, test your design, seal it well, and let your mason jar snow globe bring a little handmade snowstorm to the season.